
Pytest自动化测试 - allure报告进阶
Allure除了具有Pytest基本状态外,其他几乎所有功能也都支持。
1、严重性
如果你想对测试用例进行严重等级划分,可以使用 @allure.severity 装饰器,它可以应用于函数,方法或整个类。
它以 allure.severity_level 枚举值作为参数,分别为:BLOCKER(中断),CRITICAL(严重),NORMAL(常规),MINOR(轻微),TRIVIAL(不重要)。
示例:
# test_sample.py

import allure

# 两数相加

def add(x, y):

    return x + y

# 测试类

@allure.severity(allure.severity_level.TRIVIAL)

class TestAdd:

    @allure.severity(allure.severity_level.MINOR)

    def test_first(self):

        assert add(3, 4) == 7

    @allure.severity(allure.severity_level.NORMAL)

    def test_second(self):

        assert add(-3, 4) == 1

    @allure.severity(allure.severity_level.CRITICAL)

    def test_three(self):

        assert add(3, -4) == -1

    @allure.severity(allure.severity_level.BLOCKER)

    def test_four(self):

        assert add(-3, -4) == -7
运行:
E:\workspace-py\Pytest>pytest test_sample.py --alluredir=report --clean-alluredir

========================================================================== test session starts ==========================================================================

platform win32 -- Python 3.7.3, pytest-6.0.2, py-1.9.0, pluggy-0.13.0

rootdir: E:\workspace-py\Pytest

plugins: allure-pytest-2.8.18, assume-2.3.3, cov-2.10.1, html-3.0.0, rerunfailures-9.1.1, xdist-2.1.0

collected 4 items

test_sample.py ....                                                                                                                                                [100%]

=========================================================================== 4 passed in 0.06s ===========================================================================
报告:
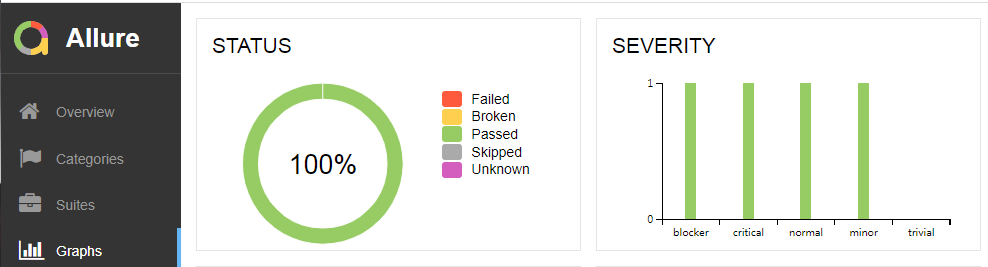
你还可以通过 --allure-severities 选项指定严重等级运行,多个以逗号分隔。
E:\workspace-py\Pytest>pytest test_sample.py --allure-severities normal,critical

========================================================================== test session starts ==========================================================================

platform win32 -- Python 3.7.3, pytest-6.0.2, py-1.9.0, pluggy-0.13.0

rootdir: E:\workspace-py\Pytest

plugins: allure-pytest-2.8.18, assume-2.3.3, cov-2.10.1, html-3.0.0, rerunfailures-9.1.1, xdist-2.1.0

collected 4 items

test_sample.py ..                                                                                                                                                  [100%]

=========================================================================== 2 passed in 0.02s ===========================================================================
2、功能
如果你想对测试功能、测试场景进行行为描述,可以分别使用装饰器:@allure.feature 和 @allure.story 。
示例:
# test_sample.py

import allure

# 两数相加

def add(x, y):

    return x + y

@allure.feature('测试类')

class TestAdd:

    @allure.story('测试两个正数相加')

    def test_first(self):

        assert add(3, 4) == 7

    @allure.story('测试负数正数相加')

    def test_second(self):

        assert add(-3, 4) == 1

    @allure.story('测试正数负数相加')

    def test_three(self):

        assert add(3, -4) == -1

    @allure.story('测试两个负数相加')

    def test_four(self):

        assert add(-3, -4) == -7
运行:
E:\workspace-py\Pytest>pytest test_sample.py --alluredir=report --clean-alluredir

========================================================================== test session starts ==========================================================================

platform win32 -- Python 3.7.3, pytest-6.0.2, py-1.9.0, pluggy-0.13.0

rootdir: E:\workspace-py\Pytest

plugins: allure-pytest-2.8.18, assume-2.3.3, cov-2.10.1, html-3.0.0, rerunfailures-9.1.1, xdist-2.1.0

collected 4 items

test_sample.py ....                                                                                                                                                [100%]

=========================================================================== 4 passed in 0.06s ===========================================================================
报告:
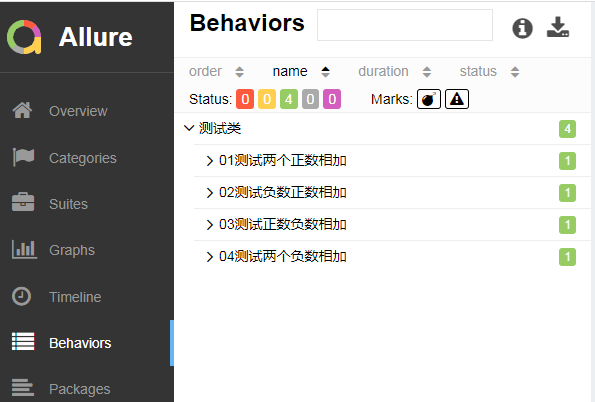
你也可以通过 --allure-features 和 --allure-stories 选择指定具体功能和故事运行,多个以逗号分隔。
E:\workspace-py\Pytest>pytest test_sample.py --allure-stories 01测试两个正数相加

========================================================================== test session starts ==========================================================================

platform win32 -- Python 3.7.3, pytest-6.0.2, py-1.9.0, pluggy-0.13.0

rootdir: E:\workspace-py\Pytest

plugins: allure-pytest-2.8.18, assume-2.3.3, cov-2.10.1, html-3.0.0, rerunfailures-9.1.1, xdist-2.1.0

collected 4 items

test_sample.py .                                                                                                                                                   [100%]

=========================================================================== 1 passed in 0.02s ===========================================================================
3、步骤
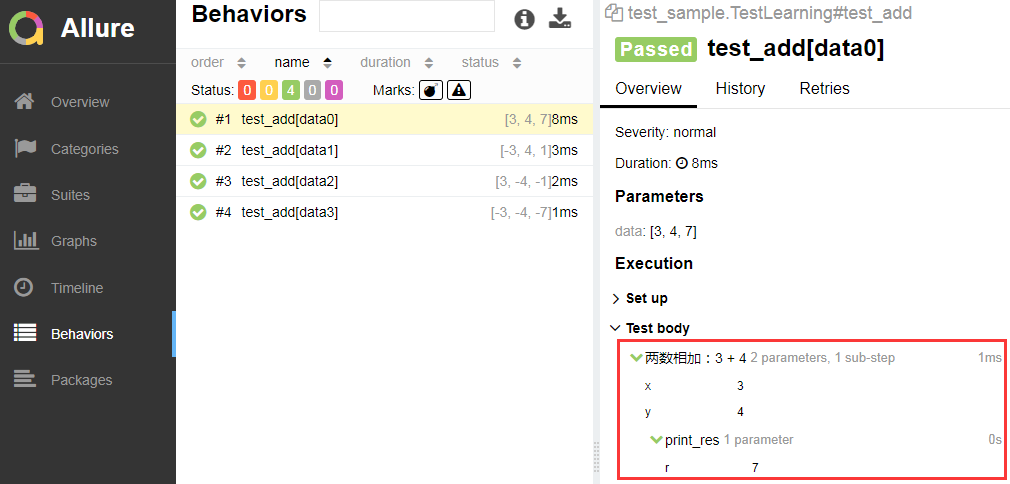
如果你想对每个测试调用进行非常详细的逐步说明,可以通过 @allure.step 装饰器来实现(固件同样支持)。
该装饰器会将方法或函数的调用与提供的参数一起添加到报表中,并且可以包含一条描述行,该行支持位置和关键字参数。
示例:
# test_sample.py

import pytest

import allure

@allure.step('两数相加:{0} + {y}')

def add(x, y):

    r = x + y

    print_res(r)

    return r

@allure.step

def print_res(r):

    print('计算结果:', r)

class TestLearning:

    data = [

        [3, 4, 7],

        [-3, 4, 1],

        [3, -4, -1],

        [-3, -4, -7],

    ]

    @pytest.mark.parametrize("data", data)

    def test_add(self, data):

        assert add(data[0], data[1]) == data[2]
报告:
4、标题
如果你想让测试标题更具可读性,可以使用 @allure.title 装饰器,该装饰器支持参数的占位符并支持动态替换(与@allure.story有点类似)。
示例:
# test_sample.py

import pytest

import allure

def add(x, y):

    return x + y

class TestLearning:

    data = [

        [3, 4, 7],

        [-3, 4, 1],

        [3, -4, -1],

        [-3, -4, -7],

    ]

    @allure.title("测试用例-{data}")

    @pytest.mark.parametrize("data", data)

    def test_add(self, data):

        assert add(data[0], data[1]) == data[2]
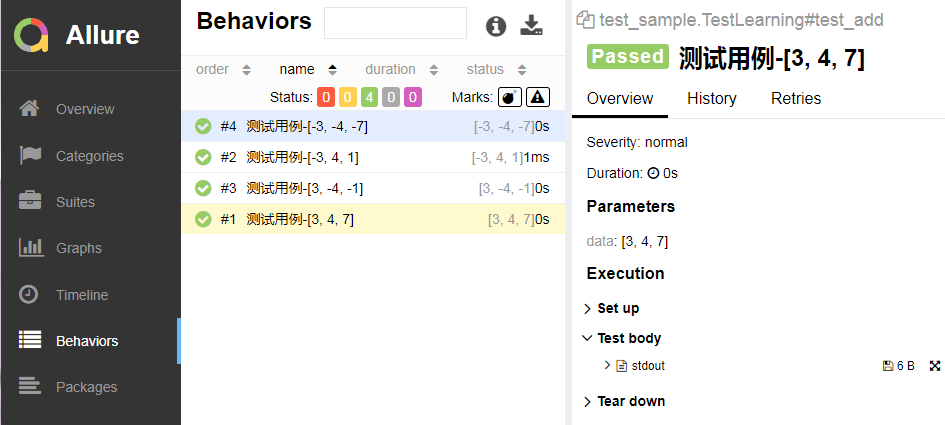
5、描述
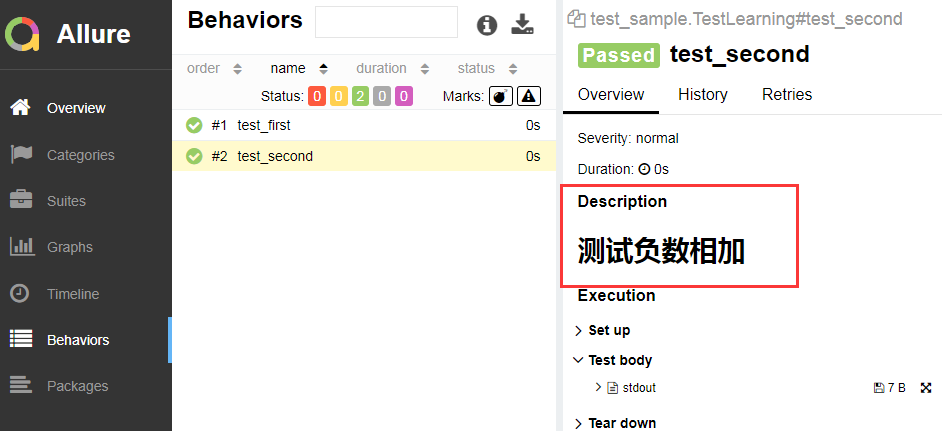
如果你想添加测试的详细说明,可以通过添加测试方法描述信息,也可以使用装饰器 @allure.description 和 @allure.description_html 。
示例:
# test_sample.py

import allure

# 被测功能

def add(x, y):

    return x + y

# 测试类

class TestLearning:

    @allure.description('测试正数相加')

    def test_first(self):

        assert add(3, 4) == 7

    @allure.description_html('<h1> 测试负数相加 </h1>')

    def test_second(self):

        """你也可以在这里添加用例的描述信息,但是会被allure装饰器覆盖"""

        assert add(-3, -4) == -7
报告:
6、附件
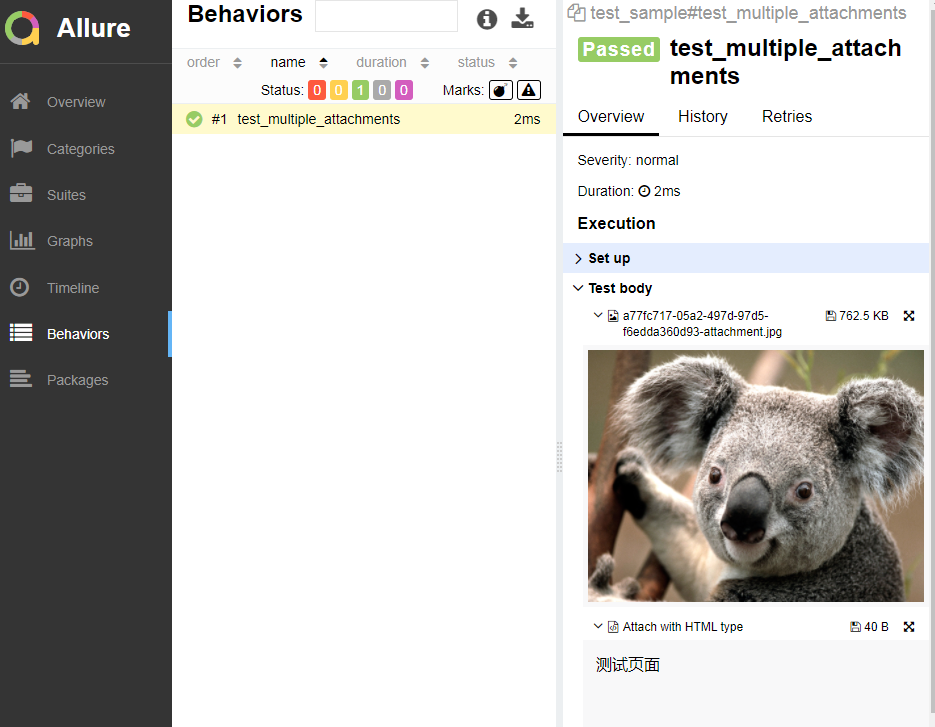
如果你想在报告中显示不同类型的附件,可以通过以下两种方式来实现:
allure.attach(body, name, attachment_type, extension)
allure.attach.file(source, name, attachment_type, extension)
示例:
import allure

def test_multiple_attachments():

    allure.attach.file(r'C:\Users\Public\Pictures\Sample Pictures\Koala.jpg', attachment_type=allure.attachment_type.JPG)

    allure.attach('<head></head><body> 测试页面 </body>', 'Attach with HTML type', allure.attachment_type.HTML)
报告:
7、链接
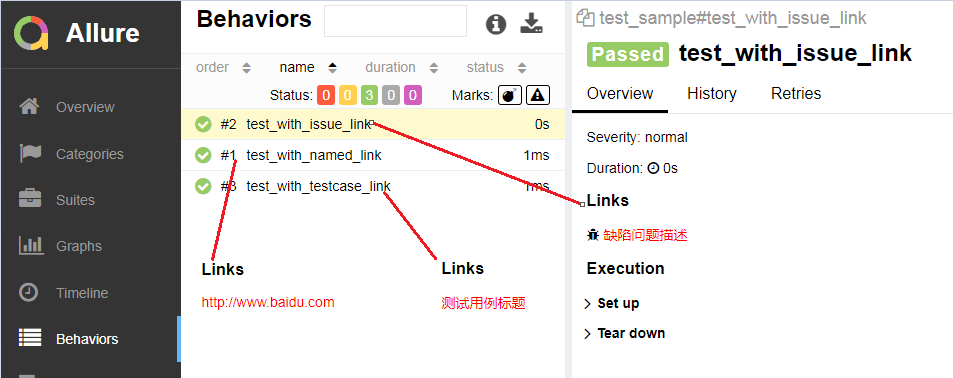
如果你想关联缺陷追踪系统或测试管理系统,你可以使用装饰器 @allure.link、@allure.issue、@allure.testcase。
示例:
import allure

@allure.link('http://www.baidu.com')

def test_with_named_link():

    pass

@allure.issue('101', '缺陷问题描述')

def test_with_issue_link():

    pass

@allure.testcase('http://this.testcase.com', '测试用例标题')

def test_with_testcase_link():

    pass
报告:
注意:
@allure.issue 将提供带有小错误图标的链接,该描述符将测试用例ID作为输入参数,以将其与提供的问题链接类型的链接模板一起使用。
链接模板在 --allure-link-patternPytest 的配置选项中指定。链接模板和类型必须使用冒号指定:
pytest test_sample.py --alluredir=report --allure-link-pattern=issue:http://www.mytesttracker.com/issue/{}
官方文档地址:https://docs.qameta.io/allure/#_pytest
作者:Leozhanggg
出处:https://www.cnblogs.com/leozhanggg/p/14059844.html
本文版权归作者和博客园共有,欢迎转载,但未经作者同意必须保留此段声明,且在文章页面明显位置给出原文连接,否则保留追究法律责任的权利。
Pytest自动化测试 - allure报告进阶的更多相关文章
- pytest生成allure报告
在pytest框架中可以用很多插件来生成测试报告,本文总结下怎么生成allure报告 allure allure是一款开源的,专门用来展示测试结果的一个工具,allure可以与很多的测试框架做集成,比 ...
- pytest系列(四)- pytest+allure+jenkins - 持续集成平台生成allure报告
pytest是什么 pytest是python的一款测试框架,拥有unittest的功能并比它更丰富. allure是什么 有非常多的优秀的测试框架,但却是有非常少优秀的报告工具可以展示非常清楚的用例 ...
- Pytest(11)allure报告
前言 allure是一个report框架,支持java的Junit/testng等框架,当然也可以支持python的pytest框架,也可以集成到Jenkins上展示高大上的报告界面. mac环境: ...
- Pytest自动化测试 - 完美结合Allure
简介 Allure Framework是一种灵活的.轻量级.多语言测试报告工具. 不仅可以以简洁的网络报告形式非常简洁地显示已测试的内容, 而且还允许参与开发过程的每个人从日常执行中提取最大程度的有用 ...
- allure报告定制(pytest+jenkins)
环境及安装可查看 pytest+jenkins安装+allure导出报告 要让allure报告更漂亮,更直观,需要在脚本中写入allure特性 一开始allure调用step().story().fe ...
- pytest框架之allure报告生成
一.关于安装 allure是跟pytest一起集成使用的,所以需要同时安装pytest以及allure-pytest插件: pip install pytest pip install allure- ...
- pytest框架优化——将异常截屏图片加入到allure报告中
痛点分析: 在做allure定制化的时候,关于附件添加这一块,我们在代码里可以添加我们准备好的附件,这里用图片,通过下面的方法就能实现 allure.attach(file, '图片描述', allu ...
- Docker DevOps实战:Docker+Jenkins+Python+Pytest+Allure(1)- 创建Jenkins容器、安装Python环境、安装项目依赖类库、安装Allure报告插件
前言: 本文实操笔记参照菠萝笔记,安装过程中的坑大家可以参考下 创建Jenkins容器 # 下载Jenkins镜像 [root@localhost ~]# docker pull jenkins/je ...
- 接口自动化框架(Pytest+request+Allure)
前言: 接口自动化是指模拟程序接口层面的自动化,由于接口不易变更,维护成本更小,所以深受各大公司的喜爱. 接口自动化包含2个部分,功能性的接口自动化测试和并发接口自动化测试. 本次文章着重介绍第一种, ...
随机推荐
- uniapp请求方法的封装
之前在接触uniapp做小程序项目时候,因为不太熟悉,遇到了不少尴尬的时刻,请求方法的封装算是灵魂啊有木有,今天看到有人问题,就把我自己写的发出来让大家参考一下吧. 请求方法的封装我一般用的是prom ...
- Go语言的互斥锁Mutex
目录 一.使用方法 二.死锁场景 1.Lock/Unlock不是成对出现 2.锁被拷贝使用 3.循环等待 一.使用方法 Mutext是互斥锁的意思,也叫排他锁,同一时刻一段代码只能被一个线程运行,两个 ...
- Scala-Mongodb入门之CRUD
Scala入门之Mongo增删改查 环境jdk1.8,scala2.13 使用sbt管理依赖,在build.sbt中添加依赖: libraryDependencies += "org.mon ...
- 浅谈 Tarjan 算法
目录 简述 作用 Tarjan 算法 原理 出场人物 图示 代码实现 例题 例题一 例题二 例题三 例题四 例题五 总结 简述 对于初学 Tarjan 的你来说,肯定和我一开始学 Tarjan 一样无 ...
- APIO 2020 爆零记
Day -3 这几天集训,貌似大家都没有把APIO放在心上... Day 0 试了下机(非官方选手)... 感觉界面还是比较清新,(至少吊打BZOJ一个数量级) (话说APIO2020中国镜像为什么还 ...
- c#导入文件以后查看制定值
//Console.ReadKey(); ceshi("3.ini", "用户名"); ceshi("3.ini", "IP地址& ...
- 小学生学习C++应该具备哪些基础?
一.电脑操作基础: 应该具备一些必要的电脑相关的知识,如操作系统的相关知识,如何打开.编辑.保存文件.对电脑的能力有一些基本的认识,以及会使用鼠标,键盘熟练输入. 磨刀不误砍柴工,至少要做到能快速找到 ...
- Spark Shuffle机制详细源码解析
Shuffle过程主要分为Shuffle write和Shuffle read两个阶段,2.0版本之后hash shuffle被删除,只保留sort shuffle,下面结合代码分析: 1.Shuff ...
- 看看poll 事件掩码 --- review代码时发现掩码不分的错误
事件 描述 是否可作为输入(events) 是否可作为输出(revents) POLLIN 数据可读(包括普通数据&优先数据) 是 是 POLLOUT 数据可写(普通数据&优先数据) ...
- python之深浅copy与id
我们都知道 所谓变量就是就是在空间中开辟一块内存空间.来存放东西的 学过c语言的都知道而数组也是有内存地址的 我们如何来查看内存地址呢?id()这函数就来了 x = 5 print(id(x)) 如此 ...