I2C总线的Arduino库函数
I2C总线的Arduino库函数
I2C即Inter-Integrated Circuit串行总线的缩写,是PHILIPS公司推出的芯片间串行传输总线。它以1根串行数据线(SDA)和1根串行时钟线(SCL)实现了双工的同步数据传输。具有接口线少,控制方式简化,器件封装形式小,通信速率较高等优点。在主从通信中,可以有多个I2C总线器件同时接到I2C总线上,通过地址来识别通信对象。
Arduino提供的I2C库函数为Wire.h。
I2C总线工作原理
SDA(串行数据线)和SCL(串行时钟线)都是双向I/O线,接口电路为开漏输出.需通过上拉电阻接电源VCC.当总线空闲时.两根线都是高电平,连接总线的外同器件都是CMOS器件,输出级也是开漏电路.在总线上消耗的电流很小,因此,总线上扩展的器件数量主要由电容负载来决定,因为每个器件的总线接口都有一定的等效电容.而线路中电容会影响总线传输速度.当电容过大时,有可能造成传输错误.所以,其负载能力为400pF,因此可以估算出总线允许长度和所接器件数量。
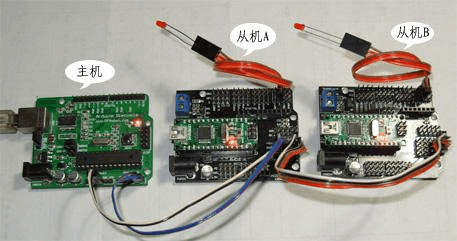
主器件用于启动总线传送数据,并产生时钟以开放传送的器件,此时任何被寻址的器件均被认为是从器件.在总线上主和从、发和收的关系不是恒定的,而取决于此时数据传送方向。如果主机要发送数据给从器件,则主机首先寻址从器件,然后主动发送数据至从器件,最后由主机终止数据传送;如果主机要接收从器件的数据,首先由主器件寻址从器件.然后主机接收从器件发送的数据,最后由主机终止接收过程。在这种情况下.主机负责产生定时时钟和终止数据传送。 [2]
I2C总线特征
I2C总线特点可以概括如下:
(1)在硬件上,I2C总线只需要一根数据线和一根时钟线两根线,总线接口已经集成在芯片内部,不需要特殊的接口电路,而且片上接口电路的滤波器可以滤去总线数据上的毛刺.因此I2C总线简化了硬件电路PCB布线,降低了系统成本,提高了系统可靠性。因为I2C芯片除了这两根线和少量中断线,与系统再没有连接的线,用户常用IC可以很容易形成标准化和模块化,便于重复利用。
(2)I2C总线是一个真正的多主机总线,如果两个或多个主机同时初始化数据传输,可以通过冲突检测和仲裁防止数据破坏,每个连接到总线上的器件都有唯一的地址,任何器件既可以作为主机也可以作为从机,但同一时刻只允许有一个主机。数据传输和地址设定由软件设定,非常灵活。总线上的器件增加和删除不影响其他器件正常工作。
(3)I2C总线可以通过外部连线进行在线检测,便于系统故障诊断和调试,故障可以立即被寻址,软件也利于标准化和模块化,缩短开发时问。
(4)连接到相同总线上的IC数量只受总线最大电容的限制,串行的8位双向数据传输速率在标准模式下可达100Kbit/s,快速模式下可达400Kbit/s,高速模式下可达3.4Mbit/s。
(5)总线具有极低的电流消耗.抗高噪声干扰,增加总线驱动器可以使总线电容扩大10倍,传输距离达到15m;兼容不同电压等级的器件,工作温度范围宽。
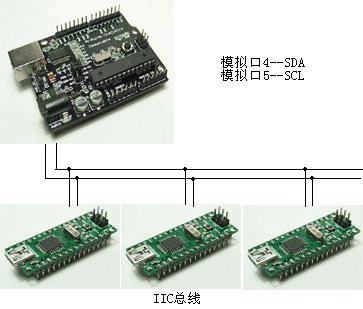
This library allows you to communicate with I2C / TWI devices. On the Arduino boards with the R3 layout (1.0 pinout), the SDA (data line) and SCL (clock line) are on the pin headers close to the AREF pin. The Arduino Due has two I2C / TWI interfaces SDA1 and SCL1 are near to the AREF pin and the additional one is on pins 20 and 21.
As a reference the table below shows where TWI pins are located on various Arduino boards. TWI引脚在不同板子上的位置。
Board I2C / TWI pins
Uno, Ethernet A4 (SDA), A5 (SCL)
Mega2560 20 (SDA), 21 (SCL)
Leonardo 2 (SDA), 3 (SCL)
Due 20 (SDA), 21 (SCL), SDA1, SCL1
As of Arduino 1.0, the library inherits from the Stream functions, making it consistent with other read/write libraries. Because of this, send() and receive() have been replaced with read() and write().
Note
There are both 7- and 8-bit versions of I2C addresses. 7 bits identify the device, and the eighth bit determines if it's being written to or read from. The Wire library uses 7 bit addresses throughout. If you have a datasheet or sample code that uses 8 bit address, you'll want to drop the low bit (i.e. shift the value one bit to the right), yielding an address between 0 and 127. However the addresses from 0 to 7 are not used because are reserved so the first address that can be used is 8. Please note that a pull-up resistor is needed when connecting SDA/SCL pins. Please refer to the examples for more informations. MEGA 2560 board has pull-up resistors on pins 20 - 21 onboard.
I2C的Arduino库函数
begin() 初始化总线,作为主机或从机加入总线,带地址参数就是从机,不带就是主机
requestFrom() 主机向从机请求字节/数据
beginTransmission() 主机向从机传送数据开始
endTransmission() 主机向从机传送数据停止
write() 写数据,从机向主机或主机向从机
available() 返回通过read()函数得到的字节数
read() 读取一个传送的字节
SetClock() 修改I2C通信的频率,标准值是100KHz
onReceive() 注册一个函数,当从机接收到主机的数据时此函数被调用
onRequest() 注册一个函数,当主机向从机请求数据时此函数 被调用
I2C的Arduino库函数详解
Wire.begin() 初始化总线,作为主机或从机加入总线,带地址参数就是从机,不带就是主机
Description 描述
Initiate the Wire library and join the I2C bus as a master or slave. This should normally be called only once.
Syntax 语法
Wire.begin(address)
Parameters 参数
address: the 7-bit slave address (optional); if not specified, join the bus as a master.
Returns 返回
None
Wire.requestFrom() 主机向从机请求字节/数据
Description
Used by the master to request bytes from a slave device. The bytes may then be retrieved with the available() and read() functions.
As of Arduino 1.0.1, requestFrom() accepts a boolean argument changing its behavior for compatibility with certain I2C devices.
If true, requestFrom() sends a stop message after the request, releasing the I2C bus.
If false, requestFrom() sends a restart message after the request. The bus will not be released, which prevents another master device from requesting between messages. This allows one master device to send multiple requests while in control.
The default value is true.
Syntax 语法
Wire.requestFrom(address, quantity)
Wire.requestFrom(address, quantity, stop)
Parameters
address: the 7-bit address of the device to request bytes from
quantity: the number of bytes to request
stop : boolean. true will send a stop message after the request, releasing the bus. false will continually send a restart after the request, keeping the connection active.
Returns
byte : the number of bytes returned from the slave device
Wire.beginTransmission(address) 主机向从机传送数据开始
Description
Begin a transmission to the I2C slave device with the given address. Subsequently, queue bytes for transmission with the write() function and transmit them by calling endTransmission().
Parameters
address: the 7-bit address of the device to transmit to
Returns
None
Wire.endTransmission() 主机向从机传送数据停止
Description
Ends a transmission to a slave device that was begun by beginTransmission() and transmits the bytes that were queued by write().
As of Arduino 1.0.1, endTransmission() accepts a boolean argument changing its behavior for compatibility with certain I2C devices.
If true, endTransmission() sends a stop message after transmission, releasing the I2C bus.
If false, endTransmission() sends a restart message after transmission. The bus will not be released, which prevents another master device from transmitting between messages. This allows one master device to send multiple transmissions while in control.
The default value is true.
Syntax
Wire.endTransmission()
Wire.endTransmission(stop)
Parameters
stop : boolean. true will send a stop message, releasing the bus after transmission. false will send a restart, keeping the connection active.
Returns
byte, which indicates the status of the transmission:
0:success
1:data too long to fit in transmit buffer
2:received NACK on transmit of address
3:received NACK on transmit of data
4:other error
write() 写数据,从机向主机或主机向从机
Description
Writes data from a slave device in response to a request from a master, or queues bytes for transmission from a master to slave device (in-between calls to beginTransmission() and endTransmission()).
Syntax
Wire.write(value)
Wire.write(string)
Wire.write(data, length)
Parameters
value: a value to send as a single byte
string: a string to send as a series of bytes
data: an array of data to send as bytes
length: the number of bytes to transmit
Returns
byte: write() will return the number of bytes written, though reading that number is optional
Example 举例
#include <Wire.h>
byte val = 0;
void setup()
{ Wire.begin(); // join i2c bus }
void loop()
{
Wire.beginTransmission(44); // transmit to device #44 (0x2c)
// device address is specified in datasheet
Wire.write(val); // sends value byte
Wire.endTransmission(); // stop transmitting
val++; // increment value
if(val == 64) // if reached 64th position (max)
{ val = 0; // start over from lowest value }
delay(500);
}
Wire.available() 返回通过read()函数得到的字节数
Description
Returns the number of bytes available for retrieval with read(). This should be called on a master device after a call to requestFrom() or on a slave inside the onReceive() handler.
available() inherits from the Stream utility class.
Parameters
None
Returns
The number of bytes available for reading.
Wire.read() 读取一个传送的字节
Description
Reads a byte that was transmitted from a slave device to a master after a call to requestFrom() or was transmitted from a master to a slave. read() inherits from the Stream utility class.
Syntax
Wire.read()
Parameters
none
Returns
The next byte received
Example
#include <Wire.h>
void setup()
{
Wire.begin(); // join i2c bus (address optional for master)
Serial.begin(9600); // start serial for output
}
void loop()
{
Wire.requestFrom(2, 6); // request 6 bytes from slave device #2
while(Wire.available()) // slave may send less than requested
{
char c = Wire.read(); // receive a byte as character
Serial.print(c); // print the character
}
delay(500);
}
Wire.setClock() 修改I2C通信的频率,标准值是100KHz
Description
This function modifies the clock frequency for I2C communication. I2C slave devices have no minimum working clock frequency, however 100KHz is usually the baseline.
Syntax
Wire.setClock(clockFrequency)
Parameters
clockFrequency: the value (in Hertz) of desired communication clock. Accepted values are 100000 (standard mode) and 400000 (fast mode). Some processors also support 10000 (low speed mode), 1000000 (fast mode plus) and 3400000 (high speed mode). Please refer to the specific processor documentation to make sure the desired mode is supported.
Returns
None
Wire.onReceive(handler) 注册一个函数,当从机接收到主机的数据时,此函数被调用
Description
Registers a function to be called when a slave device receives a transmission from a master.
Parameters
handler: the function to be called when the slave receives data; this should take a single int parameter (the number of bytes read from the master) and return nothing, e.g.: void myHandler(int numBytes)
Returns
None
Wire.onRequest(handler) 注册一个函数,当主机向从机请求数据时,此函数被调用
Description
Register a function to be called when a master requests data from this slave device.
Parameters
handler: the function to be called, takes no parameters and returns nothing, e.g.: void myHandler()
Returns
None
I2C总线的Arduino库函数的更多相关文章
- OneWire总线的Arduino库函数
OneWire总线基本点 One-wire总线是DALLAS公司研制开发的一种协议,采用单根信号线,既传输时钟,又传输数据而且数据传输是双向的.它具有节省I/O 口线资源.结构简单.成本低廉.便于总线 ...
- 总线SPI的Arduino库函数
来源参考:https://www.cnblogs.com/MyAutomation/p/9348480.html 总线SPI的Arduino库函数 SPI基本知识 SPI:高速同步串行口.是一种标准的 ...
- I2C总线完全版——I2C总线的结构、工作时序与模拟编程
I2C总线的结构.工作时序与模拟编程 I2C总线的结构.工作时序与模拟编程I2C总线(Inter Integrated Circuit)是飞利浦公司于上个世纪80年代开发的一种"电路板级&q ...
- I2C总线(异步)
起始位与停止位的定义: 起始信号:当SCL为高期间,SDA由高到低的跳变:启动信号是一种电平跳变时序信号,而不是一个电平信号. 停止信号:当SCL为高期间,SDA由低到高的跳变:停止信号也是一种电平跳 ...
- i2c总线,设备,驱动之间的关系
------ 总线上先添加好所有具体驱动,i2c.c遍历i2c_boardinfo链表,依次建立i2c_client, 并对每一个i2c_client与所有这个线上的驱动匹配,匹配上,就调用这个驱动的 ...
- [I2C]I2C总线协议图解
转自:http://blog.csdn.net/w89436838/article/details/38660631 1 I2C总线物理拓扑结构 I2C 总线在物理连接上非常简单,分别由S ...
- Linux设备驱动模型之I2C总线
一.I2C子系统总体架构 1.三大组成部分 (1)I2C核心(i2c-core):I2C核心提供了I2C总线驱动(适配器)和设备驱动的注册.注销方法,提供了与具体硬件无关的I2C读写函数. (2)I2 ...
- I2C总线和S5PV210的I2C总线控制器
一.什么是I2C通信协议? 1.物理接口:SCL + SDA (1)SCL(serial clock):时钟线,传输CLK信号,一般是I2C主设备向从设备提供时钟的通道. (2)SDA(serial ...
- I2C总线协议的简要说明
为了快速的了解I2C总线协议,此处采用另类的方式进行说明. 倘若你和另外一个人只能通过一个开关加灯泡的装置在不同的两个房间进行交流,以下是很简单能说明的一个模型: 你的房间有一个开关,另外一间房间有一 ...
随机推荐
- 【Android】AndroidStudio关于EventBus报错解决方法its super classes have no public methods with the @Subscribe
作者:程序员小冰,GitHub主页:https://github.com/QQ986945193 新浪微博:http://weibo.com/mcxiaobing 首先说明,以前我用eventBus的 ...
- JAVA中 错误代码是 the public type must be defined in its own file 解决方法 android开发 java编程
一般是由于定义的JAVA类同文件名不一致: 解决方法: 1.把文件名修改同XYZ一样的名字: 2.把类名修改成同文件名:
- 编写第一个 .NET 微服务
介绍 本文的目的是:通过创建一个返回列表的简单服务,并在 Docker 容器中运行该服务,让您熟悉使用 .NET 创建微服务的构建过程. 安装 .NET SDK 要开始构建 .NET 应用程序,首先下 ...
- 小白也能弄得懂的目标检测YOLO系列之YOLOv1网络训练
上期给大家介绍了YOLO模型的检测系统和具体实现,YOLO是如何进行目标定位和目标分类的,这期主要给大家介绍YOLO是如何进行网络训练的,话不多说,马上开始! 前言: 输入图片首先被分成S*S个网格c ...
- springboot入门遇到Whitelabel Error Page错误
错误页面: 解决方法: 启动类要放在最外层,改成下面的
- SqlAnalyzer1.01 源码
源码下载:https://files.cnblogs.com/files/heyang78/SqlAnalyzer-20200529-2.rar 现有功能:不带函数允许嵌套的select ...fro ...
- windows上部署rabbitmq遇到的一些问题及解决方法
在目前这家公司,刚进公司的时候接手了一个服务,算是个比较完备的服务,其中几台电脑之间通信用到了rabbitmq,一开始没出什么问题,然后后来勒索病毒wanner cry来的时候,系服把所有服务器装了一 ...
- memcached缓存:安装和清缓存
一.安装步骤: 1.将工具一直解压,解压到最底层的exe目录
- js之按钮切换
<!DOCTYPE html> <html> <head> <meta charset="utf-8" /> <title&g ...
- Java Object类方法解析
Java Object类方法解析 在Java中Object是所有类的父类,任何类都默认继承Object,其提供的方法主要有以下几种: registerNatives() hashCode和equale ...