
Java系列--第三篇 基于Maven的Android开发CAIO
学习要打好基础,这里用一个项目来学习一下Android的组件,参考网址为这个但不限于这个。有些东西的学习,理解三遍理论还不如一遍操作,所谓理论来自实践,实践是检验真理的唯一标准。所以,虽然看懂了那篇文章,还是自己做一遍来加深理解。
1,cmd下面生成项目
mvn archetype:generate -DarchetypeArtifactId=android-quickstart -DarchetypeGroupId=de.akquinet.android.archetypes -DarchetypeVersion=1.0.11 -DgroupId=com.vanceinfo.android -DartifactId=CAIO
2, 导入项目至Kepler,新建一个类,然后Alt+Shift+S,选择Override/Implement Method, override onCreate(Bundle savedInstanceState),方法内容先不管它,去到项目的AndroidManifest.xml文件中,将<activity android:name=".HelloAndroidActivity" >改为<activity android:name=".SpinnerActivity" >,等下启动时就来到这个组件来显示,接着来到layout的文件夹中,新建一个叫spinner.xml文件,使用Graphic layout,先拖入linearLayout,然后拖一个label,一个spinner,还有一个button共四个组件进来,由eclipse自动为我们生成的xml如下:
<?xml version="1.0" encoding="utf-8"?>

<LinearLayout xmlns:android="http://schemas.android.com/apk/res/android"

    android:layout_width="fill_parent"

    android:layout_height="fill_parent"

    android:orientation="vertical" >

    <TextView

        android:id="@+id/label"

        android:layout_width="fill_parent"

        android:layout_height="wrap_content"

        android:text="下拉框1:"

    />

    <Spinner

        android:id="@+id/spinner1"

        android:layout_width="150dip"

        android:layout_height="wrap_content"

        android:drawSelectorOnTop="false"

    />

    <TextView

        android:id="@+id/label"

        android:layout_width="fill_parent"

        android:layout_height="wrap_content"

        android:text="下拉框2:"

    />

    <Spinner

        android:id="@+id/spinner2"

        android:layout_width="150dip"

        android:layout_height="wrap_content"

        android:drawSelectorOnTop="false"

    />

    <Button

        android:id="@+id/ok"

        android:layout_width="wrap_content"

        android:layout_height="wrap_content"

        android:text="@string/ok"

    />

</LinearLayout>
layout_linear
保存之后,重新回到刚刚的onCreate方法里,base下一行输入setContentView(R.layout.spinner);告诉程序我们要显示的是spinner这个组件。整个的程序源码应该是这样子:
package com.vanceinfo.android;

import java.util.ArrayList;

import java.util.List;

import android.app.Activity;

import android.os.Bundle;

import android.view.View;

import android.widget.AdapterView;

import android.widget.ArrayAdapter;

import android.widget.Button;

import android.widget.Spinner;

public class SpinnerActivity extends Activity {

    private Spinner spinner1;

    private Spinner spinner2;

    private Button ok;

    private ArrayAdapter countiesAdapter;

    private String[] mCounties={"beijing","guangdong","guangxi","hunan"};

    private List<String> allCounties=new ArrayList<String>();

    private String result="你选择的是:";

    @Override

    protected void onCreate(Bundle savedInstanceState) {

        super.onCreate(savedInstanceState);

        setContentView(R.layout.spinner);

        spinner1=(Spinner)findViewById(R.id.spinner1);

        spinner2=(Spinner)findViewById(R.id.spinner2);

        ok=(Button)findViewById(R.id.ok);

        for(int i=0;i<mCounties.length;i++){

            allCounties.add(mCounties[i]);

        }

        countiesAdapter=new ArrayAdapter<String>(SpinnerActivity.this,android.R.layout.simple_spinner_item,allCounties);

        countiesAdapter.setDropDownViewResource(android.R.layout.simple_spinner_dropdown_item);

        spinner1.setAdapter(countiesAdapter);

        ArrayAdapter adapter=ArrayAdapter.createFromResource(SpinnerActivity.this,R.array.counties,android.R.layout.simple_spinner_item);

        adapter.setDropDownViewResource(android.R.layout.simple_spinner_dropdown_item);

        spinner2.setAdapter(adapter);

        //单击第一个下拉按钮时,显示选择的值。

        spinner1.setOnItemSelectedListener(new AdapterView.OnItemSelectedListener() {

            /* (non-Javadoc)

             * @see android.widget.AdapterView.OnItemSelectedListener#onItemSelected(android.widget.AdapterView, android.view.View, int, long)

             */

            public void onItemSelected(AdapterView<?> adapter, View view,

                    int position, long id) {

                String str=(String)spinner1.getAdapter().getItem((int)id);

                setTitle(result+str);

            }

            /* (non-Javadoc)

             * @see android.widget.AdapterView.OnItemSelectedListener#onNothingSelected(android.widget.AdapterView)

             */

            public void onNothingSelected(AdapterView<?> arg0) {

            }

        });

        //单击第二个下拉按钮时,显示选择的值。

        spinner2.setOnItemSelectedListener(new AdapterView.OnItemSelectedListener() {

            /* (non-Javadoc)

             * @see android.widget.AdapterView.OnItemSelectedListener#onItemSelected(android.widget.AdapterView, android.view.View, int, long)

             */

            public void onItemSelected(AdapterView<?> adapter, View view,

                    int position, long id) {

                String str=(String)spinner2.getAdapter().getItem(position);

                setTitle(result+str);

            }

            /* (non-Javadoc)

             * @see android.widget.AdapterView.OnItemSelectedListener#onNothingSelected(android.widget.AdapterView)

             */

            public void onNothingSelected(AdapterView<?> arg0) {

                // TODO Auto-generated method stub

            }

        });

        //单击确定按钮,提取选择的值.

        ok.setOnClickListener(new View.OnClickListener() {

            public void onClick(View v) {

                setTitle(result+spinner1.getSelectedItem()+"  - >>  "+spinner2.getSelectedItem());

            }

        });

    }

}
SpinnerActivity
因为我们演示的第二个下拉框的值是在外部定义的,所以,在values文件夹下加入arrays.xml,内容如下:
<?xml version="1.0" encoding="utf-8"?>

<resources>

    <string-array name="counties">

        <item>AAA</item>

        <item>BBB</item>

        <item>CCC</item>

        <item>DDD</item>

        <item>EEE</item>

    </string-array>

</resources>
string-array_of_arrays
在string.xml中加入一条
<string name="ok">确定</string>
最后编译,即可将apk放入模拟器运行了。不过很让我伤心纠结的是Run as Android Application是运行不起来的,Debug as Android Application也是运行不起来,从logCat看到错误是Maven将我的apk名字变了,变成了好象groupId -1....apk. 整了一个下午都没有找到解决方法。实在无奈,先暂时用模拟器运行着吧。
09-14 11:17:17.993: E/AndroidRuntime(436): java.lang.RuntimeException: Unable to instantiate activity ComponentInfo{com.vanceinfo.android/com.vanceinfo.android.SpinnerActivity}: java.lang.ClassNotFoundException: com.vanceinfo.android.SpinnerActivity in loader dalvik.system.PathClassLoader[/data/app/com.vanceinfo.android-1.apk]
apk被改名了
不过,作为开发人员,不能调试,终究是件不太能放心的事情,好吧,我就用DDMS来调吧,方法是启动模拟器,来到Kepler中打上断点,切换至DDMS,选择要调试的进程,然后你在模拟器中的操作,就会绿条到代码的断点处了。我还是截个图示吧
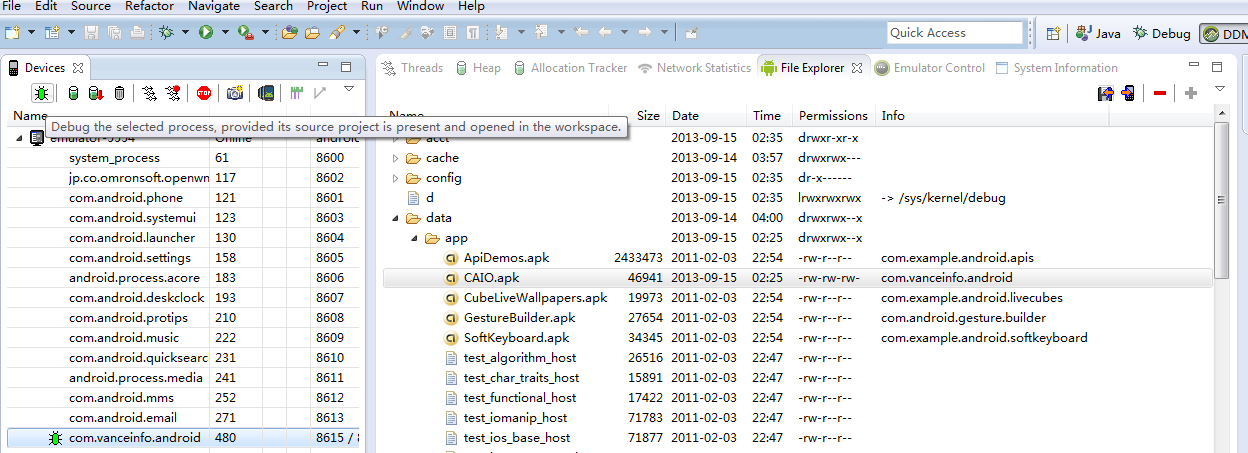
上图的绿虫说明就是我将要调试的进程了。
以上说了这么多,就是为了将这个下拉框展示出来 ,其实我个人的理解是如果对Java的Swing很了解的话,对于Android组件开发就很简单了。单单就这个下拉框 来说注意android.widget.ArrayAdapter的实例化就是关键,我们这里使用的一个是常见的直接new,另一个就是使用其静态方法createFromResource,另外android.R.layout.下面还有一些自动生成的属性,要根据情况善于利用,需要注意的是一定要打全android.R.layout,如果你为省事而少打前面那个android,估计你就等着郁闷为什么会没有吧。
3,创建4种类型的对话框,新建一个AlertDialogActivity,并去到AndroidMainifest.xml中更改启动的组件为这个,而不是2中的spinner. 接着新建一个alertdialog.xml和alertdialog_text_entry.xml。最后去到string.xml里添加
    <string name="alert_button1">有两个button的对话框1</string>

    <string name="alert_button2">有三个button的对话框2</string>

    <string name="alert_button3">能进行输入的对话框3</string>

    <string name="alert_button4">进度框</string>
displayItem_on_string
如果使用Eclipse创建xml的话是有好处的,有很多可视化的操作,单击那个带+号的a按钮即可
写对话框的API,主要是android.app.AlertDialog.Builder,他有setPositiveButton针对于确定,setNeutralButton可针对于详情,还有setNegativeButton针对于当用户按取消时对应的按钮。注册他们的单击事件即可完成功能。
还有android.app.ProgressDialog也可用于对话框,主要用在当一些需长时间运行,给用户一个提示:正在处理中,请稍后。。。
全部源码:
package com.vanceinfo.android;

import android.app.Activity;

import android.app.AlertDialog;

import android.app.AlertDialog.Builder;

import android.app.ProgressDialog;

import android.content.DialogInterface;

import android.os.Bundle;

import android.view.LayoutInflater;

import android.view.View;

import android.widget.Button;

import android.widget.EditText;

import android.widget.Toast;

public class AlertDialogActivity extends Activity {

    private Button button1;

    private Button button2;

    private Button button3;

    private Button button4;

    /* (non-Javadoc)

     * @see android.app.Activity#onCreate(android.os.Bundle)

     */

    @Override

    protected void onCreate(Bundle savedInstanceState) {

        super.onCreate(savedInstanceState);

        setContentView(R.layout.alertdialog);

        setTitle("4种对话框");

        button1=(Button)findViewById(R.id.button1);

        button2=(Button)findViewById(R.id.button2);

        button3=(Button)findViewById(R.id.button3);

        button4=(Button)findViewById(R.id.button4);

        button1.setOnClickListener(new View.OnClickListener() {

            public void onClick(View v) {

                Builder builder= new AlertDialog.Builder(AlertDialogActivity.this);

                builder.setIcon(R.drawable.ic_launcher);

                builder.setTitle("哇哈哈!");

                builder.setMessage("去不去?");

                builder.setPositiveButton("确定", new DialogInterface.OnClickListener() {

                    public void onClick(DialogInterface dialog, int which) {

                        Toast.makeText(AlertDialogActivity.this, "你选择了确定按钮!", Toast.LENGTH_SHORT).show();

                    }

                });

                builder.setNegativeButton("取消", new DialogInterface.OnClickListener() {

                    public void onClick(DialogInterface dialog, int which) {

                        Toast.makeText(AlertDialogActivity.this, "你选择了取消按钮!", Toast.LENGTH_SHORT).show();

                    }

                });

                builder.show();

            }

        });

        button2.setOnClickListener(new View.OnClickListener() {

            public void onClick(View v) {

                new AlertDialog.Builder(AlertDialogActivity.this)

                .setIcon(R.drawable.ic_launcher)

                .setTitle("温馨提示")

                .setMessage("提示内容:三个按钮")

                .setPositiveButton("确定", new DialogInterface.OnClickListener() {

                    public void onClick(DialogInterface dialog, int which) {

                        Toast.makeText(AlertDialogActivity.this, "你选择了确定按钮!", Toast.LENGTH_SHORT).show();

                    }

                })

                .setNeutralButton("详情", new DialogInterface.OnClickListener() {

                    public void onClick(DialogInterface dialog, int which) {

                        Toast.makeText(AlertDialogActivity.this, "你选择了详情按钮!", Toast.LENGTH_SHORT).show();

                    }

                })

                .setNegativeButton("取消", new DialogInterface.OnClickListener() {

                    public void onClick(DialogInterface dialog, int which) {

                        Toast.makeText(AlertDialogActivity.this, "你选择了取消按钮!", Toast.LENGTH_SHORT).show();

                    }

                })

                .show();

            }

        });

        button3.setOnClickListener(new View.OnClickListener() {

            public void onClick(View v) {

                LayoutInflater inflater=LayoutInflater.from(AlertDialogActivity.this);

                final View textEntryView=inflater.inflate(R.layout.alertdialog_text_entry, null);

                final EditText usernameET=(EditText)textEntryView.findViewById(R.id.username_value);

                final EditText passwordET=(EditText)textEntryView.findViewById(R.id.password_value);

                //final String username=usernameET.getText().toString();

                new AlertDialog.Builder(AlertDialogActivity.this)

                .setIcon(R.drawable.ic_launcher)

                .setTitle("温馨提醒")

                .setView(textEntryView)

                .setPositiveButton("确定", new DialogInterface.OnClickListener() {

                    public void onClick(DialogInterface dialog, int which) {

                        Toast.makeText(AlertDialogActivity.this, "用户名="+usernameET.getText().toString()+"\n密码="+passwordET.getText().toString(), Toast.LENGTH_LONG).show();

                    }

                })

                .setNegativeButton("取消", new DialogInterface.OnClickListener() {

                    public void onClick(DialogInterface dialog, int which) {

                        Toast.makeText(AlertDialogActivity.this, "你选择了确定取消!", Toast.LENGTH_SHORT).show();

                    }

                })

                .show();

            }

        });

        button4.setOnClickListener(new View.OnClickListener() {

            public void onClick(View v) {

                ProgressDialog dialog=new ProgressDialog(AlertDialogActivity.this);

                dialog.setTitle("处理中。。。");

                dialog.setMessage("请稍后。。。");

                dialog.show();

            }

        });

    }

}
AlertDialogActivity
<?xml version="1.0" encoding="utf-8"?>

<LinearLayout xmlns:android="http://schemas.android.com/apk/res/android"

    xmlns:tools="http://schemas.android.com/tools"

    android:layout_width="match_parent"

    android:layout_height="match_parent"

    android:orientation="vertical"

    tools:context=".AlertDialogActivity" >

    <Button

        android:id="@+id/button1"

        android:layout_width="wrap_content"

        android:layout_height="wrap_content"

        android:text="@string/alert_button1" />

    <Button

        android:id="@+id/button2"

        android:layout_width="wrap_content"

        android:layout_height="wrap_content"

        android:text="@string/alert_button2" />

    <Button

        android:id="@+id/button3"

        android:layout_width="wrap_content"

        android:layout_height="wrap_content"

        android:text="@string/alert_button3" />

    <Button

        android:id="@+id/button4"

        android:layout_width="wrap_content"

        android:layout_height="wrap_content"

        android:text="@string/alert_button4" />

</LinearLayout>
alertdialog.xml
<?xml version="1.0" encoding="utf-8"?>

<LinearLayout

    xmlns:android="http://schemas.android.com/apk/res/android"

    android:layout_width="fill_parent"

    android:layout_height="fill_parent"

    android:orientation="vertical"

    >

    <TextView

        android:id="@+id/username_text"

        android:layout_width="wrap_content"

        android:layout_height="wrap_content"

        android:layout_marginLeft="20dip"

        android:layout_marginRight="20dip"

        android:text="输 入 用 户 名"

        android:textAppearance="?android:attr/textAppearanceMedium"/>

    <EditText

        android:id="@+id/username_value"

        android:layout_width="fill_parent"

        android:layout_height="wrap_content"

        android:text=""

        android:capitalize="none"

        android:layout_marginLeft="20dip"

        android:layout_marginRight="20dip"

        android:textAppearance="?android:attr/textAppearanceMedium"/>

    <TextView

        android:id="@+id/password_text"

        android:layout_width="wrap_content"

        android:layout_height="wrap_content"

        android:text="输 入 你 密 码"

        android:layout_marginLeft="20dip"

        android:layout_marginRight="20dip"

        android:textAppearance="?android:attr/textAppearanceMedium"/>

    <EditText

        android:id="@+id/password_value"

        android:layout_width="fill_parent"

        android:layout_height="wrap_content"

        android:text=""

        android:password="true"

        android:layout_marginLeft="20dip"

        android:layout_marginRight="20dip"

        android:textAppearance="?android:attr/textAppearanceMedium"/>

</LinearLayout>
alertdialog_text_entry.xml
4,看到了吧,我每新加一个activity就要去更改一下androidmainifest.xml。为什么不创建一个主界面了,然后由主界面去到各个小界面?所以,我们就创建一个叫MainActivity的组,该组件就两个button按钮,两个Activity之间的通讯靠的就是android.content.Intent,所以,当单击的时候,我们新建这个Intent,举个例子
spinner.setOnClickListener(new View.OnClickListener() {

                public void onClick(View v) {

                    Intent intent=new Intent();

                    intent.setClass(MainActivity.this, SpinnerActivity.class);

                    startActivity(intent);

                }

            });
click_Intent
新建main.xml至res/layout下面
<?xml version="1.0" encoding="utf-8"?>

<LinearLayout xmlns:android="http://schemas.android.com/apk/res/android"

    android:layout_width="match_parent"

    android:layout_height="match_parent"

    android:orientation="vertical" >

    <ScrollView

        android:id="@+id/scrollView1"

        android:layout_width="match_parent"

        android:layout_height="match_parent" >

        <LinearLayout

            android:layout_width="match_parent"

            android:layout_height="match_parent"

            android:orientation="vertical" >

            <LinearLayout

                android:layout_width="match_parent"

                android:layout_height="wrap_content"

                android:layout_weight="17.10"

                android:orientation="vertical" >

                <Button

                    android:id="@+id/spinner"

                    android:layout_width="wrap_content"

                    android:layout_height="wrap_content"

                    android:text="@string/spinner" />

                <Button

                    android:id="@+id/alertDialog"

                    android:layout_width="wrap_content"

                    android:layout_height="wrap_content"

                    android:text="@string/alertDialog" />

            </LinearLayout>

        </LinearLayout>

    </ScrollView>

</LinearLayout>
main.xml
由于在main.xml中使用了两个变量,所以在string.xml又加上两个变量:
<string name="spinner">Spinner下拉框</string>

<string name="alertDialog">4种AlertDialog</string>
variable
最后就是更改AndroidManifest.xml,将首次更改为.MainActivity,并且还将原来的那两个加上去
        <activity android:name=".SpinnerActivity"/>

        <activity android:name=".AlertDialogActivity"></activity>
如此一来,再附上完整的MainActivity源码,就可以运行了。
package com.vanceinfo.android;

import android.app.Activity;

import android.content.Intent;

import android.os.Bundle;

import android.view.View;

import android.widget.Button;

public class MainActivity extends Activity {

    private Button spinner;

    private Button alertDialog;

    /* (non-Javadoc)

     * @see android.app.Activity#onCreate(android.os.Bundle)

     */

    @Override

    protected void onCreate(Bundle savedInstanceState) {

        super.onCreate(savedInstanceState);

        setContentView(R.layout.main);

        spinner=(Button)findViewById(R.id.spinner);

        alertDialog=(Button)findViewById(R.id.alertDialog);

         spinner.setOnClickListener(new View.OnClickListener() {

                public void onClick(View v) {

                    Intent intent=new Intent();

                    intent.setClass(MainActivity.this, SpinnerActivity.class);

                    startActivity(intent);

                }

            });

         alertDialog.setOnClickListener(new View.OnClickListener() {

                public void onClick(View v) {

                    Intent intent=new Intent();

                    intent.setClass(MainActivity.this, AlertDialogActivity.class);

                    startActivity(intent);

                }

            });

    }

}
MainActivity
最终运行图应该像下面这样子
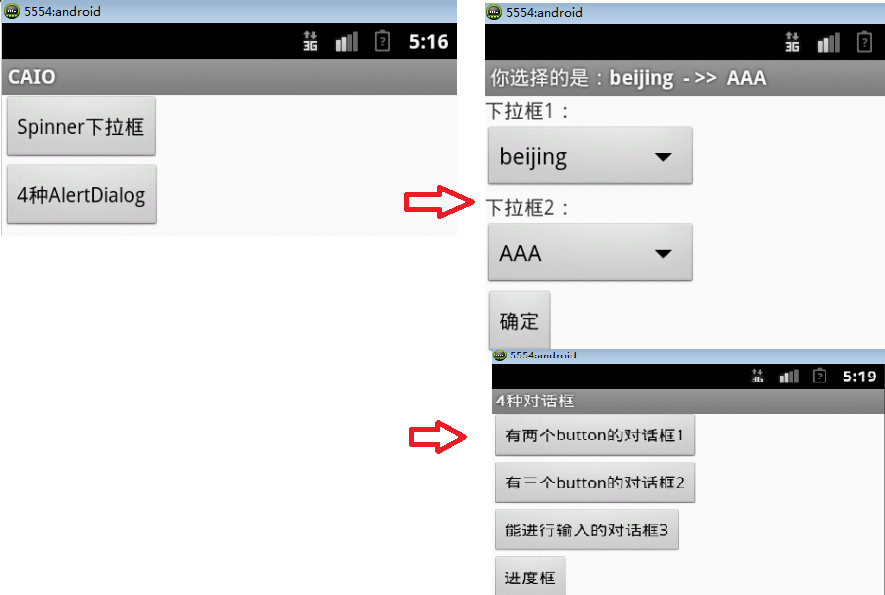
5,以上,关于如何实现这个项目,大部分就是按照这个套路来完成的。再写也是一些复制粘贴源码,还不如直接上传我的源码在这里。由于源码里面注释都很多,推荐下载这份源码以学习Android组件开发。
Java系列--第三篇 基于Maven的Android开发CAIO的更多相关文章
- Java系列--第七篇 基于Maven的Android开发实战项目
本篇是基于<Android应用案例开发大全,吴亚峰等著>的项目开发实例源码,其中有些图片,我做了一些修改,用于个人学习,请勿用于商业. 1, 日程管理专家 mvn archetype:ge ...
- Java系列--第二篇 基于Maven的Android开发HelloAndroidWorld
曾经写过一篇Android环境配置的随笔,个人感觉特繁琐,既然有Maven,何不尝试用用Maven呢,经网上搜索这篇文章但不限于这些,而做了一个基于Maven的Android版的Hello Andro ...
- Java系列--第八篇 基于Maven的SSME之定时邮件发送
关于ssme这个我的小示例项目,想做到麻雀虽小,五脏俱全,看到很多一些web都有定时发送邮件的功能,想我ssme也加入一下这种功能,经查询相关文档,发现spring本身自带了一个调度器quartz,下 ...
- Java系列--第五篇 基于Maven的SSME之Token及Parameterized单元测试
本来在第四篇要说完的,但是写着写着,我觉得内容有点多起来了,所以就另开这篇,在这里专门讲述Token的定义,JSP自定义标签以及如何用Parameterized的来做单元测试. 1,新建包com.va ...
- Java系列--第四篇 基于Maven的SSME之发送邮件
在系列第一篇中,使用的是mybatis得到了一个小小的项目,而该项目的用户对象是有邮件地址的,如果按照邮件地址给对方去一封邮件会不会更能体现针对性呢,所以,我在这篇准备加入发送邮件的功能,利用的就是s ...
- Java系列--第六篇 基于Maven的SSME之多国语言实现
如果你的网站足够强大,以致冲出了国门,走向了国际的话,你就需要考虑做多国语言了,不过,未雨绸缪,向来是我辈程序人员的优秀品质,谁知道那天,我们的网站被国外大公司看中收购,从而飞上枝头变凤凰.不扯这么多 ...
- javascript面向对象系列第三篇——实现继承的3种形式
× 目录 [1]原型继承 [2]伪类继承 [3]组合继承 前面的话 学习如何创建对象是理解面向对象编程的第一步,第二步是理解继承.本文是javascript面向对象系列第三篇——实现继承的3种形式 [ ...
- .net基础学java系列(三)徘徊反思
.net基础学java系列(三)徘徊反思 上一篇文章:.net基础学java系列(二)IDE 之 插件 这两天晚上看完了IDEA的教学视频:https://edu.51cto.com/course/1 ...
- Socket-IO 系列(三)基于 NIO 的同步非阻塞式编程
Socket-IO 系列(三)基于 NIO 的同步非阻塞式编程 缓冲区(Buffer) 用于存储数据 通道(Channel) 用于传输数据 多路复用器(Selector) 用于轮询 Channel 状 ...
随机推荐
- 深度围观block:第三集
深度围观block:第三集 发布于:2013-07-12 10:09阅读数:7804 本文是深度围观block的第三篇文章,也是最后一篇.希望读者阅读了之后,对block有更加深入的理解,同时也希望之 ...
- codevs 3223 素数密度
题目描述 Description 给定区间[L, R](L <= R <= 2147483647,R-L <= 1000000),请计算区间中素数的个数. 输入描述 Input De ...
- Windows下python安装matplotlib
此文为转载,原文地址为:http://blog.csdn.net/u010585135/article/details/42127273 一.下载matplotlib安装包:网址http://matp ...
- UNIX网络进程间通信漫谈(1)
进程间通信 IPC是进程间通信的简称,指的是运行在某个操作系统上的不同进程间各种消息传递方式,在Unix操作系统过去30年的演变史中,消息传递经历了如下几个阶段: 管道,管道是第一个广泛使用的IPC形 ...
- Android实现三级联动下拉框 下拉列表spinner
Android实现(省.市.县)三级联动下拉框 下拉列表spinner 转载请注明出处: http://www.goteny.com/articles/2013/11/46.html http://w ...
- Android 之形状Drawable
形状Drawable资源允许使用 <shape>标记指定基本形状的尺寸.背景.轮廓线,从而定义这些基本形状. 每个形状都包含一个类型(通过shape属性指定).定义该形状尺寸的属性,以及指 ...
- [LeetCode 109] - 将已排序链表转换为二叉搜索树 (Convert Sorted List to Binary Search Tree)
问题 给出一个元素以递增序列排序的单链表,将其转换为一棵高度平衡的二叉搜索树. 初始思路 二叉搜索树高度平衡,意味着左右子树的高度要平衡.根据二叉树左子树节点小于根节点,右子树节点大于根节点的性质:我 ...
- 创建.NET应用程序所经历的步骤
1.使用某种.NET兼容语言(如C#)编写应用程序.2.把代码编译为(CIL),存储在程序集中.3.在执行代码时(如果这是一个可执行文件,就自动运行,或者在其他代码使用它时运行),首先必须使用JIT( ...
- I2C的读写操作实验
[实验任务] 利用24C08断电以后存储的数据不消失的特点,可以做一个断电保护装置.首先利用单片机做一个0-99秒的自动计时器.然后随机关断电源,在 通电以后计时器接着断电前的状态继续计时. [实 ...
- bzoj3995[SDOI2015]道路修建
http://www.lydsy.com/JudgeOnline/problem.php?id=3995 线段树维护连通性. 我们发现,对于一个区间[L,R],我们只需要知道(1,L),(2,L),( ...