
菜鸟入门【ASP.NET Core】14:MVC开发:UI、 EF + Identity实现、注册实现、登陆实现
前言
之前我们进行了MVC的web页面的Cookie-based认证实现,接下来的开发我们要基于之前的MvcCookieAuthSample项目做修改。
MvcCookieAuthSample项目地址:http://www.cnblogs.com/wyt007/p/8128186.html
UI
我们首先在AccountController中添加两个Action

        public IActionResult Register()
     {

        return View();
        }

        public IActionResult Login()

        {

            return View();

        }
然后在Views文件夹下新增Account文件夹并新增Register.cshtml与Login.cshtml视图,样式我们尽量从上一节的Identity视图中拷贝过来。
我们还需要新建一个ViewModels,在ViewModels中新建RegisterViewModel.cs来接收表单提交的值以及来进行强类型视图
namespace MvcCookieAuthSample.ViewModels

{

    public class RegisterViewModel

    {

        //邮箱

        public string Email { get; set; }

        //密码

        public string Password { get; set; }

        //确认密码

        public string ConfirmedPassword { get; set; }

    }

}
Register.cshtml代码(只保留部分拷贝过来的内容,并加入强类型视图引用):
@{
ViewData["Title"] = "Register";
}
@using MvcCookieAuthSample.ViewModels;
@model RegisterViewModel;
<h2>@ViewData["Title"]</h2>
<h3>@ViewData["Message"]</h3>
<div class="row">
<div class="col-md-4">
<form method="post">
<h4>Create a new account.</h4>
<hr />
<div class="form-group">
<label asp-for="Email"></label>
<input asp-for="Email" class="form-control" />
</div>
<div class="form-group">
<label asp-for="Password"></label>
<input asp-for="Password" class="form-control" />
</div>
<div class="form-group">
<label asp-for="ConfirmedPassword"></label>
<input asp-for="ConfirmedPassword" class="form-control" />
</div>
<button type="submit" class="btn btn-default">Register</button>
</form>
</div>
</div>
Login.cshtml代码(只保留部分拷贝过来的内容,并加入强类型视图引用):
@{
ViewData["Title"] = "Login";
}
@using MvcCookieAuthSample.ViewModels;
@model RegisterViewModel;
<div class="row">
<div class="col-md-4">
<section>
<form method="post">
<h4>Use a local account to log in.</h4>
<hr />
<div class="form-group">
<label asp-for="Email"></label>
<input asp-for="Email" class="form-control" />
</div>
<div class="form-group">
<label asp-for="Password"></label>
<input asp-for="Password" type="password" class="form-control" />
</div>
<div class="form-group">
<button type="submit" class="btn btn-default">Log in</button>
</div>
</form>
</section>
</div>
</div>
然后在_Layout.cshtml中添加导航代码:
<ul class="nav navbar-nav navbar-right">

    <li><a asp-area="" asp-controller="Account" asp-action="Register">Register</a></li>

    <li><a asp-area="" asp-controller="Account" asp-action="Login">Log in</a></li>

</ul>
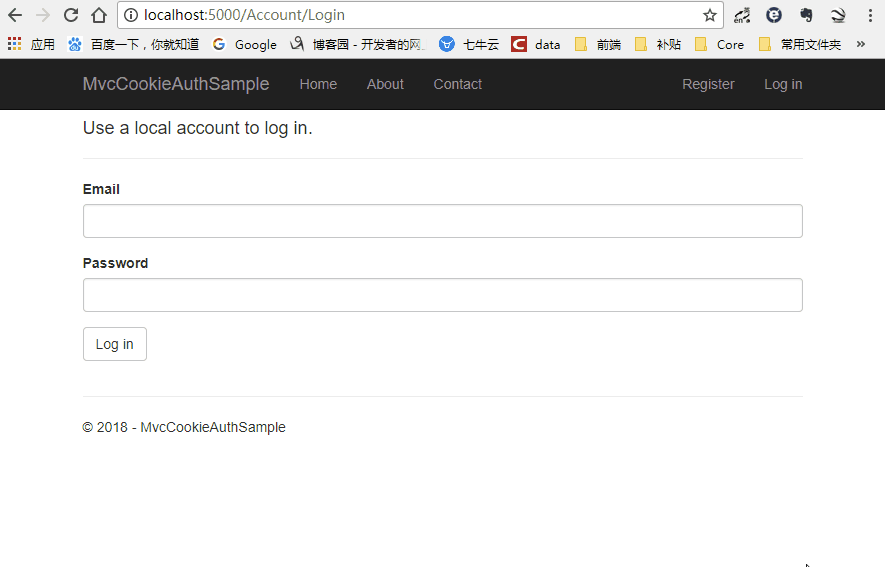
然后运行网站,UI已经实现
EF + Identity实现
EF实现
首先我们添加一个Data文件夹,由于VSCode的代码提示不是很好,接下来我们用VS2017开发。
我们首先在Models文件夹下面新建ApplicationUser.cs与ApplicationUserRole.cs
ApplicationUser.cs代码:
using Microsoft.AspNetCore.Identity;

namespace MvcCookieAuthSample.Models

{

    public class ApplicationUser:IdentityUser<int>//不加int的话是默认主键为guid

    {

    }

}
ApplicationUserRole.cs代码:
using Microsoft.AspNetCore.Identity;

namespace MvcCookieAuthSample.Models

{

    public class ApplicationUserRole: IdentityRole<int>//不加int的话是默认主键为guid

    {

    }

}
然后在Data文件夹下新建一个ApplicationDbContext.cs类,使它继承IdentityDbContext
using Microsoft.AspNetCore.Identity.EntityFrameworkCore;

using Microsoft.EntityFrameworkCore;

using MvcCookieAuthSample.Models;

namespace MvcCookieAuthSample.Data

{

    public class ApplicationDbContext:IdentityDbContext<ApplicationUser, ApplicationUserRole,int>

    {

        public ApplicationDbContext(DbContextOptions<ApplicationDbContext> options):base(options)

        {

        }

    }

}
然后我们需要在Startup.cs添加EF的注册进来
//使用配置ApplicationDbContext使用sqlserver数据库,并配置数据库连接字符串

services.AddDbContext<ApplicationDbContext>(options=> {

    options.UseSqlServer(Configuration.GetConnectionString("DefaultConnection"));

});
然后我们需要在appsettings.json中配置数据库连接字符串
"ConnectionStrings": {

  "DefaultConnection": "Server=192.168.1.184;Database=aspnet-IdentitySample-9A22BB3E-8D53-4F44-B533-2EF927C959DE;Trusted_Connection=True;MultipleActiveResultSets=true;uid=sa;pwd=123456"

}
EF实现结束
Identity实现
我们需要在Startup.cs添加Identity的注册进来
//配置Identity

services.AddIdentity<ApplicationUser, ApplicationUserRole>()

    .AddEntityFrameworkStores<ApplicationDbContext>()

    .AddDefaultTokenProviders();
由于默认的Identity在密码上限制比较严格,我们把它改的宽松简单一点(不设置也行)
//修改Identity配置

services.Configure<IdentityOptions>(options =>

{

    options.Password.RequireLowercase = false;//需要小写

    options.Password.RequireNonAlphanumeric = false;//需要字母

    options.Password.RequireUppercase = false;//需要大写

});
然后我们把认证的地址改成/Account/Login

然后我们修改AccountController,加入以下代码
private UserManager<ApplicationUser> _userManager;//创建用户的

private SignInManager<ApplicationUser> _signInManager;//用来登录的

//依赖注入

public AccountController(UserManager<ApplicationUser> userManager, SignInManager<ApplicationUser> signInManager)

{

    _userManager = userManager;

    _signInManager = signInManager;

}

[HttpPost]

public async Task<IActionResult> Register(RegisterViewModel registerViewModel)

{

    var identityUser = new ApplicationUser

    {

        Email = registerViewModel.Email,

        UserName = registerViewModel.Email,

        NormalizedUserName = registerViewModel.Email

    };

    var identityResult=await _userManager.CreateAsync(identityUser, registerViewModel.Password);

    if (identityResult.Succeeded)

    {

        return RedirectToAction("Index", "Home");

    }

    return View();

}
完整的AccountController
using System;
using System.Collections.Generic;
using System.Diagnostics;
using System.Linq;
using System.Threading.Tasks;
using Microsoft.AspNetCore.Mvc;
using MvcCookieAuthSample.Models;
using Microsoft.AspNetCore.Authorization;
using Microsoft.AspNetCore.Authentication;
using Microsoft.AspNetCore.Authentication.Cookies;
using System.Security.Claims;
using MvcCookieAuthSample.ViewModels;
using Microsoft.AspNetCore.Identity;
namespace MvcCookieAuthSample.Controllers
{
public class AccountController : Controller
{
private UserManager<ApplicationUser> _userManager;//创建用户的
private SignInManager<ApplicationUser> _signInManager;//用来登录的
//依赖注入
public AccountController(UserManager<ApplicationUser> userManager, SignInManager<ApplicationUser> signInManager)
{
_userManager = userManager;
_signInManager = signInManager;
}
public IActionResult Register()
{
return View();
}
[HttpPost]
public async Task<IActionResult> Register(RegisterViewModel registerViewModel)
{
var identityUser = new ApplicationUser
{
Email = registerViewModel.Email,
UserName = registerViewModel.Email,
NormalizedUserName = registerViewModel.Email
};
var identityResult=await _userManager.CreateAsync(identityUser, registerViewModel.Password);
if (identityResult.Succeeded)
{
return RedirectToAction("Index", "Home");
}
return View();
}
public IActionResult Login()
{
return View();
}
//登陆
public IActionResult MakeLogin()
{
var claims=new List<Claim>(){
new Claim(ClaimTypes.Name,"wyt"),
new Claim(ClaimTypes.Role,"admin")
};
var claimIdentity= new ClaimsIdentity(claims,CookieAuthenticationDefaults.AuthenticationScheme);
HttpContext.SignInAsync(CookieAuthenticationDefaults.AuthenticationScheme,new ClaimsPrincipal(claimIdentity));
return Ok();
}
//登出
public IActionResult Logout()
{
HttpContext.SignOutAsync(CookieAuthenticationDefaults.AuthenticationScheme);
return Ok();
}
}
}
接下来我们重新生成一下,我们需要执行shell命令生成一下数据库,只有添加 Microsoft.EntityFrameworkCore.Tools 才会生成成功,否则会报以下错误

执行命令总是提示 未找到与命令“dotnet-ef”匹配的可执行文件,根据网上的解决办法引用 Microsoft.EntityFrameworkCore.Tools 问题依旧不能得到解决。
解决办法:
右击项目弹出菜单点击编辑***.csprog,增加如下配置。
<ItemGroup>

    <DotNetCliToolReference Include="Microsoft.EntityFrameworkCore.Tools.DotNet" Version="2.0.0" />

</ItemGroup>
执行增加配置命令后

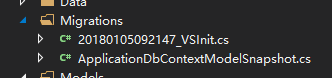
这时候Data文件夹下已经有新增的数据库更新配置文件了
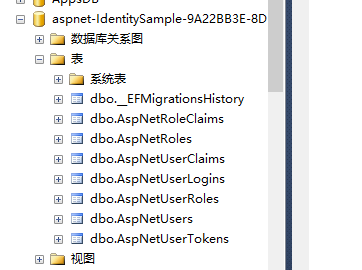
然后我们执行更新命令,执行成功后我们就可以看到数据库表已经生成了
接下来我们运行一下网站进行注册,注册成功,已经存储进数据库

注册实现
前面虽然可以注册了,但是我们注册完成后并没有生成Cookies信息。所以我们要在Register方法中进行登陆生成Cookies
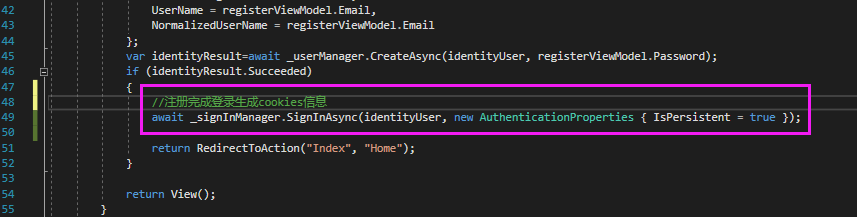
完整的注册方法如下:
[HttpPost]
public async Task<IActionResult> Register(RegisterViewModel registerViewModel)
{
var identityUser = new ApplicationUser
{
Email = registerViewModel.Email,
UserName = registerViewModel.Email,
NormalizedUserName = registerViewModel.Email
};
var identityResult=await _userManager.CreateAsync(identityUser, registerViewModel.Password);
if (identityResult.Succeeded)
{
//注册完成登录生成cookies信息
await _signInManager.SignInAsync(identityUser, new AuthenticationProperties { IsPersistent = true });
return RedirectToAction("Index", "Home");
}
return View();
}
一般来说,如果用户已经注册或者登陆了,注册和登陆按钮是要隐藏的,所以我们接下来要修改_Layout.cshtml视图页面判断注册/登陆按钮是否应该隐藏
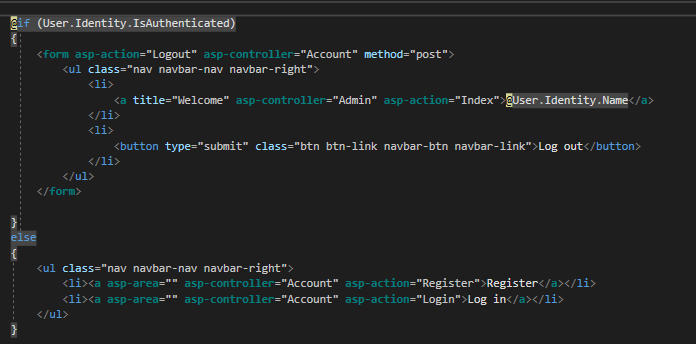
完整的_Layout.cshtml代码:
<!DOCTYPE html>
<html>
<head>
<meta charset="utf-8" />
<meta name="viewport" content="width=device-width, initial-scale=1.0" />
<title>@ViewData["Title"] - MvcCookieAuthSample</title>
<environment include="Development">
<link rel="stylesheet" href="~/lib/bootstrap/dist/css/bootstrap.css" />
<link rel="stylesheet" href="~/css/site.css" />
</environment>
<environment exclude="Development">
<link rel="stylesheet" href="https://ajax.aspnetcdn.com/ajax/bootstrap/3.3.7/css/bootstrap.min.css"
asp-fallback-href="~/lib/bootstrap/dist/css/bootstrap.min.css"
asp-fallback-test-class="sr-only" asp-fallback-test-property="position" asp-fallback-test-value="absolute" />
<link rel="stylesheet" href="~/css/site.min.css" asp-append-version="true" />
</environment>
</head>
<body>
<nav class="navbar navbar-inverse navbar-fixed-top">
<div class="container">
<div class="navbar-header">
<button type="button" class="navbar-toggle" data-toggle="collapse" data-target=".navbar-collapse">
<span class="sr-only">Toggle navigation</span>
<span class="icon-bar"></span>
<span class="icon-bar"></span>
<span class="icon-bar"></span>
</button>
<a asp-area="" asp-controller="Home" asp-action="Index" class="navbar-brand">MvcCookieAuthSample</a>
</div>
<div class="navbar-collapse collapse">
<ul class="nav navbar-nav">
<li><a asp-area="" asp-controller="Home" asp-action="Index">Home</a></li>
<li><a asp-area="" asp-controller="Home" asp-action="About">About</a></li>
<li><a asp-area="" asp-controller="Home" asp-action="Contact">Contact</a></li>
</ul>
@if (User.Identity.IsAuthenticated)
{
<form asp-action="Logout" asp-controller="Account" method="post">
<ul class="nav navbar-nav navbar-right">
<li>
<a title="Welcome" asp-controller="Admin" asp-action="Index">@User.Identity.Name</a>
</li>
<li>
<button type="submit" class="btn btn-link navbar-btn navbar-link">Log out</button>
</li>
</ul>
</form>
}
else
{
<ul class="nav navbar-nav navbar-right">
<li><a asp-area="" asp-controller="Account" asp-action="Register">Register</a></li>
<li><a asp-area="" asp-controller="Account" asp-action="Login">Log in</a></li>
</ul>
}
</div>
</div>
</nav>
<div class="container body-content">
@RenderBody()
<hr />
<footer>
<p>© 2018 - MvcCookieAuthSample</p>
</footer>
</div>
<environment include="Development">
<script src="~/lib/jquery/dist/jquery.js"></script>
<script src="~/lib/bootstrap/dist/js/bootstrap.js"></script>
<script src="~/js/site.js" asp-append-version="true"></script>
</environment>
<environment exclude="Development">
<script src="https://ajax.aspnetcdn.com/ajax/jquery/jquery-2.2.0.min.js"
asp-fallback-src="~/lib/jquery/dist/jquery.min.js"
asp-fallback-test="window.jQuery"
crossorigin="anonymous"
integrity="sha384-K+ctZQ+LL8q6tP7I94W+qzQsfRV2a+AfHIi9k8z8l9ggpc8X+Ytst4yBo/hH+8Fk">
</script>
<script src="https://ajax.aspnetcdn.com/ajax/bootstrap/3.3.7/bootstrap.min.js"
asp-fallback-src="~/lib/bootstrap/dist/js/bootstrap.min.js"
asp-fallback-test="window.jQuery && window.jQuery.fn && window.jQuery.fn.modal"
crossorigin="anonymous"
integrity="sha384-Tc5IQib027qvyjSMfHjOMaLkfuWVxZxUPnCJA7l2mCWNIpG9mGCD8wGNIcPD7Txa">
</script>
<script src="~/js/site.min.js" asp-append-version="true"></script>
</environment>
@RenderSection("Scripts", required: false)
</body>
</html>
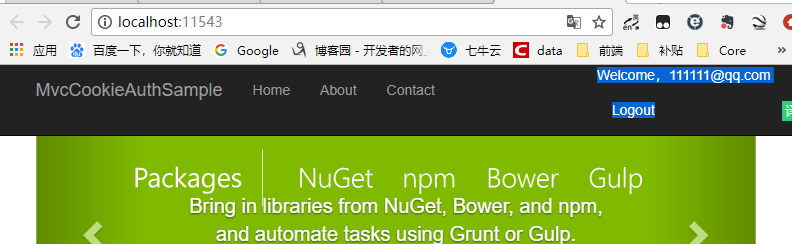
这时候登陆的之后的导航栏信息就有了
登陆实现
我们接下来实现一下登陆逻辑,我们首先新建一个HttpPost的Login的Action
[HttpPost]

public async Task<IActionResult> Login(RegisterViewModel loginViewModel)

{

    var user= await _userManager.FindByEmailAsync(loginViewModel.Email);

    if (user==null)

    {

        //异常先不写,后期统一收集

    }

    //账号密码先不做验证,需要可以自己写

    await _signInManager.SignInAsync(user, new AuthenticationProperties { IsPersistent = true });

    return RedirectToAction("Index", "Home");

}
然后我们把原来的Logout也顺便修改一下,不能是return OK();而要跳转到首页
//登出

public async Task<IActionResult> Logout()

{

    //HttpContext.SignOutAsync(CookieAuthenticationDefaults.AuthenticationScheme);

    //return Ok();

    await _signInManager.SignOutAsync();

    return RedirectToAction("Index", "Home");

}
接下来我们修改一下Login.cshtml页面
@{
ViewData["Title"] = "Login";
}
@using MvcCookieAuthSample.ViewModels;
@model RegisterViewModel;
<div class="row">
<div class="col-md-4">
<section>
<form method="post" asp-controller="Account" asp-action="Login">
<h4>Use a local account to log in.</h4>
<hr />
<div class="form-group">
<label asp-for="Email"></label>
<input asp-for="Email" class="form-control" />
</div>
<div class="form-group">
<label asp-for="Password"></label>
<input asp-for="Password" type="password" class="form-control" />
</div>
<div class="form-group">
<button type="submit" class="btn btn-default">Log in</button>
</div>
</form>
</section>
</div>
</div>
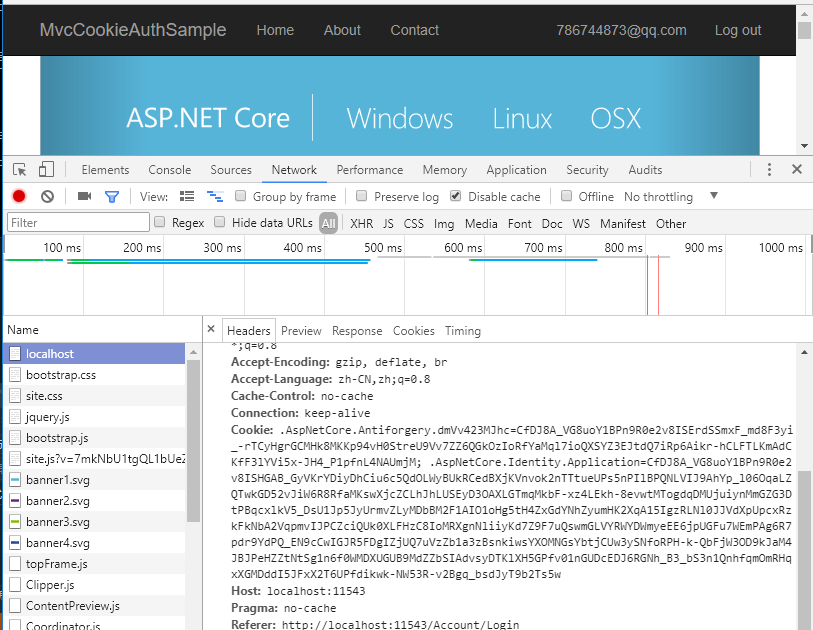
接下来我们可以运行一下登陆注册,即可成功登陆后跳转到首页,注册后跳转倒是首页
菜鸟入门【ASP.NET Core】14:MVC开发:UI、 EF + Identity实现、注册实现、登陆实现的更多相关文章
- 基于ASP.NET core的MVC站点开发笔记 0x01
基于ASP.NET core的MVC站点开发笔记 0x01 我的环境 OS type:mac Software:vscode Dotnet core version:2.0/3.1 dotnet sd ...
- Asp.net Core基于MVC框架实现PostgreSQL操作
简单介绍 Asp.net Core最大的价值在于跨平台.跨平台.跨平台.重要的事情说三遍.但是目前毕竟是在开发初期,虽然推出了1.0.0 正式版,但是其实好多功能还没有完善.比方说编译时的一些文件编码 ...
- .NET Core实战项目之CMS 第二章 入门篇-快速入门ASP.NET Core看这篇就够了
作者:依乐祝 原文链接:https://www.cnblogs.com/yilezhu/p/9985451.html 本来这篇只是想简单介绍下ASP.NET Core MVC项目的(毕竟要照顾到很多新 ...
- 基于 Vue.js 之 iView UI 框架非工程化实践记要 使用 Newtonsoft.Json 操作 JSON 字符串 基于.net core实现项目自动编译、并生成nuget包 webpack + vue 在dev和production模式下的小小区别 这样入门asp.net core 之 静态文件 这样入门asp.net core,如何
基于 Vue.js 之 iView UI 框架非工程化实践记要 像我们平日里做惯了 Java 或者 .NET 这种后端程序员,对于前端的认识还常常停留在 jQuery 时代,包括其插件在需要时就引 ...
- net core体系-web应用程序-4asp.net core2.0 项目实战(CMS)-第二章 入门篇-快速入门ASP.NET Core看这篇就够了
.NET Core实战项目之CMS 第二章 入门篇-快速入门ASP.NET Core看这篇就够了 原文链接:https://www.cnblogs.com/yilezhu/p/9985451.ht ...
- ASP.NET Core 1.0 开发记录
官方资料: https://github.com/dotnet/core https://docs.microsoft.com/en-us/aspnet/core https://docs.micro ...
- 解析ASP.NET WebForm和Mvc开发的区别 分类: ASP.NET 2013-12-29 01:59 11738人阅读 评论(5) 收藏
因为以前主要是做WebFrom开发,对MVC开发并没有太深入的了解.自从来到创新工场的新团队后,用的技术都是自己以前没有接触过的,比如:MVC 和EF还有就是WCF,压力一直很大.在很多问题都是不清楚 ...
- ASP.NET Core 配置 MVC - ASP.NET Core 基础教程 - 简单教程,简单编程
原文:ASP.NET Core 配置 MVC - ASP.NET Core 基础教程 - 简单教程,简单编程 ASP.NET Core 配置 MVC 前面几章节中,我们都是基于 ASP.NET 空项目 ...
- ASP.NET Core Web API 开发-RESTful API实现
ASP.NET Core Web API 开发-RESTful API实现 REST 介绍: 符合REST设计风格的Web API称为RESTful API. 具象状态传输(英文:Representa ...
- 解析ASP.NET WebForm和Mvc开发的区别
因为以前主要是做WebFrom开发,对MVC开发并没有太深入的了解.自从来到创新工场的新团队后,用的技术都是自己以前没有接触过的,比如:MVC 和EF还有就是WCF,压力一直很大.在很多问题都是不清楚 ...
随机推荐
- OC中重写set和get方法、懒加载
在写OC程序的时候,在很多时候我们会用到重写set或者get方法,重写这两个方法大多是用于刷新数据,比如懒加载. 意思就是说当你去调用set或者get方法时,系统会去调用重写的get或者set方法,这 ...
- [转] Java 的泛型擦除和运行时泛型信息获取
原文链接 https://my.oschina.net/lifany/blog/875769 前言 现在很多程序员都会在简历中写上精通 Java.但究竟怎样才算是精通 Java 呢?我觉得不仅要熟练掌 ...
- 《HTTP权威指南》2-URL
前言 在一个城市中,所有的东西都有一个标准化的名字,以帮助人们寻找城市中的各种资源,如宁波火车站地铁站,在因特网这座大城市中,URL就是其标准化名称,它指向每一条电子信息,告诉你它们位于何处,以及如何 ...
- CSS常见布局问题整理
实现div的水平居中和垂直居中 多元素水平居中 实现栅格化布局 1. 实现div的水平居中和垂直居中 实现效果: 这大概是最经典的一个题目了,所以放在第一个. 方法有好多, 一一列来 主要思路其实就是 ...
- HttpServlet的转发和重定向
HttpServletResponse重定向 1.HTTP协议规定了一种重定向的机制,重定向的运作流程如下 用户在浏览器输入特定的URL,请求访问服务端的某个组件. 服务端的组件返回一个状态码为302 ...
- 第68节:Java中的MYSQL运用从小白到大牛
第68节:Java中的MYSQL运用从小白到大牛 前言 学习java必备要求,学会运用!!! 常见关系化数据库 BootStrap是轻量级开发响应式页面的框架,全局css组件,js插件.栅格系统是将页 ...
- 爬虫不过如此(python的Re 、Requests、BeautifulSoup 详细篇)
网络爬虫(又被称为网页蜘蛛,网络机器人,在FOAF社区中间,更经常的称为网页追逐者),是一种按照一定的规则,自动地抓取万维网信息的程序或者脚本. 爬虫的本质就是一段自动抓取互联网信息的程序,从网络获取 ...
- python函数学习1
函数1 (1)定义: def 函数名(参数列表) 函数体 (2)参数传递: 在python中,一切都是对象,类型也属于对象,变量是没有类型的. a = [1,2,3] a = "hellow ...
- Anaconda+MINGW+theano+keras安装
前言:这几天算是被这东西困扰的十分难受,博客园和csdn各种逛,找教程,大家说法不一,很多方法也不一定适用,有些方法有待进一步完善.这里我借鉴了许多大神们的方法,以及自己的一些心得,希望对你们有一些帮 ...
- 【shiro】(3)---了解Shiro
了解Shiro 一Apache Shiro作用 Apache Shiro是一个功能强大且易于使用的Java安全框架,可执行身份验证,授权,加密和会话管理,令行应用程序. Shiro提供了应用程序安全A ...