
Solr7.4.0的API(Solrj)操作及项目中的使用
一.SolrJ的概念
solr单机版服务搭建:https://www.cnblogs.com/frankdeng/p/9615253.html
solr集群版服务搭建:https://www.cnblogs.com/frankdeng/p/9597680.html
SolrJ是一个API,它使用Java(或任何基于JVM的语言)编写的应用程序可以轻松地与Solr交谈。SolrJ隐藏了许多连接到Solr的细节,并允许您的应用程序通过简单的高级方法与Solr交互。SolrJ支持大多数Solr API,并且具有高度可配置性。
官方API参考文档: http://lucene.apache.org/solr/guide/7_4/using-solrj.html#using-solrj
这里使用Maven构建项目,请将以下内容放入pom.xml:
<dependency>

  <groupId>org.apache.solr</groupId>

  <artifactId>solr-solrj</artifactId>

  <version>7.4.0</version>

</dependency>
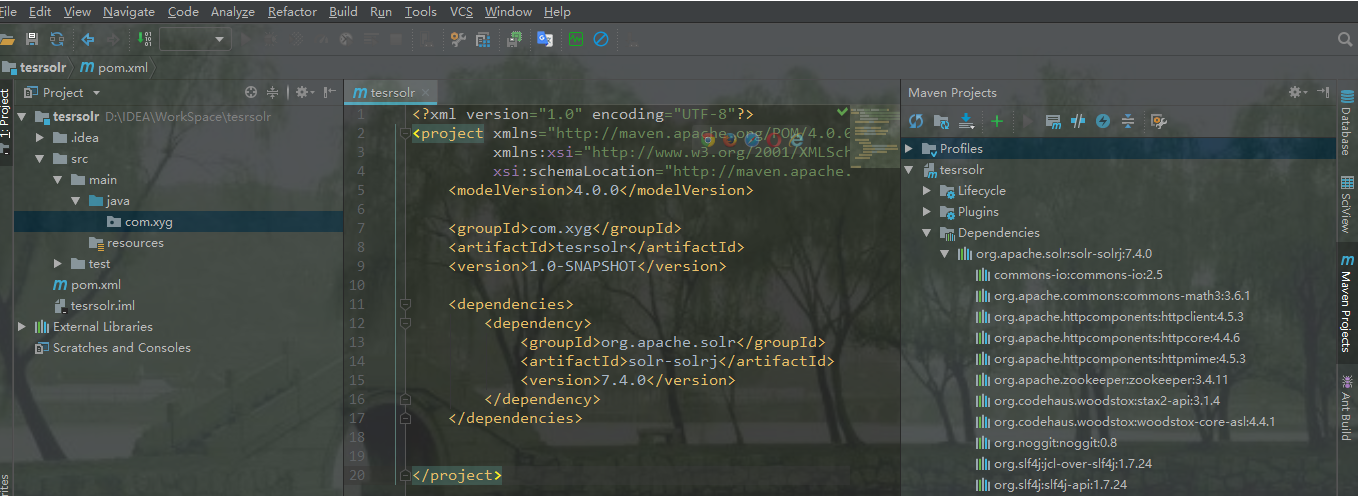
为了方便测试,导入单元测试依赖和日志依赖

<dependency>

   <groupId>junit</groupId>

   <artifactId>junit</artifactId>

   <version>4.12</version>

    <scope>test</scope>

</dependency>
<dependency>
    <groupId>org.slf4j</groupId>
    <artifactId>slf4j-nop</artifactId>
    <version>1.7.25</version>
</dependency>
二.SolrJ的单机连接
SolrClient是一个抽象类,下边有很多被实现的子类,HttpSolrClient - 面向以查询为中心的工作负载,但也是一个很好的通用客户端。直接与单个Solr节点通信。
不同solr版本solrj 的创建方式有所不同
//solr4创建方式

SolrServer solrServer = new HttpSolrServer(solrUrl);
//solr5创建方式,在url中指定core名称:core1
HttpSolrClient solrClient = new HttpSolrClient(solrUrl);
//solr7创建方式,在url中指定core名称:core1
HttpSolrClient solrClient = new HttpSolrClient.Builder(solrUrl).build();
例如:
package com.xyg.solr;

import org.apache.solr.client.solrj.impl.HttpSolrClient;

import org.junit.Test;

/**

 * Author: Mr.Deng

 * Date: 2018/9/10

 * Desc: 测试连接客户端

 */

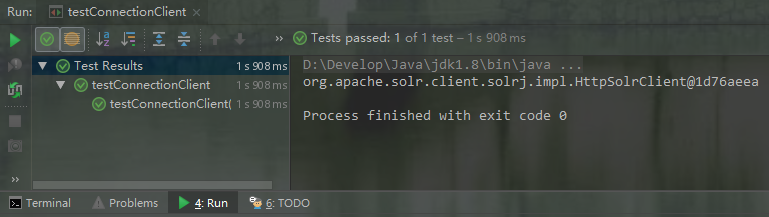
public class testConnectionClient {

    @Test

    public void testConnectionClient(){

        //设置solr客户端url地址

        String solrUrl = "http://node21:8080/solr/new_core";

        //创建solrClient同时指定超时时间,不指定走默认配置

        HttpSolrClient solrClient = new HttpSolrClient.Builder(solrUrl)

                .withConnectionTimeout(10000)

                .withSocketTimeout(60000)

                .build();

        System.out.println(solrClient);

    }

}
三.SolrJ的集群连接
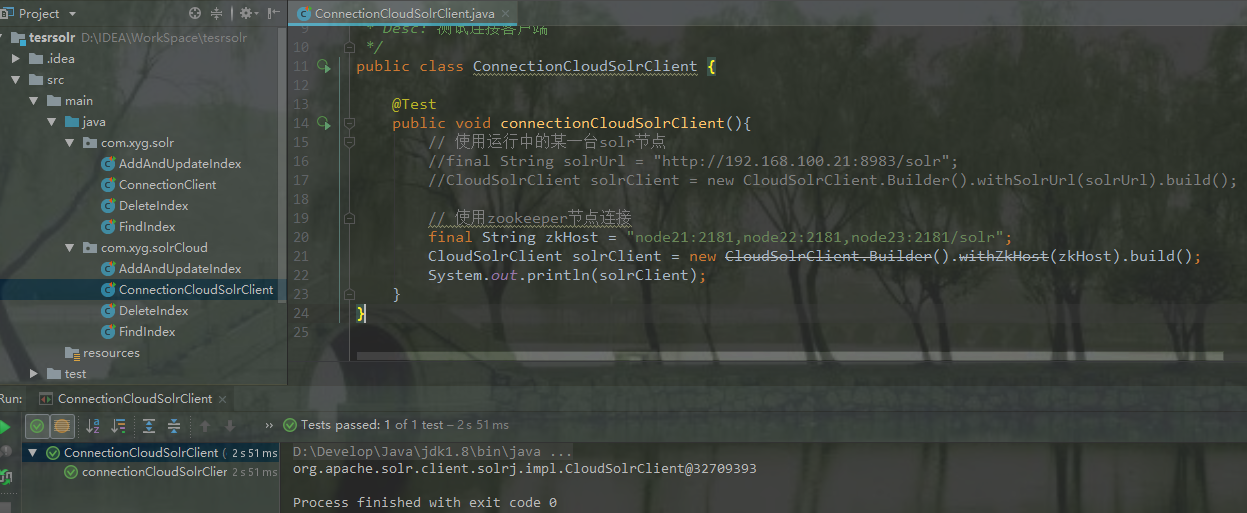
CloudSolrClient - 面向与SolrCloud部署的通信。使用已记录的ZooKeeper状态来发现并将请求路由到健康的Solr节点。
package com.xyg.solrCloud;

import org.apache.solr.client.solrj.impl.CloudSolrClient;

import org.junit.Test;

/**

 * Author: Mr.Deng

 * Date: 2018/9/10

 * Desc: 测试连接客户端

 */

public class ConnectionCloudSolrClient {

    @Test

    public void connectionCloudSolrClient(){

        // 第一种方式:使用运行中的某一台solr节点

        //final String solrUrl = "http://192.168.100.21:8983/solr";

        //CloudSolrClient solrClient = new CloudSolrClient.Builder().withSolrUrl(solrUrl).build();

        // 第二种方式:使用zookeeper节点连接(推荐)

        final String zkHost = "node21:2181,node22:2181,node23:2181/solr";

        CloudSolrClient solrClient = new CloudSolrClient.Builder().withZkHost(zkHost).build();

        System.out.println(solrClient);

    }

}
四.SolrJ的增删改查
这里测试单机版APi操作
1.创建索引
1)指定id单条创建索引
@Test

public void addIndexById() throws IOException, SolrServerException {

    String solrUrl = "http://node21:8080/solr/new_core";

    HttpSolrClient solrClient = new HttpSolrClient.Builder(solrUrl).build();

    //创建索引文档对象

    SolrInputDocument doc = new SolrInputDocument();

    // 第一个参数:域的名称,域的名称必须是在schema.xml中定义的

    // 第二个参数:域的值,注意:id的域不能少

    doc.addField("id","1");

    doc.addField("name","红豆");

    doc.addField("price","1.2");

    //3.将文档写入索引库中

    solrClient.add(doc);

    solrClient.commit();

}
2)批量创建索引
@Test

public void addIndexByListId() throws Exception {

    String solrUrl = "http://node21:8080/solr/new_core";

    HttpSolrClient solrClient = new HttpSolrClient.Builder(solrUrl).build();

    //创建索引文档对象

    SolrInputDocument doc1 = new SolrInputDocument();

    doc1.addField( "id", "2");

    doc1.addField( "name", "绿豆");

    doc1.addField( "price", 1.8 );

    SolrInputDocument doc2 = new SolrInputDocument();

    doc2.addField( "id", "3" );

    doc2.addField( "name", "黑豆" );

    doc2.addField( "price", 2.6 );

    Collection<SolrInputDocument> docs = new ArrayList<SolrInputDocument>();

    docs.add(doc1);

    docs.add(doc2);

    //3.将文档写入索引库中

    solrClient.add(docs);

    solrClient.commit();

}
2.查询索引
1)匹配查询
    @Test

    public void findIndex1() throws IOException, SolrServerException {

        String solrUrl = "http://node21:8080/solr/new_core";

        HttpSolrClient solrClient = new HttpSolrClient.Builder(solrUrl).build();

        // 创建搜索对象

        SolrQuery query = new SolrQuery();

        // 设置搜索条件

        query.set("q","*:*");

        //设置每页显示多少条

        query.setRows(2);

        //发起搜索请求

        QueryResponse response = solrClient.query(query);

        // 查询结果

        SolrDocumentList docs = response.getResults();

        // 查询结果总数

        long cnt = docs.getNumFound();

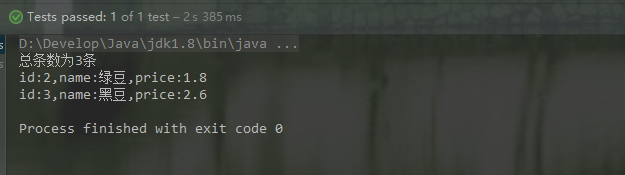
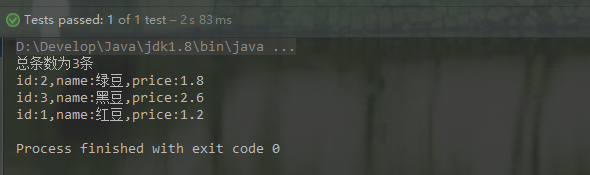
        System.out.println("总条数为"+cnt+"条");

        for (SolrDocument doc : docs) {

          System.out.println("id:"+ doc.get("id") + ",name:"+ doc.get("name") + ",price:"+ doc.get("price"));

        }

        solrClient.close();

    }
2)条件过滤查询
 @Test

    public void findIndex2() throws IOException, SolrServerException {

        String solrUrl = "http://node21:8080/solr/new_core";

        HttpSolrClient solrClient = new HttpSolrClient.Builder(solrUrl).build();

        //2 封装查询参数

        Map<String, String> queryParamMap = new HashMap<String, String>();

        queryParamMap.put("q", "*:*");

        //3 添加到SolrParams对象,SolrParams 有一个 SolrQuery 子类,它提供了一些方法极大地简化了查询操作

        MapSolrParams queryParams = new MapSolrParams(queryParamMap);

        //4 执行查询返回QueryResponse

        QueryResponse response = solrClient.query(queryParams);

        //5 获取doc文档

        SolrDocumentList docs = response.getResults();

        // 查询结果总数

        long cnt = docs.getNumFound();

        System.out.println("总条数为" + cnt + "条");

        //[6]内容遍历

        for (SolrDocument doc : docs) {

            System.out.println("id:" + doc.get("id") + ",name:" + doc.get("name") + ",price:" + doc.get("price"));

        }

        solrClient.close();

    }
3.更新索引
    @Test

    public void updateIndex() throws IOException, SolrServerException {

        String solrUrl = "http://node21:8080/solr/new_core";

        HttpSolrClient solrClient = new HttpSolrClient.Builder(solrUrl).build();

        //创建索引文档对象

        SolrInputDocument doc = new SolrInputDocument();

        //把红豆价格修改为1.5

        doc.addField("id","1");

        doc.addField("name","红豆");

        doc.addField("price","1.5");

        //3.将文档写入索引库中

        solrClient.add(doc);

        solrClient.commit();

        //提交

        solrClient.commit();

    }
4.删除索引
1)单一条件删除
    @Test

    public void deleteIndexById() throws IOException, SolrServerException {

        String solrUrl = "http://node21:8080/solr/new_core";

        HttpSolrClient solrClient = new HttpSolrClient.Builder(solrUrl).build();

        //全删

        //solrClient.deleteByQuery("*:*");

        //模糊匹配删除(带有分词效果的删除)

        solrClient.deleteByQuery("name:红");

        //指定id删除

        //solrClient.deleteById("1");

        solrClient.commit();

    }
2)批量条件删除
    @Test

    public void deleteIndexByListId() throws IOException, SolrServerException {

        String solrUrl = "http://node21:8080/solr/new_core";

        HttpSolrClient solrClient = new HttpSolrClient.Builder(solrUrl).build();

        //通过id删除

        ArrayList<String> ids = new ArrayList<String>();

        ids.add("2");

        ids.add("3");

        solrClient.deleteById(ids);

        //[3]提交

        solrClient.commit();

        //[4]关闭资源

        solrClient.close();

    }
五.代码报错问题
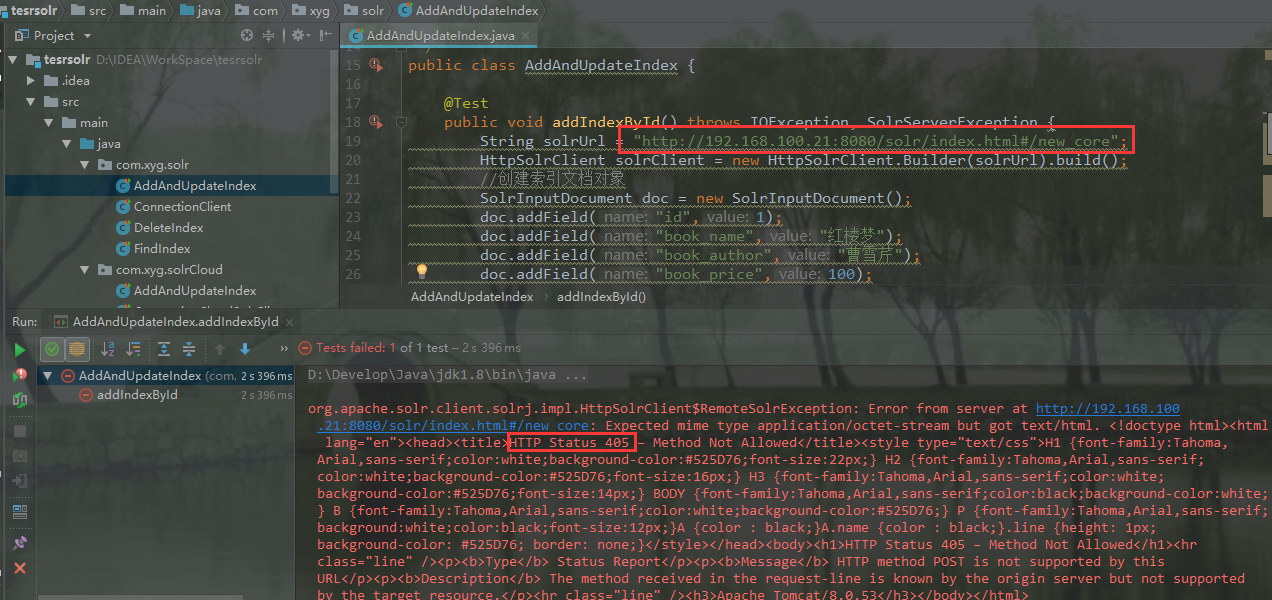
1.代码添加索引报405问题
解决方法:
在使用Tomcat部署Solr后,new_core的地址为:http://node21:8080/solr/#/new_core,但使用SolrJ进行索引的时候,应该使用http://node21:8080/solr/new_core,即无中间的#号。
2.自定义索引字段
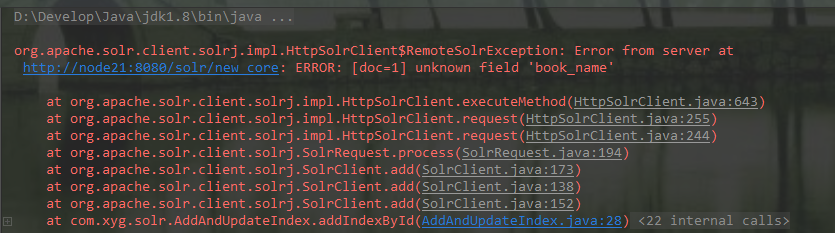
上图报错提示未识别索引字段
参考文档:
https://www.w3cschool.cn/solr_doc/solr_doc-g1az2fmd.html
https://www.cnblogs.com/gaogaoyanjiu/p/7815558.html
https://www.jianshu.com/p/11fb9cfdb2fd
Solr7.4.0的API(Solrj)操作及项目中的使用的更多相关文章
- Android 百度地图开发(一)--- 申请API Key和在项目中显示百度地图
标签: Android百度地图API Key 分类: Android 百度地图开发(2) 最近自己想研究下地图,本来想研究google Map,但是申请API key比较坑爹,于是从百度地 ...
- 【API知识】SpringBoot项目中@EnableXXX的原理
@EnableXX注解的使用场景 SpringBoot为开发人员提供了很多便利,例如如果想要定时功能,只要添加@EnableSchedule,即可配合@Schedule注解实现定时任务功能,不需要额外 ...
- Solr7.4.0的API(Solrj)操作
一.SolrJ的概念 solr单机版服务搭建:https://www.cnblogs.com/frankdeng/p/9615253.html solr集群版服务搭建:https://www.cnbl ...
- 基于 Vue3.0 Composition Api 快速构建实战项目
Quick Start 项目源码:https://github.com/Wscats/vue-cli 本项目综合运用了 Vue3.0 的新特性,适合新手学习
- django之 使用py文件操作django项目中的表
要想在一个另外的py文件中操作django,可以使用如下的代码 import os os.environ.setdefault("DJANGO_SETTINGS_MODULE",' ...
- solr7.1.0学习笔记(10)---Solr发布到Tomcat
版权声明:本文为博主原创文章,未经博主允许不得转载. https://blog.csdn.net/weixin_39082031/article/details/79069554 将solr作为一个单 ...
- (五)solr7.1.0之solrJ的使用
(五)solr7.1.0之solrJ的使用 下面是solr7的官网API介绍: 网页翻译的不是很准确,只能了解个大概,基本能获取如下信息: 一.构建和运行SolrJ应用程序 对于用Maven构建的项目 ...
- solr7.4.0+mysql+solrj(简而优美)
目录: 1 solr7部署+创建核心2 solr mysql 连接 2.1 导入相关 jar包 2.2 配置连接信息 2.3 配置中文分析器3 solrj JAVA客户端应用 3.1 solrj 构建 ...
- 利用SolrJ操作solr API完成index操作
使用SolrJ操作Solr会比利用httpClient来操作Solr要简单.SolrJ是封装了httpClient方法,来操作solr的API的.SolrJ底层还是通过使用httpClient中的方法 ...
随机推荐
- 基于Socket网络编程
版权声明:本文为博主原创文章,未经博主允许不得转载. https://blog.csdn.net/a2011480169/article/details/73602708 博客核心内容: 1.Sock ...
- centos 7下独立的python 2.7环境安装
之前写过python 3.x的独立安装,相对来说比较简单直接安装即可,因为对于系统默认的python版本是2.x,那么安装3.x的时候只需要编译到新的目录即可,所有的模块都不会和之前的2有联系,但是如 ...
- STC单片机 IAP(EEPROM)的使用
STC89C51.52内部都自带有2K字节的EEPROM,54.55和58都自带有16K字节的EEPROM,STC单片机是利用IAP技术实现的EEPROM,内部Flash擦写次数可达100,000 次 ...
- 【PMP】项目浮动的三种时间
自由浮动时间 不影响后续工作最早可以开始时间的前提下,这项工作可以拖延的时间叫做自由浮动时间. 总浮动时间 不影响项目总工期的情况下活动可以拖延的总时间. 项目浮动时间 在已经排好的总工期的基础上,领 ...
- WPF显示图片
1.WPF显示图片内部一部分 <Rectangle Height="> <Rectangle.Fill > <ImageBrush ImageSource=&q ...
- Effective Java 第三版——55. 明智而审慎地返回Optional
Tips 书中的源代码地址:https://github.com/jbloch/effective-java-3e-source-code 注意,书中的有些代码里方法是基于Java 9 API中的,所 ...
- springboot集成redis缓存
1.pom.xml增加redis缓存起步依赖(spring-boot-starter-parent包含许多starter版本) <dependency> <groupId>or ...
- malloc()參数为0的情况
以下的代码片段输出是什么?为什么? char *ptr; ))==NULL) puts("Got a null pointer"); else puts("Got a v ...
- 基于mindwave脑电波进行疲劳检测算法的设计(4)
上一次的实验做到可以从pc端读取到MindWave传输过来的脑电波原始数据了. 我是先定义一个结构体,该结构体对应保存所有能从硬件中取到的原始数据. struct FD_DATA { int batt ...
- Source Insight 中文注释为乱码解决办法(完美解决,一键搞定)
我从网上查了一堆解决办法,但是都是2017年以前的解决方案,并且都是针对于source insight 3.5及以下版本的,目前SI软件版本都到4.0了,应该有新方法出现了. ------------ ...