Android 8.1 关机充电动画(二)Uboot模式
system:Android 8.1
platform:RK3326/PX30
uboot
kernel
Android 8.1 关机充电动画(一)模式选择
Android 8.1 关机充电动画(二)Uboot模式
Android 8.1 关机充电动画(三)Android模式
前言
这部分要涉及到uboot下关机充电动画的定制,属于比较low level的部分,所以代码修改的部分不大,在uboot中主要是对多张图片进行轮播,所以这里的主要工作是定位到相应的代码以及如何定制自己的动画。
相关文档
RK在uboot的开发方面已经给出了文档,
其中已经包括了这部分动画如何打包到rom中,不可避免的是需要重新编译uboot,但是图片会被打包到resource.img中。
相关代码
重新回到代码中u-boot/drivers/power/charge_animation.c
struct charge_image {
const char *name;
int soc;
int period; /* ms */
};
/*
* IF you want to use your own charge images, please:
*
* 1. Update the following 'image[]' to point to your own images;
* 2. You must set the failed image as last one and soc = -1 !!!
*/
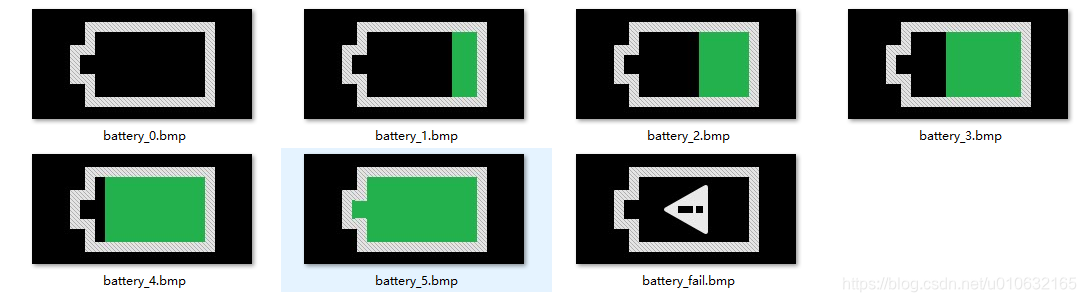
static const struct charge_image image[] = {
{ .name = "battery_0.bmp", .soc = 5, .period = 600 },
{ .name = "battery_1.bmp", .soc = 20, .period = 600 },
{ .name = "battery_2.bmp", .soc = 40, .period = 600 },
{ .name = "battery_3.bmp", .soc = 60, .period = 600 },
{ .name = "battery_4.bmp", .soc = 80, .period = 600 },
{ .name = "battery_5.bmp", .soc = 100, .period = 600 },
{ .name = "battery_fail.bmp", .soc = -1, .period = 1000 },
};
name:文件名soc:图片对应的电量百分比period:图片显示的时间(单位:ms)
那么,这里问题来了,图片如何打包到固件里呢?
- 先找到RK提供的打包用的脚本,u-boot/pack_resource.sh
- 找到需要打包的图片,然后需要修改的直接替换掉,图片采用8bit或24bit bmp格式,图片路径:u-boot/tools/images/,如下图所示:
- 最终就是如何打包图片了:
cd u-boot && ./pack_resource.sh ../kernel/resource.img
执行完以上命令后,终端会输出以下信息,说明打包成功;
Pack ./tools/images/ & resource.img to resource.img ...

Unpacking old image(resource.img):

rk-kernel.dtb battery_1.bmp battery_2.bmp battery_3.bmp battery_4.bmp battery_5.bmp battery_fail.bmp logo.bmp logo_kernel.bmp battery_0.bmp

Pack to resource.img successed!

Packed resources:

rk-kernel.dtb battery_1.bmp battery_2.bmp battery_3.bmp battery_4.bmp battery_5.bmp battery_fail.bmp logo.bmp logo_kernel.bmp battery_0.bmp

resource.img is packed ready
并且会在当前的路径下重新生成resource.img,将这个文件重新烧写到设备的对应分区,就可以把充电动画打包到设备的rom中了。
总结
简单介绍了RK平台上进行关机充电uboot模式下充电动画的定制和打包方法,篇幅较短,也可以参考RK官方的文档,下一篇介绍一下,关机充电Android模式下如何进行充电动画的修改。附录是充电动画显示的主要代码。
附录
下面的代码是函数static int charge_animation_show(struct udevice *dev)中的while(1),这里会一直循环显示充电图片;
	/* Charging ! */

	while (1) {

		/*

		 * At the most time, fuel gauge is usually a i2c device, we

		 * should avoid read/write all the time. We had better set

		 * poll seconds to update fuel gauge info.

		 */

		if (!first_poll_fg && get_timer(delta) < FUEL_GAUGE_POLL_MS)

			goto show_images;

		delta = get_timer(0);

		debug("step1 (%d)... \n", screen_on);

		/*

		 * Most fuel gauge is I2C interface, it shouldn't be interrupted

		 * during tansfer. The power key event depends on interrupt, so

		 * so we should disable local irq when update fuel gauge.

		 */

		local_irq_disable();

		/* Step1: Is charging now ? */

		charging = fuel_gauge_get_chrg_online(fg);

		if (charging <= 0) {

			printf("Not charging, online=%d. Shutdown...\n",

			       charging);

			/* wait uart flush before shutdown */

			mdelay(5);

			/* PMIC shutdown */

			pmic_shutdown(pmic);

			printf("Cpu should never reach here, shutdown failed !\n");

			continue;

		}

		debug("step2 (%d)... show_idx=%d\n", screen_on, show_idx);

		/* Step2: get soc and voltage */

		soc = fuel_gauge_get_soc(fg);

		if (soc < 0 || soc > 100) {

			printf("get soc failed: %d\n", soc);

			continue;

		}

		voltage = fuel_gauge_get_voltage(fg);

		if (voltage < 0) {

			printf("get voltage failed: %d\n", voltage);

			continue;

		}

		current = fuel_gauge_get_current(fg);

		if (current == -ENOSYS) {

			printf("get current failed: %d\n", current);

			continue;

		}

		first_poll_fg = 0;

		local_irq_enable();

show_images:

		/*

		 * Just for debug, otherwise there will be nothing output which

		 * is not good to know what happen.

		 */

		if (!debug_start)

			debug_start = get_timer(0);

		if (get_timer(debug_start) > 20000) {

			debug_start = get_timer(0);

			printf("[%8ld]: soc=%d%%, vol=%dmv, c=%dma, online=%d, screen_on=%d\n",

			       get_timer(0)/1000, soc, voltage,

			       current, charging, screen_on);

		}

		/*

		 * If ever lowpower screen off, force screen_on=false, which

		 * means key event can't modify screen_on, only voltage higher

		 * then threshold can update screen_on=true;

		 */

		if (ever_lowpower_screen_off)

			screen_on = false;

		/*

		 * Auto turn on screen when voltage higher than Vol screen on.

		 * 'ever_lowpower_screen_off' means enter while loop with

		 * screen off.

		 */

		if ((ever_lowpower_screen_off) &&

		    (voltage > pdata->screen_on_voltage)) {

			ever_lowpower_screen_off = false;

			screen_on = true;

			show_idx = IMAGE_SHOW_RESET;

		}

		/*

		 * IMAGE_SHOW_RESET means show_idx show be update by start_idx.

		 * When short key pressed event trigged, we will set show_idx

		 * as IMAGE_SHOW_RESET which updates images index from start_idx

		 * that calculate by current soc.

		 */

		if (show_idx == IMAGE_SHOW_RESET) {

			for (i = 0; i < image_num - 2; i++) {

				/* Find out which image we start to show */

				if ((soc >= image[i].soc) &&

				    (soc < image[i + 1].soc)) {

					start_idx = i;

					break;

				}

				if (soc >= 100) {

					start_idx = image_num - 2;

					break;

				}

			}

			debug("%s: show_idx=%d, screen_on=%d\n",

			      __func__, show_idx, screen_on);

			/* Mark start index and start time */

			show_idx = start_idx;

			show_start = get_timer(0);

		}

		debug("step3 (%d)... show_idx=%d\n", screen_on, show_idx);

		/* Step3: show images */

		if (screen_on) {

			/* Don't call 'charge_show_bmp' unless image changed */

			if (old_show_idx != show_idx) {

				old_show_idx = show_idx;

				debug("SHOW: %s\n", image[show_idx].name);

				charge_show_bmp(image[show_idx].name);

			}

			/* Re calculate timeout to off screen */

			if (priv->auto_screen_off_timeout == 0)

				priv->auto_screen_off_timeout = get_timer(0);

		} else {

			priv->auto_screen_off_timeout = 0;

			system_suspend_enter(pdata);

		}

		mdelay(5);

		/* Every image shows period */

		if (get_timer(show_start) > image[show_idx].period) {

			show_start = get_timer(0);

			/* Update to next image */

			show_idx++;

			if (show_idx > (image_num - 2))

				show_idx = IMAGE_SHOW_RESET;

		}

		debug("step4 (%d)... \n", screen_on);

		/*

		 * Step4: check key event.

		 *

		 * Short key event: turn on/off screen;

		 * Long key event: show logo and boot system or still charging.

		 */

		key_state = check_key_press(dev);

		if (key_state == KEY_PRESS_DOWN) {

			old_show_idx = IMAGE_SHOW_RESET;

			/* NULL means show nothing, ie. turn off screen */

			if (screen_on)

				charge_show_bmp(NULL);

			/*

			 * Clear current image index, and show image

			 * from start_idx

			 */

			show_idx = IMAGE_SHOW_RESET;

			/*

			 * We turn off screen by charge_show_bmp(NULL), so we

			 * should tell while loop to stop show images any more.

			 *

			 * If screen_on=false, means this short key pressed

			 * event turn on the screen and we need show images.

			 *

			 * If screen_on=true, means this short key pressed

			 * event turn off the screen and we never show images.

			 */

			if (screen_on)

				screen_on = false;

			else

				screen_on = true;

		} else if (key_state == KEY_PRESS_LONG_DOWN) {

			/* Only long pressed while screen off needs screen_on true */

			if (!screen_on)

				screen_on = true;

			/* Is able to boot now ? */

			if (soc < pdata->exit_charge_level) {

				printf("soc=%d%%, threshold soc=%d%%\n",

				       soc, pdata->exit_charge_level);

				printf("Low power, unable to boot, charging...\n");

				show_idx = image_num - 1;

				continue;

			}

			if (voltage < pdata->exit_charge_voltage) {

				printf("voltage=%dmv, threshold voltage=%dmv\n",

				       voltage, pdata->exit_charge_voltage);

				printf("Low power, unable to boot, charging...\n");

				show_idx = image_num - 1;

				continue;

			}

			/* Success exit charging */

			printf("Exit charge animation...\n");

			charge_show_logo();

			break;

		} else {

			/* Do nothing */

		}

		debug("step5 (%d)... \n", screen_on);

		/* Step5: Exit by ctrl+c */

		if (ctrlc()) {

			if (voltage >= pdata->screen_on_voltage)

				charge_show_logo();

			printf("Exit charge, due to ctrl+c\n");

			break;

		}

	}
Android 8.1 关机充电动画(二)Uboot模式的更多相关文章
- Android 8.1 关机充电动画(三)Android模式
system:Android 8.1 platform:RK3326/PX30 uboot kernel system/core/healthd Android 8.1 关机充电动画(一)模式选择 A ...
- Android 8.1 关机充电动画(一)模式选择
system:Android 8.1 platform:RK3326/PX30 uboot kernel Android 8.1 关机充电动画(一)模式选择 Android 8.1 关机充电动画(二) ...
- Android MTK6580 客制化关机充电动画
1.客制化关机充电图片 vendor/mediatek/proprietary/bootable/bootloader/lk/dev/logo/xxx 找到对应分辨率替换 2.调整显示图片位置.大小 ...
- 【转】android 电池(二):android关机充电流程、充电画面显示
关键词:android 电池关机充电 androidboot.mode charger关机充电 充电画面显示 平台信息:内核:linux2.6/linux3.0系统:android/android4. ...
- android 电池(二):android关机充电流程、充电画面显示【转】
本文转载自:http://blog.csdn.net/xubin341719/article/details/8498580 上一篇我们讲了锂电池的充放电的流程和电池的一些特性,这一节我们重点说一下a ...
- Android9.0 MTK 平板横屏方案修改(强制app横屏 + 开机logo/动画+关机充电横屏 + RecoveryUI 横屏)
文章较长建议先收藏再看 拆解步骤 1.app 强制横屏显示,无视 android:screenOrientation="portrait" 属性 2.屏幕触摸坐标修改为横屏 3.开 ...
- Android Framework层Power键关机流程(二,关机流程)
二,关机流程 从前一篇博文我们知道,当用户长按Power键时会弹出(关机.重启,飞行模式等选项)对话框,我们点击关机,则会弹出关机确认对话框.那么从选项对话框到关机确认对话框又是一个什么流程呢.下面我 ...
- Android 电池关机充电
android 电池(一):锂电池基本原理篇 android 电池(二):android关机充电流程.充电画面显示 android 电池(三):android电池系统 android电池(四):电池 ...
- android关机充电
1.关机充电其实是进入adb shell很快的方式! 2.手机关机时候插入USB,手机将进入关机充电模式,那么这个模式究竟是怎么进行的,这里分析如下! (1)uboot:这里代码大概浏览了一下:u-b ...
随机推荐
- vue2.x学习笔记(四)
接着前面的内容:https://www.cnblogs.com/yanggb/p/12563162.html. 模板语法 vue使用了基于html的模板语法,允许开发者声明式地将dom绑定到底层vue ...
- 数据结构(C语言版)---二叉树
1.二叉树:任意一个结点的子结点个数最多两个,且子结点的位置不可更改,二叉树的子树有左右之分. 1)分类:(1)一般二叉树(2)满二叉树:在不增加树的层数的前提下,无法再多添加一个结点的二叉树就是满二 ...
- 下载mp4文件
实现mp4文件的下载,而不是在线播放 <!DOCTYPE html> <html lang="en"> <head> <meta char ...
- PHP代码审计理解(三)---EMLOG某插件文件写入
此漏洞存在于emlog下的某个插件---友言社会化评论1.3. 我们可以看到, uyan.php 文件在判断权限之前就可以接收uid参数.并且uid未被安全过滤即写入到了$uyan_code中. 我们 ...
- 开发一款图片压缩工具(二):使用 pngquant 实现图片压缩
上一篇我尝试使用了 pillow 库对 png 图片进行了压缩,效果不好.这次我换用 pngquant 来压缩.pngquant 是用于 PNG 图像有损压缩的命令行实用程序和库.压缩程序会显著减小文 ...
- GraphicsLab Project 之 Curl Noise
作者:i_dovelemon 日期:2020-04-25 主题:Perlin Noise, Curl Noise, Finite Difference Method 引言 最近在研究流体效果相关的模拟 ...
- 有关HTTP协议
有关HTTP协议:https://www.cnblogs.com/an-wen/p/11180076.html
- php phpStudy session存放位置
如果你仅仅是想知道session保存的文件在哪里,你可以在你的PHP文件当中运行函数:session_save_path之后查看运行结果即可知道session文件的存放目录. 或者: 在php-ini ...
- 地点下来框的实现(php)
效果图: 样式(bootstrap): class="selectpicker show-tick form-control",就是多了个form-contro就行了 概念: 这里 ...
- 查看 Nginx 的日志目录
即便是 docker 容器,对应的目录也是一样的 > /var/log/nginx/xxx.log