在uwp仿制WPF的Window
移植WPF软件到uwp时碰到用作对话框的Window有多种处理选择。我个人认为最省事的是用ContentDialog模拟Window。

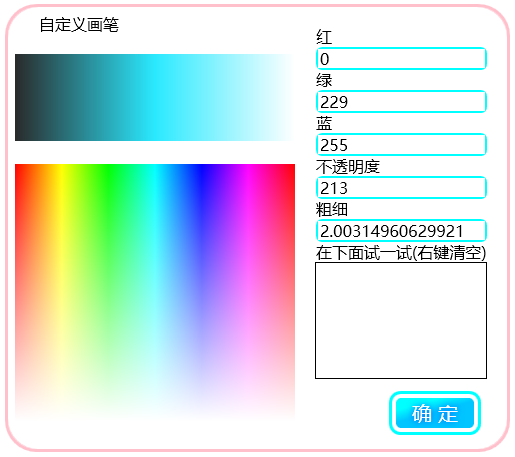
比如你想把上面这个WPF窗体弄到uwp里面去
1.修改ContentDialog的默认样式
新建一个模板化控件RoundCornerContentDialog
让它继承ContentDialog。
然后去Windows SDK里面翻默认样式(因为vs2015 update 1无法自动提取ContentDialog的默认样式到Xaml)。
我的电脑上默认样式在这个文件夹
C:\Program Files (x86)\Windows Kits\10\DesignTime\CommonConfiguration\Neutral\UAP\10.0.10586.0\Generic
找到之后打开刚才新建这个控件时的Themes\Generic.xaml
把ContentDialog的默认样式换进去。
由于要移植的对话框是圆角的,而且没有在底部放置额外的按钮,ContentDialog的样式需要修改。我把它改成了这样:
XAML
<Style TargetType="local:RoundCornerContentDialog" >

        <Setter Property="Foreground" Value="{ThemeResource SystemControlPageTextBaseHighBrush}" />

        <Setter Property="Background" Value="{ThemeResource SystemControlBackgroundChromeMediumLowBrush}" />

        <Setter Property="HorizontalAlignment" Value="Center" />

        <Setter Property="VerticalAlignment" Value="Top" />

        <Setter Property="BorderThickness" Value="3" />

        <Setter Property="IsTabStop" Value="False" />

        <Setter Property="BorderBrush" Value="{ThemeResource SystemControlForegroundAccentBrush}"/>

        <Setter Property="MaxHeight" Value="{ThemeResource ContentDialogMaxHeight}" />

        <Setter Property="MinHeight" Value="{ThemeResource ContentDialogMinHeight}" />

        <Setter Property="MaxWidth" Value="{ThemeResource ContentDialogMaxWidth}" />

        <Setter Property="MinWidth" Value="{ThemeResource ContentDialogMinWidth}" />

        <Setter Property="Template">

            <Setter.Value>

                <ControlTemplate TargetType="local:RoundCornerContentDialog">

                    <Border x:Name="Container">

                        <Grid x:Name="LayoutRoot">

                            <Grid.RowDefinitions>

                                <RowDefinition Height="Auto" />

                            </Grid.RowDefinitions>

                            <Grid.ColumnDefinitions>

                                <ColumnDefinition Width="Auto" />

                            </Grid.ColumnDefinitions>

                            <Border x:Name="BackgroundElement"

                                FlowDirection="{TemplateBinding FlowDirection}"

                                MaxWidth="{TemplateBinding MaxWidth}"

                                MaxHeight="{TemplateBinding MaxHeight}"

                                MinWidth="{TemplateBinding MinWidth}"

                                MinHeight="{TemplateBinding MinHeight}" >

                                <Grid x:Name="DialogSpace" VerticalAlignment="Stretch">

                                    <Grid.RowDefinitions>

                                        <RowDefinition Height="Auto" />

                                        <RowDefinition Height="*" />

                                        <RowDefinition Height="Auto" />

                                    </Grid.RowDefinitions>

                                    <ScrollViewer x:Name="ContentScrollViewer"

                                        HorizontalScrollBarVisibility="Disabled"

                                        VerticalScrollBarVisibility="Disabled"

                                        ZoomMode="Disabled"

                                        IsTabStop="False">

                                        <Grid>

                                            <Grid.RowDefinitions>

                                                <RowDefinition Height="Auto" />

                                                <RowDefinition Height="Auto" />

                                            </Grid.RowDefinitions>

                                            <ContentControl x:Name="Title"

                                                Margin="{ThemeResource ContentDialogTitleMargin}"

                                                Content="{TemplateBinding Title}"

                                                ContentTemplate="{TemplateBinding TitleTemplate}"

                                                FontSize="20"

                                                FontFamily="XamlAutoFontFamily"

                                                FontWeight="Normal"

                                                Foreground="{TemplateBinding Foreground}"

                                                HorizontalAlignment="Left"

                                                VerticalAlignment="Top"

                                                IsTabStop="False"

                                                MaxHeight="{ThemeResource ContentDialogTitleMaxHeight}" >

                                                <ContentControl.Template>

                                                    <ControlTemplate TargetType="ContentControl">

                                                        <ContentPresenter

                                                            Content="{TemplateBinding Content}"

                                                            MaxLines="2"

                                                            TextWrapping="Wrap"

                                                            ContentTemplate="{TemplateBinding ContentTemplate}"

                                                            Margin="{TemplateBinding Padding}"

                                                            ContentTransitions="{TemplateBinding ContentTransitions}"

                                                            HorizontalAlignment="{TemplateBinding HorizontalContentAlignment}"

                                                            VerticalAlignment="{TemplateBinding VerticalContentAlignment}" />

                                                    </ControlTemplate>

                                                </ContentControl.Template>

                                            </ContentControl>

                                            <ContentPresenter x:Name="Content"

                                                Background="{TemplateBinding Background}"

                                                BorderThickness="{TemplateBinding BorderThickness}"

                                                BorderBrush="{ThemeResource ContentDialogBorderThemeBrush}"

                                                CornerRadius="20"

                                                ContentTemplate="{TemplateBinding ContentTemplate}"

                                                Content="{TemplateBinding Content}" VerticalContentAlignment="Stretch"

                                                FontSize="{ThemeResource ControlContentThemeFontSize}"

                                                FontFamily="{ThemeResource ContentControlThemeFontFamily}"

                                                Foreground="{TemplateBinding Foreground}"

                                                Grid.Row="1"

                                                TextWrapping="Wrap" />

                                        </Grid>

                                    </ScrollViewer>

                                    <Grid x:Name="CommandSpace" Visibility="Collapsed" Grid.Row="1" HorizontalAlignment="Stretch" VerticalAlignment="Bottom">

                                        <Grid.ColumnDefinitions>

                                            <ColumnDefinition/>

                                            <ColumnDefinition/>

                                        </Grid.ColumnDefinitions>

                                        <Border x:Name="Button1Host"

                                            Margin="{ThemeResource ContentDialogButton1HostMargin}"

                                            MinWidth="{ThemeResource ContentDialogButtonMinWidth}"

                                            MaxWidth="{ThemeResource ContentDialogButtonMaxWidth}"

                                            Height="{ThemeResource ContentDialogButtonHeight}"

                                            HorizontalAlignment="Stretch" />

                                        <Border x:Name="Button2Host"

                                            Margin="{ThemeResource ContentDialogButton2HostMargin}"

                                            MinWidth="{ThemeResource ContentDialogButtonMinWidth}"

                                            MaxWidth="{ThemeResource ContentDialogButtonMaxWidth}"

                                            Height="{ThemeResource ContentDialogButtonHeight}"

                                            Grid.Column="1"

                                            HorizontalAlignment="Stretch" />

                                    </Grid>

                                </Grid>

                            </Border>

                        </Grid>

                    </Border>

                </ControlTemplate>

            </Setter.Value>

        </Setter>

    </Style>
2.添加DragMove方法
需要移植的那个WPF窗口是可以在空白处进行拖动的。
通过输入指针的事件收集信息,对ContentDialog的Margin属性进行更改达到模拟拖动的效果。
子类调用DragMove方法启用拖动。
下面是VB代码示例。需要其它语言示例的话可以用SharpDevelop转换。
VB
    Protected Sub DragMove(ptr As Pointer)

        Pressed = True

        CapturePointer(ptr)

    End Sub

    Dim Pressed As Boolean

    Dim pos As Point

    Private Sub RoundCornerContentDialog_PointerMoved(sender As Object, e As PointerRoutedEventArgs) Handles Me.PointerMoved

        If Pressed Then

            Dim pt = e.GetCurrentPoint(Me).Position

            Dim marg = Margin

            Dim ofsx = pt.X - pos.X

            Dim ofsy = pt.Y - pos.Y

            marg.Left += ofsx

            marg.Right -= ofsx

            marg.Top += ofsy

            marg.Bottom -= ofsy

            Margin = marg

        End If

    End Sub

    Private Sub RoundCornerContentDialog_PointerReleased(sender As Object, e As PointerRoutedEventArgs) Handles Me.PointerReleased

        Pressed = False

        ReleasePointerCapture(e.Pointer)

    End Sub

    Private Sub RoundCornerContentDialog_PointerPressed(sender As Object, e As PointerRoutedEventArgs) Handles Me.PointerPressed

        pos = e.GetCurrentPoint(Me).Position

    End Sub
3.把对话框内容加进去
新建一个ContentDialog,并把Xaml根节点的名称改为刚才建立的local:RoundCornerContentDialog,还要在相应的类里面把基类也改成RoundCornerContentDialog。
注意,加入内容时要考虑照顾小屏幕设备和低性能设备。
我把布局改了一下,按钮的视觉效果也去除了。

4.在合适的位置调用DragMove
在你认为表示非客户区中可拖动部分的控件的PointerPressed调用DragMove
VB
Private Sub RectDrag_PointerPressed(sender As Object, e As PointerRoutedEventArgs) Handles RectDrag.PointerPressed

    DragMove(e.Pointer)

End Sub
5.其它功能的模拟
有些对话框需要拖动改变大小之类复杂的功能。这个可以仿照WPF的自定义处理非客户区碰撞检测消息进行编写。
以后我遇到需要实现这个功能的时候会补上这里的代码。
在uwp仿制WPF的Window的更多相关文章
- UWP 和 WPF 对比
原文:UWP 和 WPF 对比 本文告诉大家 UWP 和 WPF 的不同. 如果在遇到技术选择或者想和小伙伴吹的时候可以让他以为自己很厉害,那么请继续看. 如果在看这文章还不知道什么是 UWP 和 W ...
- [WPF自定义控件]?Window(窗体)的UI元素及行为
原文:[WPF自定义控件]?Window(窗体)的UI元素及行为 1. 前言 本来打算写一篇<自定义Window>的文章,但写着写着发觉内容太多,所以还是把使用WindowChrome自定 ...
- vb.net WPF webbrowser window.close 关闭后不触发 WindowClosing 事件 WNDPROC解决方式
vb.net WPF webbrowser window.close 关闭后不触发 WindowClosing 事件 WNDPROC解决方式 #Region "WPF 当浏览器窗体关闭 ...
- WPF自定义Window样式(2)
1. 引言 在上一篇中,介绍了如何建立自定义窗体.接下来,我们需要考虑将该自定义窗体基类放到类库中去,只有放到类库中,我们才能在其他地方去方便的引用该基类. 2. 创建类库 接上一篇的项目,先添加一个 ...
- WPF自定义Window样式(1)
1. 引言 WPF是制作界面的一大利器.最近在做一个项目,用的就是WPF.既然使用了WPF了,那么理所当然的,需要自定义窗体样式.所使用的代码是在网上查到的,遗憾的是,整理完毕后,再找那篇帖子却怎么也 ...
- What is the difference between WinRT, UWP and WPF?
在学习UWP的过程中确实有这个迷惑,在此分享一下. UWP (Universal Windows platform), Metro and WinRT are all result of Micros ...
- WPF设置Window的数据上下文(DataContext)为自身
WPF设置Window的数据上下文(DataContext)为自身的XAML: DataContext="{Binding RelativeSource={RelativeSource Se ...
- [WPF系列] window自定义
效果图: 源码下载 SourceCode 参考 Disabling or hiding the minimize, maximize or close button of a WPF ...
- WPF移动Window窗体(鼠标点击左键移动窗体自定义行为)
XAML代码部分:1.引用System.Windows.Interactivity 2.为指定的控件添加一个拖动的行为 3.很简单的了解行为的作用和用法 <Window xmlns=" ...
随机推荐
- WPF TextBlock 绑定 换行
最近有个小需求 需要在textblock中换行 其实textblock换行有很多写法,比如: Xaml: <TextBlock Text="AAAAA BBBBB" /> ...
- 【网络编程】——connect函数遇见EINTR的处理
最近在公司项目中突然报错如下 “connect: Interrupted system call”, 经过查找代码发现是在创建 socket 中执行了 connect 函数失败导致.上网查阅资料发现这 ...
- 【python】——小程序之电话薄
初学python,写一个小程序练习一下.主要功能就是增删改查的一些功能.主要用到的技术:字典的使用,pickle的使用,io文件操作.代码如下: import pickle #studentinfo ...
- Xcode 8 新特性
在2016 苹果全球开发者大会(WWDC)期间, 苹果一如既往地给开发者们披露了新版的集成开发工具 – Xcode, 在过去的每一次大版本发布中,苹果都会积极地改进开发工具,添加一些极具吸引力的新功能 ...
- 修改windows密码后ssrs报错
昨夜修改了windows的登录密码,第二日发现ssrs全部无法访问.显示filenotfound等错误.细想一下,应该是修改了windows的密码导致ssrs权限验证失败. 因此将ssrs的服务帐号修 ...
- Etl之HiveSql调优(union all)
相信在Etl的过程中不可避免的实用union all来拼装数据,那么这就涉及到是否并行处理的问题了. 在hive中是否适用并行map,可以通过参数来设定: set hive.exec.parallel ...
- swift 属性
属性将值和类,结构,枚举相关联.属性分为计算属性和存储属性.存储属性存储常量或变量作为实例的一部分 ,计算属性计算一个值.存储属性用于类和结构体,计算属性用于类,结构体和枚举. 1:存储属性 存储属性 ...
- 安卓TTS语音合成经验分享(科大讯飞语音+)集成
应用场景:足浴软件,技师钟房安排调派和队列排序查看,语音播报提醒.老程序是使用双屏显卡,windows系统PC上运行一个无人值守桌面程序.如今安卓机顶盒(WIFI)和MINI电视棒通过HDMI接口和支 ...
- mongodb备份恢复
注意:在备份文件存放目录的选择上有这样一个条件,文件存放目录不管有多深,都只能有它一个文件:(即除了备份文件之外只能存在文件夹,这个条件约束其整个目录树) 数据备份 : /mongodump --ho ...
- Touch Event
转自: http://hi.baidu.com/masaiui/item/971775e8b316238bc10d754b 参考: http://hedgehogking.com/?p=55 ...
