Spring Cloud 如何使用Eureka注册服务 4.2.2
搭建Maven父工程
文件4-1 pom.xml
<project xmlns="http://maven.apache.org/POM/4.0.0" xmlns:xsi="http://www.w3.org/2001/XMLSchema-instance"

        xsi:schemaLocation="http://maven.apache.org/POM/4.0.0

        http://maven.apache.org/xsd/maven-4.0.0.xsd">

    <modelVersion>4.0.0</modelVersion>

    <groupId>com.xc</groupId>

    <artifactId>xcservice-springcloud</artifactId>

    <version>0.0.1-SNAPSHOT</version>

    <packaging>pom</packaging>

    <parent>

        <groupId>org.springframework.boot</groupId>

        <artifactId>spring-boot-starter-parent</artifactId>

        <version>1.5.6.RELEASE</version>

        <relativePath/>

    </parent>

    <properties>

        <project.build.sourceEncoding>UTF-8</project.build.sourceEncoding>

        <project.reporting.outputEncoding>UTF-8</project.reporting.outputEncoding>

        <java.version>1.8</java.version>

    </properties>

    <dependencyManagement>

        <dependencies>

            <dependency>

                <groupId>org.springframework.cloud</groupId>

                <artifactId>spring-cloud-dependencies</artifactId>

                <version>Dalston.SR3</version>

                <type>pom</type>

                <scope>import</scope>

            </dependency>

        </dependencies>

    </dependencyManagement>

    <build>

        <plugins>

            <!--Spring Boot的编译插件 -->

            <plugin>

                <groupId>org.springframework.boot</groupId>

                <artifactId>spring-boot-maven-plugin</artifactId>

            </plugin>

        </plugins>

    </build>

</project>
搭建服务端工程
(1)添加依赖。
在pom.xml中添加Eureka Server的依赖,如文件4-2所示。
文件4-2 pom.xml
<?xml version="1.0" encoding="UTF-8"?>

<project xmlns="http://maven.apache.org/POM/4.0.0" xmlns:xsi="http://www.w3.org/2001/XMLSchema-instance"

         xsi:schemaLocation="http://maven.apache.org/POM/4.0.0 http://maven.apache.org/xsd/maven-4.0.0.xsd">

    <modelVersion>4.0.0</modelVersion>

    <parent>

        <groupId>com.xc</groupId>

        <artifactId>xcservice-springcloud</artifactId>

        <version>0.0.1-SNAPSHOT</version>

    </parent>

    <groupId>com.xc</groupId>

    <artifactId>xcservice-eureka-server</artifactId>

    <version>0.0.1-SNAPSHOT</version>

    <name>xcservice-eureka-server</name>

    <description>服务端工程</description>

    <dependencies>

        <dependency>

            <groupId>org.springframework.cloud</groupId>

            <artifactId>spring-cloud-starter-eureka-server</artifactId>

        </dependency>

        <dependency>

            <groupId>org.springframework.boot</groupId>

            <artifactId>spring-boot-starter-test</artifactId>

            <scope>test</scope>

        </dependency>

    </dependencies>

    <build>

        <plugins>

            <plugin>

                <groupId>org.springframework.boot</groupId>

                <artifactId>spring-boot-maven-plugin</artifactId>

            </plugin>

        </plugins>

    </build>

</project>
(2)编写配置文件。
在配置文件中增加端口号等配置信息,如文件4-3所示。
文件4-3 application.yml
server:

  port: 8761

eureka:

  instance:

    hostname: localhost

  client:

    register-with-eureka: false

    fetch-registry: false

    service-url:

      defaultZone: http://${eureka.instance.hostname}:${server.port}/eureka/

  #server:

    #enable-self-preservation: false #关闭保护机制,以确保注册中心可以将不可用的实例正确删除
上述代码中,首先配置了端口号为8761,所有服务的实例都需要向此端口注册。接下来配置了实例名为localhost。由于本项目是一个注册中心,是不需要向自己注册和检索服务的,所以register-with-eureka和fetch-registry都需要设置为false。最后defaultZone中的地址是注册中心的地址。
(3)修改服务端Java代码。
在项目的引导类上添加注解@EnableEurekaServer,该注解用于声明标注类是一个EurekaServer,如文件4-4所示。
文件4-4 EurekaApplication.java
package com.xc.xcserviceeurekaserver;

import org.springframework.boot.SpringApplication;

import org.springframework.boot.autoconfigure.SpringBootApplication;

import org.springframework.cloud.netflix.eureka.server.EnableEurekaServer;

/**

 * http://localhost:8761/

 */

@SpringBootApplication

@EnableEurekaServer

public class XcserviceEurekaServerApplication {

    public static void main(String[] args) {

        SpringApplication.run(XcserviceEurekaServerApplication.class, args);

    }

}
(4)启动应用,查看信息。
完成上述配置后,启动应用程序并在浏览器中访问地址http://localhost:8761/即可看到Eureka的信息面板。


可以看出,Eureka Server的信息页面已经成功显示,但此时“Instances currently registered with Eureka”下的显示信息为“No instances available”,这表示该注册中心还没有注册任何可用的实例。
搭建客户端工程
(1)添加依赖。在pom.xml中添加Eureka依赖,如文件4-5所示。
文件4-5 pom.xml
<?xml version="1.0" encoding="UTF-8"?>

<project xmlns="http://maven.apache.org/POM/4.0.0" xmlns:xsi="http://www.w3.org/2001/XMLSchema-instance"

         xsi:schemaLocation="http://maven.apache.org/POM/4.0.0 http://maven.apache.org/xsd/maven-4.0.0.xsd">

    <modelVersion>4.0.0</modelVersion>

    <parent>

        <groupId>com.xc</groupId>

        <artifactId>xcservice-springcloud</artifactId>

        <version>0.0.1-SNAPSHOT</version>

    </parent>

    <groupId>com.xc</groupId>

    <artifactId>xcservice-eureka-user</artifactId>

    <version>0.0.1-SNAPSHOT</version>

    <name>xcservice-eureka-user</name>

    <description>客户端工程</description>

    <dependencies>

        <dependency>

            <groupId>org.springframework.cloud</groupId>

            <artifactId>spring-cloud-starter-eureka</artifactId>

        </dependency>

        <dependency>

            <groupId>org.springframework.boot</groupId>

            <artifactId>spring-boot-starter-test</artifactId>

            <scope>test</scope>

        </dependency>

    </dependencies>

    <build>

        <plugins>

            <plugin>

                <groupId>org.springframework.boot</groupId>

                <artifactId>spring-boot-maven-plugin</artifactId>

            </plugin>

        </plugins>

    </build>

</project>
(2)编写配置文件。在配置文件中添加Eureka服务实例的端口号、服务端地址等信息,如文件4-6所示。
文件4-6 application.yml
server:

  port:8000 # 指定该Eureka实例的端口号

eureka:

  instance:

    prefer-ip-address: true  # 是否显示主机的IP

    #instance-id: ${spring.cloud.client.ipAddress}:${server.port} #将Status中的显示内容也以“IP:端口号”的形式显示

  client:

    service-url:

      defaultZone: http://localhost:8761/eureka/ # 指定Eureka服务端地址

spring:

  application:

    name: microservice-eureka-user # 指定应用名称
(3)修改客户端Java代码。
在项目的引导类上添加注解@EnableEurekaClient,该注解用于声明标注类是一个Eureka客户端组件,如文件4-7所示。
文件4-7 Application.java
package com.xc.xcserviceeurekauser;

import org.springframework.boot.SpringApplication;

import org.springframework.boot.autoconfigure.SpringBootApplication;

import org.springframework.cloud.netflix.eureka.EnableEurekaClient;

import org.springframework.web.bind.annotation.RequestMapping;

import org.springframework.web.bind.annotation.RestController;

@SpringBootApplication

@EnableEurekaClient

@RestController

public class XcserviceEurekaUserApplication {

    @RequestMapping("/hello")

    public String home() {

        return "hello world!";

    }

    public static void main(String[] args) {

        SpringApplication.run(XcserviceEurekaUserApplication.class, args);

    }

}
(4)启动应用,查看信息。
完成上述配置后,分别启动服务器工程和客户端工程,在浏览器中访问地址http://local-host:8761/后,我们可以从Eureka的信息面板中看到注册的服务信息,如图4-5所示。

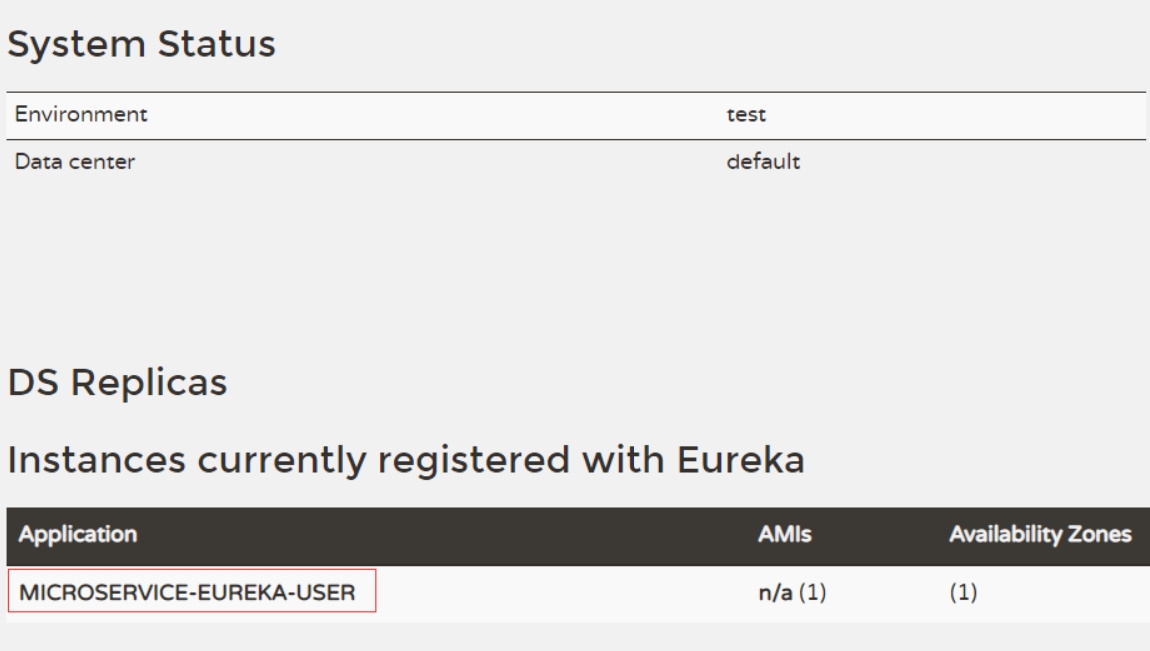
从图4-5中可以看出,服务已经成功注册到了注册中心,注册后的服务就可以直接被其他服务调用了。
Spring Cloud 如何使用Eureka注册服务 4.2.2的更多相关文章
- Spring Cloud 系列之 Eureka 实现服务注册与发现
如果你对 Spring Cloud 体系还不是很了解,可以先读一下 Spring Cloud 都有哪些模块 Eureka 是 Netflix 开源的服务注册发现组件,服务发现可以说是微服务架构的核心功 ...
- Spring Cloud(Dalston.SR5)--Eureka 注册中心高可用-服务提供和消费
由于 Eureka 注册中心只是在内存中保存服务注册实例,并且没有将服务注册实例进行同步,因此我们需要对服务提供和消费进行调整,需要指定服务提供和消费的注册.服务发现的具体Eureka 注册中心配置, ...
- 【Spring Cloud笔记】Eureka注册中心增加权限认证
在Spring Cloud通过Eureka实现服务注册与发现时,默认提供web管理界面,但是如果在生产环境暴露出来,会存在安全问题.为了解决这个问题,我们可以通过添加权限认证进行控制,具体步骤如下: ...
- Spring Cloud(Dalston.SR5)--Eureka 注册中心搭建
基于 Netflix Eureka 做了二次封装,主要负责完成微服务架构中的服务治理功能,服务治理可以说是微服务架构中最为核心和基础的模块,他主要用来实现各个微服务实例的自动化注册与发现 服务注册:在 ...
- Spring Cloud(Dalston.SR5)--Eureka 注册中心高可用搭建
高可用集群 在微服务架构这样的分布式环境中,我们需要充分考虑发生故障的情况,所以在生产环境中必须对各个组件进行高可用部署,对与微服务和服务注册中心都需要高可用部署,Eureka 高可用实际上就是将自己 ...
- SpringCloud学习笔记(5)----Spring Cloud Netflix之Eureka的服务认证和集群
1. Eureka服务认证 1. 引入依赖 <dependency> <groupId>org.springframework.boot</groupId> < ...
- Spring Cloud(二):服务注册与发现 Eureka【Finchley 版】
Spring Cloud(二):服务注册与发现 Eureka[Finchley 版] 发表于 2018-04-15 | 更新于 2018-05-07 | 上一篇主要介绍了相关理论,这一篇开始我们 ...
- spring cloud+.net core搭建微服务架构:服务注册(一)
背景 公司去年开始使用dotnet core开发项目.公司的总体架构采用的是微服务,那时候由于对微服务的理解并不是太深,加上各种组件的不成熟,只是把项目的各个功能通过业务层面拆分,然后通过nginx代 ...
- Spring Cloud(三):服务提供与调用 Eureka【Finchley 版】
Spring Cloud(三):服务提供与调用 Eureka[Finchley 版] 发表于 2018-04-15 | 更新于 2018-05-07 | 上一篇文章我们介绍了 Eureka 服务 ...
随机推荐
- 瀑布流(基于Django)
# 后端 from django.shortcuts import render, HttpResponse from django.http import JsonResponse from app ...
- Python凯撒密码和括号匹配
1.凯撒密码: 除了特殊字符不转化,其余的按照规定经行转译,以下以a~z和A~Z的字符都进行转译. plaincode = input("")print(len(plaincode ...
- PAT1059Prime Factors
1059 Prime Factors (25分) Given any positive integer N, you are supposed to find all of its prime f ...
- SpringBoot测试Controller层
一.准备工作 1.导入测试依赖 <dependency> <groupId>org.springframework.boot</groupId> <artif ...
- 017_Python3 数据结构
本章节我们主要结合前面所学的知识点来介绍Python数据结构. ***************************** 1.列表 Python中列表是可变的,这是它区别于字符串和元组的最重 ...
- 在Modelsim中使用dsp 48e进行仿真
在Modelsim中使用DSP 48E仿真时,需要用到glbl模块,它的调用方法如下所示: vlog -incr GND.v VCC.v FDRE.v DSP48E.vvlog -incr glbl. ...
- 【转】浅析Linux中的零拷贝技术
本文探讨Linux中主要的几种零拷贝技术以及零拷贝技术适用的场景.为了迅速建立起零拷贝的概念,我们拿一个常用的场景进行引入: 引文## 在写一个服务端程序时(Web Server或者文件服务器),文件 ...
- 常用命令备忘 xargs
xargs 作为使用率很高的命令,但是长久不用就会模糊了记忆,所以要记录下来. 获取所有的cobbler相关的布尔值然后全部设置为真 getsebool -a|grep cobbler|awk '{p ...
- 2019强网杯web upload writeup及关键思路
<?phpnamespace app\web\controller; class Profile{ public $checker; public $filename_tmp; ...
- Python和多线程(multi-threading)。这是个好主意码?列举一些让Python代码以并行方式运行的方法。
Python并不支持真正意义上的多线程.Python中提供了多线程包,但是如果你想通过多线程提高代码的速度,使用多线程包并不是个好主意.Python中有一个被称为Global Interpreter ...