rabbitmq监控之消息确认ack
一直以来,学习rabbitmq都是跟着各种各样的教程、博客、视频和文档,撸起袖子就是干!!!最后,也成功了。
当然,成功的标志也仅仅是生产者发送了消息,消费者消费了消息 。
。
真正在实际项目中,一旦出问题,需要分析问题的时候,仅仅了解这些是不够的。
老祖宗说过:实践,是检验真理的唯一标准。所以,研究分析一下消息确认模式ack的整个过程,到底怎么回事
一、测试环境
使用springboot环境:
- 一个Fanout交换机
fanout.exchange - 两个队列:
fanout.queue1和fanout.queue2
pom依赖:
<!-- 添加springboot对amqp的支持 -->

<dependency>

	<groupId>org.springframework.boot</groupId>

	<artifactId>spring-boot-starter-amqp</artifactId>

</dependency>
application配置:
# RabbitMQ 基本配置

spring.rabbitmq.host=192.168.183.220

spring.rabbitmq.port=5672

spring.rabbitmq.username=guest

spring.rabbitmq.password=guest

## 生产端配置

# 开启发布确认,就是confirm模式. 消费端ack应答后,才将消息从队列中删除

spring.rabbitmq.publisher-confirms=true

# 发布返回

spring.rabbitmq.publisher-returns=true

## 消费端配置

# 手动ack

spring.rabbitmq.listener.simple.acknowledge-mode=manual

# 消费者最小数量

spring.rabbitmq.listener.simple.concurrency=1

# 消费者最大数量

spring.rabbitmq.listener.simple.max-concurrency=10

# 在单个请求中处理的消息个数,他应该大于等于事务数量(unack的最大数量)

spring.rabbitmq.listener.simple.prefetch=1

## 模板配置

#设置为 true 后 消费者在消息没有被路由到合适队列情况下会被return监听,而不会自动删除

spring.rabbitmq.template.mandatory=true
RabbitConfig.java
import org.slf4j.Logger;

import org.slf4j.LoggerFactory;

import org.springframework.amqp.core.*;

import org.springframework.amqp.rabbit.connection.ConnectionFactory;

import org.springframework.amqp.rabbit.core.RabbitTemplate;

import org.springframework.beans.factory.annotation.Qualifier;

import org.springframework.context.annotation.Bean;

import org.springframework.context.annotation.Configuration;

@Configuration

public class RabbitConfig {

    private static final Logger log= LoggerFactory.getLogger(RabbitConfig.class);

    @Bean

    public Queue queue() {

        return new Queue("queue");

    }

    @Bean(name = "FQ1")

    public Queue fanoutQueue1() {

        return new Queue("fanout.queue1");

    }

    @Bean(name = "FQ2")

    public Queue fanoutQueue2() {

        return new Queue("fanout.queue2");

    }

    @Bean

    public FanoutExchange fanoutExchange() {

        return new FanoutExchange("fanout.exchange");

    }

    @Bean

    public Binding bindingFQ1(@Qualifier("FQ1") Queue queue, FanoutExchange exchange){

        return BindingBuilder.bind(queue).to(exchange);

    }

    @Bean

    public Binding bindingFQ2(@Qualifier("FQ2") Queue queue, FanoutExchange exchange){

        return BindingBuilder.bind(queue).to(exchange);

    }

    /**

     * 定制化amqp模版

     *

     * ConfirmCallback接口用于ack回调   即消息发送到exchange  ack

     * ReturnCallback接口用于消息发送失败回调  即消息发送不到任何一个队列中  ack

     */

    @Bean

    public RabbitTemplate rabbitTemplate(ConnectionFactory connectionFactory) {

        RabbitTemplate rabbitTemplate = new RabbitTemplate(connectionFactory);

        // 消息返回, 需要配置 publisher-returns: true

        rabbitTemplate.setReturnCallback((message, replyCode, replyText, exchange, routingKey) -> {

            String correlationId = message.getMessageProperties().getCorrelationId();

            log.debug("消息:{} 发送失败, 应答码:{} 原因:{} 交换机: {}  路由键: {}", correlationId, replyCode, replyText, exchange, routingKey);

        });

        // 消息确认, 需要配置 publisher-confirms: true

        rabbitTemplate.setConfirmCallback((correlationData, ack, cause) -> {

            if (ack) {

//                 log.debug("消息发送到exchange成功,id: {}", correlationData.getId());

                 log.debug("消息发送到exchange成功");

            } else {

                log.debug("消息发送到exchange失败,原因: {}", cause);

            }

        });

        return rabbitTemplate;

    }

}
HelloSender.java
import org.springframework.amqp.core.AmqpTemplate;

import org.springframework.beans.factory.annotation.Autowired;

import org.springframework.stereotype.Component;

@Component

public class HelloSender {

    @Autowired

    private AmqpTemplate template;

    public void sendAck(String msg) {

        template.convertAndSend("fanout.exchange","",msg);

    }

}
HelloReceive.java
import com.rabbitmq.client.Channel;
import org.springframework.amqp.core.Message;
import org.springframework.amqp.rabbit.annotation.RabbitListener;
import org.springframework.stereotype.Component;
import java.io.IOException;
@Component
public class HelloReceive {
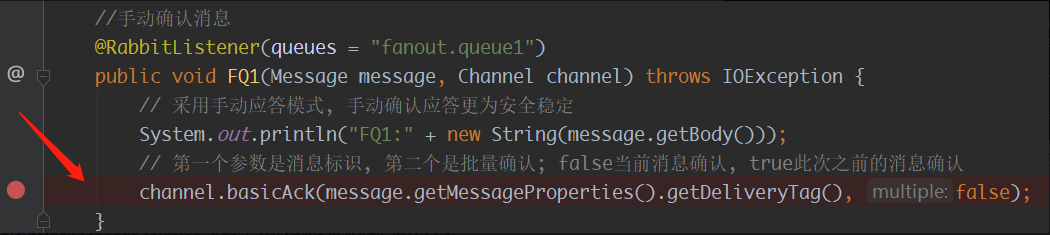
//手动确认消息
@RabbitListener(queues = "fanout.queue1")
public void FQ1(Message message, Channel channel) throws IOException {
// 采用手动应答模式, 手动确认应答更为安全稳定
System.out.println("FQ1:" + new String(message.getBody()));
// 第一个参数是消息标识, 第二个是批量确认; false当前消息确认, true此次之前的消息确认
channel.basicAck(message.getMessageProperties().getDeliveryTag(), false);
}
// 不确认消息,消息会重回队列
@RabbitListener(queues = "fanout.queue2")
public void FQ2(String str) {
System.out.println("FQ2:" + str);
}
}
单元测试
import com.lyf.springboot.SpringbootApplication;

import com.lyf.springboot.rabbitmq.HelloSender;

import org.junit.Test;

import org.junit.runner.RunWith;

import org.springframework.beans.factory.annotation.Autowired;

import org.springframework.boot.test.context.SpringBootTest;

import org.springframework.test.context.junit4.SpringJUnit4ClassRunner;

// SpringbootApplication Springboo启动类

@SpringBootTest(classes= SpringbootApplication.class)

@RunWith(SpringJUnit4ClassRunner.class)

public class TestRabbitMQ {

    @Autowired

    private HelloSender helloSender;

    @Test

    public void testRabbit2() {

        for (int i = 0; i < 10; i++) {

            helloSender.sendAck("haha~"+i);

            try {

                Thread.sleep(1000);

            } catch (InterruptedException e) {

                e.printStackTrace();

            }

        }

    }

}
二、启动测试
在确认消息的地方加上断点,方便查看消息确认的过程。
rabbitmq后台管理界面:
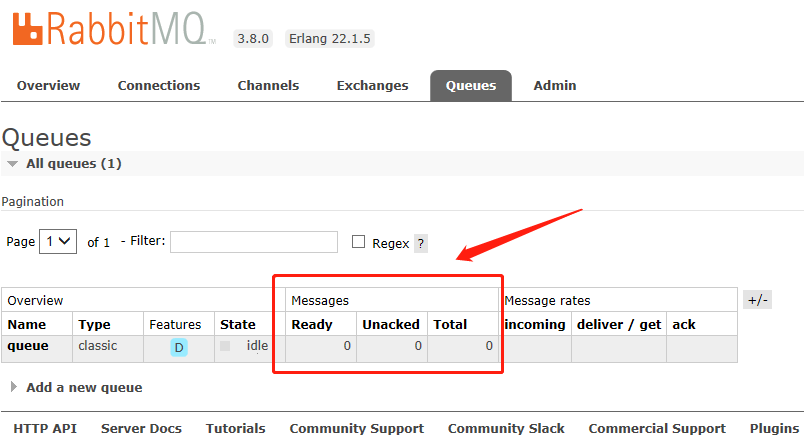
Message
- Ready: 队列中等待消费的消息
- Unacked:队列中等待被确认的消息(此时消息已到达消费者,但是未被确认)
- Total:队列中消息总数
启动测试

一开始两个队列都收到了1条消息,因为开启了confirm模式,所以Message的Unacked状态都为1,Total为1。

收到第2条消息后,队列queue1执行了ack确认,所以队列中只有1条消息,1条消息等待被确认;队列queue2没有被ack确认,所以Ready=1,Unacked=1,Total=2。

收到第10条消息后,队列queue1依然是Ready=0,Unacked=1,Total=1;而队列queue2一直没有被ack确认,所以Ready=9,Unacked=1,Total=10。

消息发送完后,队列queue1已经没有消息了,队列queue2还有10条等待被消费的消息。默认未被ack的消息重回队列中。
spring.rabbitmq.listener.simple.default-requeue-rejected=true参考文档:
- SpringBoot 整合 RabbitMQ https://www.cnblogs.com/haixiang/p/10959551.html
- springboot整合rabbitmq,支持消息确认机制 https://www.cnblogs.com/milicool/p/9662447.html
- Spring Boot + RabbitMQ 配置参数解释 https://www.cnblogs.com/qts-hope/p/11242559.html
- RabbitMQ入门教程(十二):消息确认Ack https://blog.csdn.net/vbirdbest/article/details/78699913
rabbitmq监控之消息确认ack的更多相关文章
- RabbitMQ的消息确认ACK机制
1.什么是消息确认ACK. 答:如果在处理消息的过程中,消费者的服务器在处理消息的时候出现异常,那么可能这条正在处理的消息就没有完成消息消费,数据就会丢失.为了确保数据不会丢失,RabbitMQ支持消 ...
- RabbitMQ入门教程(十二):消息确认Ack
原文:RabbitMQ入门教程(十二):消息确认Ack 版权声明:本文为博主原创文章,遵循CC 4.0 BY-SA版权协议,转载请附上原文出处链接和本声明. 本文链接:https://blog.csd ...
- rabbitmq++:RabbitMQ的消息确认ACK机制介绍
1):什么是消息确认ACK. 答:如果在处理消息的过程中,消费者的服务器在处理消息的时候出现异常,那么可能这条正在处理的消息就没有完成消息消费,数据就会丢失.为了确保数据不会丢失,RabbitMQ支持 ...
- springboot + rabbitmq 用了消息确认机制,感觉掉坑里了
本文收录在个人博客:www.chengxy-nds.top,技术资源共享,一起进步 最近部门号召大伙多组织一些技术分享会,说是要活跃公司的技术氛围,但早就看穿一切的我知道,这 T M 就是为了刷KPI ...
- RabbitMQ 消费者的消息确认机制
消息确认的几点说明: 1. Basic.Ack 发回给 RabbitMQ 以告知,可以将相应 message 从 RabbitMQ 的消息缓存中移除.2. Basic.Ack 未被 consumer ...
- 【RabbitMQ】6、rabbitmq生产者的消息确认
通过Publisher Confirms and Returns机制,生产者可以判断消息是否发送到了exchange及queue,而通过消费者确认机制,Rabbitmq可以决定是否重发消息给消费者,以 ...
- 【rabbitmq】rabbitmq概念解析--消息确认--示例程序
概述 本示例程序全部来自rabbitmq官方示例程序,rabbitmq-demo: 官方共有6个demo,针对不同的语言(如 C#,Java,Spring-AMQP等),都有不同的示例程序: 本示例程 ...
- rabbitmq生产者的消息确认
通过Publisher Confirms and Returns机制,生产者可以判断消息是否发送到了exchange及queue,而通过消费者确认机制,Rabbitmq可以决定是否重发消息给消费者,以 ...
- springboot整合rabbitmq实现生产者消息确认、死信交换器、未路由到队列的消息
在上篇文章 springboot 整合 rabbitmq 中,我们实现了springboot 和rabbitmq的简单整合,这篇文章主要是对上篇文章功能的增强,主要完成如下功能. 需求: 生产者在启 ...
随机推荐
- JavaScript初探系列(十一)——ES6
一.前言 ECMAScript 6.0(以下简称 ES6)是 JavaScript 语言的下一代标准,已经在 2015 年 6 月正式发布了.它的目标,是使得 JavaScript 语言可以用来编写复 ...
- vue-devtools 获取到 vuex store 和 Vue 实例的?
vue-devtools 获取到 vuex store 和 Vue 实例的? https://github.com/vuejs/vue-devtools 安装了 vue-devTools ...
- 使用trace文件分析ANR
2017年02月07日 12:32:45 不死鸟JGC 阅读数 13886更多 分类专栏: Android 版权声明:本文为博主原创文章,遵循CC 4.0 BY-SA版权协议,转载请附上原文出处链 ...
- Xamarin.FormsShell基础教程(3)Shell项目构成
Xamarin.FormsShell基础教程(3)Shell项目构成 在创建的ShellDemo解决方案中,有3个子项目,分别为ShellDemo.ShellDemo.Android和ShellDem ...
- Spring不能直接@autowired注入Static变量/ 关于SpringBoot的@Autowired 静态变量注入
昨天在编写JavaMail工具类的时候,静态方法调用静态变量,这是很正常的操作,当时也没多想,直接静态注入. @Component public class JavaMailUtil { @Autow ...
- 爬虫数据提取之JSON与JsonPATH
数据提取之JSON与JsonPATH JSON(JavaScript Object Notation) 是一种轻量级的数据交换格式,它使得人们很容易的进行阅读和编写.同时也方便了机器进行解析和生成.适 ...
- Linux 磁盘管理_016
以5个方面讲解 1. 硬盘 2. 磁盘RAID.LVM等 3. 磁盘分区 4. 磁盘格式化 5. 磁盘挂载后磁盘管理 一.硬盘 硬盘分类 备注 机械硬盘 IDE SCSI SATA SAS 固态 ...
- Hive学习笔记——metadata
Hive结构体系 https://blog.csdn.net/zhoudaxia/article/details/8855937 可以在hive的jdbc接口中使用getMetaData方法来获取hi ...
- (转载)人脸识别中Softmax-based Loss的演化史
人脸识别中Softmax-based Loss的演化史 旷视科技 近期,人脸识别研究领域的主要进展之一集中在了 Softmax Loss 的改进之上:在本文中,旷视研究院(上海)(MEGVII Re ...
- maven-archetype-plugin 的正确打开方式
1. 准备好一个编辑好的模板工程 2. 在 pom.xml 中添加 maven-archetype-plugin 插件 <plugin> <groupId>org.apach ...