使用Swagger2构建SpringMVC项目中的Restful API文档
使用Swagger自动生成API文档,不仅增加了项目的可维护性,还提高了API的透明度更利于快速测试等工作,便于更快地发现和解决问题。
本篇文章只记录整合过程,关于Security Configuration等其他特性这里就不展开讲了,感兴趣的可以通过以下链接了解更多。
参考文档:
https://howtodoinjava.com/swagger2/swagger-spring-mvc-rest-example/

http://www.baeldung.com/swagger-2-documentation-for-spring-rest-api

http://blog.didispace.com/springbootswagger2/
项目中各组件的版本情况:
spring.version=4.3.18.RELEASE

jackson.version=2.9.

swagger.version=2.7.
核心的pom配置(spring的省略):
<dependency>

    <groupId>io.springfox</groupId>

    <artifactId>springfox-swagger2</artifactId>

    <version>${swagger.version}</version>

</dependency>

<dependency>

    <groupId>io.springfox</groupId>

    <artifactId>springfox-swagger-ui</artifactId>

    <version>${swagger.version}</version>

</dependency>

<dependency>

    <groupId>com.fasterxml.jackson.core</groupId>

    <artifactId>jackson-databind</artifactId>

    <version>${jackson.version}</version>

</dependency>

<dependency>

    <groupId>com.fasterxml.jackson.core</groupId>

    <artifactId>jackson-core</artifactId>

    <version>${jackson.version}</version>

</dependency>

<dependency>

    <groupId>com.fasterxml.jackson.core</groupId>

    <artifactId>jackson-annotations</artifactId>

    <version>${jackson.version}</version>

</dependency>
编写Swagger的配置类:
tip:做了拦截处理的同学需要注意开放swagger的资源访问路径:/swagger-resources/*、/swagger-ui.html、/v2/api-docs、/webjars/*
@Configuration

@EnableSwagger2

@EnableWebMvc

@ComponentScan("springfox")

public class SwaggerConfig extends WebMvcConfigurerAdapter {

    @Bean

    public Docket createRestApi() {

        return new Docket(DocumentationType.SWAGGER_2)

                .select()

                .apis(RequestHandlerSelectors.withClassAnnotation(Api.class))

                .paths(PathSelectors.any())

                .build()

                .apiInfo(apiInfo());

    }

    private ApiInfo apiInfo() {

        return new ApiInfoBuilder()

                .title("REST API 描述文档")

                .description("REST API 描述文档")

                .version("1.0")

                .termsOfServiceUrl("http://localhost:9080/")

                .contact(new Contact("lichmama", "", ""))

                .license("Apache License 2.0")

                .licenseUrl("https://www.apache.org/licenses/LICENSE-2.0")

                .build();

    }

    @Override

    public void addResourceHandlers(ResourceHandlerRegistry registry) {

        registry.addResourceHandler("swagger-ui.html").addResourceLocations("classpath:/META-INF/resources/");

        registry.addResourceHandler("/webjars/**").addResourceLocations("classpath:/META-INF/resources/webjars/");

    }

}
在springmvc-servlet.xml中增加配置:
<bean class="com.lichmama.demo.core.swagger.SwaggerConfig" />
在RestController上使用Swagger的注解(其中ApiOperation和ApiImplicitParam尤为关键),用以自动生成文档:
@RestController

@RequestMapping("/config")

@Api(description = "配置管理接口")

@Slf4j

public class ConfigAction {

    @PostMapping("/set")

    @ApiOperation(value = "更改或新增配置信息")

    @ApiResponses(value = { @ApiResponse(code = 500, message = "系统错误"), @ApiResponse(code = 0, message = "成功") })

    @ApiImplicitParams({ @ApiImplicitParam(name = "key", value = "键", paramType = "form", dataType = "string"),

            @ApiImplicitParam(name = "value", value = "值", paramType = "form", dataType = "string") })

    public ActionMessage setConfig(String key, String value) {

        log.debug("key: {}, value: {}", key, value);

        ConfigUtil.setConfig(key, value);

        return ActionStatus.success();

    }

    @GetMapping("/get")

    @ApiOperation(value = "获取配置信息")

    @ApiImplicitParam(name = "key", value = "键", paramType = "query", dataType = "string")

    public Map<String, Object> getConfig(String key) {

        Object value = ConfigUtil.getConfig(key);

        log.debug("key: {}, value: {}", key, value);

        Map<String, Object> map = new HashMap<>();

        map.put(key, value);

        return map;

    }

}
启动项目,访问http://{host:port}/{project}/swagger-ui.html查看配置是否生效:
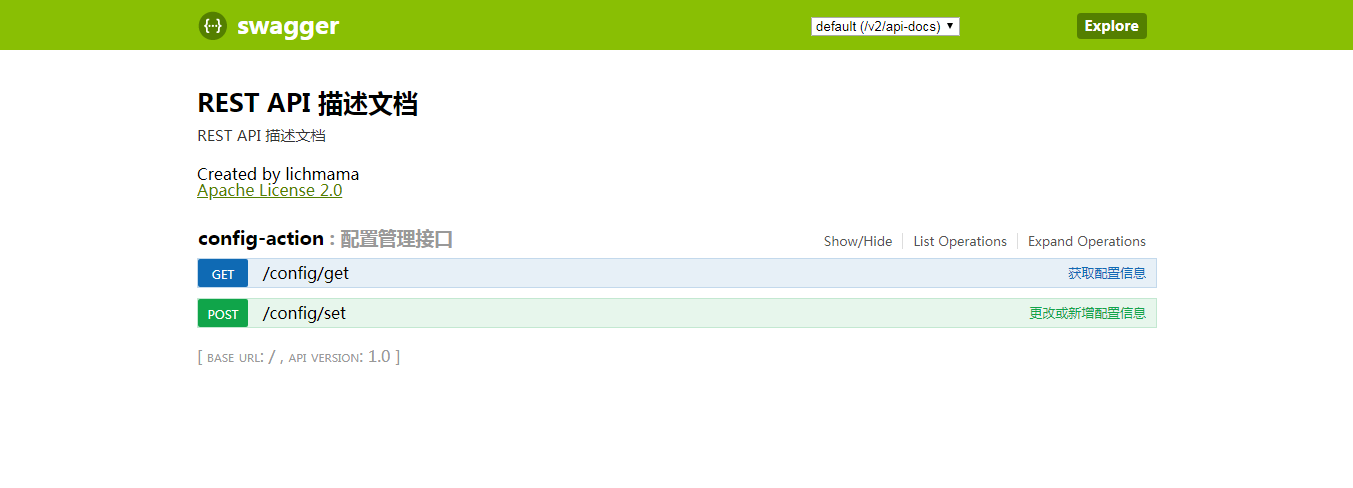
看上去没有问题,测试下:


ps:网上关于swagger的文章配置上多数都有些问题,所以不能直接照搬使用。自己部署swagger时要根据实际项目来修改配置,比如spring、swagger的版本等。
使用Swagger2构建SpringMVC项目中的Restful API文档的更多相关文章
- JavaWeb项目中集成Swagger API文档
1.增加依赖 <dependency> <groupId>io.springfox</groupId> <artifactId>springfox-sw ...
- Spring Boot 中使用 Swagger2 构建强大的 RESTful API 文档
项目现状:由于前后端分离,没有很好的前后端合作工具. 由于接口众多,并且细节复杂(需要考虑不同的HTTP请求类型.HTTP头部信息.HTTP请求内容等),高质量地创建这份文档本身就是件非常吃力的事,下 ...
- Spring Boot中使用Swagger2构建强大的RESTful API文档
由于Spring Boot能够快速开发.便捷部署等特性,相信有很大一部分Spring Boot的用户会用来构建RESTful API.而我们构建RESTful API的目的通常都是由于多终端的原因,这 ...
- Spring Boot中使用Swagger2构建RESTful API文档
在开发rest api的时候,为了减少与其他团队平时开发期间的频繁沟通成本,传统做法我们会创建一份RESTful API文档来记录所有接口细节,然而这样的做法有以下几个问题: 1.由于接口众多,并且细 ...
- Spring Boot 入门系列(二十二)使用Swagger2构建 RESTful API文档
前面介绍了如何Spring Boot 快速打造Restful API 接口,也介绍了如何优雅的实现 Api 版本控制,不清楚的可以看我之前的文章:https://www.cnblogs.com/zha ...
- 使用Swagger2构建强大的RESTful API文档(1)(二十二)
由于Spring Boot能够快速开发.便捷部署等特性,相信有很大一部分Spring Boot的用户会用来构建RESTful API.而我们构建RESTful API的目的通常都是由于多终端的原因,这 ...
- springboot集成swagger2构建RESTful API文档
在开发过程中,有时候我们需要不停的测试接口,自测,或者交由测试测试接口,我们需要构建一个文档,都是单独写,太麻烦了,现在使用springboot集成swagger2来构建RESTful API文档,可 ...
- SpringBoot_06_使用Swagger2构建强大的RESTful API文档
二.参考资料 1.Spring Boot中使用Swagger2构建强大的RESTful API文档 2.
- Spring Boot教程(二十二)使用Swagger2构建强大的RESTful API文档(1)
由于Spring Boot能够快速开发.便捷部署等特性,相信有很大一部分Spring Boot的用户会用来构建RESTful API.而我们构建RESTful API的目的通常都是由于多终端的原因,这 ...
随机推荐
- JavaScript学习思维导图
JS基本概念 JS操作符 JS基本语法 JS数组 JS Date用法 JS 字符串用法 JS编程风格 JS实践
- python 动态创建变量 获取变量名
参考链接:https://www.cnblogs.com/technologylife/p/9211324.html 参考链接(未)(使用inspect 获取变量名):https://blog.csd ...
- 线程状态---Day24
线程状态概述: 当线程被创建并启动以后,它既不是一启动就进入了执行状态,也不是一直处于执行状态.在线程的生命周期中, 有几种状态呢?在API中 java.lang.Thread.State 这个枚举中 ...
- Winform中实现跨窗体获取ZedGraph的ZedGraphControl控件对象
场景 Winforn中设置ZedGraph曲线图的属性.坐标轴属性.刻度属性: https://blog.csdn.net/BADAO_LIUMANG_QIZHI/article/details/10 ...
- java--static与代码块
static与代码块: static class Student{ static String school; // 随着类的加载而执行 可以由类进行调用 static { // 静态代码块 加载类时 ...
- PHP:CURL分别以GET、POST方式请求HTTPS协议接口api【转】
1.curl以GET方式请求https协议接口 //注意:这里的$url已经包含参数了,不带参数你自己处理哦GET很简单 function curl_get_https($url){ $curl = ...
- 关于ORACLE图形化安装过程中出现的竖线的处理办法
这种情况上传个jre 并指定下就好了 ~/database/runInstaller -jreLoc /usr/local/jre1.8.0_191/
- A simple introduction to Three kinds of Delegation of Kerberos
1.What is Delegation? Just like the name. Delegation is that a server pretend to behalf of a user an ...
- Django框架(八)--单表增删改查,在Python脚本中调用Django环境
一.数据库连接配置 如果连接的是pycharm默认的Sqlite,不用改动,使用默认配置即可 如果连接mysql,需要在配置文件中的setting中进行配置: 将DATABASES={} 更新为 DA ...
- Jenkins+SVN+Ant在Linux环境下自动完成版本的增量更新与编译
第一步:查看安装的jdk版本,查看是否安装ant,查看是否安装Jenkins java -version ant -version rpm -qa|grep jenkins 第二步:安装ant 官网: ...