[iOS基础控件 - 5.5] 代理设计模式 (基于”APP列表"练习)
  // 创建下载成功消息框

     CGFloat labelWidth = ;

     CGFloat labelHeight = ;

     CGFloat labelX = (self.view.frame.size.width - labelWidth) / ;

     CGFloat labelY = (self.view.frame.size.height - labelHeight) / ;

     UILabel *successMsgLabel = [[UILabel alloc] initWithFrame:CGRectMake(labelX, labelY, labelWidth, labelHeight)];

     // 设置圆角矩形样式

     successMsgLabel.layer.cornerRadius = 10.0;

     successMsgLabel.layer.masksToBounds = YES;

     // 设置全透明隐藏

     successMsgLabel.alpha = ;

     successMsgLabel.textColor = [UIColor whiteColor];

     successMsgLabel.backgroundColor = [UIColor grayColor];

     [successMsgLabel setTextAlignment:NSTextAlignmentCenter];

     successMsgLabel.tag = ;

     [self.view addSubview:successMsgLabel];
// 点击下载按钮
- (IBAction)onDownloadButtonClick {
// 更改“下载”按钮样式
[self.downloadButton setTitle:@"已下载" forState:UIControlStateDisabled];
self.downloadButton.enabled = NO; // 拿到消息框
UILabel *successMsgLabel = [self.superview viewWithTag:];
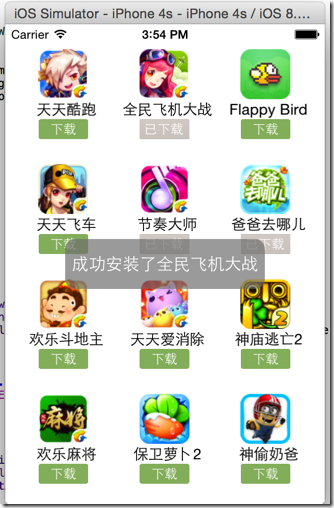
successMsgLabel.text = [NSString stringWithFormat:@"成功安装了%@", self.appData.name];
successMsgLabel.alpha = 0.7; // 使用动画
[UIView beginAnimations:nil context:nil];
[UIView setAnimationDuration:];
successMsgLabel.alpha = ;
[UIView commitAnimations];
}
 // 存储主View的引用

 @property (nonatomic, weak) UIView *vcView;
  for (int index=; index<self.apps.count; index++) {

         App *appData = self.apps[index];

         // 1.创建View

         AppView *appView = [AppView appViewWithApp:appData];

         // 2.定义每个app的位置、尺寸

         CGFloat appX = marginX + column * (marginX + APP_WIDTH);

         CGFloat appY = marginY + row * (marginY + APP_HEIGHT);

         appView.frame = CGRectMake(appX, appY, APP_WIDTH, APP_HEIGHT);

         // 设置每个app控件view的主view引用

         appView.vcView = self.view;

         // 3.加入此app信息到总view

         [self.view addSubview:appView];

         column++;

         if (column == appColumnCount) {

             column = ;

             row++;

         }
 // 点击下载按钮

 - (IBAction)onDownloadButtonClick {

     // 更改“下载”按钮样式

     [self.downloadButton setTitle:@"已下载" forState:UIControlStateDisabled];

     self.downloadButton.enabled = NO;

     // 创建消息框

     UILabel *successMsgLabel = [self.vcView viewWithTag:];

     successMsgLabel.text = [NSString stringWithFormat:@"成功安装了%@", self.appData.name];

     successMsgLabel.alpha = 0.7;

     // 使用动画

     [UIView beginAnimations:nil context:nil];

     [UIView setAnimationDuration:];

     successMsgLabel.alpha = ;

     [UIView commitAnimations];

 }
 // 将“下载”按钮控件移到 .h 文件中暴露

 @property (weak, nonatomic) IBOutlet UIButton *downloadButton;
 // 控制器创建“下载”按钮点击事件

 - (IBAction)onAppViewDownloadButtonClick:(UIButton *) downloadButton {

     // 更改“下载”按钮样式

     [downloadButton setTitle:@"已下载" forState:UIControlStateDisabled];

     downloadButton.enabled = NO;

     // 创建消息框

     UILabel *successMsgLabel = [self.view viewWithTag:];

     App *app = self.apps[downloadButton.tag];

     successMsgLabel.text = [NSString stringWithFormat:@"成功安装了%@", app.name];

     successMsgLabel.alpha = 0.7;

     // 使用动画

     [UIView beginAnimations:nil context:nil];

     [UIView setAnimationDuration:];

     successMsgLabel.alpha = ;

     [UIView commitAnimations];

 }

 @end
  for (int index=; index<self.apps.count; index++) {

         App *appData = self.apps[index];

         // 1.创建View

         AppView *appView = [AppView appViewWithApp:appData];

         // 2.定义每个app的位置、尺寸

         CGFloat appX = marginX + column * (marginX + APP_WIDTH);

         CGFloat appY = marginY + row * (marginY + APP_HEIGHT);

         appView.frame = CGRectMake(appX, appY, APP_WIDTH, APP_HEIGHT);

         // 存储每个AppView对应的AppData数据索引在tag中

         appView.downloadButton.tag = index;

         // 绑定每个AppView中的“下载”按钮点击事件

         [appView.downloadButton addTarget:self action:@selector(onAppViewDownloadButtonClick:) forControlEvents:UIControlEventTouchUpInside];

         // 3.加入此app信息到总view

         [self.view addSubview:appView];

         column++;

         if (column == appColumnCount) {

             column = ;

             row++;

         }

     }
 // 定义代理的协议

 @protocol AppViewDelegate <NSObject>

 // “下载”按钮被点击事件

 @optional

 - (void) appViewClickedDownloadButton:(AppView *) appView;

 @end
 @interface AppView : UIView

 // 代理

 @property(nonatomic, weak) id<AppViewDelegate> delegate;

 ...

 @end
 ViewController.m

 @interface ViewController () <AppViewDelegate>

 ...

 @end
 // “下载”按钮点击的代理方法

 - (void)appViewClickedDownloadButton:(AppView *)appView {

     // 创建下载成功消息框

     CGFloat labelWidth = ;

     CGFloat labelHeight = ;

     CGFloat labelX = (self.view.frame.size.width - labelWidth) / ;

     CGFloat labelY = (self.view.frame.size.height - labelHeight) / ;

     UILabel *successMsgLabel = [[UILabel alloc] initWithFrame:CGRectMake(labelX, labelY, labelWidth, labelHeight)];

     // 设置圆角矩形样式

     successMsgLabel.layer.cornerRadius = 10.0;

     successMsgLabel.layer.masksToBounds = YES;

     // 设置全透明隐藏

     successMsgLabel.alpha = ;

     successMsgLabel.textColor = [UIColor whiteColor];

     successMsgLabel.backgroundColor = [UIColor grayColor];

     [successMsgLabel setTextAlignment:NSTextAlignmentCenter];

     successMsgLabel.text = [NSString stringWithFormat:@"成功安装了%@", appView.appData.name];

     successMsgLabel.alpha = 0.7;

     // 使用动画

     [UIView beginAnimations:nil context:nil];

     [UIView setAnimationDuration:];

     successMsgLabel.alpha = ;

     [UIView commitAnimations];

     [self.view addSubview:successMsgLabel];

 }
   for (int index=; index<self.apps.count; index++) {

         App *appData = self.apps[index];

         // 1.创建View

         AppView *appView = [AppView appViewWithApp:appData];

         // 2.定义每个app的位置、尺寸

         CGFloat appX = marginX + column * (marginX + APP_WIDTH);

         CGFloat appY = marginY + row * (marginY + APP_HEIGHT);

         appView.frame = CGRectMake(appX, appY, APP_WIDTH, APP_HEIGHT);

         // 设置代理

         appView.delegate = self;

         // 3.加入此app信息到总view

         [self.view addSubview:appView];

         column++;

         if (column == appColumnCount) {

             column = ;

             row++;

         }

     }
 // 点击下载按钮

 - (IBAction)onDownloadButtonClick {

     // 更改“下载”按钮样式

     [self.downloadButton setTitle:@"已下载" forState:UIControlStateDisabled];

     self.downloadButton.enabled = NO;

     // 通知代理

     // 检查是否实现了代理方法

     if ([self.delegate respondsToSelector:@selector(appViewClickedDownloadButton:)]) {

         [self.delegate appViewClickedDownloadButton:self];

     }

 }
 App.h

 //

 //  App.h

 //  01-应用管理

 //

 //  Created by hellovoidworld on 14/11/25.

 //  Copyright (c) 2014年 hellovoidworld. All rights reserved.

 //

 #import <Foundation/Foundation.h>

 @interface App : NSObject

 /**

 copy : NSString

 strong: 一般对象

 weak: UI控件

 assign: 基本数据类型

 */

 /**

 名称

 */

 @property(nonatomic, copy) NSString *name;

 /**

 图标

 */

 @property(nonatomic, copy) NSString *icon;

 /**

 自定义构造方法

 通过字典来初始化模型对象

 */

 - (instancetype) initWithDictionary:(NSDictionary *) dictionary;

 + (instancetype) appWithDictionary:(NSDictionary *) dictionary;

 @end
 //

 //  App.m

 //  01-应用管理

 //

 //  Created by hellovoidworld on 14/11/25.

 //  Copyright (c) 2014年 hellovoidworld. All rights reserved.

 //

 #import "App.h"

 #define ICON_KEY @"icon"

 #define NAME_KEY @"name"

 @implementation App

 - (instancetype) initWithDictionary:(NSDictionary *) dictionary {

     if (self = [super init]) {

         self.name = dictionary[NAME_KEY];

         self.icon = dictionary[ICON_KEY];

     }

     return self;

 }

 + (instancetype) appWithDictionary:(NSDictionary *) dictionary {

     // 使用self代表类名代替真实类名,防止子类调用出错

     return [[self alloc] initWithDictionary:dictionary];

 }

 @end
 AppView.h

 //

 //  AppView.h

 //  01-应用管理

 //

 //  Created by hellovoidworld on 14/11/25.

 //  Copyright (c) 2014年 hellovoidworld. All rights reserved.

 //

 #import <UIKit/UIKit.h>

 @class App, AppView;

 // 定义代理的协议

 @protocol AppViewDelegate <NSObject>

 // “下载”按钮被点击事件

 @optional

 - (void) appViewClickedDownloadButton:(AppView *) appView;

 @end

 @interface AppView : UIView

 // 代理

 @property(nonatomic, weak) id<AppViewDelegate> delegate;

 // 在Controller和View之间传输的Model数据

 @property(nonatomic, strong) App *appData;

 // 自定义将Model数据加载到View的构造方法

 - (instancetype) initWithApp:(App *) appData;

 // 自定义构造的类方法

 + (instancetype) appViewWithApp:(App *) appData;

 // 返回一个不带Model数据的类构造方法

 + (instancetype) appView;

 @end
 //

 //  AppView.m

 //  01-应用管理

 //

 //  Created by hellovoidworld on 14/11/25.

 //  Copyright (c) 2014年 hellovoidworld. All rights reserved.

 //

 #import "AppView.h"

 #import "App.h"

 // 封装私有属性

 @interface AppView()

 // 封装View中的控件,只允许自己访问

 @property (weak, nonatomic) IBOutlet UIImageView *iconView;

 @property (weak, nonatomic) IBOutlet UILabel *nameLabel;

 @property (weak, nonatomic) IBOutlet UIButton *downloadButton;

 - (IBAction)onDownloadButtonClick;

 @end

 @implementation AppView

 - (void)setAppData:(App *)appData {

     // 1.赋值Medel成员

     _appData = appData;

     // 2.设置图片

     self.iconView.image = [UIImage imageNamed:appData.icon];

     // 3.设置名字

     self.nameLabel.text = appData.name;

 }

 // 自定义将Model数据加载到View的构造方法

 - (instancetype) initWithApp:(App *) appData {

     // 1.从NIB取得控件

     UINib *nib = [UINib nibWithNibName:@"app" bundle:[NSBundle mainBundle]];

     NSArray *viewArray = [nib instantiateWithOwner:nil options:nil];

     AppView *appView = [viewArray lastObject];

     // 2.加载Model

     appView.appData = appData;

     return appView;

 }

 // 自定义构造的类方法

 + (instancetype) appViewWithApp:(App *) appData {

     return [[self alloc] initWithApp:appData];

 }

 // 返回一个不带Model数据的类构造方法

 + (instancetype) appView {

     return [self appViewWithApp:nil];

 }

 // 点击下载按钮

 - (IBAction)onDownloadButtonClick {

     // 更改“下载”按钮样式

     [self.downloadButton setTitle:@"已下载" forState:UIControlStateDisabled];

     self.downloadButton.enabled = NO;

     // 通知代理

     // 检查是否实现了代理方法

     if ([self.delegate respondsToSelector:@selector(appViewClickedDownloadButton:)]) {

         [self.delegate appViewClickedDownloadButton:self];

     }

 }

 @end
 //

 //  ViewController.m

 //  01-应用管理

 //

 //  Created by hellovoidworld on 14/11/24.

 //  Copyright (c) 2014年 hellovoidworld. All rights reserved.

 //

 #import "ViewController.h"

 #import "App.h"

 #import "AppView.h"

 #define ICON_KEY @"icon"

 #define NAME_KEY @"name"

 #define APP_WIDTH 85

 #define APP_HEIGHT 90

 #define MARGIN_HEAD 20

 #define ICON_WIDTH 50

 #define ICON_HEIGHT 50

 #define NAME_WIDTH APP_WIDTH

 #define NAME_HEIGHT 20

 #define DOWNLOAD_WIDTH (APP_WIDTH - 20)

 #define DOWNLOAD_HEIGHT 20

 @interface ViewController () <AppViewDelegate>

 /** 存放应用信息 */

 @property(nonatomic, strong) NSArray *apps; // 应用列表

 @end

 @implementation ViewController

 - (void)viewDidLoad {

     [super viewDidLoad];

     // Do any additional setup after loading the view, typically from a nib.

     [self loadApps];

 }

 - (void)didReceiveMemoryWarning {

     [super didReceiveMemoryWarning];

     // Dispose of any resources that can be recreated.

 }

 #pragma mark 取得应用列表

 - (NSArray *) apps {

     if (nil == _apps) {

         // 1.获得plist的全路径

         NSString *path = [[NSBundle mainBundle] pathForResource:@"app.plist" ofType:nil];

         // 2.加载数据

         NSArray *dictArray  = [NSArray arrayWithContentsOfFile:path];

         // 3.将dictArray里面的所有字典转成模型,放到新数组中

         NSMutableArray *appArray = [NSMutableArray array];

         for (NSDictionary *dict in dictArray) {

             // 3.1创建模型对象

             App *app = [App appWithDictionary:dict];

             // 3.2 添加到app数组中

             [appArray addObject:app];

         }

         _apps = appArray;

     }

     return _apps;

 }

 #pragma mark 加载全部应用列表

 - (void) loadApps {

     int appColumnCount = [self appColumnCount];

     int appRowCount = [self appRowCount];

     CGFloat marginX = (self.view.frame.size.width - APP_WIDTH * appColumnCount) / (appColumnCount + );

     CGFloat marginY = (self.view.frame.size.height - APP_HEIGHT * appRowCount) / (appRowCount + ) + MARGIN_HEAD;

     int column = ;

     int row = ;

     for (int index=; index<self.apps.count; index++) {

         App *appData = self.apps[index];

         // 1.创建View

         AppView *appView = [AppView appViewWithApp:appData];

         // 2.定义每个app的位置、尺寸

         CGFloat appX = marginX + column * (marginX + APP_WIDTH);

         CGFloat appY = marginY + row * (marginY + APP_HEIGHT);

         appView.frame = CGRectMake(appX, appY, APP_WIDTH, APP_HEIGHT);

         // 设置代理

         appView.delegate = self;

         // 3.加入此app信息到总view

         [self.view addSubview:appView];

         column++;

         if (column == appColumnCount) {

             column = ;

             row++;

         }

     }

 }

 #pragma mark 计算列数

 - (int) appColumnCount {

     int count = ;

     count = self.view.frame.size.width / APP_WIDTH;

     if ((int)self.view.frame.size.width % (int)APP_WIDTH == ) {

         count--;

     }

     return count;

 }

 #pragma mark 计算行数

 - (int) appRowCount {

     int count = ;

     count = (self.view.frame.size.height - MARGIN_HEAD) / APP_HEIGHT;

     if ((int)(self.view.frame.size.height - MARGIN_HEAD) % (int)APP_HEIGHT == ) {

         count--;

     }

     return count;

 }

 // “下载”按钮点击的代理方法

 - (void)appViewClickedDownloadButton:(AppView *)appView {

     // 创建下载成功消息框

     CGFloat labelWidth = ;

     CGFloat labelHeight = ;

     CGFloat labelX = (self.view.frame.size.width - labelWidth) / ;

     CGFloat labelY = (self.view.frame.size.height - labelHeight) / ;

     UILabel *successMsgLabel = [[UILabel alloc] initWithFrame:CGRectMake(labelX, labelY, labelWidth, labelHeight)];

     // 设置圆角矩形样式

     successMsgLabel.layer.cornerRadius = 10.0;

     successMsgLabel.layer.masksToBounds = YES;

     // 设置全透明隐藏

     successMsgLabel.alpha = ;

     successMsgLabel.textColor = [UIColor whiteColor];

     successMsgLabel.backgroundColor = [UIColor grayColor];

     [successMsgLabel setTextAlignment:NSTextAlignmentCenter];

     successMsgLabel.text = [NSString stringWithFormat:@"成功安装了%@", appView.appData.name];

     successMsgLabel.alpha = 0.7;

     // 使用动画

     [UIView beginAnimations:nil context:nil];

     [UIView setAnimationDuration:];

     successMsgLabel.alpha = ;

     [UIView commitAnimations];

     [self.view addSubview:successMsgLabel];

 }

 @end
[iOS基础控件 - 5.5] 代理设计模式 (基于”APP列表"练习)的更多相关文章
- [iOS基础控件 - 6.6] 展示团购数据 自定义TableViewCell
A.需求 1.头部广告 2.自定义cell:含有图片.名称.购买数量.价格 3.使用xib设计自定义cell,自定义cell继承自UITableViewCell 4.尾部“加载更多按钮”,以及其被点击 ...
- [iOS基础控件 - 4.4] 进一步封装"APP列表”,初见MVC模式
A.从ViewController分离View 之前的代码中,View的数据加载逻辑放在了总的ViewController中,增加了耦合性,应该对控制器ViewController隐藏数据加载到Vie ...
- iOS 基础控件(下)
上篇介绍了UIButton.UILabel.UIImageView和UITextField,这篇就简短一点介绍UIScrollView和UIAlertView. UIScrollView 顾名思义也知 ...
- [iOS基础控件 - 7.0] UIWebView
A.基本使用 1.概念 iOS内置的浏览器控件 Safari浏览器就是通过UIWebView实现的 2.用途:制作简易浏览器 (1)基本请求 创建请求 加载请求 (2)代理监听webView加载, ...
- [iOS基础控件 - 6.11.3] 私人通讯录Demo 控制器的数据传递、存储
A.需求 1.搭建一个"私人通讯录"Demo 2.模拟登陆界面 账号 密码 记住密码开关 自动登陆开关 登陆按钮 3.退出注销 4.增删改查 5.恢复数据(取消修改) 这个代码 ...
- [iOS基础控件 - 6.9] 聊天界面Demo
A.需求 做出一个类似于QQ.微信的聊天界面 1.每个cell包含发送时间.发送人(头像).发送信息 2.使用对方头像放在左边,我方头像在右边 3.对方信息使用白色背景对话框,我方信息使用蓝色背景对话 ...
- [iOS基础控件 - 6.12.3] @property属性 strong weak copy
A.概念 @property 的修饰词 strong: 强指针/强引用(iOS6及之前是retain) weak: 弱智真/弱引用(iOS6及之前是assign) 默认情况所有指针都是强指针 ...
- [iOS基础控件 - 6.11.4] storyboard 的 Segue
A.概念 storyboard中的跳转事件连线,都是一个UIStoryboardSegue对象(Segue) 来源控制器 触发控制器 目标控制器 跳转到的控制器 Seg ...
- [iOS基础控件 - 6.10.2] PickerView 自定义row内容 国家选择Demo
A.需求 1.自定义一个UIView和xib,包含国家名和国旗显示 2.学习row的重用 B.实现步骤 1.准备plist文件和国旗图片 2.创建模型 // // Flag.h // Co ...
随机推荐
- php获取类的实例变量
<?php class Page {private $title; //构造函数固定名称为__construct,这样能将php的类构造函数独立于类名,以后修改类名就无需修改构造函数名称 fun ...
- 缺少编译器要求的成员“System.Runtime.CompilerServices.ExtensionAttribute..ctor” 解决方案
静态类中添加如下.此方法本人测试有效. //缺少编译器要求的成员“ystem.Runtime.CompilerServices.ExtensionAttribute..ctor” namespace ...
- linux命令中 rpm –qa|grep softname的含义
rpm –qa是列出所有rpm包后面接管道 |grep softname就是查含有softname的包名
- 李洪强iOS开发之使用 Reachability 检测网络
1.iOS平台是按照一直有网络连接的思路来设计的,开发者利用这一特点创造了很多优秀的第三方应用. 大多数的iOS应用都需要联网,甚至有些应用严重依赖网络,没有网络就无法正常工作. 2.在你的应用尝试通 ...
- Hibernate逍遥游记-第1章-JDBC访问数据库
1. package mypack; import java.awt.*; import java.awt.event.*; import javax.swing.*; import javax.sw ...
- altium designer 13 学习之添加汉字
在altium desginer中如果你是想添加英文还是比较方便的,基本直接就可以输入了,但是添加中文就不是那么简单了,下面不介绍下如何在altium designer中快速的添加自己想要的中文 工具 ...
- VC中支持中文的字符串比较函数
VS2008开发环境,多字符集和UNICODE字符集都可用. WCHAR * mbcsToUnicode(const char *zStr) { int nByte; WCHAR *zMbcsStr; ...
- Spring中的实例生成方式及其生命周期
三种实例化bean的方式1.使用类构造器实例化 <!-- 使用类构造器实例化,class属性表示要使用的类的全限定名 --> <bean id="userDao1" ...
- 217. Contains Duplicate
题目: Given an array of integers, find if the array contains any duplicates. Your function should retu ...
- 手机通过WIFI连上ZXV10 H618B路由器但不能上网问题的解决
前几天朋友帮忙拿到一个ZXV10 H618B路由器,一看需要12V供电,还好以前留下一个12V输出的DC充电器,关键时刻用上了,先大概下载了此路由器的用户手册,发现原来是08年的产品,都5年了. 开始 ...