
Spring Boot2 系列教程(二十一)整合 MyBatis
前面两篇文章和读者聊了 Spring Boot 中最简单的数据持久化方案 JdbcTemplate,JdbcTemplate 虽然简单,但是用的并不多,因为它没有 MyBatis 方便,在 Spring+SpringMVC 中整合 MyBatis 步骤还是有点复杂的,要配置多个 Bean,Spring Boot 中对此做了进一步的简化,使 MyBatis 基本上可以做到开箱即用,本文就来看看在 Spring Boot 中 MyBatis 要如何使用。
工程创建
首先创建一个基本的 Spring Boot 工程,添加 Web 依赖,MyBatis 依赖以及 MySQL 驱动依赖,如下:

创建成功后,添加Druid依赖,并且锁定MySQL驱动版本,完整的依赖如下:
<dependency>

    <groupId>org.springframework.boot</groupId>

    <artifactId>spring-boot-starter-web</artifactId>

</dependency>

<dependency>

    <groupId>org.mybatis.spring.boot</groupId>

    <artifactId>mybatis-spring-boot-starter</artifactId>

    <version>2.0.0</version>

</dependency>

<dependency>

    <groupId>com.alibaba</groupId>

    <artifactId>druid-spring-boot-starter</artifactId>

    <version>1.1.10</version>

</dependency>

<dependency>

    <groupId>mysql</groupId>

    <artifactId>mysql-connector-java</artifactId>

    <version>5.1.28</version>

    <scope>runtime</scope>

</dependency>
如此,工程就算是创建成功了。小伙伴们注意,MyBatis 和 Druid 依赖的命名和其他库的命名不太一样,是属于 xxx-spring-boot-stater 模式的,这表示该 starter 是由第三方提供的。
基本用法
MyBatis 的使用和 JdbcTemplate 基本一致,首先也是在 application.properties 中配置数据库的基本信息:
spring.datasource.url=jdbc:mysql:///test01?useUnicode=true&characterEncoding=utf-8

spring.datasource.username=root

spring.datasource.password=root

spring.datasource.type=com.alibaba.druid.pool.DruidDataSource
配置完成后,MyBatis 就可以创建 Mapper 来使用了,例如我这里直接创建一个 UserMapper2,如下:
public interface UserMapper2 {

    @Select("select * from user")

    List<User> getAllUsers();

    @Results({

            @Result(property = "id", column = "id"),

            @Result(property = "username", column = "u"),

            @Result(property = "address", column = "a")

    })

    @Select("select username as u,address as a,id as id from user where id=#{id}")

    User getUserById(Long id);

    @Select("select * from user where username like concat('%',#{name},'%')")

    List<User> getUsersByName(String name);

    @Insert({"insert into user(username,address) values(#{username},#{address})"})

    @SelectKey(statement = "select last_insert_id()", keyProperty = "id", before = false, resultType = Integer.class)

    Integer addUser(User user);

    @Update("update user set username=#{username},address=#{address} where id=#{id}")

    Integer updateUserById(User user);

    @Delete("delete from user where id=#{id}")

    Integer deleteUserById(Integer id);

}
这里是通过全注解的方式来写 SQL,不写 XML 文件。
@Select、@Insert、@Update 以及 @Delete 四个注解分别对应 XML 中的 select、insert、update 以及 delete 标签,@Results 注解类似于 XML 中的 ResultMap 映射文件(getUserById 方法给查询结果的字段取别名主要是向小伙伴们演示下 @Results 注解的用法)。
另外使用 @SelectKey 注解可以实现主键回填的功能,即当数据插入成功后,插入成功的数据 id 会赋值到 user 对象的id 属性上。
UserMapper2 创建好之后,还要配置 mapper 扫描,有两种方式,一种是直接在 UserMapper2 上面添加 @Mapper 注解,这种方式有一个弊端就是所有的 Mapper 都要手动添加,要是落下一个就会报错,还有一个一劳永逸的办法就是直接在启动类上添加 Mapper 扫描,如下:
@SpringBootApplication

@MapperScan(basePackages = "org.javaboy.mybatis.mapper")

public class MybatisApplication {

    public static void main(String[] args) {

        SpringApplication.run(MybatisApplication.class, args);

    }

}
好了,做完这些工作就可以去测试 Mapper 的使用了。
mapper 映射
当然,开发者也可以在 XML 中写 SQL,例如创建一个 UserMapper,如下:
public interface UserMapper {

    List<User> getAllUser();

    Integer addUser(User user);

    Integer updateUserById(User user);

    Integer deleteUserById(Integer id);

}
然后创建 UserMapper.xml 文件,如下:
<?xml version="1.0" encoding="UTF-8" ?>

<!DOCTYPE mapper

        PUBLIC "-//mybatis.org//DTD Mapper 3.0//EN"

        "http://mybatis.org/dtd/mybatis-21-mapper.dtd">

<mapper namespace="org.javaboy.mybatis.mapper.UserMapper">

    <select id="getAllUser" resultType="org.javaboy.mybatis.model.User">

        select * from t_user;

    </select>

    <insert id="addUser" parameterType="org.javaboy.mybatis.model.User">

        insert into user (username,address) values (#{username},#{address});

    </insert>

    <update id="updateUserById" parameterType="org.javaboy.mybatis.model.User">

        update user set username=#{username},address=#{address} where id=#{id}

    </update>

    <delete id="deleteUserById">

        delete from user where id=#{id}

    </delete>

</mapper>
将接口中方法对应的 SQL 直接写在 XML 文件中。
那么这个 UserMapper.xml 到底放在哪里呢?有两个位置可以放,第一个是直接放在 UserMapper 所在的包下面:
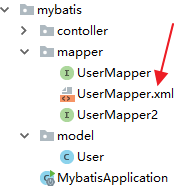
放在这里的 UserMapper.xml 会被自动扫描到,但是有另外一个 Maven 带来的问题,就是 java 目录下的 xml 资源在项目打包时会被忽略掉,所以,如果 UserMapper.xml 放在包下,需要在 pom.xml 文件中再添加如下配置,避免打包时 java 目录下的 XML 文件被自动忽略掉:
<build>

    <resources>

        <resource>

            <directory>src/main/java</directory>

            <includes>

                <include>**/*.xml</include>

            </includes>

        </resource>

        <resource>

            <directory>src/main/resources</directory>

        </resource>

    </resources>

</build>
当然,UserMapper.xml 也可以直接放在 resources 目录下,这样就不用担心打包时被忽略了,但是放在 resources 目录下,必须创建和 Mapper 接口包目录相同的目录层级,这样才能确保打包后 XML 和 Mapper 接口又处于在一起,否则 XML 文件将不能被自动扫描,这个时候就需要添加额外配置。例如我在 resources 目录下创建 mapper 目录用来放 mapper 文件,如下:
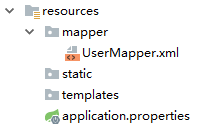
此时在 application.properties 中告诉 mybatis 去哪里扫描 mapper:
mybatis.mapper-locations=classpath:mapper/*.xml
如此配置之后,mapper 就可以正常使用了。注意这种方式不需要在 pom.xml 文件中配置文件过滤。
原理分析
在 SSM 整合中,开发者需要自己提供两个 Bean,一个SqlSessionFactoryBean ,还有一个是 MapperScannerConfigurer,在 Spring Boot 中,这两个东西虽然不用开发者自己提供了,但是并不意味着这两个 Bean 不需要了,在 org.mybatis.spring.boot.autoconfigure.MybatisAutoConfiguration 类中,我们可以看到 Spring Boot 提供了这两个 Bean,部分源码如下:
@org.springframework.context.annotation.Configuration

@ConditionalOnClass({ SqlSessionFactory.class, SqlSessionFactoryBean.class })

@ConditionalOnSingleCandidate(DataSource.class)

@EnableConfigurationProperties(MybatisProperties.class)

@AutoConfigureAfter(DataSourceAutoConfiguration.class)

public class MybatisAutoConfiguration implements InitializingBean {

  @Bean

  @ConditionalOnMissingBean

  public SqlSessionFactory sqlSessionFactory(DataSource dataSource) throws Exception {

    SqlSessionFactoryBean factory = new SqlSessionFactoryBean();

    factory.setDataSource(dataSource);

    return factory.getObject();

  }

  @Bean

  @ConditionalOnMissingBean

  public SqlSessionTemplate sqlSessionTemplate(SqlSessionFactory sqlSessionFactory) {

    ExecutorType executorType = this.properties.getExecutorType();

    if (executorType != null) {

      return new SqlSessionTemplate(sqlSessionFactory, executorType);

    } else {

      return new SqlSessionTemplate(sqlSessionFactory);

    }

  }

  @org.springframework.context.annotation.Configuration

  @Import({ AutoConfiguredMapperScannerRegistrar.class })

  @ConditionalOnMissingBean(MapperFactoryBean.class)

  public static class MapperScannerRegistrarNotFoundConfiguration implements InitializingBean {

    @Override

    public void afterPropertiesSet() {

      logger.debug("No {} found.", MapperFactoryBean.class.getName());

    }

  }

}
从类上的注解可以看出,当当前类路径下存在 SqlSessionFactory、 SqlSessionFactoryBean 以及 DataSource 时,这里的配置才会生效,SqlSessionFactory 和 SqlTemplate 都被提供了。为什么要看这段代码呢?下篇文章,松哥和大伙分享 Spring Boot 中 MyBatis 多数据源的配置时,这里将是一个重要的参考。
好了,本文就先说到这里,本文相关案例,大家可以在 GitHub 上下载:https://github.com/lenve/javaboy-code-samples
关注公众号【江南一点雨】,专注于 Spring Boot+微服务以及前后端分离等全栈技术,定期视频教程分享,关注后回复 Java ,领取松哥为你精心准备的 Java 干货!

Spring Boot2 系列教程(二十一)整合 MyBatis的更多相关文章
- Spring Boot2 系列教程 (九) | SpringBoot 整合 Mybatis
前言 如题,今天介绍 SpringBoot 与 Mybatis 的整合以及 Mybatis 的使用,本文通过注解的形式实现. 什么是 Mybatis MyBatis 是支持定制化 SQL.存储过程以及 ...
- Spring Boot2 系列教程(二十)Spring Boot 整合JdbcTemplate 多数据源
多数据源配置也算是一个常见的开发需求,Spring 和 SpringBoot 中,对此都有相应的解决方案,不过一般来说,如果有多数据源的需求,我还是建议首选分布式数据库中间件 MyCat 去解决相关问 ...
- Spring Boot2 系列教程(二十五)Spring Boot 整合 Jpa 多数据源
本文是 Spring Boot 整合数据持久化方案的最后一篇,主要和大伙来聊聊 Spring Boot 整合 Jpa 多数据源问题.在 Spring Boot 整合JbdcTemplate 多数据源. ...
- Spring Boot2 系列教程(二十六)Spring Boot 整合 Redis
在 Redis 出现之前,我们的缓存框架各种各样,有了 Redis ,缓存方案基本上都统一了,关于 Redis,松哥之前有一个系列教程,尚不了解 Redis 的小伙伴可以参考这个教程: Redis 教 ...
- Spring Boot2 系列教程(二十八)Spring Boot 整合 Session 共享
这篇文章是松哥的原创,但是在第一次发布的时候,忘了标记原创,结果被好多号转发,导致我后来整理的时候自己没法标记原创了.写了几百篇原创技术干货了,有一两篇忘记标记原创进而造成的一点点小小损失也能接受,不 ...
- Spring Boot2 系列教程(二)创建 Spring Boot 项目的三种方式
我最早是 2016 年底开始写 Spring Boot 相关的博客,当时使用的版本还是 1.4.x ,文章发表在 CSDN 上,阅读量最大的一篇有 43W+,如下图: 2017 年由于种种原因,就没有 ...
- Spring Boot2 系列教程(二十二)整合 MyBatis 多数据源
关于多数据源的配置,前面和大伙介绍过 JdbcTemplate 多数据源配置,那个比较简单,本文来和大伙说说 MyBatis 多数据源的配置. 其实关于多数据源,我的态度还是和之前一样,复杂的就直接上 ...
- Spring Boot2 系列教程(二十四)Spring Boot 整合 Jpa
Spring Boot 中的数据持久化方案前面给大伙介绍了两种了,一个是 JdbcTemplate,还有一个 MyBatis,JdbcTemplate 配置简单,使用也简单,但是功能也非常有限,MyB ...
- Spring Boot2 系列教程(二十九)Spring Boot 整合 Redis
经过 Spring Boot 的整合封装与自动化配置,在 Spring Boot 中整合Redis 已经变得非常容易了,开发者只需要引入 Spring Data Redis 依赖,然后简单配下 red ...
随机推荐
- 一致性哈希(PHP核心技术与最佳实践)
<?php /** * 分布式缓存部署方案 * 当有1台cache服务器不能满足我们的需求,我们需要布置多台来做分布式服务器,但是 * 有个问题,怎么确定一个数据应该保存到哪台服务器上呢? * ...
- 给老师安排课表JAVA项目及登录窗口的实现
实现一个安排课表的Java实验. 有以下几点要求: ①用所给的教师姓名进行课表安排 ②用所给的地点进行课表安排 ③不得有重复的课程名称出现 ④将信息写入到文件里 ⑤用窗口来进行实现 package c ...
- Azure pipeline 配置根据条件执行脚本
Azure pipeline 配置根据条件执行脚本 Intro 我的应用通过 azure pipeline 来做持续集成,之前已经介绍了根据不同分支去打包不同的package,具体的就不再这里详细介绍 ...
- HTML块元素与内联元素嵌套规则
HTML存在许多种类型的标签,有的标签下面只允许特定的标签存在,这就叫HTML嵌套规则.不按HTML嵌套规则写,浏览器就不会正确解析,会将不符合嵌套规则的节点放到目标节点的下面,或者变成纯文本.关于H ...
- bugku 一个普通的压缩包
压缩包打不开,用winhex打开压缩包,发现头文件是zip的,将后缀改为zip,成功解压. 打开发现还是个压缩包,而且打不开,提示secret.png损坏,使用winhex打开. 将a8 3c 7a ...
- wampserver 运行橙色,80端口没有被占用,查看错误日志方法
wampserver运行时橙色,经检查80端口并没有被占用,试了很多种方法都无效,去查看错误日志吧 1.以管理员身份打开CMD 注意这里必须是管理员身份的CMD ,powershell不行的 进入wa ...
- Zabbix安装与简单配置
目录 0. 前言 1. 安装 1.1 准备安装环境 1.1.1 下载安装包 1.1.2 修改文件配置 1.2 开始安装 2. 实验环境 2.1 简易拓扑图 2.2 基本配置 3. 配置 0. 前言 不 ...
- 单引号、双引号与定界符——PHP
单引号与双引号 单引号和双引号在echo输出时的区别 echo输出时,如果使用单引号,那么echo会把单引号之间的全部内容当成普通字符串输出,不能识别变量和转义字符(单引号串中的内容总被认为是普通字符 ...
- 上手Typescript,让JavaScript适用于大型应用开发
Typescript Typescript是一个基于静态类型的,能编译为JavaScript的JavaScript的超集.也就是说任何JavaScript都可以看成是Typescript,IDE能够更 ...
- [NOIp2018] luogu P5021 赛道修建
我同学的歌 题目描述 你有一棵树,每条边都有权值 did_idi.现在要修建 mmm 条赛道,一条赛道是一条连贯的链,且一条边至多出现在一条赛道里.一条赛道的长被定义为,组成这条赛道的边的权值之和. ...