springBoot 集成swagger2.9.2
加依赖
        <!-- https://mvnrepository.com/artifact/io.springfox/springfox-swagger-ui -->

        <dependency>

            <groupId>io.springfox</groupId>

            <artifactId>springfox-swagger-ui</artifactId>

            <version>2.9.2</version>

        </dependency>

        <!-- https://mvnrepository.com/artifact/io.springfox/springfox-swagger2 -->

        <dependency>

            <groupId>io.springfox</groupId>

            <artifactId>springfox-swagger2</artifactId>

            <version>2.9.2</version>

        </dependency>
springBoot的application.java的同级目录下新建SwaggerConfiguration类
package com.example.demo;

import org.springframework.context.annotation.Bean;

import org.springframework.context.annotation.Configuration;

import springfox.documentation.builders.ApiInfoBuilder;

import springfox.documentation.builders.PathSelectors;

import springfox.documentation.builders.RequestHandlerSelectors;

import springfox.documentation.service.ApiInfo;

import springfox.documentation.service.Contact;

import springfox.documentation.spi.DocumentationType;

import springfox.documentation.spring.web.plugins.Docket;

import springfox.documentation.swagger2.annotations.EnableSwagger2;

@Configuration

@EnableSwagger2

public class SwaggerConfiguration {

    @Bean

    public Docket api() {

        return new Docket(DocumentationType.SWAGGER_2)

                .apiInfo(getApiInfo())

                .select()

                .apis(RequestHandlerSelectors.basePackage("com.example.demo.controller")) //过滤的接口

                .paths(PathSelectors.any())

                .build();

    }

    private ApiInfo getApiInfo() {

        // 定义联系人信息

        Contact contact = new Contact("name","https://baidu.com", "test@test.com");

        return new ApiInfoBuilder()

                .title("标题")

                .description("描述")

                .version("版本")

                .license("Apache 2.0")

                .licenseUrl("http://www.apache.org/licenses/LICENSE-2.0")

                .contact(contact)

                .build();

    }

}
controller类:
@RestController

@Api(value = "/user",description = "这个是用户信息 ",tags = "用户信息")

@RequestMapping("/user")

public class UserContrller {

    @ApiOperation(value="获取用户列表", notes="")

    @GetMapping("")

    public List<User> getUserList() {

        return null;

    }

    @ApiOperation(value="创建用户", notes="根据User对象创建用户")

    @PostMapping("")

    public String postUser(@RequestBody User user) {

        return "success";

    }
}
浏览器输入 http://localhost:8080/swagger-ui.html 访问
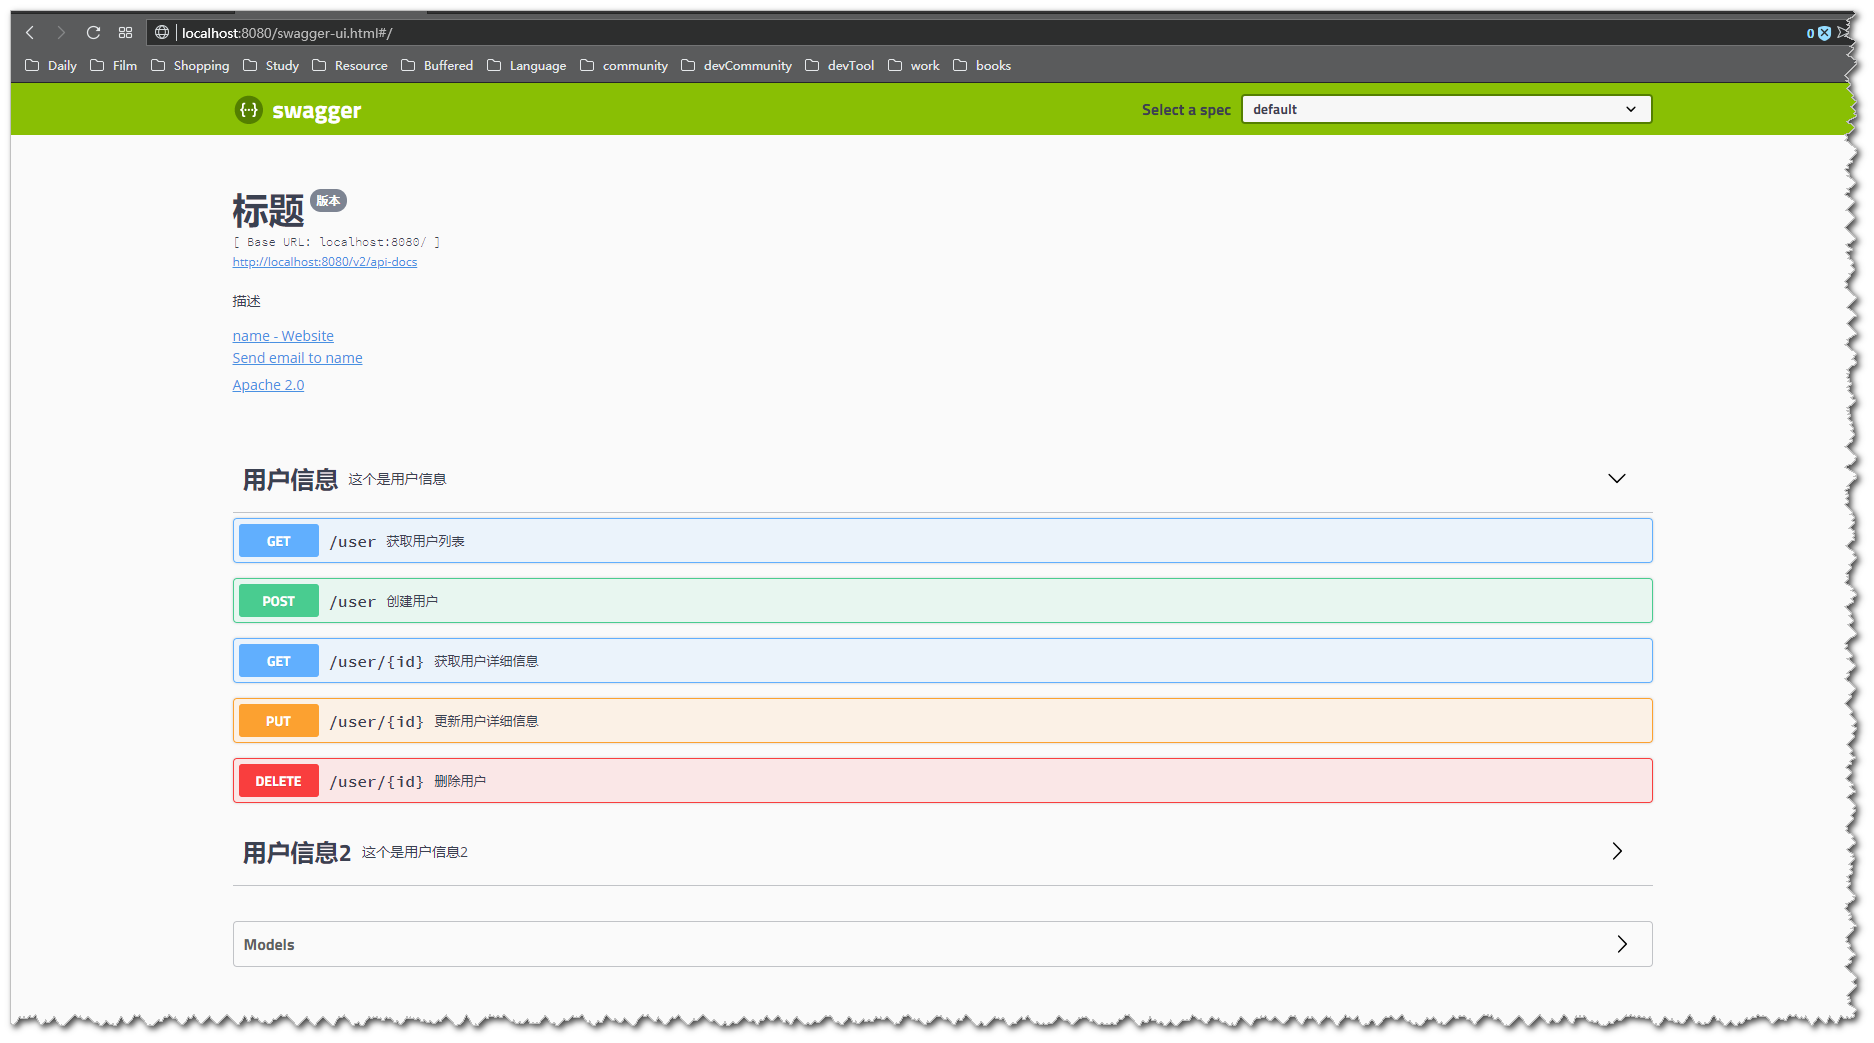
这样就完成了, 接下来就是去搜Swagger的常用注解怎么使用就ok了。 附上链接: https://github.com/swagger-api/swagger-core/wiki/annotations
——————————————————————————————————————
以下是我遇到的部分问题
@ApiImplicitParam 注解: 如果参数是实体类并且实体类中被@ApiModel和@ApiModelProperty注解修饰过, @ApiImplicitParam注解就不要加了。
如果,没有实体类没有被@ApiModel和@ApiModelProperty注解修饰过, @ApiImplicitParam可加可不加, 另外在实体类参数之前加上@RequestBody 和不加@RequestBody,swagger的文档参数显示是不一样的
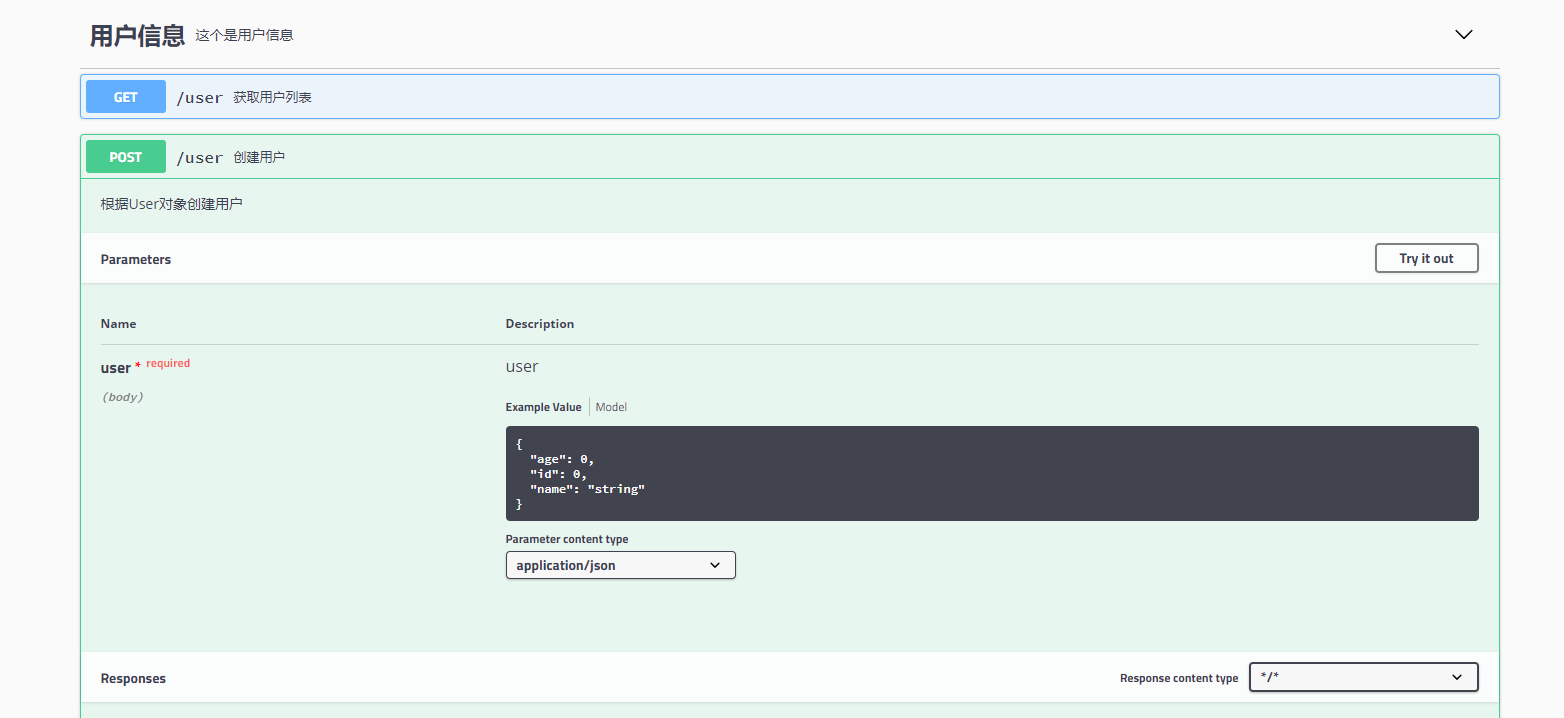
比如不加@RequestBody注解的代码:
@ApiOperation(value="创建用户", notes="根据User对象创建用户")
@PostMapping("")
public String postUser(User user) {
    users.put(user.getId(), user);
    return "success";
}
User实体:
package com.example.demo.model;

import io.swagger.annotations.ApiModel;

import io.swagger.annotations.ApiModelProperty;

import lombok.Data;

@ApiModel(value = "用户信息", description = "这个用户信息只用于测试")

@Data

public class User {

    @ApiModelProperty("id")

    private Long id;

    @ApiModelProperty(value="姓名",required=true)

    private String name;

    @ApiModelProperty("年龄")

    private Integer age;

}
swagger显示的参数是这样的

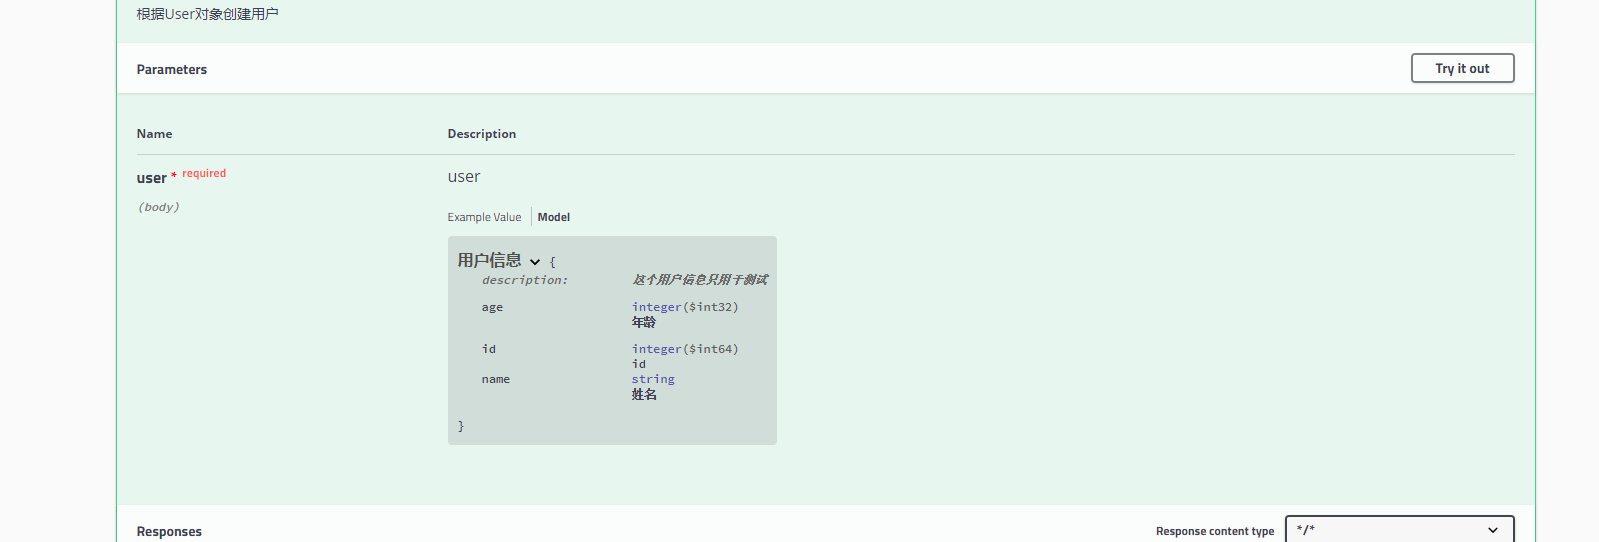
加了@RequestBody
    @ApiOperation(value="创建用户", notes="根据User对象创建用户")

    @PostMapping("")

    public String postUser(@RequestBody User user) {

        users.put(user.getId(), user);

        return "success";

    }
加了@RequestBody的swagger:
springBoot 集成swagger2.9.2的更多相关文章
- SpringBoot集成Swagger2实现Restful(类型转换错误解决办法)
1.pom.xml增加依赖包 <dependency> <groupId>io.springfox</groupId> <artifactId>spri ...
- springboot集成swagger2构建RESTful API文档
在开发过程中,有时候我们需要不停的测试接口,自测,或者交由测试测试接口,我们需要构建一个文档,都是单独写,太麻烦了,现在使用springboot集成swagger2来构建RESTful API文档,可 ...
- SpringBoot集成Swagger2在线文档
目录 SpringBoot集成Swagger2在线文档 前言 集成SpringBoot 登录接口文档示例 代码 效果 注解说明 总结 SpringBoot集成Swagger2在线文档 前言 不得不说, ...
- springboot 集成swagger2.x 后静态资源报404
package com.bgs360.configuration; import org.springframework.context.EnvironmentAware; import org.sp ...
- SpringBoot集成Swagger2并配置多个包路径扫描
1. 简介 随着现在主流的前后端分离模式开发越来越成熟,接口文档的编写和规范是一件非常重要的事.简单的项目来说,对应的controller在一个包路径下,因此在Swagger配置参数时只需要配置一 ...
- springboot集成swagger2报Illegal DefaultValue null for parameter type integer
springboot集成swagger2,实体类中有int类型,会报" Illegal DefaultValue null for parameter type integer"的 ...
- SpringBoot集成Swagger2 以及汉化 快速教程
(一) Swagger介绍 Swagger 是一款RESTFUL接口的文档在线自动生成+功能测试功能软件 (二)为什么使用Swagger 在现在的开发过程中还有很大一部分公司都是以口口相传的方式来进行 ...
- Springboot集成swagger2生成接口文档
[转载请注明]: 原文出处:https://www.cnblogs.com/jstarseven/p/11509884.html 作者:jstarseven 码字挺辛苦的..... 一 ...
- springboot 集成swagger2
使用Swagger 可以动态生成Api接口文档,在项目开发过程中可以帮助前端开发同事减少和后端同事的沟通成本,而是直接参照生成的API接口文档进行开发,提高了开发效率.这里以springboot(版本 ...
- [转] spring-boot集成swagger2
经测,spring-boot版本使用1.5.2+时需使用springfox-swagger2版本2.5+(spring-boot 1.2 + springfox-swagger2 2.2 在未扫描ja ...
随机推荐
- sesstionStorage和localStorage
使用: 对于多页面的pc端,为了同步多页面的消息提醒,可以将数据储存在localStorage中,多页面共享同一个localStorage.然后使用setInterval轮询获取数据,执行逻辑代码 s ...
- java课后思考问题(七)
1.继承条件下的构造方法调用 package parent;class Grandparent { public Grandparent() { System.out.println("Gr ...
- Typora--Draw Diagrams With Markdown
Typora Typora supports some Markdown extension for diagrams, you could enable this feature from pref ...
- ruby 字符串常用方法学习
引用链接:http://www.blogjava.net/nkjava/archive/2010/01/03/308088.html 1,切片:silce, [ ]-----------------[ ...
- ruby 数组 Hash相互转换
由[索引, 值, ...] 型的数组变为哈希表 ary = [1,"a", 2,"b", 3,"c"] p Hash[*ary] # =&g ...
- (译)Cg Programming/Unity(Cg编程/Unity)
最近在学习Unity3d中的shader编程,能找到的中文资料比较少,于是,尝试翻译一下wiki Books上的资料,以方便其他跟我一样的入门学习者.由于是第一次翻译技术资料,经验不足,难免出错,请路 ...
- JAVA基础之转换流和缓冲流
个人理解: 在理解的字符流和字节流的区别后.要是想读取指定的编码格式的文件时,特别是不是默认的格式时,就需要转换流了,需要注意的是字符流是需要清除缓冲区的:当需要快速的进行读取时,则需要缓冲流.存在即 ...
- B/S架构 C/S架构 SOA架构
一.什么是C/S和B/S 第一.什么是C/S结构.C/S (Client/Server)结构,即大家熟知的客户机和服务器结构.它是软件系统体系结构,通过它可以充分利用两端硬件环境的优势,将任务合理分配 ...
- 编写Servlet,验证用户登录,如果用户名与密码都为“admin”则验证通过,跳转欢迎页面,否则弹出提示信息“用户名或密码错误,请重新输入!”,点击“确定”后跳转至登录页面
java代码:(Test1) package com.test; import java.io.IOException; import java.io.PrintWriter; import java ...
- SVN合并步骤
1.trunk->branch/tag 分支路径在分支文件夹中,选择右键检出 2.合并分支到主干分支新增 1.txt 文件 需要合并到主干 在trunck->鼠标右键合并->合并到不 ...