
[转] spring-boot集成swagger2
经测,spring-boot版本使用1.5.2+时需使用springfox-swagger2版本2.5+(spring-boot 1.2 + springfox-swagger2 2.2 在未扫描jar包里的component时表现良好)。
否则,如果spring-boot扫描jar包中的spring component将抛异常,程序无法启动。
详见springcloud feign 注入bean null问题。
添加依赖包
<dependency>

    <groupId>io.springfox</groupId>

    <artifactId>springfox-swagger2</artifactId>

    <version>2.7.</version>

</dependency>

<dependency>

    <groupId>io.springfox</groupId>

    <artifactId>springfox-swagger-ui</artifactId>

    <version>2.7.</version>

</dependency>
EnableSwagger2
在启动类上添加@EnableSwagger2注解即可完成最简单的swagger集成。
package com.enmo.dbaas;

import org.springframework.boot.SpringApplication;

import org.springframework.boot.autoconfigure.SpringBootApplication;

import org.springframework.cloud.client.discovery.EnableDiscoveryClient;

import org.springframework.cloud.netflix.feign.EnableFeignClients;

import org.springframework.context.ApplicationContext;

import springfox.documentation.swagger2.annotations.EnableSwagger2;

/**

 * Create by IntelliJ IDEA

 *

 * @Author chenlei

 * @DateTime 2017/9/25 15:21

 * @Description Application

 */

@EnableDiscoveryClient

@EnableFeignClients

@SpringBootApplication

@EnableSwagger2

public class Application {

    public static void main(String[] args){

        ApplicationContext ctx = SpringApplication.run(Application.class, args);

    }

}
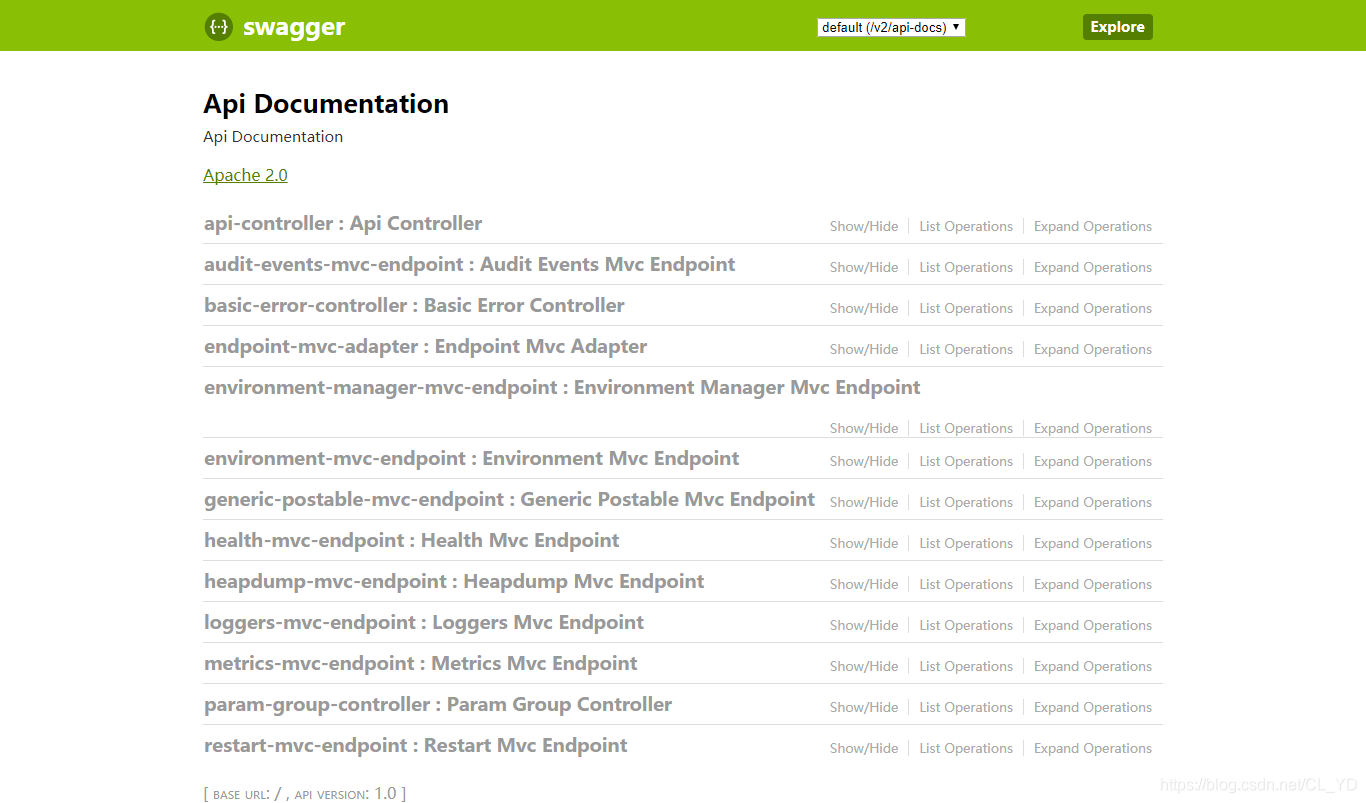
启动项目,浏览器访问:http://${server.ip}:{server.port}/swagger-ui.html即可查看项目下所有被@Controller注解过的类中所有的API,包括spring-boot和swagger2自身的Controller。
自定义配置
默认的API生成方式不满足实际使用需求,可以做一些简单的配置,按照自己的需求展示API。
API过滤和文档说明
创建一个swagger配置类,筛选API/生成文档信息。
package com.enmo.dbaas.swagger2;

import org.springframework.context.annotation.Bean;

import org.springframework.context.annotation.Configuration;

import springfox.documentation.builders.ApiInfoBuilder;

import springfox.documentation.builders.PathSelectors;

import springfox.documentation.builders.RequestHandlerSelectors;

import springfox.documentation.service.ApiInfo;

import springfox.documentation.service.Contact;

import springfox.documentation.spi.DocumentationType;

import springfox.documentation.spring.web.plugins.Docket;

/**

 * Create by IntelliJ IDEA

 *

 * @Author chenlei

 * @DateTime 2017/9/27 10:07

 * @Description Swagger2

 */

@Configuration

public class Swagger2 {

    @Bean

    public Docket createRestApi() {

        return new Docket(DocumentationType.SWAGGER_2)

                .apiInfo(apiInfo())

                .select()

                .apis(RequestHandlerSelectors.basePackage("com.enmo.dbaas.web"))//这里配置swagger扫描的规则,可以是包/类注解/方法注解

                .paths(PathSelectors.any())//筛选路径,可是any/正则表达式/antPattern

                .build();

    }

    private ApiInfo apiInfo() {

        return new ApiInfoBuilder()

                .title("DBAAS-CONFIGURATION(选件组/参数组/资源池) APIs")

                .description("Generated by spring-boot-swagger2.")

                .termsOfServiceUrl("")

                .contact(new Contact("陈雷","","lei.chen@enmotech.com"))

                .version("1.0")

                .build();

    }

}
重新启动项目,结果如下。
界面汉化
如果需要汉化界面,需要再做一些简单的配置。
可以查看swagger-ui包里的代码,只有一个resources文件夹,里面包括了所有html/css/js/img,也包括一个lang文件夹,里面有中文js映射(zh-cn.js)。
由于需要配置View,需要添加依赖spring-boot-starter-thymeleaf。
<dependency>

    <groupId>org.springframework.boot</groupId>

    <artifactId>spring-boot-starter-thymeleaf</artifactId>

</dependency>
然后覆盖swagger-ui的swagger-ui.html(放在项目的resources/templates文件夹下,这是默认的template文件夹,application.prperties可配置成其他文件夹)。
主要是添加了两行:
<script src='webjars/springfox-swagger-ui/lang/translator.js' type='text/javascript'></script>

<script src='webjars/springfox-swagger-ui/lang/zh-cn.js' type='text/javascript'></script>
<!DOCTYPE html>
<html>
<head>
<meta charset="UTF-8"/>
<title>Swagger UI</title>
<link rel="icon" type="image/png" href="webjars/springfox-swagger-ui/images/favicon-32x32.png" sizes="32x32"/>
<link rel="icon" type="image/png" href="webjars/springfox-swagger-ui/images/favicon-16x16.png" sizes="16x16"/>
<link href='webjars/springfox-swagger-ui/css/typography.css' media='screen' rel='stylesheet' type='text/css'/>
<link href='webjars/springfox-swagger-ui/css/reset.css' media='screen' rel='stylesheet' type='text/css'/>
<link href='webjars/springfox-swagger-ui/css/screen.css' media='screen' rel='stylesheet' type='text/css'/>
<link href='webjars/springfox-swagger-ui/css/reset.css' media='print' rel='stylesheet' type='text/css'/>
<link href='webjars/springfox-swagger-ui/css/print.css' media='print' rel='stylesheet' type='text/css'/> <script src='webjars/springfox-swagger-ui/lib/object-assign-pollyfill.js' type='text/javascript'></script>
<script src='webjars/springfox-swagger-ui/lib/jquery-1.8.0.min.js' type='text/javascript'></script>
<script src='webjars/springfox-swagger-ui/lib/jquery.slideto.min.js' type='text/javascript'></script>
<script src='webjars/springfox-swagger-ui/lib/jquery.wiggle.min.js' type='text/javascript'></script>
<script src='webjars/springfox-swagger-ui/lib/jquery.ba-bbq.min.js' type='text/javascript'></script>
<script src='webjars/springfox-swagger-ui/lib/handlebars-4.0.5.js' type='text/javascript'></script>
<script src='webjars/springfox-swagger-ui/lib/lodash.min.js' type='text/javascript'></script>
<script src='webjars/springfox-swagger-ui/lib/backbone-min.js' type='text/javascript'></script>
<script src='webjars/springfox-swagger-ui/swagger-ui.min.js' type='text/javascript'></script>
<script src='webjars/springfox-swagger-ui/lib/highlight.9.1.0.pack.js' type='text/javascript'></script>
<script src='webjars/springfox-swagger-ui/lib/highlight.9.1.0.pack_extended.js' type='text/javascript'></script>
<script src='webjars/springfox-swagger-ui/lib/jsoneditor.min.js' type='text/javascript'></script>
<script src='webjars/springfox-swagger-ui/lib/marked.js' type='text/javascript'></script>
<script src='webjars/springfox-swagger-ui/lib/swagger-oauth.js' type='text/javascript'></script> <script src='webjars/springfox-swagger-ui/springfox.js' type='text/javascript'></script>
<script src='webjars/springfox-swagger-ui/lang/translator.js' type='text/javascript'></script>
<script src='webjars/springfox-swagger-ui/lang/zh-cn.js' type='text/javascript'></script>
</head> <body class="swagger-section">
<div id='header'>
<div class="swagger-ui-wrap">
<a id="logo" href="http://swagger.io"><img class="logo__img" alt="swagger" height="" width="" src="webjars/springfox-swagger-ui/images/logo_small.png" /><span class="logo__title">swagger</span></a>
<form id='api_selector'>
<div class='input'>
<select id="select_baseUrl" name="select_baseUrl"/>
</div>
<div class='input'><input placeholder="http://example.com/api" id="input_baseUrl" name="baseUrl" type="text"/></div>
<div id='auth_container'></div>
<div class='input'><a id="explore" class="header__btn" href="#" data-sw-translate="">Explore</a></div>
</form>
</div>
</div> <div id="message-bar" class="swagger-ui-wrap" data-sw-translate=""> </div>
<div id="swagger-ui-container" class="swagger-ui-wrap"></div>
</body>
</html>
最后覆盖swagger-ui.html请求,重定向到汉化的页面。
package com.enmo.dbaas.swagger2;

import org.springframework.stereotype.Controller;

import org.springframework.web.bind.annotation.RequestMapping;

import org.springframework.web.bind.annotation.RequestMethod;

/**

 * Create by IntelliJ IDEA

 *

 * @Author chenlei

 * @DateTime 2017/9/27 10:55

 * @Description SwaggerController

 */

@Controller

public class SwaggerController {

    @RequestMapping(value = "/swagger-ui.html",method = RequestMethod.GET)

    public String swagger(){

        return "swagger";

    }

}
重启项目: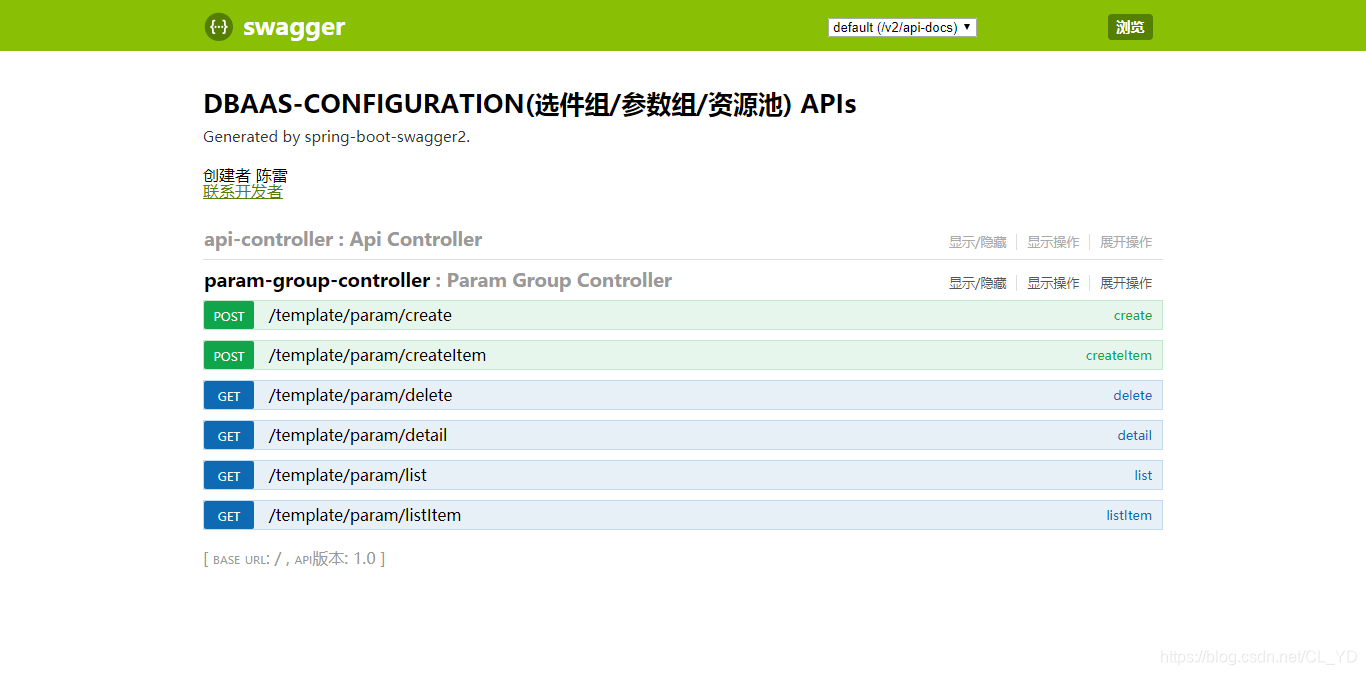
多个微服务集中部署swagger
需要基于spring-cloud-starter-zuul,具体配置过程参考:微服务架构下使用Spring Cloud Zuul作为网关将多个微服务整合到一个Swagger服务上
注解
[原文地址:https://blog.csdn.net/CL_YD/article/details/85103012]
[转] spring-boot集成swagger2的更多相关文章
- Spring Boot 集成 Swagger2 与配置 OAuth2.0 授权
Spring Boot 集成 Swagger2 很简单,由于接口采用了OAuth2.0 & JWT 协议做了安全验证,使用过程中也遇到了很多小的问题,多次尝试下述配置可以正常使用. Maven ...
- Spring boot集成swagger2
一.Swagger2是什么? Swagger 是一款RESTFUL接口的文档在线自动生成+功能测试功能软件. Swagger 是一个规范和完整的框架,用于生成.描述.调用和可视化 RESTful 风格 ...
- Spring boot集成Swagger2,并配置多个扫描路径,添加swagger-ui-layer
Spring boot集成Swagger,并配置多个扫描路径 1:认识Swagger Swagger 是一个规范和完整的框架,用于生成.描述.调用和可视化 RESTful 风格的 Web 服务.总体目 ...
- Spring Boot 集成Swagger2生成RESTful API文档
Swagger2可以在写代码的同时生成对应的RESTful API文档,方便开发人员参考,另外Swagger2也提供了强大的页面测试功能来调试每个RESTful API. 使用Spring Boot可 ...
- Spring Boot 集成 Swagger2 教程
上篇讲过 Spring Boot RESTful api ,这篇简单介绍下 SwaggerUI 在 Spring Boot 中的应用. Swagger 是一个规范和完整的框架,用于生成.描述.调用和可 ...
- spring boot 集成swagger2
1 在pom.xml中加入Swagger2的依赖 <dependency> <groupId>io.springfox</groupId> <artifac ...
- Spring Boot之Swagger2集成
一.Swagger2简单介绍 Swagger2,它可以轻松的整合到Spring Boot中,并与Spring MVC程序配合组织出强大RESTful API文档.它既可以减少我们创建文档的工作量,同时 ...
- spring boot整合Swagger2
Swagger 是一个规范和完整的框架,用于生成.描述.调用和可视化RESTful风格的 Web 服务.总体目标是使客户端和文件系统作为服务器以同样的速度来更新.文件的方法,参数和模型紧密集成到服务器 ...
- Spring Boot 集成 Swagger 生成 RESTful API 文档
原文链接: Spring Boot 集成 Swagger 生成 RESTful API 文档 简介 Swagger 官网是这么描述它的:The Best APIs are Built with Swa ...
- Spring boot集成Swagger,并配置多个扫描路径
Spring boot集成Swagger,并配置多个扫描路径 1:认识Swagger Swagger 是一个规范和完整的框架,用于生成.描述.调用和可视化 RESTful 风格的 Web 服务.总体目 ...
随机推荐
- 2018南京区域赛K题 Kangaroo Puzzle——随机&&乱搞
题意 在 n * m 的平面上有若干个袋鼠和墙(1为袋鼠,0为墙),每次可以把所有袋鼠整体往一个方向移动一步(不能走出边界和不能走到墙),为在不超过50000步的情况下能否把全部袋鼠聚集在同一个位置. ...
- ansible 批量部署准备工作
Ansible:自动化运维工具,基于Python开发 功能{ 批量系统配置 批量程序部署 批量运行命令等等 } 准备工作: 一.操作主机安装epel源 和 ansible工具 yum -y insta ...
- 【BZOJ1095】【ZJOI2007】捉迷藏
前言 好恶心的一道题,代码写了2.5h,调试调了5h+,局部重构了n遍. 题意 一棵树上的节点有黑白两色,初始为黑,支持修改颜色,查询最远黑点对.$n<=10^5,m<=5*10^5$ 题 ...
- (尚031)Vue_案例_自定义事件(组件间通信第2种方式:vue自定义事件)
自定义事件: 我们知道,父组件使用prop传递数据的子组件,但子组件怎么跟父组件通信呢? 这个时候Vue的自定义事件系统就派得上用场了. 自定义事件知道两件事: (1).绑定 (2).触发 注意:$o ...
- 【LG3582】[POI2015]KIN
[LG3582][POI2015]KIN 题面 洛谷 题解 这题维护区间的信息有点像最大子段和,我们往最大子段和上面靠. 对于一个颜色,我们有一个直观的想法就是将它一次出现的权值设为正,二次出现就设为 ...
- 2019 SDN上机第七次作业
1.补充并运行basic /* -*- P4_16 -*- */ #include <core.p4> #include <v1model.p4> const bit<1 ...
- Cisco路由器用SSH替代Telnet连接
本文告诉你若何用SSH替代Telnet. 使用Telnet这个用来访谒远程计较机的TCP/IP和你的用户名和口令.很快地,会有人进行监听,而且他们会操作你平安是因为你意识的缺乏. SSH是替代Teln ...
- ubuntu之路——day18 用pytorch完成CNN
本次作业:Andrew Ng的CNN的搭建卷积神经网络模型以及应用(1&2)作业目录参考这位博主的整理:https://blog.csdn.net/u013733326/article/det ...
- 批归一化(Batch Normalization)
之前在几篇博客中说到了权重共享,但都觉得不够全面,这里做个专题,以后有新的理解都在此更新. 1. 减少运算只是锦上添花之前说到权重共享可以减少运算,是的,但这样说好像是可有可无,只是运算量大小的问题, ...
- 启用IIS Express SSL(Https)的注意事项
2年前搞国外的信用卡支付对接,必须用SSL方式调用第三方支付公司的接口,本地调试需要启用IIS Express的SSl,最近又搞类似需要SSL的项目,忘记怎么设置的了,本以为直接将原来的http后面加 ...