SpringMVC + Spring 3.2.14 + Hibernate 3.6.10
SpringMVC + Spring 3.2.14 + Hibernate 3.6.10 集成详解
注:此文档只说明简单的框架集成,各个框架的高级特性未涉及,刚刚接触框架的新人可能需要参考其他资料。
PS:本次练习所用jar包都能在此下载到:http://pan.baidu.com/s/1sjmgdYX
- 准备工作
开发环境:JDK 7u80、Eclipse 4.4 、Tomcat 7.0.63、MySQL 5.6
开发使用组件:Spring 3.2.14、Hibernate 3.6.10、common-logging 1.2、aopalliance.jar、aspectjweaver.jar、mysql-connector-java-5.1.35-bin.jar
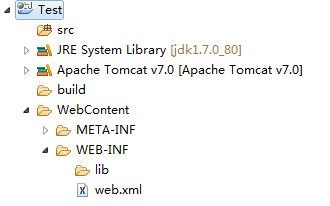
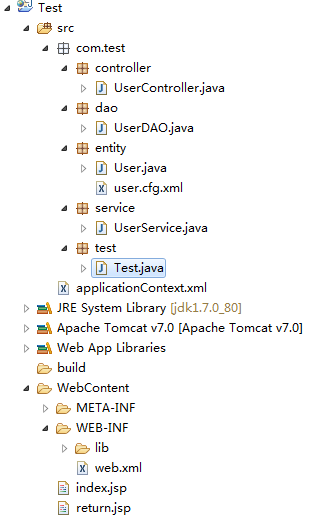
在Eclipse下创建动态web项目Test,创建过程中注意勾选web.xml的选项,如果不勾选,项目创建之后需要手动创建web.xml,创建完成后将其部署到Tomcat中,项目结构应该如下(Package Explorer下,看个人习惯):
- 配置Spring
将以下JAR包复制到lib文件夹下,不要问为什么是这些,想知道为什么可以把其他任意一个删掉看看启动项目报什么错。

在web.xml中配置Spring监听器,代码如下:
<listener>

    <listener-class>org.springframework.web.context.ContextLoaderListener</listener-class>

</listener>
创建applicationContext.xml,当前版本的Spring默认其位于WEB-INF下,不过大多数开发人员习惯还是将其放到src下,这里我们将其放在src下。之后向applicationContext.xml中添加bean相关声明,具体如下
<?xml version="1.0" encoding="UTF-8"?>

<beans xmlns="http://www.springframework.org/schema/beans"

    xmlns:xsi="http://www.w3.org/2001/XMLSchema-instance"

    xsi:schemaLocation="http://www.springframework.org/schema/beans

         http://www.springframework.org/schema/beans/spring-beans-3.2.xsd">

</beans>
web.xml中添加如下内容,用于自定义Spring配置文件的位置:
<context-param>

    <param-name>contextConfigLocation</param-name>

    <param-value>classpath:applicationContext.xml</param-value>

</context-param>
新建测试实体类User,路径暂定为com.test.entity,添加如下代码:

package com.test.entity;

public class User {

    private String id;

    private String username;

    private String password;

    public String getId() {

        return id;

    }

    public void setId(String id) {

        this.id = id;

    }

    public String getUsername() {

        return username;

    }

    public void setUsername(String username) {

        this.username = username;

    }

    public String getPassword() {

        return password;

    }

    public void setPassword(String password) {

        this.password = password;

    }

}
applicationContext.xml中添加如下定义(此处测试完成之后可以删除):
<bean id="user" class="com.test.entity.User">

    <property name="username" value="test" />

</bean>
新建Test类,暂定路径com.test.test,添加如下代码:
package com.test.test;

import org.springframework.context.support.FileSystemXmlApplicationContext;

import com.test.entity.User;

public class Test{

    @SuppressWarnings("resource")

    public static void main(String[] args) {

        FileSystemXmlApplicationContext ac =

                new FileSystemXmlApplicationContext("src\\applicationContext.xml");

        User user = (User) ac.getBean("user");

        System.out.println(user.getUsername());

    }

}
运行Test类查看结果,如果输出test则表示spring框架运行正常。
- 配置SpringMVC
添加SpringMVC所需JAR包:spring-webmvc-3.2.14.RELEASE.jar,在web.xml中添加SpringMVC前端控制器相关配置,SpringMVC的配置文件默认servlet配置名-servlet.xml(例如此处应该为springmvc-servlet.xml),位于WEB-INF下,这里我们将spring的配置文件与springmvc配置文件合并,所以我们需要在配置DispatcherServlet时说明配置文件的位置,配置如下:
    <servlet>

        <servlet-name>springmvc</servlet-name>

        <servlet-class>org.springframework.web.servlet.DispatcherServlet</servlet-class>

        <init-param>

            <param-name>contextConfigLocation</param-name>

            <param-value>classpath:applicationContext.xml</param-value>

        </init-param>

        <load-on-startup>1</load-on-startup>

    </servlet>

    <servlet-mapping>

        <servlet-name>springmvc</servlet-name>

        <url-pattern>*.do</url-pattern>

    </servlet-mapping>
配置springmvc扫描器,用于扫描springmvc注解,此处需要用到context标签, 所以需要添加context的文档声明,所有代码如下:
<?xml version="1.0" encoding="UTF-8"?>

<beans xmlns="http://www.springframework.org/schema/beans"

    xmlns:xsi="http://www.w3.org/2001/XMLSchema-instance"

    xmlns:context="http://www.springframework.org/schema/context"

    xsi:schemaLocation="http://www.springframework.org/schema/beans

         http://www.springframework.org/schema/beans/spring-beans-3.2.xsd

         http://www.springframework.org/schema/context

         http://www.springframework.org/schema/context/spring-context-3.2.xsd">

    <context:component-scan base-package="com.test" />

    <bean id="user" class="com.test.entity.User">

        <property name="username" value="test" />

    </bean>

</beans>
配置视图解析器,Controller层处理完请求之后会返回数据或者视图,所以我们需要先添加视图解析器,否则无法跳转回前台页面,代码如下:
    <bean class="org.springframework.web.servlet.view.InternalResourceViewResolver">

        <property name="suffix" value=".jsp"/>

    </bean>
- 测试SpringMVC
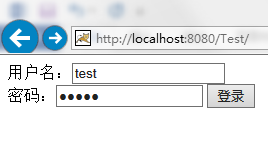
创建index.jsp,代码如下:
<%@ page language="java" contentType="text/html; charset=UTF-8" pageEncoding="UTF-8"%>

<!DOCTYPE html PUBLIC "-//W3C//DTD HTML 4.01 Transitional//EN" "http://www.w3.org/TR/html4/loose.dtd">

<html>

    <head>

        <meta http-equiv="Content-Type" content="text/html; charset=UTF-8">

        <title>test</title>

    </head>

    <body>

        <form action="${pageContext.request.contextPath }/user/test.do" method="post">

          <label>用户名:</label><input type="text" name="username" /><br>

          <label>密码:</label><input type="password" name="password" />

          <input type="submit" value="登录">

       </form>

    </body>

</html>
创建return.jsp,代码如下:
<%@ page language="java" contentType="text/html; charset=UTF-8" pageEncoding="UTF-8"%>
<!DOCTYPE html PUBLIC "-//W3C//DTD HTML 4.01 Transitional//EN" "http://www.w3.org/TR/html4/loose.dtd">
<html>
<head>
<meta http-equiv="Content-Type" content="text/html; charset=UTF-8">
<title>test</title>
</head>
<body>
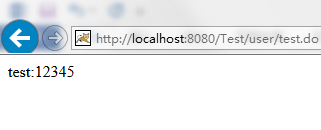
${user.username }:${user.password }
</body>
</html>
创建UserController,暂定位于com.test.controller,用于接收前台请求,代码如下:
package com.test.controller;

import org.springframework.beans.factory.annotation.Autowired;

import org.springframework.stereotype.Controller;

import org.springframework.ui.ModelMap;

import org.springframework.web.bind.annotation.RequestMapping;

import com.test.entity.User;

import com.test.service.UserService;

@Controller

@RequestMapping("/user")

public class UserController {

    @Autowired

    private UserService userService;

    @RequestMapping("/test")

    public String test(User user,ModelMap model){

        System.out.println(user.getUsername());

        System.out.println(user.getPassword());

        model.addAttribute(user);

        return "/return";

    }

}
启动Tomcat后测试即可,正常情况下结果如下,说明框架已成功相应请求:
- 配置Hibernate集成
添加以下JAR包:
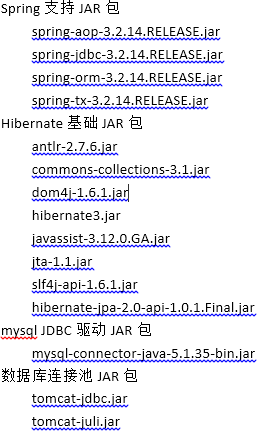
applicationContest.xml中添加Hibernate相关配置,hibernate的实体声明可以选择配置文件和注解两种方式,我个人比较倾向于配置文件方式,如下图所示:
    <bean id="dataSource" class="org.apache.tomcat.jdbc.pool.DataSource">

        <property name="url" value="jdbc:mysql://localhost:3306/test" />

        <property name="driverClassName" value="com.mysql.jdbc.Driver" />

        <property name="username" value="root" />

        <property name="password" value="root" />

    </bean>

    <bean id="sessionFactory" class="org.springframework.orm.hibernate3.LocalSessionFactoryBean">

        <property name="dataSource" ref="dataSource" />

        <property name="mappingLocations">

            <value>classpath*:/com/test/entity/*.cfg.xml</value>

        </property>

        <property name="hibernateProperties">

            <props>

                <prop key="hibernate.show_sql">true</prop>

            </props>

        </property>

    </bean>
由于Hibernate3必须在事务中处理数据访问,所以需要添加事务控制,个人倾向于使用aop方式,所以需要先添加tx和aop的文档配置,配置后文档声明部分代码如下:
<beans xmlns="http://www.springframework.org/schema/beans"

    xmlns:xsi="http://www.w3.org/2001/XMLSchema-instance"

    xmlns:context="http://www.springframework.org/schema/context"

    xmlns:tx="http://www.springframework.org/schema/tx"

    xmlns:aop="http://www.springframework.org/schema/aop"

    xsi:schemaLocation="http://www.springframework.org/schema/beans

         http://www.springframework.org/schema/beans/spring-beans-3.2.xsd

         http://www.springframework.org/schema/context

         http://www.springframework.org/schema/context/spring-context-3.2.xsd

         http://www.springframework.org/schema/tx

         http://www.springframework.org/schema/tx/spring-tx-3.2.xsd

         http://www.springframework.org/schema/aop

         http://www.springframework.org/schema/aop/spring-aop-3.2.xsd">
配置事务控制器,并通过aop将其织入到service切面进行事务控制,如下所示:
    <bean id="txManager" class="org.springframework.orm.hibernate3.HibernateTransactionManager">

        <property name="sessionFactory" ref="sessionFactory" />

    </bean>

    <tx:advice id="txAdvice" transaction-manager="txManager">

        <tx:attributes >

            <tx:method name="*" propagation="REQUIRED"/>

        </tx:attributes>

    </tx:advice>

    <aop:config>

        <aop:pointcut expression="execution(* com.test.service.*.*(..))" id="aopPointcut"/>

        <aop:advisor advice-ref="txAdvice" pointcut-ref="aopPointcut"/>

    </aop:config>
- 测试整体框架
Mysql中创建test_user表用于测试框架能否正常进行数据库的操作,此处我们测试在事务管理中进行保存操作,建表语句如下:
create table test_user (

    id varchar(36) primary key,

    username varchar(20) not null,

    password varchar(50) not null

);
创建Hibernate实体映射文件,内容如下:
<?xml version="1.0" encoding="UTF-8"?>

<!DOCTYPE hibernate-mapping PUBLIC

    "-//Hibernate/Hibernate Mapping DTD 3.0//EN"

    "http://www.hibernate.org/dtd/hibernate-mapping-3.0.dtd">

<hibernate-mapping>

    <class name="com.test.entity.User" table="test_user">

        <id name="id" type="java.lang.String" length="36">

            <column name="id" />

            <generator class="uuid" />

        </id>

        <property name="username" type="java.lang.String" length="10" >

            <column name="username" not-null="true" unique="true"/>

        </property>

        <property name="password" type="java.lang.String" length="32" >

            <column name="password" not-null="true" unique="true"/>

        </property>

    </class>

</hibernate-mapping>
创建UserDAO,暂定位于com.test.dao下,用于处理数据库操作,代码如下:
package com.test.dao;

import org.hibernate.SessionFactory;

import org.springframework.beans.factory.annotation.Autowired;

import org.springframework.stereotype.Repository;

import com.test.entity.User;

@Repository

public class UserDAO {

    @Autowired

    private SessionFactory sessionFactory;

    public String save(User user){

        return (String) sessionFactory.getCurrentSession().save(user);

    }

}
创建UserService,暂定位于com.test.service下,用于提供请求服务,代码如下:
package com.test.service;

import org.springframework.beans.factory.annotation.Autowired;

import org.springframework.stereotype.Service;

import com.test.dao.UserDAO;

import com.test.entity.User;

@Service

public class UserService {

    @Autowired

    private UserDAO userDAO;

    public String save(User user){

        return userDAO.save(user);

    }

}
修改UserController如下:
package com.test.controller;

import org.springframework.beans.factory.annotation.Autowired;

import org.springframework.stereotype.Controller;

import org.springframework.ui.ModelMap;

import org.springframework.web.bind.annotation.RequestMapping;

import com.test.entity.User;

import com.test.service.UserService;

@Controller

@RequestMapping("/user")

public class UserController {

    @Autowired

    private UserService userService;

    @RequestMapping("/test")

    public String test(User user,ModelMap model){

        userService.save(user);

        model.addAttribute(user);

        return "/return";

    }

}
至此项目内容应该如下图所示:
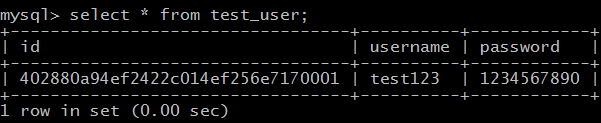
重启Tomcat后输入用户名和密码,点击按钮后查看数据库,正常结果为后台未报错且数据库有数据存入,如下图所示:
接下来我们测试下在出现异常的情况下能否正常回滚事务,修改Service代码如下:
package com.test.service;

import org.springframework.beans.factory.annotation.Autowired;

import org.springframework.stereotype.Service;

import com.test.dao.UserDAO;

import com.test.entity.User;

@Service

public class UserService {

    @Autowired

    private UserDAO userDAO;

    public String save(User user){

        userDAO.save(user);

        throw new RuntimeException("测试事务能否正常回滚!");

    }

}
重启Tomcat后测试框架能否正常回滚,正常情况下,后台会将自定义的异常抛出,而数据库中未出现第二条数据,框架集成到此结束,之后便可进行基于框架的开发工作了。
PS:各位有什么问题或者不同看法可以留言
SpringMVC + Spring 3.2.14 + Hibernate 3.6.10的更多相关文章
- SpringMVC + Spring 3.2.14 + Hibernate 3.6.10 集成详解
注:此文档只说明简单的框架集成,各个框架的高级特性未涉及,刚刚接触框架的新人可能需要参考其他资料. PS:本次练习所用jar包都能在此下载到:http://pan.baidu.com/s/1sjmgd ...
- S2SH框架集成详解(Struts 2.3.16 + Spring 3.2.6 + Hibernate 3.6.10)
近期集成了一次较新版本的s2sh,出现了不少问题,网上资料也是良莠不齐,有的甚至就是扯淡,简单的把jar包扔进去就以为是集成成功了,在这里整理一下详细的步骤,若哪位有什么不同看法,可以留言,欢迎批评改 ...
- javaweb各种框架组合案例(四):maven+spring+springMVC+spring data jpa(hibernate)【失败案例】
一.失败案例 1. 控制台报错信息 严重: Exception sending context initialized event to listener instance of class org. ...
- SSH(Struts,Spring,Hibernate)和SSM(SpringMVC,Spring,MyBatis)的区别
SSH 通常指的是 Struts2 做前端控制器,Spring 管理各层的组件,Hibernate 负责持久化层. SSM 则指的是 SpringMVC 做前端控制器,Spring 管理各层的组件,M ...
- Springmvc+Spring+Hibernate搭建方法及实例
Springmvc+Spring+Hibernate搭建方法及实例
- SpringMVC+Spring+Hibernate的小样例
Strusts2+Spring+Hibernate尽管是主流的WEB开发框架,可是SpringMVC有越来越多的人使用了.确实也很好用.用得爽! 这里实现了一个SpringMVC+Spring+Hib ...
- Springmvc+Spring+Hibernate搭建方法
Springmvc+Spring+Hibernate搭建方法及example 前面两篇文章,分别介绍了Springmvc和Spring的搭建方法,本文再搭建hibernate,并建立SSH最基本的代码 ...
- Maven搭建springMVC+spring+hibernate环境
这次不再使用struts2做控制器,采用spring自己的springMVC框架实现. 首先,改写pom.xml文件,不需要struts2的相关jar了. pom.xml <project xm ...
- spring(一)--spring/springmvc/spring+hibernate(mybatis)配置文件
这篇文章用来总结一下spring,springmvc,spring+mybatis,spring+hibernate的配置文件 1.web.xml 要使用spring,必须在web.xml中定义分发器 ...
随机推荐
- JDK基本介绍
JDK这是Java Development Kit 缩写,中国被称为Java开发套件.由SUN该公司提供.这是Java应用程序开发提供了编译和执行环境,所有的Java写程序都依赖于它. JDK能够将J ...
- 重新想象 Windows 8 Store Apps (12) - 控件之 GridView 特性: 拖动项, 项尺寸可变, 分组显示
原文:重新想象 Windows 8 Store Apps (12) - 控件之 GridView 特性: 拖动项, 项尺寸可变, 分组显示 [源码下载] 重新想象 Windows 8 Store Ap ...
- IOS设计模式学习(11)中介者
1 前言 面向对象的设计鼓励把行为分散到不同对象中.这种分散可能导致对象之间的相互关联.在最糟糕的情况下,所有对象都彼此了解并相互操作.但是增加的相互关联又减少了获得的益处.增加的关联似的对象很难或不 ...
- Ubuntu 13.04 用户安装 gnome 3.8 桌面
昨天我试用了一把 Ubuntu gnome 13.04,如果你看了那一片文章:Ubuntu Gnome 13.04 体验截图.对 Ubuntu gnome 13.04 并不是采用的gnome 3.8 ...
- 【翻译自mos文章】回收 asm磁盘空间的方法
回收 asm磁盘空间的方法 參考原文: How To Reclaim Asm Disk Space? (Doc ID 351866.1) 适用于: Oracle Database - Enterpri ...
- WebxFrameworkFilter 请求响应过程
watermark/2/text/aHR0cDovL2Jsb2cuY3Nkbi5uZXQvTFRpYW5jaGFv/font/5a6L5L2T/fontsize/400/fill/I0JBQkFCMA ...
- 利用__index和__newindex实现默认值表、监控表、只读表(转)
__index和__newindex实际上相当于是在读写表的时候分别加了一道过滤的逻辑,让读写表的操作可以被监控或说回调,利用这个特性可以实现一些带有特殊功能的表. 带有默认值的表: setdefau ...
- 从jdbc到mybatis
前面我已经写了几篇文章介绍mybatis的使用方法, 现准备从原理上分析mybatis, 本篇将会解说JDBC演变到mybatis的过程. JDBC查询 使用jdbc查询数据库一般有下面七个步骤: 1 ...
- Web指纹识别目的Discuz识别+粗糙的版本演绎
这个识别程序是本学期在我的职业培训项目.它是做一类似至Zoomeye怪东西,然后使用ES集成,为了让搜索引擎寻找.因此,我们必须首先去网上识别相应的能力Web包裹,如果用户输入的关键词:Discuz ...
- ASP.NET自定义控件组件开发 第四章 组合控件开发CompositeControl
原文:ASP.NET自定义控件组件开发 第四章 组合控件开发CompositeControl 第四章 组合控件开发CompositeControl 大家好,今天我们来实现一个自定义的控件,之前我们已经 ...