Shiro-集成Spring
集成Spring
- 加入Spring 和Shiro的jar 包
- 配置Spring 及SpringMVC
- 参照:1.3.2\shiro-root-1.3.2-source-release\shiro-root-1.3.2\samples\spring 配置web.xml 文件和Spring 的配置文件
加入Spring和springMVC
1.加入Spring的jar包

2.配置ContextLoaderListener
在web.xml中加入
<!-- needed for ContextLoaderListener -->

    <context-param>

        <param-name>contextConfigLocation</param-name>

        <param-value>classpath:applicationContext.xml</param-value>

    </context-param>

    <!-- Bootstraps the root web application context before servlet initialization -->

    <listener>

        <listener-class>org.springframework.web.context.ContextLoaderListener</listener-class>

    </listener>
配置SpringMVC的 DispatcherServlet,在web.xml中加入
<!-- The front controller of this Spring Web application, responsible for handling all application requests -->

    <servlet>

        <servlet-name>spring</servlet-name>

        <servlet-class>org.springframework.web.servlet.DispatcherServlet</servlet-class>

        <load-on-startup>1</load-on-startup>

    </servlet>

    <!-- Map all requests to the DispatcherServlet for handling -->

    <servlet-mapping>

        <servlet-name>spring</servlet-name>

        <url-pattern>/</url-pattern>

    </servlet-mapping>
在WEB-INF下新建一个spring-servlet.xml配置文件,并加入springMVC 的基本配置
<context:component-scan base-package="com.java.shiro"></context:component-scan>

    <bean class="org.springframework.web.servlet.view.InternalResourceViewResolver">

        <property name="prefix" value="/"></property>

        <property name="suffix" value=".jsp"></property>

    </bean>

    <!-- 两个基本配置 -->

    <mvc:annotation-driven></mvc:annotation-driven>

    <mvc:default-servlet-handler/>
新建一个 user.jsp 在webContent目录下
此时的目录结构为
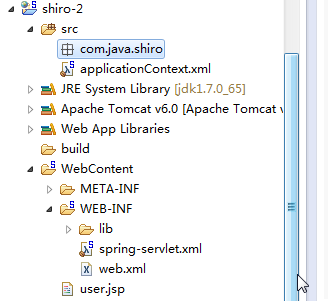
页面可以正常访问,配置成功

3.加入shiro
3.1 加入shiro的jar包
- shiro-all-1.3.2.jar
- log4j-1.2.15.jar
- slf4j-api-1.6.1.jar
- slf4j-log4j12-1.6.1.jar
3.2 加入shiro的配置
web.xml中加入 Shiro Filter 可以参照shiro的sample中的例子
shiro-root-1.3.2-source-release\shiro-root-1.3.2\samples\spring\src\main\webapp\WEB-INF中web.xml中的配置
<!-- Shiro Filter is defined in the spring application context: -->

     <!--

         1.配置Shiro Filter

         2.DelagatingFilterProxy 实际上是Filter 的一个代理对象,默认情况下,Spring会到IOC容器中查找和

         <filter-name> 对应的filter bean.也可以通过targetBeanName 的初始化参数来配置filter bean的id

      -->

    <filter>

        <filter-name>shiroFilter</filter-name>

        <filter-class>org.springframework.web.filter.DelegatingFilterProxy</filter-class>

        <init-param>

            <param-name>targetFilterLifecycle</param-name>

            <param-value>true</param-value>

        </init-param>

        <!-- <init-param>

            <param-name>targetBeanName</param-name>

            <param-value>aaa</param-value>

        </init-param> -->

    </filter>

    <filter-mapping>

        <filter-name>shiroFilter</filter-name>

        <url-pattern>/*</url-pattern>

    </filter-mapping>
在spring配置文件中加入shiro
即applicationContext.xml文件变为:
<?xml version="1.0" encoding="UTF-8"?>

<beans xmlns="http://www.springframework.org/schema/beans"

    xmlns:xsi="http://www.w3.org/2001/XMLSchema-instance"

    xsi:schemaLocation="http://www.springframework.org/schema/beans http://www.springframework.org/schema/beans/spring-beans.xsd">

    <!-- 数据源配置,暂时不考虑数据源,做一些静态的数据 -->

    <!-- Sample RDBMS data source that would exist in any application - not Shiro related. -->

    <!-- <bean id="dataSource" class="org.springframework.jdbc.datasource.DriverManagerDataSource">

        <property name="driverClassName" value="org.hsqldb.jdbcDriver"/>

        <property name="url" value="jdbc:hsqldb:mem:shiro-spring"/>

        <property name="username" value="sa"/>

    </bean> -->

    <!-- Populates the sample database with sample users and roles. -->

    <!-- <bean id="bootstrapDataPopulator" class="org.apache.shiro.samples.spring.BootstrapDataPopulator">

        <property name="dataSource" ref="dataSource"/>

    </bean> -->

    <!-- Simulated business-tier "Manager", not Shiro related, just an example -->

    <!-- <bean id="sampleManager" class="org.apache.shiro.samples.spring.DefaultSampleManager"/> -->

    <!-- =========================================================

         Shiro Core Components - Not Spring Specific

         ========================================================= -->

    <!-- Shiro's main business-tier object for web-enabled applications

         (use DefaultSecurityManager instead when there is no web environment)-->

    <!--

        1.配置SecurityManager!

    -->

    <bean id="securityManager" class="org.apache.shiro.web.mgt.DefaultWebSecurityManager">

        <property name="cacheManager" ref="cacheManager"/>

        <!-- Single realm app.  If you have multiple realms, use the 'realms' property instead. -->

        <!-- 配置session的管理方式 -->

        <!-- <property name="sessionMode" value="native"/> -->

        <property name="realm" ref="jdbcRealm"/>

    </bean>

    <!-- Let's use some enterprise caching support for better performance.  You can replace this with any enterprise

         caching framework implementation that you like (Terracotta+Ehcache, Coherence, GigaSpaces, etc -->

    <!--

        2.配置CacheManager,实例上可以用企业的缓存产品来提升性能

        2.1需要加入ehcache的jar包及配置文件

     -->

    <bean id="cacheManager" class="org.apache.shiro.cache.ehcache.EhCacheManager">

        <!-- Set a net.sf.ehcache.CacheManager instance here if you already have one.  If not, a new one

             will be creaed with a default config:

             <property name="cacheManager" ref="ehCacheManager"/> -->

        <!-- If you don't have a pre-built net.sf.ehcache.CacheManager instance to inject, but you want

             a specific Ehcache configuration to be used, specify that here.  If you don't, a default

             will be used.: -->

        <property name="cacheManagerConfigFile" value="classpath:ehcache.xml"/>

    </bean>

    <!-- Used by the SecurityManager to access security data (users, roles, etc).

         Many other realm implementations can be used too (PropertiesRealm,

         LdapRealm, etc. -->

    <!--

        3.配置Realm

        3.1 自己写一个Realm,需要实现Realm接口

     -->

    <bean id="jdbcRealm" class="com.java.shiro.realms.ShiroRealm"></bean>

    <!-- =========================================================

         Shiro Spring-specific integration

         ========================================================= -->

    <!-- Post processor that automatically invokes init() and destroy() methods

         for Spring-configured Shiro objects so you don't have to

         1) specify an init-method and destroy-method attributes for every bean

            definition and

         2) even know which Shiro objects require these methods to be

            called. -->

    <!--

        4.配置 LifecycleBeanPostProcessor,可以自动的调用配置在spring IOC容器中Shiro bean的声明周期方法

     -->

    <bean id="lifecycleBeanPostProcessor" class="org.apache.shiro.spring.LifecycleBeanPostProcessor"/>

    <!-- Enable Shiro Annotations for Spring-configured beans.  Only run after

         the lifecycleBeanProcessor has run: -->

    <!--

        5.启用 IOC 容器中使用 shiro 注解,但必须在配置了LifecycleBeanPostProcessor 之后才可以使用。

     -->

    <bean class="org.springframework.aop.framework.autoproxy.DefaultAdvisorAutoProxyCreator"

          depends-on="lifecycleBeanPostProcessor"/>

    <bean class="org.apache.shiro.spring.security.interceptor.AuthorizationAttributeSourceAdvisor">

        <property name="securityManager" ref="securityManager"/>

    </bean>

    <!-- Secure Spring remoting:  Ensure any Spring Remoting method invocations can be associated

         with a Subject for security checks. -->

    <!-- 远程调用,暂时不需要 -->

    <!-- <bean id="secureRemoteInvocationExecutor" class="org.apache.shiro.spring.remoting.SecureRemoteInvocationExecutor">

        <property name="securityManager" ref="securityManager"/>

    </bean> -->

    <!-- Define the Shiro Filter here (as a FactoryBean) instead of directly in web.xml -

         web.xml uses the DelegatingFilterProxy to access this bean.  This allows us

         to wire things with more control as well utilize nice Spring things such as

         PropertiesPlaceholderConfigurer and abstract beans or anything else we might need: -->

    <!--

        6.配置ShiroFilter

        6.1 id 必须和web.xml 中配置的 DelegatingFilterProxy 的 <filter-name> 一致

            若不一致,则会抛出:NoSuchBeanDefinitionException.因为Shiro会来IOC容器中查找和<filter-name> 名字对应的filter bean.

     -->

    <bean id="shiroFilter" class="org.apache.shiro.spring.web.ShiroFilterFactoryBean">

        <property name="securityManager" ref="securityManager"/>

        <property name="loginUrl" value="/login.jsp"/><!-- 登录页面 -->

        <property name="successUrl" value="/list.jsp"/><!-- 登录成功页面 -->

        <property name="unauthorizedUrl" value="/unauthorized.jsp"/><!-- 没有权限的页面 -->

        <!-- The 'filters' property is not necessary since any declared javax.servlet.Filter bean

             defined will be automatically acquired and available via its beanName in chain

             definitions, but you can perform overrides or parent/child consolidated configuration

             here if you like: -->

        <!-- <property name="filters">

            <util:map>

                <entry key="aName" value-ref="someFilterPojo"/>

            </util:map>

        </property> -->

        <!--

            配置哪些页面需要受保护

            以及访问这些页面需要的权限

            1). anon(anonymous) 可以被匿名访问,即不需要登录就可以访问

            2). authc(authentication) 必须认证之后,即登录后才可以访问

            3). URL 权限采取第一次匹配优先的方式,即从开头使用第一个匹配的url模式对应的拦截器链。

         -->

        <property name="filterChainDefinitions">

            <value>

                /login.jsp= anon

                # everything else requires authentication:

                /list.jsp = anon

                /** = authc

            </value>

        </property>

    </bean>

</beans>
启动tomcat服务器
只有http://localhost:8080/shiro-2/login.jsp可以匿名访问,其他页面访问时会自动重定向到login.jsp
ShiroFilter 的工作原理
由于在web.xml中配置了一个 shiroFilter 的 Filter 拦截的资源为所有请求 /*
其中两种可以通过拦截器
1.在FilterChainDefinitions 中配置了 anon权限的页面。
2.另一种是不被拦截的页面。

Shiro-集成Spring的更多相关文章
- shiro集成spring&工作流程&DelegatingFilterProxy
1.集成Spring 参考文献: 新建web工程: ehcache-core来自Hibernate wen.xml <?xml version="1.0" encoding= ...
- Shiro集成Spring
本篇博客主要讲述的是两者的集成.不涉及到各自的详细细节和功能. 因为官方给出的文档不够具体,对新手而言通过官方文档还不可以非常快的搭建出SpringShiro的webproject.本博客将通过实际的 ...
- shiro 集成spring 配置 学习记录(一)
首先当然是项目中需要增加shiro的架包依赖: <!-- shiro --> <dependency> <groupId>org.apache.shiro</ ...
- shiro 集成spring 使用 redis作为缓存 学习记录(六)
1.在applicationContext-redis.xml配置文件中增加如下: 申明一个cacheManager对象 用来注入到 shiro的 securityManager 属性 cac ...
- Shiro 集成Spring 使用 redis时 使用redisTemplate替代jedisPool(五)
1.添加依赖架包: <dependency> <groupId>org.springframework.data</groupId> <artifactId& ...
- shiro学习(四、shiro集成spring+springmvc)
依赖:spring-context,spring-MVC,shiro-core,shiro-spring,shiro-web 实话实说:web.xml,spring,springmvc配置文件好难 大 ...
- Apache Shiro 集成Spring(二)
1.依赖: <dependency> <groupId>org.apache.shiro</groupId> <artifactId>shiro-cor ...
- shiro与spring集成
简介 Apache Shiro 是 Java 的一个安全(权限)框架.主要提供了认证.授权.加密和会话管理等功能. Authentication:身份认证/登录,验证用户是不是拥有相应的身份:Auth ...
- shiro:集成Spring(四)
基于[加密及密码比对器(三)]项目改造 引入相关依赖环境 shiro-spring已经包含 shiro-core和shiro-web 所以这两个依赖可以删掉 <!--shiro继承spring依 ...
- cas+tomcat+shiro实现单点登录-4-Apache Shiro 集成Cas作为cas client端实现
目录 1.tomcat添加https安全协议 2.下载cas server端部署到tomcat上 3.CAS服务器深入配置(连接MYSQL) 4.Apache Shiro 集成Cas作为cas cli ...
随机推荐
- 关于mysql字段时间类型timestamp默认值为当前时间问题
今天把应用部署到AWS上发现后台修改内容提交后程序报错,经过排查发现是更新数据的时候,有张数据表中的一个timestamp类型的字段默认值变成了"0000-00-00 00:00:00.00 ...
- 纯css3 3D图片立方体旋转动画特效
纯css3 3D立方体模块,鼠标触碰,模块炸开,大立方体中套小立方体 效果展示 手机扫描二维码体验效果: 效果图如下: 源码下载:http://hovertree.com/h/bjaf/0qmul8g ...
- Canvas设置width与height 的问题!
最近因为工作需要,所以就学了一下Html中的Canvas标签. 当我看了一下教程后,自己写了一个hello world的时候,麻烦事就出现了.看下面代码: <!DOCTYPE html> ...
- 模块化你的JS代码
为什么要使用模块模式? 因为在全局作用域中声明的变量和函数都自动成为全局对象Window的属性,这经常会导致命名冲突,还会导致一些非常重要的可维护性难题,全局变量越多,引入错误BUG的概率就越大!所以 ...
- Android中点击隐藏软键盘最佳方法——Android开发之路4
Android中点击隐藏软键盘最佳方法 实现功能:点击EditText,软键盘出现并且不会隐藏,点击或者触摸EditText以外的其他任何区域,软键盘被隐藏: 1.重写dispatchTouchEve ...
- [JAVA]定时任务之-Quartz使用篇
Quartz是OpenSymphony开源组织在Job scheduling领域又一个开源项目,它可以与J2EE与J2SE应用程序相结合也可以单独使用.Quartz可以用来创建简单或为运行十个,百个, ...
- 如何升级PowerShell
背景: 开发的PowerShell 脚本需要使用Invoke-RestMethod命令,发现在老的服务器上不支持这一命令,经过查询得知由于PS版本的问题.涉及到了PS的升级,需要介绍下PowerShe ...
- 关于SQL Server镜像的一个小误区
昨天晚上突然接到客户的电话, 说在配置了镜像的生产环境数据库下修改 “已提交读快照” 选项的时候报错, 需要先取消镜像然后再重新搭建.悲催的是这是个近TB的数据库,问我有没有什么快速的方法.于是我就问 ...
- 常用MySQL图形化管理工具
MySQL的管理维护工具非常多,除了系统自带的命令行管理工具之外,还有许多其他的图形化管理工具,这里我介绍几个经常使用的MySQL图形化管理工具,供大家参考. MySQL是一个非常流行的小型关系型数据 ...
- Linux C语言解析.bmp格式图片并显示汉字
bmp.h 文件 #ifndef __BMP_H__ #define __BMP_H__ #include <unistd.h> #include <stdio.h> #inc ...