
android GridLayout布局
android4.0版本后新增了一个GridLayout,它使用虚细线将布局划分为行、列和单元格,也支持一个控件在行、列上都有交错排列,其实用方法和LinearLayout,Relativelayout等类似,只不过多了一些特有的属性。
GridLayout的布局策略简单分为以下三个部分:
首先它与LinearLayout布局一样,也分为水平和垂直两种方式,默认是水平布 局,一个控件挨着一个控件从左到右依次排列,但是通过指定android:columnCount设置列数的属性后,控件会自动换行进行排列。另一方面, 对于GridLayout布局中的子控件,默认按照wrap_content的方式设置其显示,这只需要在GridLayout布局中显式声明即可。
其次,若要指定某控件显示在固定的行或列,只需设置该子控件的android:layout_row和android:layout_column属性即 可,但是需要注意:android:layout_row=”0”表示从第一行开始,android:layout_column=”0”表示从第一列开 始,这与编程语言中一维数组的赋值情况类似。
最后,如果需要设置某控件跨越多行或多列,只需将该子控件的android:layout_rowSpan或者layout_columnSpan属性
设置为数值,再设置其layout_gravity属性为fill即可,前一个设置表明该控件跨越的行数或列数,后一个设置表明该控件填满所跨越的整行或
整列。
可以说使用GridLayout以后可以完全不用tablelayout了,而且使用GridLayout有效减少了布局的深度,提高了app整体的性能质量。
下面是使用GridLayout完成的效果图:
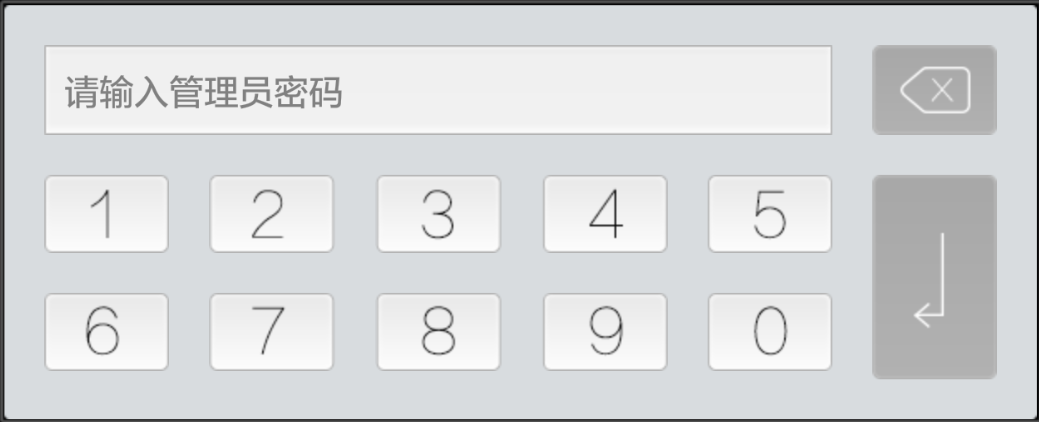
布局代码如下:
<?xml version="1.0" encoding="utf-8"?>

<GridLayout xmlns:android="http://schemas.android.com/apk/res/android"

    android:layout_width="wrap_content"

    android:layout_height="wrap_content"

    android:background="@drawable/digital_bg"

    android:columnCount="6"

    android:orientation="horizontal"

    android:padding="16dip"

    android:rowCount="3">

    <TextView

        android:id="@+id/edit_input"

        android:layout_columnSpan="5"

        android:layout_gravity="fill"

        android:textSize="14sp"

        android:gravity="center_vertical"

        android:paddingLeft="8dip"

        android:background="@drawable/input_bg" />

    <ImageButton

        android:id="@+id/delete"

        android:layout_marginLeft="16dip"

        android:background="@drawable/delete_btn_style" />


    <ImageButton

        android:id="@+id/num_1"

        android:layout_marginTop="16dip"

        android:background="@drawable/num_1_btn_style" />

    <ImageButton

        android:id="@+id/num_2"

        android:layout_marginLeft="16dip"

        android:layout_marginTop="16dip"

        android:background="@drawable/num_2_btn_style" />

    <ImageButton

        android:id="@+id/num_3"

        android:layout_marginLeft="16dip"

        android:layout_marginTop="16dip"

        android:background="@drawable/num_3_btn_style" />

    <ImageButton

        android:id="@+id/num_4"

        android:layout_marginLeft="16dip"

        android:layout_marginTop="16dip"

        android:background="@drawable/num_4_btn_style" />

    <ImageButton

        android:id="@+id/num_5"

        android:layout_marginLeft="16dip"

        android:layout_marginTop="16dip"

        android:background="@drawable/num_5_btn_style" />


    <ImageButton

        android:id="@+id/confirm"

        android:layout_marginLeft="16dip"

        android:layout_marginTop="16dip"

        android:layout_rowSpan="2"

        android:background="@drawable/confirm_btn_style" />

    <ImageButton

        android:id="@+id/num_6"

        android:layout_marginTop="16dip"

        android:background="@drawable/num_6_btn_style" />

    <ImageButton

        android:id="@+id/num_7"

        android:layout_marginLeft="16dip"

        android:layout_marginTop="16dip"

        android:background="@drawable/num_7_btn_style" />

    <ImageButton

        android:id="@+id/num_8"

        android:layout_marginLeft="16dip"

        android:layout_marginTop="16dip"

        android:background="@drawable/num_8_btn_style" />

    <ImageButton

        android:id="@+id/num_9"

        android:layout_marginLeft="16dip"

        android:layout_marginTop="16dip"

        android:background="@drawable/num_9_btn_style" />

    <ImageButton

        android:id="@+id/num_0"

        android:layout_marginLeft="16dip"

        android:layout_marginTop="16dip"

        android:background="@drawable/num_0_btn_style" />

</GridLayout>
参考资料:http://blog.csdn.net/pku_android/article/details/7343258
android GridLayout布局的更多相关文章
- Android 4.0开发之GridLayOut布局实践
在上一篇教程中http://blog.csdn.net/dawanganban/article/details/9952379,我们初步学习了解了GridLayout的布局基本知识,通过学习知道,Gr ...
- Android 优化布局层次结构
前面介绍过使用HierarchyViewer和Android lint来优化我们的程序,这一篇算是总结性的,借助一个小例子来说用怎么优化应用布局.这个例子是android官网给出的,作者也当一把翻译. ...
- 浅谈android4.0开发之GridLayout布局
作者:李响 本文重点讲述了自android4.0版本号后新增的GridLayout网格布局的一些基本内容,并在此基础上实现了一个简单的计算器布局框架.通过本文,您可以了解到一些android UI开发 ...
- Android 之布局
1.RelativeLayout相对布局 a).第一类:属性值为true或false android:layout_centerHrizontal 水平居中 android:layout_center ...
- 使用gridlayout布局后,因某些原因又删除,并整理文件夹结构时,Unable to resolve target 'android-7'
出现的问题 [2013-01-11 10:52:39 - gridlayout_v7] Unable to resolve target 'android-7' 事由:在一次做九宫格时.误使用了gri ...
- Android五大布局详解——LinearLayout(线性布局)
Android五大布局 本篇开始介绍Android的五大布局的知识,一个丰富的界面显示总是要有众多的控件来组成的,那么怎样才能让这些控件能够按你的想法进行摆放,从而自定义你所想要的用户界面呢?这就牵涉 ...
- 【腾讯Bugly干货分享】Android动态布局入门及NinePatchChunk解密
本文来自于腾讯bugly开发者社区,非经作者同意,请勿转载,原文地址:http://dev.qq.com/topic/57c7ff5d53bbcffd68c64411 作者:黄进——QQ音乐团队 摆脱 ...
- Xamarin.Android之布局文件智能提示问题
一.前言 看到有人问关于xamarin.android的布局没智能提示问题(VS 2015),当然,写布局这东西没提示这是一件相对痛苦的事 ,所以这里就提供一个解决的方案! 二.解决方案 想要智能提示 ...
- android—-线性布局
android五大布局之线性布局. 1.线性布局的特点:各个子元素彼此连接,中间不留空白 而今天我们要讲解的就是第一个布局,LinearLayout(线性布局),我们屏幕适配的使用 用的比较多的就是L ...
随机推荐
- jaxws.xsd
示例: <?xml version="1.0" encoding="UTF-8"?> <beans xmlns="http://ww ...
- xib创建cell的两种方法
方法一:第一步:[self.collectionView registerNib:[UINib nibWithNibName:@"QGLShareBtnCell" bundle:n ...
- 图书助手Alpha版使用说明
一.产品介绍 我们做的是一个基于安卓的手机app,通过连接图书馆的数据库,实现查询图书馆的书目信息的功能. 二.软件运行 我们只做了安卓版本,需要在安卓环境下运行. 三.软件结构 本软件主要包括客户端 ...
- Python学习-16.Python中的错误处理
虽然叫错误,但跟 C# 中的异常是一回事.只不过 Python 中叫错误(Error)而 C# 中叫异常(Exception). 先手工产生一个异常: file = open('','r') 上面一句 ...
- linux系统编程之文件与IO(三):利用lseek()创建空洞文件
一.lseek()系统调用 功能说明: 通过指定相对于开始位置.当前位置或末尾位置的字节数来重定位 curp,这取决于 lseek() 函数中指定的位置 函数原型: #include <sys/ ...
- Mac iTerm2登陆CentOS提示warning: setlocale: LC_CTYPE: cannot change locale (UTF-8): No such file or directory
[报错原因]:没有utf-8这个语系(没添加语言_国名前缀),LC_ALL又没设定值. 服务端解决方法: 在远程系统上, /etc/environment 加入以下两行,重新登陆即可. LANG=en ...
- vs 2015 结合新配置的IIS 发布网站过程中遇到的问题及解决办法?
1.由于扩展配置问题而无法提供您请求的页面.如果该页面是脚本,请添加处理程序 错误: HTTP 错误 404.3 - Not Found 由于扩展配置问题而无法提供您请求的页面.如果该页面是脚本,请添 ...
- ASP.NET MVC 全局异常
先新建一个过滤器ExceptionHandleErrorAttribute.cs 内容如下: using System; using System.Net; using System.Web; usi ...
- asp.net 下载EXCEL文件
一.需要导入NPOI 库文件 打开VS2012 工具>>库程序包管理器>>管理解决方案的NuGet程序包,搜索NPOI,如下图 安装完成: 添加 using NPOI.HSSF ...
- JQuery Mobile - 解决切换页面时,闪屏,白屏等问题
在点击链接,切换页面时候,总是闪屏,感觉很别扭,看起来不舒服,怎么解决这个问题?方法很简单,就是在每个页面的meta标签内定义user-scalable的属性为 no! <meta name=& ...