TP5使用Composer安装phpoffice/phpspreadsheet,导出Excel文件
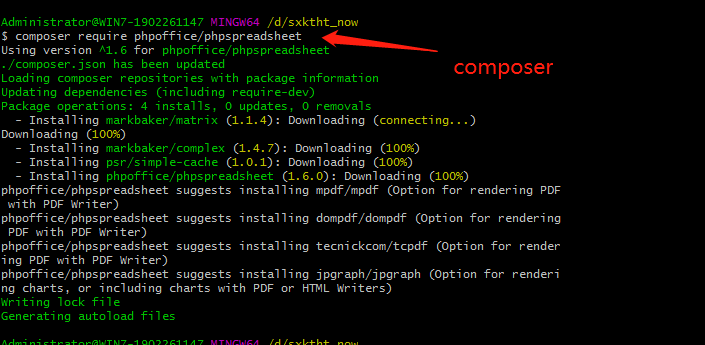
1、composer安装:
composer require phpoffice/phpspreadsheet
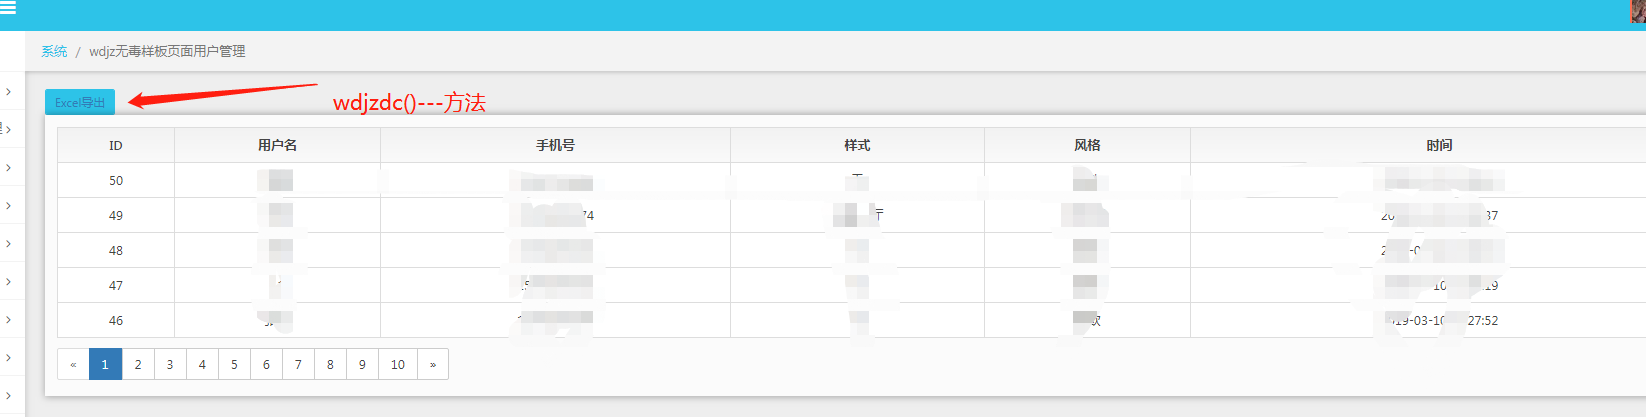
2.点击导出按钮,触发控制器里面的方法 wdjzdc()
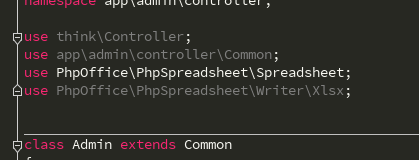
3. 在控制中引入
use PhpOffice\PhpSpreadsheet\Spreadsheet;

use PhpOffice\PhpSpreadsheet\Writer\Xlsx;
//wdjzdc数据导出
public function wdjzdc()
{
$spreadsheet = new Spreadsheet();
$worksheet = $spreadsheet->getActiveSheet();
//设置工作表标题名称
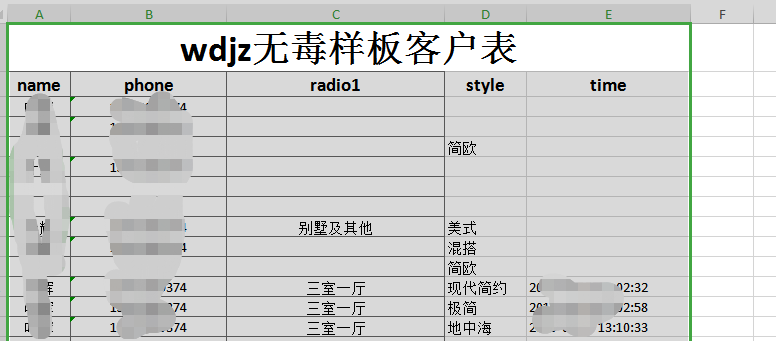
$worksheet->setTitle('wdjz客户表'); //表头
//设置单元格内容
$worksheet->setCellValueByColumnAndRow(1, 1, 'wdjz无毒样板客户表');
$worksheet->setCellValueByColumnAndRow(1, 2, 'name');
$worksheet->setCellValueByColumnAndRow(2, 2, 'phone');
$worksheet->setCellValueByColumnAndRow(3, 2, 'radio1');
$worksheet->setCellValueByColumnAndRow(4, 2, 'style');
$worksheet->setCellValueByColumnAndRow(5, 2, 'time'); //合并单元格
$worksheet->mergeCells('A1:E1'); $styleArray = [
'font' => [
'bold' => true
],
'alignment' => [
'horizontal' => \PhpOffice\PhpSpreadsheet\Style\Alignment::HORIZONTAL_CENTER,
],
];
//设置单元格样式
$worksheet->getStyle('A1')->applyFromArray($styleArray)->getFont()->setSize(28); $worksheet->getStyle('A2:E2')->applyFromArray($styleArray)->getFont()->setSize(14);
;
$jzInfo = db('wdjz')->select();
$len = count($jzInfo);
$j = 0;
for ($i=0; $i < $len; $i++) {
$j = $i + 3; //从表格第3行开始 $worksheet->setCellValueByColumnAndRow(1, $j, $jzInfo[$i]['name']);
$worksheet->setCellValueByColumnAndRow(2, $j, $jzInfo[$i]['phone']);
$worksheet->setCellValueByColumnAndRow(3, $j, $jzInfo[$i]['radio1']);
$worksheet->setCellValueByColumnAndRow(4, $j, $jzInfo[$i]['style']);
$worksheet->setCellValueByColumnAndRow(5, $j, $jzInfo[$i]['time']);
} $styleArrayBody = [
'borders' => [
'allBorders' => [
'borderStyle' => \PhpOffice\PhpSpreadsheet\Style\Border::BORDER_THIN,
'color' => ['argb' => '666666'],
],
],
'alignment' => [
'horizontal' => \PhpOffice\PhpSpreadsheet\Style\Alignment::HORIZONTAL_CENTER,
],
];
$total_jzInfo = $len + 2;
//添加所有边框/居中
$worksheet->getStyle('A1:C'.$total_jzInfo)->applyFromArray($styleArrayBody); $filename = 'wdjz无毒样板客户表.xlsx';
header('Content-Type: application/vnd.openxmlformats-officedocument.spreadsheetml.sheet');
header('Content-Disposition: attachment;filename="'.$filename.'"');
header('Cache-Control: max-age=0'); $writer = \PhpOffice\PhpSpreadsheet\IOFactory::createWriter($spreadsheet, 'Xlsx');
$writer->save('php://output');
}
-----------------------------------摘取大神文档---------------------------------------------------------------------
1.设置表头
首先我们引入自动加载PhpSpreadsheet库,然后实例化,设置工作表标题名称为:学生成绩表,接着设置表头内容。表头分为两行,第一行是表格的名称,第二行数表格列名称。最后我们将第一行单元格进行合并,并设置表头内容样式:字体、对齐方式等。
require 'vendor/autoload.php';

use PhpOffice\PhpSpreadsheet\Spreadsheet;

use PhpOffice\PhpSpreadsheet\Writer\Xlsx;

include('conn.php'); //连接数据库

$spreadsheet = new Spreadsheet();

$worksheet = $spreadsheet->getActiveSheet();

//设置工作表标题名称

$worksheet->setTitle('学生成绩表');

//表头

//设置单元格内容

$worksheet->setCellValueByColumnAndRow(1, 1, '学生成绩表');

$worksheet->setCellValueByColumnAndRow(1, 2, '姓名');

$worksheet->setCellValueByColumnAndRow(2, 2, '语文');

$worksheet->setCellValueByColumnAndRow(3, 2, '数学');

$worksheet->setCellValueByColumnAndRow(4, 2, '外语');

$worksheet->setCellValueByColumnAndRow(5, 2, '总分');

//合并单元格

$worksheet->mergeCells('A1:E1');

$styleArray = [

    'font' => [

        'bold' => true

    ],

    'alignment' => [

        'horizontal' => \PhpOffice\PhpSpreadsheet\Style\Alignment::HORIZONTAL_CENTER,

    ],

];

//设置单元格样式

$worksheet->getStyle('A1')->applyFromArray($styleArray)->getFont()->setSize(28);

$worksheet->getStyle('A2:E2')->applyFromArray($styleArray)->getFont()->setSize(14);
2.读取数据
我们连接数据库后,直接读取学生成绩表t_student,然后for循环,设置每个单元格对应的内容,计算总成绩。注意的是表格中的数据是从第3行开始,因为第1,2行是表头占用了。
然后,我们设置整个表格样式,给表格加上边框,并且居中对齐。
$sql = "SELECT id,name,chinese,maths,english FROM `t_student`";

$stmt = $db->query($sql);

$rows = $stmt->fetchAll(PDO::FETCH_ASSOC);

$len = count($rows);

$j = 0;

for ($i=0; $i < $len; $i++) {

    $j = $i + 3; //从表格第3行开始

    $worksheet->setCellValueByColumnAndRow(1, $j, $rows[$i]['name']);

    $worksheet->setCellValueByColumnAndRow(2, $j, $rows[$i]['chinese']);

    $worksheet->setCellValueByColumnAndRow(3, $j, $rows[$i]['maths']);

    $worksheet->setCellValueByColumnAndRow(4, $j, $rows[$i]['english']);

    $worksheet->setCellValueByColumnAndRow(5, $j, $rows[$i]['chinese'] + $rows[$i]['maths'] + $rows[$i]['english']);

}

$styleArrayBody = [

    'borders' => [

        'allBorders' => [

            'borderStyle' => \PhpOffice\PhpSpreadsheet\Style\Border::BORDER_THIN,

            'color' => ['argb' => '666666'],

        ],

    ],

    'alignment' => [

        'horizontal' => \PhpOffice\PhpSpreadsheet\Style\Alignment::HORIZONTAL_CENTER,

    ],

];

$total_rows = $len + 2;

//添加所有边框/居中

$worksheet->getStyle('A1:E'.$total_rows)->applyFromArray($styleArrayBody);
如果仅是为了满足文章开头说的老板的需求,我们这个时候就可以将数据保存为Excel文件,当然这个Excel文件只保存在服务器上,然后再使用邮件等方式将Excel发送给老板就结了。
但是我们更多的应用场景是用户直接将数据下载导出为Excel表格文件,请接着看:
3.下载保存
最后,我们强制浏览器下载数据并保存为Excel文件。
$filename = '成绩表.xlsx';

header('Content-Type: application/vnd.openxmlformats-officedocument.spreadsheetml.sheet');

header('Content-Disposition: attachment;filename="'.$filename.'"');

header('Cache-Control: max-age=0');

$writer = \PhpOffice\PhpSpreadsheet\IOFactory::createWriter($spreadsheet, 'Xlsx');

$writer->save('php://output');
如果你想要保存为.xls文件格式的话,可以改下header代码:
$filename = '成绩表.xlsx';

header('Content-Type: application/vnd.ms-excel');

header('Content-Disposition: attachment;filename="'.$filename.'"');

header('Cache-Control: max-age=0');

$writer = \PhpOffice\PhpSpreadsheet\IOFactory::createWriter($spreadsheet, 'xls');

$writer->save('php://output');
PhpSpreadsheet提供了很多选项设置,接下来的文章我会专门介绍有关生成Excel的设置,如样式:字体、对齐、颜色、行高于列宽,合并与拆分、图片、日期时间、换行、函数使用等等。敬请关注。
TP5使用Composer安装phpoffice/phpspreadsheet,导出Excel文件的更多相关文章
- tp5.0 composer下载phpexcel 实现导出excel 表格
tp5.0 composer下载phpexcel 实现导出excel 表格 1.在下载好的tp5.0 框架里面使用 composer 下载phpexcel 的插件 composer require p ...
- c# listview导出excel文件
首先在工程中需要添加对Microsoft Excel office 11.0 object的引用 生成excel的类代码如下 using System; using System.Collection ...
- HTML导出Excel文件(兼容IE及所有浏览器)
注意:IE浏览器需要以下设置: 打开IE,在常用工具栏中选择“工具”--->Internet选项---->选择"安全"标签页--->选择"自定义级别&q ...
- EasyUI 如何结合JS导出Excel文件
出处:http://blog.csdn.net/jumtre/article/details/41119991 EasyUI 如何结合JS导出Excel文件 分类: 技术 Javascript jQu ...
- 使用vue导出excel文件
今天再开发中遇到一件事情,就是怎样用已有数据导出excel文件,网上有许多方法,有说用数据流的方式,https://www.cnblogs.com/yeqrblog/p/9758981.html,但是 ...
- vue+element 表格导出Excel文件
https://www.cnblogs.com/bobodeboke/p/8867481.html 非常感谢 这个大佬 才让我搞到了Blob.js 和 Export2Excel.js 如果最后运行时 ...
- 纯前端实现数据导出excel文件
一 安装依赖 npm install -S file-saver xlsx npm install -D script-loader 二 新建文件夹 在网上百度引入即可 三 在main.js中引入 ...
- ASP.NET Core导入导出Excel文件
ASP.NET Core导入导出Excel文件 希望在ASP.NET Core中导入导出Excel文件,在网上搜了一遍,基本都是使用EPPlus插件,EPPlus挺好用,但商用需要授权,各位码友若有好 ...
- 前端必读3.0:如何在 Angular 中使用SpreadJS实现导入和导出 Excel 文件
在之前的文章中,我们为大家分别详细介绍了在JavaScript.React中使用SpreadJS导入和导出Excel文件的方法,作为带给广大前端开发者的"三部曲",本文我们将为大家 ...
随机推荐
- linux,windows 可执行文件(ELF、PE)
现在PC平台流行的可执行文件格式(Executable)主要是Windows下的PE(Portable Executable)和Linux的ELF(Executable Linkable Format ...
- x-www-form-urlencoded
就是application/x-www-from-urlencoded,会将表单内的数据转换为键值对,比如,name=java&age = 23 postman: 2.ajax传值
- process_进程池_2
import multiprocessingimport os, time, random def Lee(): print("\nRun task Lee-%s" %(os.ge ...
- jQuery Datepicker 插件遇到问题
Datepicker ver 1.7.3 浏览更多 常用设置 //禁用今天之前时间 $(".datePicker").datepicker('option', { minDate ...
- 构造函数constructor 与析构函数destructor(二)
(1)转换构造函数 转换构造函数的定义:转换构造函数就是把普通的内置类型转换成类类型的构造函数,这种构造函数只有一个参数.只含有一个参数的构造函数,可以作为两种构造函数,一种是普通构造函数用于初始化对 ...
- KBMMW 4.81.00 发布
这次更新的速度非常快. 4.81.00 May 9 2015 Important notes (changes that may break existing code) ============== ...
- java实现从url路径中下载pdf文档到本地
package com.cellstrain.icell.util; import java.io.*;import java.net.*; public class DownloadPdf { /* ...
- 2018.10.13 bzoj4008: [HNOI2015]亚瑟王(概率dp)
传送门 马上2点考初赛了,心里有点小紧张. 做道概率dp压压惊吧. 话说这题最开始想错了. 最开始的方法是考虑f[i][j]f[i][j]f[i][j]表示第iii轮出牌为jjj的概率. 然后用第ii ...
- python面向对象-1方法、构造函数
类是指:描述一种事物的定义,是个抽象的概念 实例指:该种事物的一个具体的个体,是具体的东西 打个比方: “人”是一个类.“张三”是人类的一个具体例子 在编程时也是同样的道理,你先自己定义一个“类”,当 ...
- java @option之args4j
args4j简介 args4j是一个用来配置命令行的工具. 在实际的项目中用到命令行的并不是很常见,但当真正使用到时,特别是在程序启动时配置一下参数的时候就很有用了,如果参数很多的话,一个一个解析命令 ...