IntelliJ IDEA 2017版 spring-boot-devtools实现热部署
1、配置pom.xml文档
 <?xml version="1.0" encoding="UTF-8"?>

 <project xmlns="http://maven.apache.org/POM/4.0.0" xmlns:xsi="http://www.w3.org/2001/XMLSchema-instance"

     xsi:schemaLocation="http://maven.apache.org/POM/4.0.0 http://maven.apache.org/xsd/maven-4.0.0.xsd">

     <modelVersion>4.0.0</modelVersion>

     <groupId>com.easytest</groupId>

     <artifactId>rebushu</artifactId>

     <version>0.0.1-SNAPSHOT</version>

     <packaging>jar</packaging>

     <name>rebushu</name>

     <url>http://maven.apache.org</url>

     <description>Demo project for Spring Boot</description>

     <parent>

         <groupId>org.springframework.boot</groupId>

         <artifactId>spring-boot-starter-parent</artifactId>

         <version>1.5.9.RELEASE</version>

         <relativePath/> <!-- lookup parent from repository -->

     </parent>

     <properties>

         <project.build.sourceEncoding>UTF-8</project.build.sourceEncoding>

         <project.reporting.outputEncoding>UTF-8</project.reporting.outputEncoding>

         <java.version>1.8</java.version>

     </properties>

     <dependencies>

         <dependency>

             <groupId>org.springframework.boot</groupId>

             <artifactId>spring-boot-starter-web</artifactId>

         </dependency>

         <dependency>

             <groupId>org.springframework.boot</groupId>

             <artifactId>spring-boot-starter-test</artifactId>

             <scope>test</scope>

         </dependency>

         <dependency>

             <groupId>com.alibaba</groupId>

             <artifactId>fastjson</artifactId>

             <version>1.2.15</version>

         </dependency>

         <!-- spring boot devtools 依赖包. -->

         <dependency>

             <groupId>org.springframework.boot</groupId>

             <artifactId>spring-boot-devtools</artifactId>

             <optional>true</optional>

             <scope>true</scope>

         </dependency>

     </dependencies>

     <!--构建节点-->

     <build>

         <plugins>

             <plugin>

                 <groupId>org.springframework.boot</groupId>

                 <artifactId>spring-boot-maven-plugin</artifactId>

                 <configuration>

                     <!--fork :  如果没有该项配置,肯呢个devtools不会起作用,即应用不会restart -->

                     <fork>true</fork>

                 </configuration>

             </plugin>

         </plugins>

     </build>

 </project>
2、书写测试代码pojo(实体类)
 package com.easytest;

 import com.alibaba.fastjson.annotation.JSONField;

 import java.util.Date;

 /**

  * Created by liuya on 2018-01-17.

  */

 public class UserPoJo

 {

     private int userId;

     private String userName;

     @JSONField(format="yyyy-MM-dd HH:mm:ss")

     private Date createTime;

     public Date getCreateTime() {

         return createTime;

     }

     public void setCreateTime(Date createTime) {

         this.createTime = createTime;

     }

     public int getUserId() {

         return userId;

     }

     public void setUserId(int userId) {

         this.userId = userId;

     }

     public String getUserName() {

         return userName;

     }

     public void setUserName(String userName) {

         this.userName = userName;

     }

     @Override

     public String toString() {

         return "UserPoJo{" +

                 "userId=" + userId +

                 ", userName='" + userName + '\'' +

                 ", createTime=" + createTime +

                 '}';

     }

 }
3、书写测试服务器
 package com.easytest;

 import com.alibaba.fastjson.serializer.SerializerFeature;

 import com.alibaba.fastjson.support.config.FastJsonConfig;

 import com.alibaba.fastjson.support.spring.FastJsonHttpMessageConverter;

 import org.springframework.boot.SpringApplication;

 import org.springframework.boot.autoconfigure.SpringBootApplication;

 import org.springframework.http.MediaType;

 import org.springframework.http.converter.HttpMessageConverter;

 import org.springframework.web.servlet.config.annotation.WebMvcConfigurerAdapter;

 import java.util.ArrayList;

 import java.util.List;

 @SpringBootApplication

 public class RebushuApplication extends WebMvcConfigurerAdapter {

     /**

      //     * 在这里我们使用 @Bean注入 fastJsonHttpMessageConvert

      //     * @return

      //     */

     @Override

     public void configureMessageConverters(List<HttpMessageConverter<?>> converters) {

         // 1、需要先定义一个 convert 转换消息的对象;

         FastJsonHttpMessageConverter fastConverter = new FastJsonHttpMessageConverter();

         //2、添加fastJson 的配置信息,比如:是否要格式化返回的json数据;

         FastJsonConfig fastJsonConfig = new FastJsonConfig();

         fastJsonConfig.setSerializerFeatures(SerializerFeature.PrettyFormat);

         //处理中文乱码

         List<MediaType> fastMediaTypes = new ArrayList<>();

         fastMediaTypes.add(MediaType.APPLICATION_JSON_UTF8);

         fastConverter.setSupportedMediaTypes(fastMediaTypes);

         //3、在convert中添加配置信息.

         fastConverter.setFastJsonConfig(fastJsonConfig);

         HttpMessageConverter<?> converter = fastConverter;

         converters.add(fastConverter);

     }

     public static void main(String[] args) {

         SpringApplication.run(RebushuApplication.class, args);

     }

 }
4、书写controller代码
package com.easytest; import org.springframework.web.bind.annotation.RequestMapping;
import org.springframework.web.bind.annotation.RestController; import java.util.Date; /**
* Created by liuya on 2018-01-16.
*
* 测试用的一个helloworld例子
*/ @RestController
public class ControllerJson { @RequestMapping("user2")
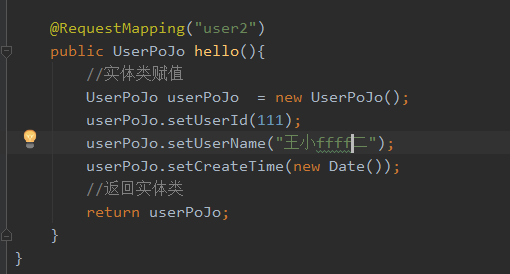
public UserPoJo hello(){
//实体类赋值
UserPoJo userPoJo = new UserPoJo();
userPoJo.setUserId(111);
userPoJo.setUserName("王小二");
userPoJo.setCreateTime(new Date());
//返回实体类
return userPoJo;
}
}
5、编译器配置
(1)开启idea自动make功能
File--->setting--->如图:

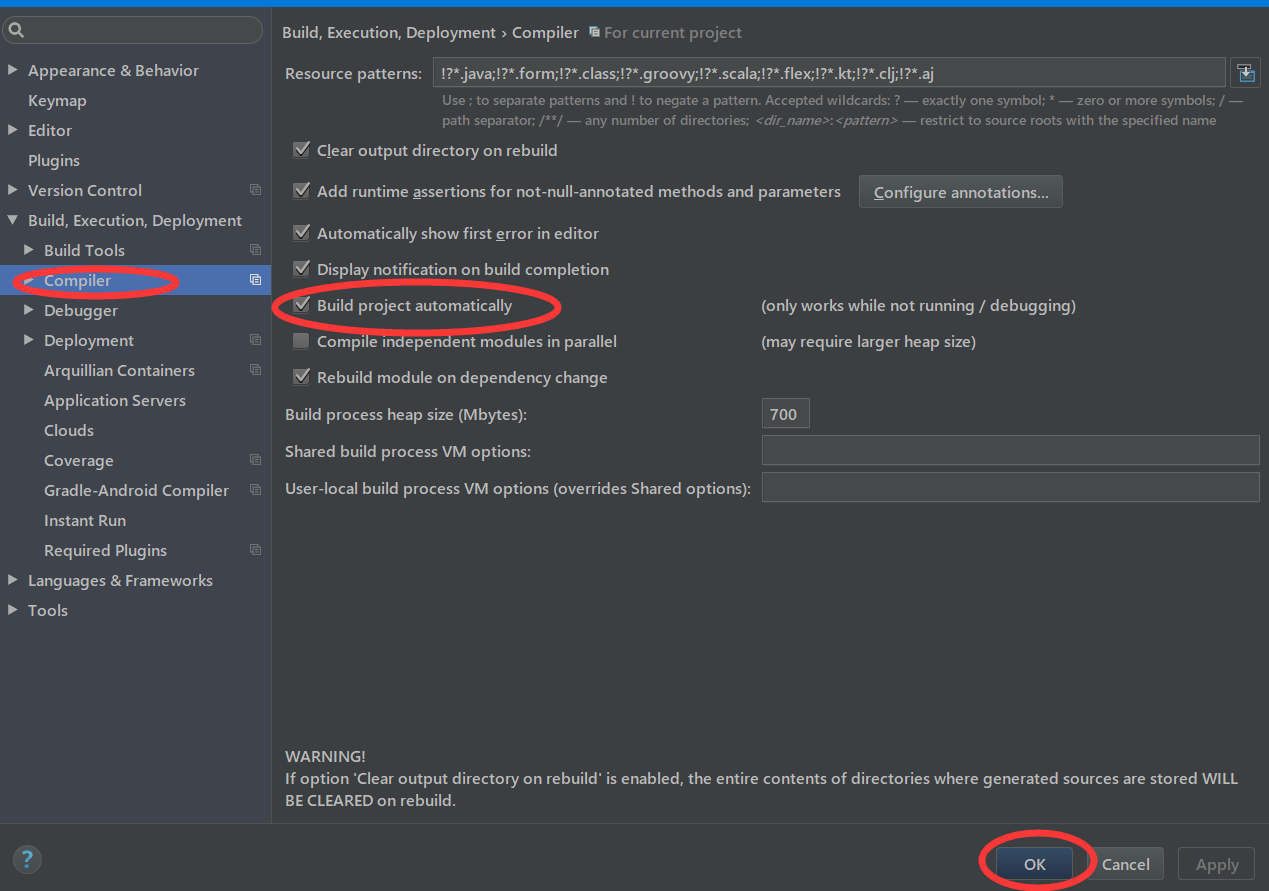
(2)点击Compiler进入界面如图:(选择make project automatically)
(3)CTRL + SHIFT + A ----->查找Registry --->勾选compiler.automake.allow.when.app.running项目(详见:http://www.cnblogs.com/liuyangfirst/p/8317419.html)
6、maven启动,在编译器右侧栏点开右侧栏

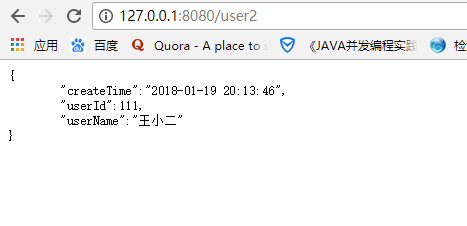
7、访问网页测试一下是否联通
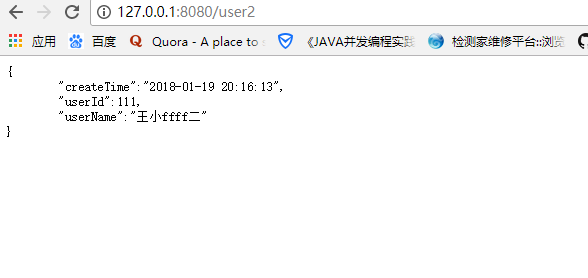
8、controller中加如下内容,然后F5刷新界面,如图就是成功实现热部署
IntelliJ IDEA 2017版 spring-boot-devtools实现热部署的更多相关文章
- IntelliJ IDEA Spring boot devtools 实现热部署
一.spring-boot-devtools是一个为开发者服务的一个模块,其中最重要的功能就是自动部署新代码. 二.原理 使用了两个ClassLoader,一个ClassLoader用来加载那些不会变 ...
- Spring Boot入门系列(十五)Spring Boot 开发环境热部署
在实际的项目开发过中,当我们修改了某个java类文件时,需要手动重新编译.然后重新启动程序的,整个过程比较麻烦,特别是项目启动慢的时候,更是影响开发效率.其实Spring Boot的项目碰到这种情况, ...
- Spring Boot 应用的热部署配置
前言 所谓热部署,简单来说,就是代码修改后不需重启项目就可自动加载出新的内容. 注意:热部署在 debug 调试模式下才生效! IDEA 配置 在 IDE(IDEA)中开启相关项目自动构建选项 开启编 ...
- Spring Boot 2.0 热部署指南
Spring Boot 2.0 支持热部署,实现方法很简单 Spring Boot 2.0 有几种热重载的选项. 推荐的方法是使用spring-boot-devtools 因为它提供了额外的开发时间功 ...
- Spring Boot 五种热部署方式
[推荐]2019 Java 开发者跳槽指南.pdf(吐血整理)>>> 1.模板热部署 在SpringBoot中,模板引擎的页面默认是开启缓存的,如果修改了页面的内容,则刷新页面是得不 ...
- Spring Boot 五种热部署方式,极速开发就是生产力!
1.模板热部署 在 Spring Boot 中,模板引擎的页面默认是开启缓存的,如果修改了页面的内容,则刷新页面是得不到修改后的页面的,因此我们可以在application.properties中关闭 ...
- IntelliJ IDEA 2017版 spring-boot2.0.4+mybatis 自动部署的细节问题
一.加载pom依赖包 <!--spring-boot开发热部署--> <dependency> <groupId>org.springframework.boot& ...
- spring boot 中的热部署
<plugin> <groupId>org.springframework.boot</groupId> <artifactId>sprin ...
- spring boot入门学习---热部署
1.maven文件 2.application.properties文件配置
- Spring Boot学习笔记-配置devtools实现热部署
写在前面 Spring为开发者提供了一个名为spring-boot-devtools的模块来使Spring Boot应用支持热部署,提高开发者的开发效率,无需手动重启Spring Boot应用. de ...
随机推荐
- C语言Socket编程(计算机网络作业)
最近我计算机网络课程要做作业了,没办法跟着老师一步一步的写C语言的代码,使用的计算就是Socket通信发送消息:代码实现的功能很简单,客户端向服务器端发送消息,服务器端接收客户端发来的消息,并且输出显 ...
- CentOS7 tomcat systemctl脚本
1,centos7 使用 systemctl 替换了 service命令 参考:redhat文档: https://access.redhat.com/documentation/en-US/Red_ ...
- Mplayer1.0rc2移植到am335x开发板
因项目需要媒体播放器,所以准备使用QT+Mplayer来做,但遇到了屏幕闪烁的问题,无法满足需求. 1.参考<mplayer 移植到 arm 心得> ,http://blog.csdn.n ...
- [您有新的未分配科技点]可,可,可持久化!?------0-1Trie和可持久化Trie普及版讲解
这一次,我们来了解普通Trie树的变种:0-1Trie以及在其基础上产生的可持久化Trie(其实,普通的Trie也可以可持久化,只是不太常见) 先简单介绍一下0-1Trie:一个0-1Trie节点只有 ...
- Makefile编写 三 伪目标的作用
本节我们讨论一个Makefile中的一个重要的特殊目标:伪目标. 伪目标是这样一个目标:它不代表一个真正的文件名,在执行make时可以指定这个目标来执行其所在规则定义的命令,有时我们也可以将一个伪目标 ...
- 花瓶使用笔记 (抓数据时,记得添加host,不然抓不了包的)
情况一: 有时候抓不了app的数据,那么把app的host 添加一下就可以了 proxy > SSL Proxying Settings 情况二: 开了 翻 墙 是抓不了包的! (掉了一次坑)
- 第 0 课 Golang环境搭建
1 下载 https://studygolang.com/dl 2 安装完成后,查看环境变量 GOBIN 存放可执行文件的目录的绝对路径. GOPATH 工作区目录的绝对路径.存放远源码的路径 ...
- 第3课 QT的诞生和本质
1. GUI用户界面元素 (1)操作系统提供了创建用户界面元素所需要的函数 (2)各种功能不同的函数依次调用,从而创建出界面元素 (3)操作系统提供的原生函数无法直接映射到界面元素 2. 面向对象的G ...
- 给iOS开发新手送点福利,简述UISlide的属性和用法
UISlide属性 1. minimumValue : 当值可以改变时,滑块可以滑动到最小位置的值,默认为0.0 _slider.minimumValue = 10.0; 2. maximu ...
- Basic64 编码解码
import sun.misc.BASE64Decoder; public class Base64 { /** * 字符串转Base64编码 * @param s * @return */ publ ...