pytorch学习笔记(9)--损失函数
1、损失函数的作用:
(1)计算实际输出和目标输出之间的差距;
(2)为我们更新输出提供一定的依据(也就是反向传播)
官网链接:https://pytorch.org/docs/1.8.1/nn.html
2、损失函数的使用
2.1、L1Loss
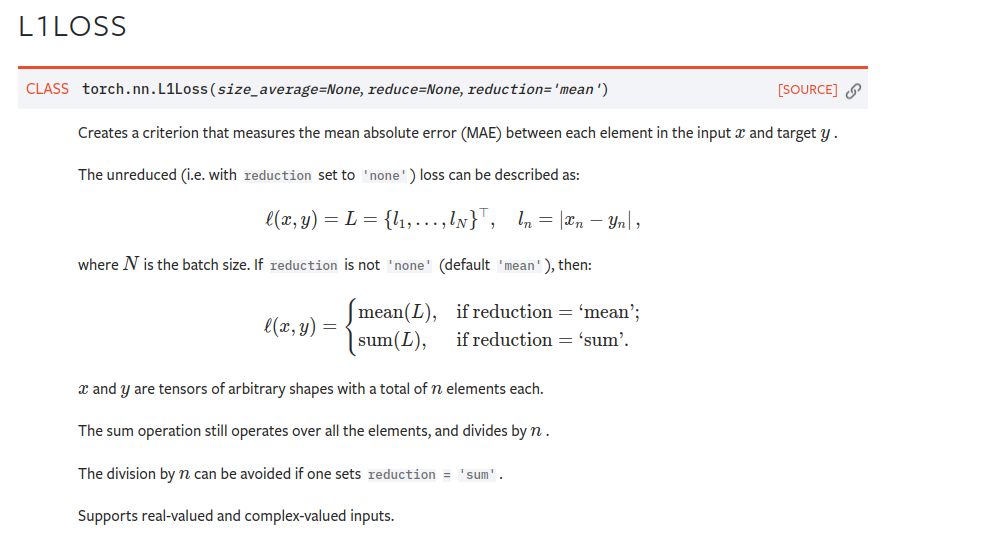
注:reduction = “sum” 表示求和 / reduction = "mean" 表示求平均值 默认求平均值
代码:
# file     : nn_lose.py

# time     : 2022/8/2 上午10:31

# function : L1Loss

import torch

from torch.nn import L1Loss

from torch import nn

inputs = torch.tensor([1, 2, 3], dtype=torch.float32)

targets = torch.tensor([1, 2, 5], dtype=torch.float32)

# reshape()添加维度,原来tensor是二维

inputs = torch.reshape(inputs, (1, 1, 1, 3))

targets = torch.reshape(targets, (1, 1, 1, 3))

loss = L1Loss()

result = loss(inputs, targets)

print(result)
上述代码计算了实际输出[1, 2, 3]和目标输出[1, 2, 5]之间的L1Loss,代码输出结果为:
tensor(0.6667)
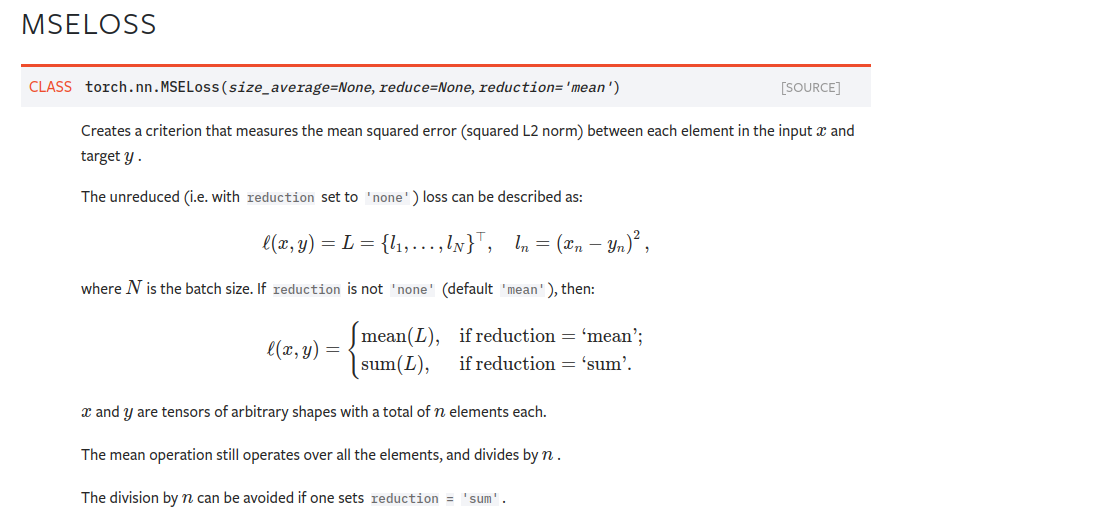
2.2MSELoss 均方损失函数:可以设置reduction参数来决定具体的计算方法
代码:
# file     : nn_lose.py

# time     : 2022/8/2 上午10:31

# function :

import torch

from torch.nn import L1Loss

from torch import nn

inputs = torch.tensor([1, 2, 3], dtype=torch.float32)

targets = torch.tensor([1, 2, 5], dtype=torch.float32)

# reshape

inputs = torch.reshape(inputs, (1, 1, 1, 3))

targets = torch.reshape(targets, (1, 1, 1, 3))

loss = L1Loss(reduction="sum")

result = loss(inputs, targets)

print(result)

# MSELoss 均方损失函数

loss_mse = nn.MSELoss(reduction="sum")

result_mse = loss_mse(inputs, targets)

print(result_mse)
结果:tensor(2.)
tensor(4.)#均方误差损失函数计算结果
2.3 CrossEntropyLoss交叉熵损失函数----没懂
交叉熵损失函数计算方法的细节可以参照这个博文:交叉熵损失函数。(看上去很牛)
代码:
# file     : nn_lose.py

# time     : 2022/8/2 上午10:31

# function :

import torch

from torch.nn import L1Loss

from torch import nn

inputs = torch.tensor([1, 2, 3], dtype=torch.float32)

targets = torch.tensor([1, 2, 5], dtype=torch.float32)

# reshape

inputs = torch.reshape(inputs, (1, 1, 1, 3))

targets = torch.reshape(targets, (1, 1, 1, 3))

loss = L1Loss(reduction="sum")

result = loss(inputs, targets)

print(result)

# MSELoss 均方损失函数

loss_mse = nn.MSELoss(reduction="sum")

result_mse = loss_mse(inputs, targets)

print(result_mse)

# CrossEntropyLoss

x = torch.tensor([0.1, 0.2, 0.3])

y = torch.tensor([1])

x = torch.reshape(x, (1, 3))

loss_cross = nn.CrossEntropyLoss()

result_cross = loss_cross(x, y)

print(result_cross)
结果:tensor(1.1019)
用了之前的一个简单神经网络,测试了损失函数及反向传播
# file     : nn_loss_network.py

# time     : 2022/8/2 下午2:39

# function :

import torch

import torchvision.datasets

from torch import nn

from torch.nn import Conv2d, MaxPool2d, Flatten, Linear, Sequential

from torch.utils.data import DataLoader

dataset = torchvision.datasets.CIFAR10("../dataset", train=False, transform=torchvision.transforms.ToTensor(), download=False)

dataloader = DataLoader(dataset, batch_size=1)

class Tudui(nn.Module):

    def __init__(self):

        super(Tudui, self).__init__()

        self.model1 = Sequential(

            Conv2d(3, 32, 5, padding=2),

            MaxPool2d(2),

            Conv2d(32, 32, 5, padding=2),

            MaxPool2d(2),

            Conv2d(32, 64, 5, padding=2),

            MaxPool2d(2),

            Flatten(),

            Linear(1024, 64),

            Linear(64, 64)

        )

    def forward(self, x):

        x = self.model1(x)

        return x

loss = nn.CrossEntropyLoss()

tudui = Tudui()

for data in dataloader:

    imgs, targets = data

    outputs = tudui(imgs)

    result_loss = loss(outputs, targets)

    result_loss.backward()

    print("ok")
pytorch学习笔记(9)--损失函数的更多相关文章
- [PyTorch 学习笔记] 4.2 损失函数
本章代码: https://github.com/zhangxiann/PyTorch_Practice/blob/master/lesson4/loss_function_1.py https:// ...
- 【pytorch】pytorch学习笔记(一)
原文地址:https://pytorch.org/tutorials/beginner/deep_learning_60min_blitz.html 什么是pytorch? pytorch是一个基于p ...
- Pytorch学习笔记(一)——简介
一.Tensor Tensor是Pytorch中重要的数据结构,可以认为是一个高维数组.Tensor可以是一个标量.一维数组(向量).二维数组(矩阵)或者高维数组等.Tensor和numpy的ndar ...
- [PyTorch 学习笔记] 1.3 张量操作与线性回归
本章代码:https://github.com/zhangxiann/PyTorch_Practice/blob/master/lesson1/linear_regression.py 张量的操作 拼 ...
- [PyTorch 学习笔记] 1.1 PyTorch 简介与安装
PyTorch 的诞生 2017 年 1 月,FAIR(Facebook AI Research)发布了 PyTorch.PyTorch 是在 Torch 基础上用 python 语言重新打造的一款深 ...
- [PyTorch 学习笔记] 4.3 优化器
本章代码: https://github.com/zhangxiann/PyTorch_Practice/blob/master/lesson4/optimizer_methods.py https: ...
- Pytorch学习笔记(二)---- 神经网络搭建
记录如何用Pytorch搭建LeNet-5,大体步骤包括:网络的搭建->前向传播->定义Loss和Optimizer->训练 # -*- coding: utf-8 -*- # Al ...
- Pytorch学习笔记(一)---- 基础语法
书上内容太多太杂,看完容易忘记,特此记录方便日后查看,所有基础语法以代码形式呈现,代码和注释均来源与书本和案例的整理. # -*- coding: utf-8 -*- # All codes and ...
- 【深度学习】Pytorch 学习笔记
目录 Pytorch Leture 05: Linear Rregression in the Pytorch Way Logistic Regression 逻辑回归 - 二分类 Lecture07 ...
- [PyTorch 学习笔记] 1.4 计算图与动态图机制
本章代码:https://github.com/zhangxiann/PyTorch_Practice/blob/master/lesson1/computational_graph.py 计算图 深 ...
随机推荐
- hexo部署和优化记录
title: hexo部署和优化记录 date: 2020-06-14 09:00:03 前端 tags: hexo summary: Repository_Pages使用.Github仓库打造网页群 ...
- MassTransit - .NET Core 的分布式应用程序框架
简介 MassTransit 是一个免费的.开源的.NET 分布式应用程序框架.MassTransit 使创建应用程序和服务变得容易,这些应用程序和服务利用基于消息的松散耦合异步通信来实现更高的可用性 ...
- [1] Multi-View Transformer for 3D Visual Grounding 论文精读
参考: https://zhuanlan.zhihu.com/p/467913475 3D Visual Grounding小白调研笔记 https://zhuanlan.zhihu.com/p/34 ...
- 剑指 Offer II 动态规划
088. 爬楼梯的最少成本 class Solution { public: int minCostClimbingStairs(vector<int>& cost) { int ...
- 51电子-STC89C51开发板:开发包
全部内容,请点击: 51电子-STC89C51开发板:<目录> --------------------------- 正文开始 --------------------------- ...
- 【快问快答】为什么NPOI读取表格数据的时候,遇到空格单元值会直接忽略
答:其实就是Excel文档的问题,具体问题出在哪里不知道,反正尝试换了一份新的文档来进行导入就可以!
- 如何完整卸载sketchup草图大师?
如何完整卸载sketchup草图大师?完全彻底卸载删除干净sketchup各种残留注册表和文件的方法和步骤.如何卸载sketchup呢?有很多同学想把sketchup卸载后重新安装,但是发现sketc ...
- AIX查看目录大小
cd $ORACLE_HOME cd .. du -sg * 16.35 dbhome_1
- C# DataGrid嵌套DataGrid动态隐藏显示行
前端代码: <Window x:Class="DataGridPractice.MainWindow" xmlns="http://schemas.microsof ...
- Hyper-V虚拟机在Win2019server中共用一个公网IP
Hyper-V虚拟机在Win2019server中共用一个公网IP 有时生产环境中希望一台宿主机上的多台虚拟机共用一个IP出口,按以下操作处理即可. 环境: Windows 2019 server D ...