vue router应用及总结
编写一个小的demo,对router基础的应用学习和理解。
效果图示:
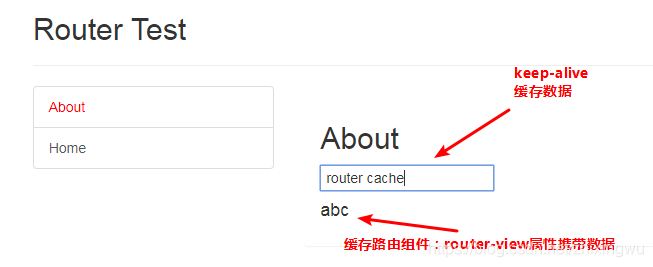
说明: 点击About在右边显示相关信息.
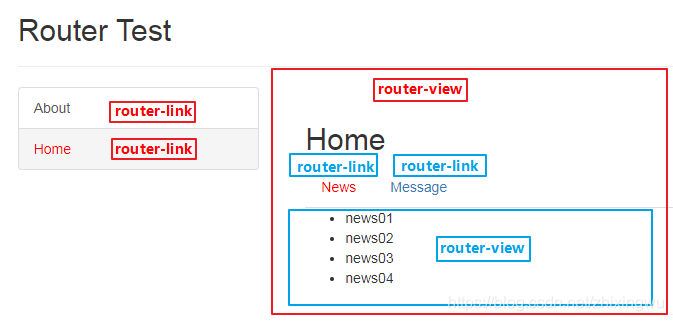
说明: 点击Home,在下边显示相关信息,且Home下有两个路由链接,分别对应各自的路由组件.
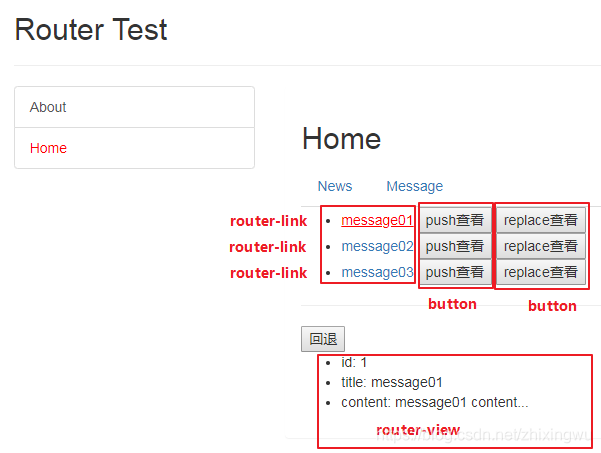
说明: Message下有三个路由链接,对应的路由组件只有一个,只是根据传入的参数不同显示不同数据。
项目目录:

代码:
1.index.html
<!DOCTYPE html>

<html>

  <head>

    <meta charset="utf-8">

    <meta name="viewport" content="width=device-width,initial-scale=1.0">

    <title>my-project</title>

    <link rel="stylesheet" href="./static/css/bootstrap.css">

    <style>

      .router-link-active {

        color: red !important;

      }

    </style>

  </head>

  <body>

    <div id="app"></div>

    <!-- built files will be auto injected -->

  </body>

</html>
2.index.js(router模块)
/**

 * 路由器对象模块

 */

import Vue from 'vue';

import Router from 'vue-router'

import Home from '../views/Home'

import About from '../views/About'

import News from '../views/News'

import Message from '../views/Message'

import MessageDetail from "../views/MessageDetail";

// 声明使用vue-router插件

/*

内部定义并注册了2个组件标签(router-link/router-view),

给组件对象添加了2个属性:

  1. $router: 路由器

  2. $route: 当前路由

 */

Vue.use(Router)

export default new Router({

  // 注册应用中所有的路由

  routes: [

    {

      path: '/about',

      name: 'About',

      component: About

    },

    {

      path: '/home',

      name: 'Home',

      component: Home,

      children: [

        {

          path: '/home/news',   // 绝对路径:path左侧的'/'永远代表跟路由

          name: 'News',

          component: News

        },

        {

          path: 'message',  // 相对路径

          name: 'Message',

          component: Message,

          children: [

            {

              path: 'detail/:id',  // id是变化的, :id 占位符来显示

              name: 'MessageDetail',

              component: MessageDetail

            }

          ]

        },

        {

          path: '',

          redirect: 'news'

        }

      ]

    },

    {

      path: '/',

      redirect: '/about'

    }

  ]

})
3.main.js
/**

 * 入口js

 */

import Vue from 'vue'

import App from './App'

import router2 from './router'

new Vue({   // 配置对象的属性名都是一些确定的名称,不能随便修改

  el: '#app',

  components: {App},  // 映射组件标签

  template: '<App/>',   // 指定需要渲染到页面的模板

  router: router2   // 注册路由器

})
4.App.vue
<template>

  <div>

    <div class="row">

      <div class="col-xs-offset-2 col-xs-8">

        <div class="page-header"><h2>Router Test</h2></div>

      </div>

    </div>

    <div class="row">

      <div class="col-xs-2 col-xs-offset-2">

        <div class="list-group">

          <!--生成路由链接:链接与路由配置中path一致-->

          <router-link to="/about" class="list-group-item">About</router-link>

          <router-link to="/home" class="list-group-item">Home</router-link>

        </div>

      </div>

      <div class="col-xs-6">

        <div class="panel">

          <div class="panel-body">

            <!-- 缓存路由组件对象 -->

            <keep-alive>

              <!-- 显示当前组件,并向路由组件传递数据(属性携带数据),与props用法类似 -->

              <router-view msg="abc"></router-view>

            </keep-alive>

          </div>

        </div>

      </div>

    </div>

  </div>

</template>

<script>

  export default {

    name: 'App',

  }

</script>

<style>

</style>
5.About.vue
<template>

  <div>

    <h2>About</h2>

    <input type="text" />

    <h4>{{msg}}</h4>

  </div>

</template>

<script>

  export default {

    name: "About",

    props: {  // 声明接受数据

      msg: String

    }

  }

</script>

<style scoped>

</style>
6.Home.vue
<template>

  <div>

    <h2>Home</h2>

    <div>

      <ul class="nav nav-tabs">

        <li><router-link to="/home/news">News</router-link></li>

        <li><router-link to="message">Message</router-link></li>

      </ul>

      <!-- 根据路由链接显示路由组件 -->

      <router-view></router-view>

    </div>

  </div>

</template>

<script>

    export default {

        name: "Header"

    }

</script>

<style scoped>

</style>
7.News.vue
<template>

  <div>

    <ul>

      <li v-for="(news, index) in newsArr" :key="index">{{news}}</li>

    </ul>

  </div>

</template>

<script>

  export default {

    name: "News",

    data () {

      return {

        newsArr: ['news01','news02','news03','news04']

      }

    }

  }

</script>

<style scoped>

</style>
8.Message.vue
<template>

	<!-- 一个组件只能有一个根标签 -->

  <div>

    <ul>

      <li v-for="message in messages" :key="message.id">

      <!-- 这里to绑定表达式,链接是动态的;不能用相对路径,不然连续点链接时会出错 -->

        <router-link :to="`/home/message/detail/${message.id}`">{{message.title}}</router-link>

        <button @click="pushShow(message.id)">push查看</button>

        <button @click="replaceShow(message.id)">replace查看</button>

      </li>

    </ul>

    <hr>

    <button @click="$router.back()">回退</button>

    <router-view></router-view>

  </div>

</template>

<script>

  export default {

    name: "Message",

    data() {

      return {

        messages: []

      }

    },

    mounted() {

      // 模拟ajax异步从后台请求数据

      setTimeout(() => {

        const messages = [

          {

            id: 1,

            title: 'message01'

          },

          {

            id: 2,

            title: 'message02'

          },

          {

            id: 3,

            title: 'message03'

          },

        ]

        this.messages = messages

      }, 1000)

    },

    methods: {

      pushShow(id) {

        this.$router.push(`/home/message/detail/${id}`)

      },

      replaceShow(id) {

        this.$router.replace(`/home/message/detail/${id}`)

      }

    }

  }

</script>

<style scoped>

</style>
9.MessageDetail.vue
<template>

  <div>

    <ul>

      <li>id: {{$route.params.id}}</li>

      <li>title: {{detail.title}}</li>

      <li>content: {{detail.content}}</li>

    </ul>

  </div>

</template>

<script>

  export default {

    name: "MessageDetail",

    data() {

      return {

        detail: {},

      }

    },

    mounted() {  // 改变当前路由组件参数数据时, 不会重新创建组件对象, mounted不会重新执行

      // setTimeout含义是定时器,到达一定的时间触发一次,在代码的执行时间上加1s

      // 但是setInterval含义是计时器,到达一定时间触发一次,并且会持续触发

      setTimeout(() => {

        const messageDetails = [

          {

            id: 1,

            title: 'message01',

            content: 'message01 content...'

          },

          {

            id: 2,

            title: 'message02',

            content: 'message02 content...'

          },

          {

            id: 3,

            title: 'message03',

            content: 'message03 content...'

          },

        ]

        this.messageDetails = messageDetails    //初始化数据,声明全局messageDetails

        const id = this.$route.params.id * 1  // id有可能为文本,故乘以1

        this.detail = messageDetails.find(detail => detail.id === id)

      }, 1000)

    },

    watch: {

      $route: function(value) {   // 改变当前路由组件参数数据时自动调用

        const id = value.params.id * 1

        this.detail = this.messageDetails.find(detail => detail.id === id)

      }

    }

  }

</script>

<style scoped>

</style>
总结
1.路由组件跳转
路由跳转与页面跳转相似,页面跳转是从一个页面跳到另一个页面,但路由跳转是从一个路由组件跳到另一个路由组件,类似tab页切换和导航栏效果。
页面跳转方式:
- a链接 -- html
- window.location.href -- js
路由组件跳转方式:
- router-link -- html,等同于 $router.push, replace默认为false
- router-link replace -- 当添加replace=true时等同于$router.replace
- $router.push -- 在 history 栈中添加新记录
- $router.replace -- 替换掉当前的 history 记录
- $router.back() -- 回退
都是在 router-view 标签定义的地方显示url指向的路由组件
router.push(location)
这个方法会向 history 栈添加一个新的记录,当用户点击浏览器后退按钮时,则回到之前的 URL。
router.replace(location)
这个方法不会向 history 添加新记录,而是跟它的方法名一样 —— 替换掉当前的 history 记录,点击返回按钮也不会回到之前的URL页面.
2.路由组件跳转时传递数据
声明式:
router-link :to="..." path上传递参数
params: /home/message/detail/${message.id}
query: '/home/message/detail?id='+message.id
router-view :abc="data" 属性携带参数
类似与同props进行组件通信,跳转的下一路由组件需声明接受属性props
编程式:
router.push(...)
该方法的参数可以是一个字符串路径,或者一个描述地址的对象。
// 字符串

router.push('/home')	// 添加新记录

//push方法也可以传replace

this.$router.push({path: '/home', replace: true})	// 替换当前记录

// 对象

this.$router.push({path: '/login?url=' + this.$route.path});

// 带查询参数,变成/backend/order?selected=2

this.$router.push({path: '/backend/order', query: {selected: "2"}});

// 命名的路由

router.push({ name: 'user', params: { userId: 123 }})
params与query传参区别
- query 传参配置的是path,而params传参配置的是name,在params中配置path无效
- query在路由配置不需要设置参数,而params必须设置
- query传递的参数会显示在地址栏中
- params传参刷新会无效,但是query会保存传递过来的值,刷新不变
- 路由配置:
query: {path: '/home', name: Home, component: Home}
params: {path: '/home/:site/:bu', name: Home, component: Home} - 获取路由参数
	created () {

	let self = this

	self.getParams()

	},

	watch () {

	'$route': 'getParams'

	},

	methods: {

	  getParams () {

	  let site = this.$route.query.site

	  let bu = this.$route.query.bu

	  // 如果是params 传参,那就是this.$route.params.site

	  上面就可以获取到传递的参数了

	 }

	}
说明: 路由传递参数和传统传递参数是一样的,命名路由类似表单提交而查询就是url传递.
- 命名路由搭配params,刷新页面参数会丢失
- 传递参数搭配query,刷新页面数据不会丢失
- 接受参数使用this.$router后面就是搭配路由的名称就能获取到参数的值
- $route为当前router跳转对象,携带数据。对象可以获取name、path、query、params等
- $router为VueRouter实例,调用相关router方法来进行路由跳转
vue router应用及总结的更多相关文章
- Vue 2.0 + Vue Router + Vuex
用 Vue.js 2.x 与相配套的 Vue Router.Vuex 搭建了一个最基本的后台管理系统的骨架. 当然先要安装 node.js(包括了 npm).vue-cli 项目结构如图所示: ass ...
- vue router 只需要这么几步
<!DOCTYPE html><html lang="en"><head> <meta charset="UTF-8" ...
- Vue.js 2.x笔记:路由Vue Router(6)
1. Vue Router简介与安装 1.1 Vue Router简介 Vue Router 是 Vue.js 官方的路由管理器.它和 Vue.js 的核心深度集成,构建单页面应用. Vue Rout ...
- Vue Router学习笔记
前端的路由:一个地址对应一个组件 Vue Router中文文档 一.路由基本使用 第1步:导入Vue Router: <script src="https://unpkg.com/vu ...
- vue router.push(),router.replace(),router.go()和router.replace后需要返回两次的问题
转载:https://www.cnblogs.com/lwwen/p/7245083.html https://blog.csdn.net/qq_15385627/article/details/83 ...
- 前端MVC Vue2学习总结(八)——Vue Router路由、Vuex状态管理、Element-UI
一.Vue Router路由 二.Vuex状态管理 三.Element-UI Element-UI是饿了么前端团队推出的一款基于Vue.js 2.0 的桌面端UI框架,手机端有对应框架是 Mint U ...
- 深入浅出的webpack4构建工具---webpack+vue+router 按需加载页面(十五)
1. 为什么需要按需加载? 对于vue单页应用来讲,我们常见的做法把页面上所有的代码都打包到一个bundle.js文件内,但是随着项目越来越大,文件越来越多的情况下,那么bundle.js文件也会越来 ...
- 深入浅出的webpack构建工具--webpack4+vue+router项目架构(十四)
阅读目录 一:vue-router是什么? 二:vue-router的实现原理 三:vue-router使用及代码配置 四:理解vue设置路由导航的两种方法. 五:理解动态路由和命名视图 六:理解嵌套 ...
- python 全栈开发,Day91(Vue实例的生命周期,组件间通信之中央事件总线bus,Vue Router,vue-cli 工具)
昨日内容回顾 0. 组件注意事项!!! data属性必须是一个函数! 1. 注册全局组件 Vue.component('组件名',{ template: `` }) var app = new Vue ...
- vue router 跳转到新的窗口方法
在CreateSendView2.vue 组件中的方法定义点击事件,vue router 跳转新的窗口通过采用如下的方法可以实现传递参数跳转相应的页面goEditor: function (index ...
随机推荐
- pyqt5--QTDesigner--安装与配置
安装: 安装PyQt5-tools 文件--->设置---> ---> 安装之后在 安装目录\Lib\site-packages\pyqt5_tools 找到 designer.e ...
- jvm——NIO
https://blog.csdn.net/Evankaka/article/details/48464013 https://www.cnblogs.com/aspirant/p/9166944.h ...
- idea编写第一个springboot程序
1. 创建一个 springboot 项目 使用 idea 创建的基本步骤: 2. 加入父级,起步依赖 pom.xml文件内容: <?xml version="1.0" en ...
- docker-compose命令及yaml文件
Docker-compose常用命令 docker-compose up -d nginx 构建建启动nignx容器 docker-compose exec nginx bash 登录到nginx容器 ...
- The GuidRepresentation for the reader is CSharpLegacy, which requires the binary sub type to be Uuid
使用客户端链接MongoDb报错 The GuidRepresentation for the reader is CSharpLegacy, which requires the binary su ...
- SSM整合之---环境搭建
SSM整合---环境搭建 l 查询所有用户的信息,保存用户信息 1.pom.xml配置项目所需的jar包 <dependencies> <dependency> <gr ...
- java jdk原生的http请求工具类
package com.base; import java.io.IOException; import java.io.InputStream; import java.io.InputStream ...
- pycharm selenium 安装firefox驱动和Google驱动教程
一.下载Firefox浏览器或Google浏览器 下载渠道有很多,直接下载最新版的就可以了. 二.下载驱动 Firefox驱动 地址:https://github.com/mozilla/geckod ...
- Ubuntu 12.04输入密码登陆后又跳回到登录界面
先找到这个文件: /home/user/.xsession-errors 打开这个文件. 这个文件记录了系统启动的日志,从这里你就可以看到启动的时候哪里出了问题. 对于我的来说,问题出在这里: & ...
- 移动开发与PC开发区别
移动开发领域与PC 开发得区别,总结为:3低, 3高,3有限.开发移动程序是应该时刻记住这9个限制. 3低 低处理能力 低分辨率 低速的数据传输能力 ...