【C#/WPF】调节图像的HSL(色相、饱和度、明亮度)
原文:【C#/WPF】调节图像的HSL(色相、饱和度、明亮度)
先说概念:
HSL是一种描述颜色的方式(其他颜色描述方式还有大家熟悉的RGB值)。HSL三个字母分别表示图像的Hue色相、Saturation饱和度、Lightness明亮度。
需求:
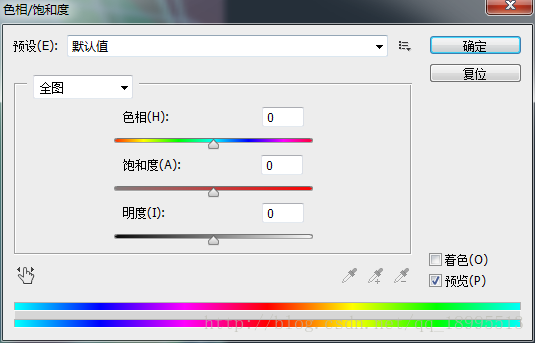
制作一个面板,包含三个滑动条,拖动滑动条可以修改目标图片的HSL值。即模仿PS中类似的功能,如下图:
方案一:遍历所有像素点,修改每个点的HSL值。
参考:https://stackoverflow.com/questions/10332363/getting-hue-from-every-pixel-in-an-image
前台界面:一个Image控件显示目标图片,一个Button按钮点击一下降低一点图片亮度。
<StackPanel Orientation="Vertical">

    <Image x:Name="img" Width="800" Height="300" Stretch="Uniform" Source="C:\Users\Administrator\Documents\Visual Studio 2015\Projects\WpfApplication1\WpfApplication1\Resources\Images\1.png"/>

    <Button Click="Button_Click" Width="100" Height="40" Content="调暗" FontSize="22"/>

</StackPanel>
后台代码:
// 亮度降低

private void Button_Click(object sender, RoutedEventArgs e)

{

    // 获得图源的Bitmap

    Bitmap bitmap = UtilSet.ImageSourceToBitmap(img.Source); // img是前台Image控件

    // 遍历Bitmap中的每个像素点,像素点执行操作

    for (int j = 0; j < bitmap.Height; j++)

    {

        for (int i = 0; i < bitmap.Width; i++)

        {

            System.Drawing.Color oldColor = bitmap.GetPixel(i, j);

            System.Drawing.Color newColor = HSLHelper.ModifyBrightness(oldColor, 1.05);

            bitmap.SetPixel(i, j, newColor);

        }

    }

    ImageSource newSource =  UtilSet.ConvertBitmapToImageSource(bitmap);

    img.Source = newSource;

    MessageBox.Show("完成");

}

// 工具方法:ImageSource --> Bitmap

public static System.Drawing.Bitmap ImageSourceToBitmap(ImageSource imageSource)

{

    BitmapSource m = (BitmapSource)imageSource;

    System.Drawing.Bitmap bmp = new System.Drawing.Bitmap(m.PixelWidth, m.PixelHeight, System.Drawing.Imaging.PixelFormat.Format32bppPArgb);

    System.Drawing.Imaging.BitmapData data = bmp.LockBits(

    new System.Drawing.Rectangle(System.Drawing.Point.Empty, bmp.Size), System.Drawing.Imaging.ImageLockMode.WriteOnly, System.Drawing.Imaging.PixelFormat.Format32bppPArgb);

    m.CopyPixels(Int32Rect.Empty, data.Scan0, data.Height * data.Stride, data.Stride); bmp.UnlockBits(data);

    return bmp;

}
经测试,该方法可以修改图片的Lightness明亮度,但是遍历像素点修改效率极低,卡得难以忍受。还是找第三方库吧。
方案二:使用三方库MagickImage.Net
众所周知MagickImage是一个及其强大又多功能的图像处理库,而且有多个平台下对应的版本(如Java、PHP)。
步骤:
1、 在Visual Studio的NuGet中搜索、下载、安装MagickImage。选最上面最高下载量这个。

2、随便打开一个类,输入ImageMagick.MagickImage并导包后,按下F12查看该类有哪些方法能实现我们的需求。在该类中按Ctrl + F搜索hue,即可看到该类的确提供了修改图像HSL的方法!

(文件很长,中间省略。。。)
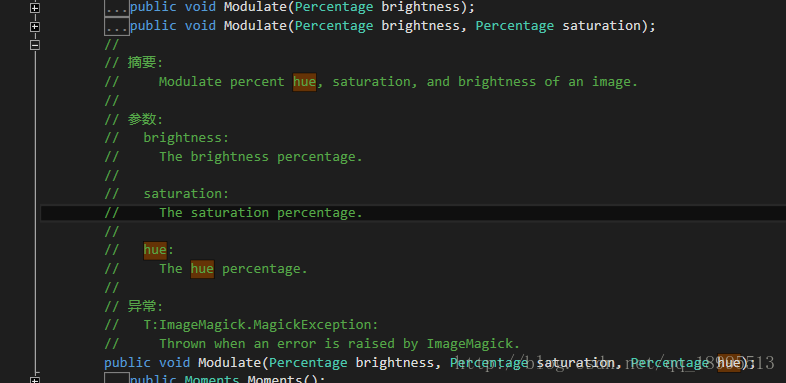
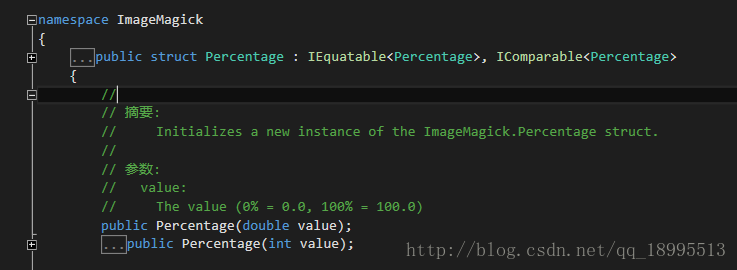
3、观察上图这个Modelate()方法的传参,是结构体ImageMagick.Percentage,该结构体的描述跟图片像素无关。看下图,该Percentage构造函数中传参的是一个数字,可知该Modelate()方法修改的HSL值是原图的HSL值的一个百分比!
4、再观察被操作的图像ImageMagick.MagickImage这个类,该类提供了toBitmap()和toBitmapSource()方法,前者Bitmap是通用的图像类型,后者BitmapSource是WPF使用的图像类型,说明该类连图像类型转换的功能都准备好了,前置条件一切OK!
5、了解所需函数的使用方法后,开始做Demo。界面如下,一个Image控件显示图片,三个Slider滑动条分别调节Hue色相、Saturation饱和度、Lightness明亮度。
<DockPanel Width="400" Height="150" VerticalAlignment="Top" Margin="0,20,0,0">

    <Grid>

        <Grid.RowDefinitions>

            <RowDefinition Height="1*"/>

            <RowDefinition Height="1*"/>

            <RowDefinition Height="1*"/>

        </Grid.RowDefinitions>

        <Grid.ColumnDefinitions>

            <ColumnDefinition Width="1*"/>

            <ColumnDefinition Width="3*"/>

        </Grid.ColumnDefinitions>

        <Label Content="色相" Grid.Row="0" Grid.Column="0" HorizontalAlignment="Center" VerticalAlignment="Center" FontSize="18" />

        <Slider x:Name="slider0" Value="{Binding SliderValue0}" Minimum="0" Maximum="200" VerticalAlignment="Center" Grid.Row="0" Grid.Column="1"/>

        <Label Content="饱和度" Grid.Row="1" Grid.Column="0" HorizontalAlignment="Center" VerticalAlignment="Center" FontSize="18" />

        <Slider x:Name="slider1" Value="{Binding SliderValue1}" Minimum="0" Maximum="200" VerticalAlignment="Center" Grid.Row="1" Grid.Column="1"/>

        <Label Content="明度" Grid.Row="2" Grid.Column="0" HorizontalAlignment="Center" VerticalAlignment="Center" FontSize="18" />

        <Slider x:Name="slider2" Value="{Binding SliderValue2}" Minimum="0" Maximum="200" VerticalAlignment="Center" Grid.Row="2" Grid.Column="1"/>

    </Grid>

</DockPanel>
界面如下图:
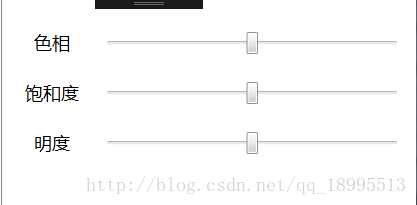
注意,因为Modelate()方法的传参要求是百分比,所以Slider滑动条的两头的值为0,200(表示0%和200%),默认位置在中间100(表示100%,即HSL未修改的状态)。
Controller层给这三个Slider滑动条添加滑动事件,下面只以修改Hue色相为例:
private ImageMagick.MagickImage originalMagickImage; // 图层图像修改前的状态

// 先执行该方法!

private void Init()

{

    // 滑动条的修改是在原图的基础上修改!

    Bitmap bitmap = ImageSourceToBitmap(img.Source); // img是前台Image控件

    originalMagickImage = new ImageMagick.MagickImage(bitmap);

}

/// <summary>

/// 调节色相。在原图的基础上增加/减少百分比

/// </summary>

/// <param name="sender"></param>

/// <param name="e"></param>

private void Hue_ValueChanged(object sender, RoutedPropertyChangedEventArgs<double> e)

{

    // 只调整图像的Hue色相值

    ImageMagick.Percentage brightness = new ImageMagick.Percentage(100); // 100%表示不改变该属性

    ImageMagick.Percentage saturation = new ImageMagick.Percentage(100);

    ImageMagick.Percentage hue = new ImageMagick.Percentage(e.NewValue); // 滑动条范围值0%~200%

    ImageMagick.MagickImage newImage = new ImageMagick.MagickImage(originalMagickImage); // 相当于深复制

    newImage.Modulate(brightness, saturation, hue);

    // 重新给Image控件赋值新图像

    BitmapSource bitmapImage = newImage.ToBitmapSource();

    img.Source = imageSource;

}

// 工具方法:ImageSource --> Bitmap

public System.Drawing.Bitmap ImageSourceToBitmap(ImageSource imageSource)

{

    BitmapSource m = (BitmapSource)imageSource;

    System.Drawing.Bitmap bmp = new System.Drawing.Bitmap(m.PixelWidth, m.PixelHeight, System.Drawing.Imaging.PixelFormat.Format32bppPArgb);

    System.Drawing.Imaging.BitmapData data = bmp.LockBits(

    new System.Drawing.Rectangle(System.Drawing.Point.Empty, bmp.Size), System.Drawing.Imaging.ImageLockMode.WriteOnly, System.Drawing.Imaging.PixelFormat.Format32bppPArgb);

    m.CopyPixels(Int32Rect.Empty, data.Scan0, data.Height * data.Stride, data.Stride); bmp.UnlockBits(data);

    return bmp;

}
经测试,该方法效率很高!拖拽滑动条立马能看到HSL修改后的效果!显著比两个For循环遍历所有像素点高效很多!
待补充:之后再补一个GIF,看得更直观一点。
【C#/WPF】调节图像的HSL(色相、饱和度、明亮度)的更多相关文章
- 【C#/WPF】调节图像的HSL(色相Hue、饱和度Saturation、明亮度Lightness)
先说概念: HSL是一种描述颜色的方式,其他颜色描述方式还有大家熟悉的RGB值.HSL三个字母分别表示图像的Hue色相.Saturation饱和度.Lightness明亮度. 需求: 制作一个面板,包 ...
- 【C#/WPF】调节图像的对比度(Contrast)
关于对比度: 调节对比度直观感受是,高对比度的图像明暗关系更明显,色彩更鲜艳:低对比度的图像表面像是蒙上一层灰,色彩不鲜艳. 需求: 制作一个面板,一个滑动条,拖动滑动条可以修改目标图片的对比度. 资 ...
- GDI+在Delphi程序的应用 Photoshop色相饱和度明度功能
本文用GDI+实现Photoshop色相/饱和度/明度功能,参照我的其它有关GDI+在 Delphi程序的应用的文章,代码也可供TBitmap使用. 有些人不喜欢,或者不太懂Delphi的BASM代码 ...
- photoshop:调整图层之色相/饱和度
色相/饱和度:快速调色及调整图片色彩浓淡明暗 面板主要参数:色相.饱和度.明度 色相用来改变颜色:顺序按红-黄-绿-青-蓝-洋红 饱和度用来控制色彩浓淡 明度控制色彩明暗 勾选“着色”,图片会变成单色 ...
- PS日记二(调色:色阶,曲线,色相/饱和度,色彩平衡,蒙板)
基础知识一:在PS操作中为什么要复制图层(ctrl+J)? 答:复制图层主要是为了 备份原图层,在副本中进行操作 如果说你副本弄坏了,还有原来的PS复制图层一方面是保全原图.二是因为图层是ps操作的基 ...
- 借助Photoshop,Illustrator等设计软件进行WPF图形图像的绘制
原文:借助Photoshop,Illustrator等设计软件进行WPF图形图像的绘制 本文所示例子是借助第三方设计软件,制作复杂的矢量图形,转成与XAML酷似的SVG,再转换成xaml而实现的. 这 ...
- WPF图形图像相关类
BitmapMetadata类: 继承自抽象类ImageMetadata,包含图像的原数据信息,如相机型号.图像修改程序名称.拍照日期.拍照地点等.ImageSoure类包含ImageMetadata ...
- 【C#/WPF】图像数据格式转换时,透明度丢失的问题
问题:工作中涉及到图像的数据类型转换,经常转着转着发现,到了哪一步图像的透明度丢失了! 例如,Bitmap转BitmapImage的经典代码如下: public static BitmapImage ...
- WPF将RGB转为HSL的工具类
class HSLColor { private int _alpha = 255; public int _hue = 0; public d ...
随机推荐
- [HTML] Creating visual skip links in HTML and CSS
Skip links are an extremely helpful navigation pattern for keyboard and screen reader users, since t ...
- printk()函数的总结
我们在使用printk()函数中使用日志级别为的是使编程人员在编程过程中自定义地进行信息的输出,更加容易地掌握系统当前的状况.对程序的调试起到了很重要的作用.(下文中的日志级别和控制台日志控制级别是一 ...
- docker nginx实现一个主机部署多个站点
原文:docker nginx实现一个主机部署多个站点 在某站租赁的虚拟机快到期了,续费得花200多,想到在阿里云新买的服务器,不如把这个也转移过去.域名我就用真实的吧,大家别黑我网站就好了,谢谢各位 ...
- 【u010】银河英雄传说
Time Limit: 1 second Memory Limit: 128 MB [问题描述] 公元五八○一年,地球居民迁移至金牛座α第二行星,在那里发表银河联邦创立宣言,同年改元为宇宙历元年,并开 ...
- 怎么实现登录之后跳转到登录之前的页面?SpringMVC+Freemarker
项目中,想实现一个功能. 直接访问某个需要登录的url,比如/addArticle,可能会跳转到登录页面login.html. 登录成功之后,自动跳转到/addArticle这个登录前的页面,继续登录 ...
- Zygote总结
Zygote是由init进程通过解析 init.zygote.rc 文件而创建的,zygote所对应的可执行程序 app_process,所对应的源文件是App_main.cpp,进程名为zygote ...
- 看看是不是你想要的:pycharm永久激活!!!
pycharm是很强大的开发工具,但是每次注册着实让人头疼.网络上很多注册码.注册服务器等等.但都只是一年或者不能用:为次有如下解决方案.亲测有效!!! 如果想让pycharm永久被激活,比如截止日到 ...
- Android中SQLite数据库操作(2)——使用SQLiteDatabase提供的方法操作数据库
如果开发者对SQL语法不熟,甚至以前从未使用过任何数据库,Android的SQLiteDatabase提供了insert.update.delete或query语句来操作数据库. 一.insert方法 ...
- C#之Linq、where()、FindAll()的区别
原地址 C#之Linq.where().FindAll()的区别 对于实现了IEnumerable接口的类.类型.集合可以使用Linq.Linq的扩展方法where().FindAll()来查询符合谓 ...
- Bit error testing and training in double data rate (ddr) memory system
DDR PHY interface bit error testing and training is provided for Double Data Rate memory systems. An ...