Android 可单选多选的任意层级树形控件
花了几天研究了下鸿扬大神的博客《Android打造任意层级树形控件,考验你的数据结构和设计》,再结合公司项目改造改造,现在做个笔记。
先看看Demo的实现效果。首先看的是多选效果

再看看单选效果图。
(不好意思,还没学会整动态图,两张图片看不出什么区别哈)
先回顾下数据结构中树的几个重要概念。
(1)一棵树是N个节点和N-1条边的集合。
(2)除去根节点外,每一个节点都有一个父亲,每条边都将某个节点连接到它的父亲。
(3)一棵树的深度等于它的最深的树叶的深度;该深度总是等于这棵树的高度
将要打造的树形控件本质上是一个listView,既然是树形的,那么listView的item本质上其实就是树的节点,所以每个item都得具备一下树节点的属性吧,比如说它的父节点是谁?儿子节点都有哪些等等,所以我们需要将我们从服务器接收回来的数据转化成节点模式的数据,这里就新建一个类Node。
先看看Node类必不可少的几个属性吧,一个是自身标志id、一个是父辈标志pid,还有一个是你需要在页面展示的内容,比如说你这个树形控件展示的机构部门,那么这个name就是机构名称,如果这个属性控件展示的人员,那么这个name就是人员的姓名,这里我把id,pid都设置成字符串类型,主要是为了防止有时候id,pid可能是非int类型的数据,比如说带字符串的id,pid或者超过2147483647的数字。所以索性就将id,pid设置成字符串类型。
 package com.example.keranbin.testdemo.treeHelp;

 import java.util.ArrayList;

 import java.util.List;

 /**

  * Created by keranbin on 2016/8/30.

  */

 public class Node {

     //id

     private String id;

     //父辈id

     private String pid = "";

     //要在树形控件上展示的内容,比如说机构名称。

     private String name;

     //树的层级

     private int level;

     // 是否是展开的

     private boolean isExpand = false;

     //是否是选择的

     private boolean isChoose=false;

     //缩进图标

     private int icon;

     //父亲节点

     private Node parent;

     //儿子节点集合

     private List<Node> children = new ArrayList<>();

     public Node(String id, String pid, String name) {

         this.id = id;

         this.pid = pid;

         this.name = name;

     }

     public String getId() {

         return id;

     }

     public void setId(String id) {

         this.id = id;

     }

     public String getPid() {

         return pid;

     }

     public void setPid(String pid) {

         this.pid = pid;

     }

     public String getName() {

         return name;

     }

     public void setName(String name) {

         this.name = name;

     }

     /**

      * 得到当前节点的层级,如果当前节点没有父节点,则该节点

      *是根节点,否则当前节点的层级为当前节点父节点的层级加1

      * @return

      */

     public int getLevel() {

         return parent == null ? 0 : parent.getLevel() + 1;

     }

     public void setLevel(int level) {

         this.level = level;

     }

     public boolean isExpand() {

         return isExpand;

     }

     /**

      * 设置当前节点是否展开,如果是false,那么递归关闭当前节点的所有子节点

      *

      * @param expand

      */

     public void setExpand(boolean expand) {

         isExpand = expand;

         if (!expand) {

             for (Node node : children) {

                 node.setExpand(false);

             }

         }

     }

     public boolean isChoose() {

         return isChoose;

     }

     public void setChoose(boolean choose) {

         isChoose = choose;

     }

     public int getIcon() {

         return icon;

     }

     public void setIcon(int icon) {

         this.icon = icon;

     }

     public Node getParent() {

         return parent;

     }

     public void setParent(Node parent) {

         this.parent = parent;

     }

     public List<Node> getChildren() {

         return children;

     }

     public void setChildren(List<Node> children) {

         this.children = children;

     }

     /**

      * 是否是根节点

      */

     public boolean isRoot() {

         return parent == null;

     }

     /**

      * 是否是展开状态,

      */

     public boolean isParentExpand() {

         if (parent == null)

             return false;

         return parent.isExpand();

     }

     /**

      * 是否是叶子节点

      *

      * @return

      */

     public boolean isLeft() {

         return children.size() == 0;

     }

 }
Node类已经打造完毕啦,那么我们如何将服务器端取回的bean转化成我们的Node类呢?答案是通过注解+反射。
 package com.example.keranbin.business.ccsq.annotion;

 import java.lang.annotation.ElementType;

 import java.lang.annotation.Retention;

 import java.lang.annotation.RetentionPolicy;

 import java.lang.annotation.Target;

 /**

  * Created by keranbin on 2016/8/30.

  */

 @Target(ElementType.FIELD)

 @Retention(RetentionPolicy.RUNTIME)

 public @interface TreeNodeId {

 }
 package com.example.keranbin.business.ccsq.annotion;

 import java.lang.annotation.ElementType;

 import java.lang.annotation.Retention;

 import java.lang.annotation.RetentionPolicy;

 import java.lang.annotation.Target;

 /**

  * Created by keranbin on 2016/8/30.

  */

 @Target(ElementType.FIELD)

 @Retention(RetentionPolicy.RUNTIME)

 public @interface TreeNodePid {

 }
 package com.example.keranbin.business.ccsq.annotion;

 import java.lang.annotation.ElementType;

 import java.lang.annotation.Retention;

 import java.lang.annotation.RetentionPolicy;

 import java.lang.annotation.Target;

 /**

  * Created by keranbin on 2016/8/30.

  */

 @Target(ElementType.FIELD)

 @Retention(RetentionPolicy.RUNTIME)

 public @interface TreeNodeLabel {

 }
我们新建一个工具类TreeHelp,先看看怎么将bean转化成Node。
    /**

      * 将服务器端取回的数据转化成Node

      * @param datas

      * @return

      * @throws IllegalAccessError

      */

     public static <T> List<Node> convertDataToNodes(List<T> datas) throws IllegalAccessException {

         List<Node> nodes = new ArrayList<>();

         Node node = null;

         for (T t : datas) {

             String id = "";

             String pid = "";

             String label = null;

             String type=null;

             node = null;

             Class c = t.getClass();

             Field fields[] = c.getDeclaredFields();

             for (Field field : fields) {

                 if (field.getAnnotation(TreeNodeId.class) != null) {

                     //设置访问权限,强制性的可以访问

                     field.setAccessible(true);

                     id= (String) field.get(t);

                 }

                 if (field.getAnnotation(TreeNodePid.class) != null) {

                     //设置访问权限,强制性的可以访问

                     field.setAccessible(true);

                     pid= (String) field.get(t);

                 }

                 if (field.getAnnotation(TreeNodeLabel.class) != null) {

                     //设置访问权限,强制性的可以访问

                     field.setAccessible(true);

                     label = (String) field.get(t);

                 }

             node = new Node(id, pid, label,type);

             nodes.add(node);

         }
这时候我们已经将bean转化成Node啦,但是我们现在所得到的Node集合中的各个Node是毫无关联的,父节点并不知道谁是他的儿子,儿子节点也不知道谁是他的父亲。所以我们得处理下
    /**

          * 循环对比两个Node,设置节点间关联关系

          */

         for (int i = 0; i < nodes.size(); i++) {

             Node n = nodes.get(i);

             for (int j = i+1; j < nodes.size(); j++) {

                 Node m = nodes.get(j);

                 if (m.getId().equals( n.getPid())) {//m是n的父节点

                     m.getChildren().add(n);

                     n.setParent(m);

                 } else if (m.getPid().equals( n.getId())) {//n是m的父节点

                     n.getChildren().add(m);

                     m.setParent(n);

                 }

             }

         }
除此之外,我们还得为节点设置图标。
  /**

      * 为节点设置图标

      * 逻辑:(1)如果当前节点有孩子节点并且处于展开状态,那么设置向下的图标

      * (2)如果当前节点有孩子节点并且处于闭合状态,那么设置向右的图标

      * (3)如果当前节点没有孩子节点,传参-1,到时候判断是-1,不设置图标

      * @param n

      */

     private static void setNodeIcon(Node n) {

         if (n.getChildren().size() > 0 && n.isExpand()) {

             n.setIcon(R.mipmap.tree_ex);

         } else if (n.getChildren().size() > 0 && !n.isExpand()) {

             n.setIcon(R.mipmap.tree_ec);

         } else {

             n.setIcon(-1);

         }

     }
这时候我们已经设置好节点的关联关系啦,但是,这个时候的nodes是杂乱无章的,试想一下,我们不可能一进这个页面从根节点到所有的叶子节点都展示给用户吧,要是树的层级少那还乐观,但是要是树的层级是100,1000呢,所以我们需要给Nodes集合中的Node排一下序,然后还需要设置一个方法来过滤出可见的节点。
 **

      * 得到排序后的Nodes

      * @param datas

      * @param <T>

      * @return

      */

     public static <T> List<Node> getSortedNodes(List<T> datas, int defaultExpandLevel) throws IllegalAccessException {

         List<Node> result = new ArrayList<>();

         List<Node> nodes = convertDataToNodes(datas);

         //获取树的根节点

         List<Node> rootNodes = getRootNodes(nodes);

         for (Node node : rootNodes) {

             addNode(result, node, defaultExpandLevel, 1);

         }

         return result;

     }
 /**

     * 从所有节点中过滤出根节点

     * @param nodes

     * @return

     */

    private static List<Node> getRootNodes(List<Node> nodes) {

        List<Node> root = new ArrayList<>();

        for (Node node : nodes) {

            if (node.isRoot()) {

                root.add(node);

            }

        }

        return root;

    }
  /**

      * 把一个节点的所有孩子节点都放入result

      * @param result

      * @param node               当前节点

      * @param defaultExpandLevel 默认初始化是展开几层

      * @param currentLevel       当前节点层级

      */

     private static void addNode(List<Node> result, Node node, int defaultExpandLevel, int currentLevel) {

         result.add(node);

         //如果默认展开层级大于或者当前节点层级,那么设置当前层级是展开的,否则设置是闭合的

         if (defaultExpandLevel >= currentLevel){

             node.setExpand(true);

         }

         //如果当前节点已经是叶子节点,那么不需要做任何处理啦

         if(node.isLeft()){

             return;

         }else{

             //如果当前节点不是叶子节点,递归循环遍历不断的添加子节点

             for(int i=0;i<node.getChildren().size();i++){

                 addNode(result,node.getChildren().get(i),defaultExpandLevel,currentLevel+1);

             }

         }

     }
   /**

      * 过滤出可见的节点

      * @param nodes

      * @return

      */

     public static List<Node> filterVisibleNodes(List<Node> nodes){

         List<Node> visibleNodes=new ArrayList<>();

         for (Node node:nodes){

             //如果当前节点是根节点或者当前节点的父节点是展开的

             if (node.isRoot()||node.isParentExpand()){

                 setNodeIcon(node);

                 visibleNodes.add(node);

             }

         }

         return visibleNodes;

     }
至此,我们的treeHelp类打造完毕,整个类的代码如下。
 package com.example.keranbin.business.help.treeHelp;

 import com.example.keranbin.business.R;

 import com.example.keranbin.business.ccsq.annotion.TreeNodeId;

 import com.example.keranbin.business.ccsq.annotion.TreeNodeLabel;

 import com.example.keranbin.business.ccsq.annotion.TreeNodePid;

 import com.example.keranbin.business.ccsq.annotion.TreeNodeType;

 import java.lang.reflect.Field;

 import java.util.ArrayList;

 import java.util.List;

 /**

  * Created by keranbin on 2016/8/30.

  */

 public class TreeHelp {

     /**

      * 将服务器端取回的数据转化成Node

      * @param datas

      * @return

      * @throws IllegalAccessError

      */

     public static <T> List<Node> convertDataToNodes(List<T> datas) throws IllegalAccessException {

         List<Node> nodes = new ArrayList<>();

         Node node = null;

         for (T t : datas) {

             String id = "";

             String pid = "";

             String label = null;

             node = null;

             Class c = t.getClass();

             Field fields[] = c.getDeclaredFields();

             for (Field field : fields) {

                 if (field.getAnnotation(TreeNodeId.class) != null) {

                     //设置访问权限,强制性的可以访问

                     field.setAccessible(true);

                     id= (String) field.get(t);

                 }

                 if (field.getAnnotation(TreeNodePid.class) != null) {

                     //设置访问权限,强制性的可以访问

                     field.setAccessible(true);

                     pid= (String) field.get(t);

                 }

                 if (field.getAnnotation(TreeNodeLabel.class) != null) {

                     //设置访问权限,强制性的可以访问

                     field.setAccessible(true);

                     label = (String) field.get(t);

                 }

             }

             node = new Node(id, pid, label);

             nodes.add(node);

         }

         /**

          * 循环对比两个Node,设置节点间关联关系

          */

         for (int i = 0; i < nodes.size(); i++) {

             Node n = nodes.get(i);

             for (int j = i+1; j < nodes.size(); j++) {

                 Node m = nodes.get(j);

                 if (m.getId().equals( n.getPid())) {//m是n的父节点

                     m.getChildren().add(n);

                     n.setParent(m);

                 } else if (m.getPid().equals( n.getId())) {//n是m的父节点

                     n.getChildren().add(m);

                     m.setParent(n);

                 }

             }

         }

         /**

          * 设置节点的图标

          */

         for (Node n : nodes) {

             setNodeIcon(n);

         }

         return nodes;

     }

     /**

      * 为节点设置图标

      * 逻辑:(1)如果当前节点有孩子节点并且处于展开状态,那么设置向下的图标

      * (2)如果当前节点有孩子节点病区处于闭合状态,那么设置向右的图标

      * (3)如果当前节点没有孩子节点,传参-1,到时候判断是-1,不设置图标

      * @param n

      */

     private static void setNodeIcon(Node n) {

         if (n.getChildren().size() > 0 && n.isExpand()) {

             n.setIcon(R.mipmap.tree_ex);

         } else if (n.getChildren().size() > 0 && !n.isExpand()) {

             n.setIcon(R.mipmap.tree_ec);

         } else {

             n.setIcon(-1);

         }

     }

     /**

      * 得到排序后的Nodes

      * @param datas

      * @param <T>

      * @return

      */

     public static <T> List<Node> getSortedNodes(List<T> datas, int defaultExpandLevel) throws IllegalAccessException {

         List<Node> result = new ArrayList<>();

         List<Node> nodes = convertDataToNodes(datas);

         //获取树的根节点

         List<Node> rootNodes = getRootNodes(nodes);

         for (Node node : rootNodes) {

             addNode(result, node, defaultExpandLevel, 1);

         }

         return result;

     }

     /**

      * 从所有节点中过滤出根节点

      * @param nodes

      * @return

      */

     private static List<Node> getRootNodes(List<Node> nodes) {

         List<Node> root = new ArrayList<>();

         for (Node node : nodes) {

             if (node.isRoot()) {

                 root.add(node);

             }

         }

         return root;

     }

     /**

      * 把一个节点的所有孩子节点都放入result

      * @param result

      * @param node               当前节点

      * @param defaultExpandLevel 默认初始化是展开几层

      * @param currentLevel       当前节点层级

      */

     private static void addNode(List<Node> result, Node node, int defaultExpandLevel, int currentLevel) {

         result.add(node);

         //如果默认展开层级大于或者当前节点层级,那么设置当前层级是展开的,否则设置是闭合的

         if (defaultExpandLevel >= currentLevel){

             node.setExpand(true);

         }

         //如果当前节点已经是叶子节点,那么不需要做任何处理啦

         if(node.isLeft()){

             return;

         }else{

             //如果当前节点不是叶子节点,递归循环遍历不断的添加子节点

             for(int i=0;i<node.getChildren().size();i++){

                 addNode(result,node.getChildren().get(i),defaultExpandLevel,currentLevel+1);

             }

         }

     }

     /**

      * 过滤出可见的节点

      * @param nodes

      * @return

      */

     public static List<Node> filterVisibleNodes(List<Node> nodes){

         List<Node> visibleNodes=new ArrayList<>();

         for (Node node:nodes){

             //如果当前节点是根节点或者当前节点的父节点是展开的

             if (node.isRoot()||node.isParentExpand()){

                 setNodeIcon(node);

                 visibleNodes.add(node);

             }

         }

         return visibleNodes;

     }

 }
再来看看我们的公共adapter
 package com.example.keranbin.testdemo.treeHelp;

 import android.content.Context;

 import android.view.LayoutInflater;

 import android.view.View;

 import android.view.ViewGroup;

 import android.widget.AdapterView;

 import android.widget.BaseAdapter;

 import android.widget.ListView;

 import java.util.List;

 /**

  * Created by keranbin on 2016/8/30.

  */

 public abstract class TreeListViewAdapter<T> extends BaseAdapter implements AdapterView.OnItemClickListener {

     protected Context context;

     protected ListView listView;

     protected List<Node> mAllNodes;

     protected List<Node> mVisibleNodes;

     protected LayoutInflater inflater;

     private OnTreeNodeClickListener onTreeNodeClickListener;

     public TreeListViewAdapter(Context context, ListView listView, List<T> datas, int defaultExpandLevel) throws IllegalAccessException {

         this.context = context;

         this.listView = listView;

         mAllNodes = TreeHelp.getSortedNodes(datas,defaultExpandLevel);

         mVisibleNodes = TreeHelp.filterVisibleNodes(mAllNodes);

         inflater = LayoutInflater.from(context);

         listView.setOnItemClickListener(this);

     }

     @Override

     public int getCount() {

         return mVisibleNodes.size();

     }

     @Override

     public Object getItem(int position) {

         return mVisibleNodes.get(position);

     }

     @Override

     public long getItemId(int position) {

         return position;

     }

     @Override

     public View getView(int position, View view, ViewGroup viewGroup) {

         Node node=mVisibleNodes.get(position);

         view=getConvertView(node,position,view,viewGroup);

         //设置内边距

         view.setPadding(30*node.getLevel(),3,3,3);

         return view;

     }

     /**

      * 设置点击展开或者收缩

      *

      * @param position

      */

     private void expandOrCollapse(int position) {

         Node node = mVisibleNodes.get(position);

         if (node != null) {

             if (node.isLeft())

                 return;

             node.setExpand(!node.isExpand());

             mVisibleNodes=TreeHelp.filterVisibleNodes(mAllNodes);

             notifyDataSetChanged();

         }

     }

     @Override

     public void onItemClick(AdapterView<?> adapterView, View view, int position, long l) {

         expandOrCollapse(position);

         if (onTreeNodeClickListener!=null){

             onTreeNodeClickListener.setOnClick(mVisibleNodes.get(position),position);

         }

     }

     public void setOnTreeNodeClickListener(OnTreeNodeClickListener onTredNodeClickListener){

         this.onTreeNodeClickListener=onTredNodeClickListener;

     }

     /**

      * 设置node的点击回调

      */

     public interface OnTreeNodeClickListener{

         void setOnClick(Node node, int position);

     }

     public abstract View getConvertView(Node node,int position, View view, ViewGroup viewGroup);

 }
我们建一个CheckBoxTreeListViewAdapter继承自TreeViewAdapter
 package com.example.keranbin.testdemo;

 import android.content.Context;

 import android.view.View;

 import android.view.ViewGroup;

 import android.widget.CheckBox;

 import android.widget.CompoundButton;

 import android.widget.ImageView;

 import android.widget.ListView;

 import android.widget.TextView;

 import com.example.keranbin.testdemo.treeHelp.Node;

 import com.example.keranbin.testdemo.treeHelp.TreeListViewAdapter;

 import java.util.ArrayList;

 import java.util.List;

 /**

  * Created by keranbin on 2016/8/30.

  */

 public class CheckBoxTreeListViewAdapter<T> extends TreeListViewAdapter {

     //判断checkbox是否是单选的标志

     private boolean isSingle = true;

     private static List<Node> nodeList;

     private OnTreeNodeChooseListener onTreeNodeChooseListener;

     /**

      * @param context           上下文对象

      * @param listView

      * @param datas

      * @param defaultExpandLevel  默认初始化时展开几层

      * @param isSingle              checkbox是不是单选的

      * @throws IllegalAccessException

      */

     public CheckBoxTreeListViewAdapter(Context context, ListView listView, List<T> datas, int defaultExpandLevel, boolean isSingle) throws IllegalAccessException {

         super(context, listView, datas, defaultExpandLevel);

         this.isSingle = isSingle;

     }

     @Override

     public View getConvertView(final com.example.keranbin.testdemo.treeHelp.Node node, int position, View view, ViewGroup viewGroup) {

         ViewHolder vh=null;

         if (view == null) {

             vh = new ViewHolder();

             view = inflater.inflate(R.layout.lv_tree_item, viewGroup, false);

             vh.ivIcon = (ImageView) view.findViewById(R.id.iv_tree_icon);

             vh.tvName = (TextView) view.findViewById(R.id.tv_tree_title);

             vh.cbChoose = (CheckBox) view.findViewById(R.id.cb_tree_choose);

             view.setTag(vh);

         } else {

             vh = (ViewHolder) view.getTag();

         }

         //如果node的icon为-1,说明是叶子节点,隐藏图标,显示checkbox,否则显示相应的图标,隐藏checkbox

         if (node.getIcon() == -1) {

             vh.ivIcon.setVisibility(View.INVISIBLE);

             vh.cbChoose.setVisibility(View.VISIBLE);

             vh.cbChoose.setOnCheckedChangeListener(new CompoundButton.OnCheckedChangeListener() {

                 @Override

                 public void onCheckedChanged(CompoundButton compoundButton, boolean isCheck) {

                     if (isSingle) {  //如果checkbox是单选的

                         if (isCheck) { //如果checkbox的状态是选中的,那么除了被选中的那条数据,其他Node节点的checkbox状态都为false

                             for (int i = 0; i < mAllNodes.size(); i++) {

                                 if (((Node) mAllNodes.get(i)).getId().equals(node.getId())) {

                                     ((Node) mAllNodes.get(i)).setChoose(isCheck);

                                 } else {

                                     ((Node) mAllNodes.get(i)).setChoose(false);

                                 }

                             }

                         } else {//如果checkbox的状态是选中的,所有Node节点checkbox状态都为false

                             for (int i = 0; i < mAllNodes.size(); i++) {

                                 if (((Node) mAllNodes.get(i)).getId().equals(node.getId())) {

                                     ((Node) mAllNodes.get(i)).setChoose(isCheck);

                                 }

                             }

                         }

                     } else {   ////如果checkbox是多选的,对应node节点的checkbox状态视用户的操作而定

                         for (int i = 0; i < mAllNodes.size(); i++) {

                             if (((Node) mAllNodes.get(i)).getId().equals(node.getId()))

                                 ((Node) mAllNodes.get(i)).setChoose(isCheck);

                         }

                     }

                     onTreeNodeChooseListener.OnTreeNodeChoose(getSelectedNodes());//回调所选择的节点数据给用户

                     notifyDataSetChanged();

                 }

             });

             vh.cbChoose.setChecked(node.isChoose());

         } else {

             vh.ivIcon.setVisibility(View.VISIBLE);

             vh.ivIcon.setImageResource(node.getIcon());

             vh.cbChoose.setVisibility(View.INVISIBLE);

         }

         vh.tvName.setText(node.getName());

         return view;

     }

     /**

      * 返回所选node集合

      * @return

      */

     public List<Node> getSelectedNodes(){

         nodeList=new ArrayList<>();

         for(int i=0;i<mAllNodes.size();i++){

             if(((Node)mAllNodes.get(i)).isChoose()){

                 nodeList.add((Node) mAllNodes.get(i));

             }

         }

         return nodeList;

     }

     public void setOnTreedNodeChooseListener(OnTreeNodeChooseListener onTreeNodeChooseListener) {

         this.onTreeNodeChooseListener = onTreeNodeChooseListener;

     }

     public interface OnTreeNodeChooseListener {

         void OnTreeNodeChoose(List<Node> nodes);

     }

     class ViewHolder {

         private ImageView ivIcon;

         private TextView tvName;

         private CheckBox cbChoose;

     }

 }
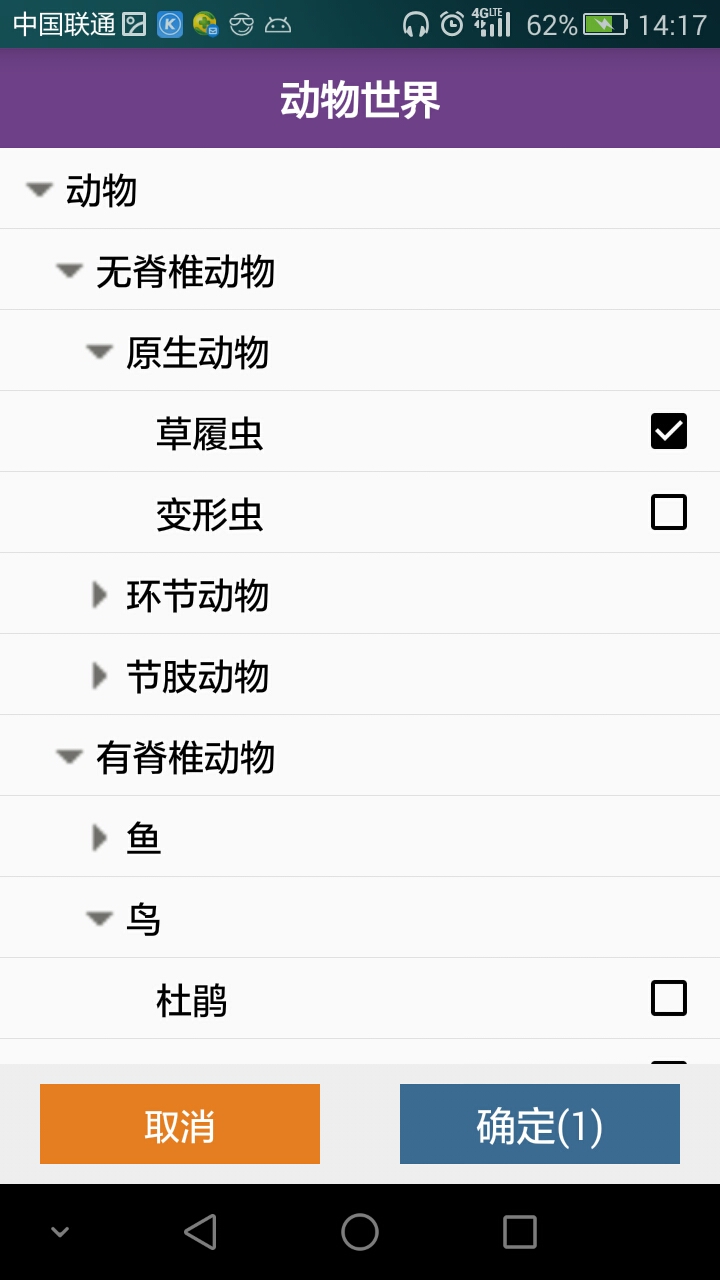
至此,我们的程序结束了吗,没有,看看下面出现的这种情况

细心的童鞋就会发现原生动物不是具体的动物,居然可以选择???????这是什么情况造成的呢,是我们代码的问题,是的,我们的代码逻辑还不够严谨,造成这种情况的原因是可能管理员还没为原始动物添加具体的动物,而我们代码中,原始动物并没有子节点,是叶子节点,是可以选择的,到底怎么解决?无非就是添加一个字段进行判断是不是具体的动物,具体实现就不啰嗦,大家可以自己研究研究。
Android 可单选多选的任意层级树形控件的更多相关文章
- Android 打造任意层级树形控件 考验你的数据结构和设计
转载请标明出处:http://blog.csdn.net/lmj623565791/article/details/40212367,本文出自:[张鸿洋的博客] 1.概述 大家在项目中或多或少的可能会 ...
- Android 打造任意层级树形控件 考验你的数据结构和设计
转载请标明出处:http://blog.csdn.net/lmj623565791/article/details/40212367,本文出自:[张鸿洋的博客] 1.概述 大家在项目中或多或少的可能会 ...
- Android 打造随意层级树形控件 考验你的数据结构和设计
转载请标明出处:http://blog.csdn.net/lmj623565791/article/details/40212367,本文出自:[张鸿洋的博客] 1.概述 大家在项目中或多或少的可能会 ...
- Pro Android 4 第六章 构建用户界面以及使用控件(一)
目前为止,我们已经介绍了android的基础内容,但是还没开始接触用户界面(UI).本章我们将开始探讨用户界面和控件.我们先讨论一下android中UI设计的一般原理,然后我们在介绍一下an ...
- Qt树形控件QTreeView使用1——节点的添加删除操作 复选框的设置
QtreeView是ui中最常用的控件,Qt中QTreeWidget比QTreeView更简单,但没有QTreeView那么灵活(QTreeWidget封装的和MFC的CTreeCtrl很类似,没有m ...
- 通用数据水平层级选择控件v0.70升级版使其支持jQuery v1.9.1
升级原因:作者原来脚本支持的jquery版本太低了,查找了下资料,使得它能支持最新版本的jquery 备注说明:脚本代码源作者跟源文出处很难找,只能在此特感谢他的分享. 更新部分: 1.新版本不再支持 ...
- android开发游记:meterial design 5.0 开源控件整套合集 及使用demo
android 的5.0公布不光google官方给出了一些新控件,同一时候还给出了一套符合material design风格的设计标准,这套标准将未来将覆盖google全部产品包括pc端,站点,移动端 ...
- 《深入理解Android 卷III》第六章 深入理解控件(ViewRoot)系统
<深入理解Android 卷III>即将公布,作者是张大伟.此书填补了深入理解Android Framework卷中的一个主要空白,即Android Framework中和UI相关的部分. ...
- wxpython 树形控件全选和取消全选
#encoding:utf-8 import wx import wx.lib.agw.customtreectrl as CT class MyFrame(wx.Frame): def __init ...
随机推荐
- Appium+python自动化(三)- SDK Manager(超详解)
简介 本来宏哥一开始打算用真机做的,所以在前边搭建环境时候就没有下载SDK,但是由于许多小伙伴通过博客发短消息给宏哥留言说是没有真机,所以顺应民意整理一下模拟器,毕竟“得民心者,得天下”.SDK顾名思 ...
- CPU-bound(计算密集型) 和I/O bound(I/O密集型)/数据密集型
https://blog.csdn.net/q_l_s/article/details/51538039 I/O密集型 (CPU-bound)I/O bound 指的是系统的CPU效能相对硬盘/内存的 ...
- [LeetCode] 895. Maximum Frequency Stack 最大频率栈
Implement FreqStack, a class which simulates the operation of a stack-like data structure. FreqStack ...
- [LeetCode] 659. Split Array into Consecutive Subsequences 将数组分割成连续子序列
You are given an integer array sorted in ascending order (may contain duplicates), you need to split ...
- .Net Core 最简洁的约定式依赖注入
.Net Core 最简洁的约定式依赖注入 github:https://github.com/280780363/guc/tree/master/src/Guc.Kernel/Dependency ...
- 安装Oracle 11g时遇到“【INS-13001】此环境不满足最低配置”的问题解决
一.问题如下: win10一般容易出现这个问题,可能是版本兼容的关系. 二.解决方法: 在Oracle 11g解压出的文件夹下寻找cvu_prereq.xml文件: 路径:database\stag ...
- Visual Studio 调试系列4 单步后退来检查旧应用状态(使用使用 IntelliTrace 窗口)
系列目录 [已更新最新开发文章,点击查看详细] IntelliTrace 后退会在每个断点处及调试器步骤事件发生时自动拍摄应用程序的快照. 凭借记录的快照便可以返回到上一个断点或步骤,并查看当 ...
- 基于opencv+python的二维码识别
花了2天时间终于把二维码识别做出来了,不过效果一般,后面会应用在ROS辅助定位上,废话少说先上图: 具体过程参考了这位大神的博客:http://blog.csdn.net/qq_25491201/ar ...
- Windows 配置Apache+CGI
首先还是先在官网下载Apache,版本为Apache 2.4.26 x64,下载64位的地址为:http://www.apachehaus.com/cgi-bin/download.plx 下载完成后 ...
- 读了两章的 How Tomcat Works
周一发现了一本书.How Tomcat Works 惯例先到豆瓣搜书评.结果书评出奇的好.然后下载了PDF.从简介中看,本书的每个章节都会不断的围绕怎么建造一个Tomcat讲解.我本人比较喜欢这种造轮 ...