Relativelayout和LinearLayout对比分析
分析之前先了解下View的绘制流程
首先view在windows中的布局样式如下图:
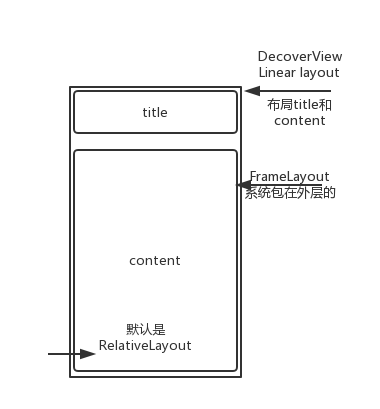
view绘制在windows,windows与DecoverView的交互在VIewRoot中进行。
view绘制的入口函数是ViewRootImpl中的performTraversals, performTraversals钟会一次调用performMeasure、performLayout、performDraw,三个函数中会分别调用view.Measure、view.Layout、view.Draw,然后分别调用需要子类实现的onMeasure、onLayout、onDraw函数。
而继承自view的自定义view或者系统写好的textview或者LinearLayout等实例化的onMeasure、onLayout、onDraw函数分别用于测量view大小,摆放view、以及将view画出来。
LinearLayout继承自viewGroup,在onMeasure中,会分别调用子控件的view.Measure, 进而在子控件的onMeasur中完成测量,如果子控件仍然是一个viewGroup则依次下去。
view绘制各重载函数的执行流程:
创建
I/TestView: TestView(Context context, AttributeSet attrs)

I/TestView: onFinishInflate()

I/TestView: onVisibilityChanged(View changedView, int visibility) changedView = com.android.internal.policy.impl.PhoneWindow$DecorView{2192bad9 I.E..... R.....ID 0,0-0,0} visibility = 4

I/TestView: onVisibilityChanged(View changedView, int visibility) changedView = com.android.internal.policy.impl.PhoneWindow$DecorView{2192bad9 V.E..... R.....ID 0,0-0,0} visibility = 0

I/TestView: onAttachedToWindow()

I/TestView: onWindowVisibilityChanged(int visibility) visibility = 0

I/TestView: onMeasure(int widthMeasureSpec, int heightMeasureSpec) widthMeasureSpec = 1073743152 heightMeasureSpec = 1073743848

I/TestView: onMeasure(int widthMeasureSpec, int heightMeasureSpec) widthMeasureSpec = 1073743152 heightMeasureSpec = 1073743848

I/TestView: onMeasure(int widthMeasureSpec, int heightMeasureSpec) widthMeasureSpec = 1073743152 heightMeasureSpec = 1073744016

I/TestView: onMeasure(int widthMeasureSpec, int heightMeasureSpec) widthMeasureSpec = 1073743152 heightMeasureSpec = 1073744016

I/TestView: onSizeChanged(int w, int h, int oldw, int oldh) w = 1328 h = 2192 oldw = 0 oldh0

I/TestView: onLayout(boolean changed, int left, int top, int right, int bottom) changed = true left = 56 top = 56 right = 1384 bottom = 2248

I/TestView: onMeasure(int widthMeasureSpec, int heightMeasureSpec) widthMeasureSpec = 1073743152 heightMeasureSpec = 1073743820

I/TestView: onSizeChanged(int w, int h, int oldw, int oldh) w = 1328 h = 1996 oldw = 1328 oldh2192

I/TestView: onLayout(boolean changed, int left, int top, int right, int bottom) changed = true left = 56 top = 56 right = 1384 bottom = 2052

I/TestView: onDraw(Canvas canvas)

I/TestView: onWindowFocusChanged(boolean hasWindowFocus) hasWindowFocus = true

I/TestView: onMeasure(int widthMeasureSpec, int heightMeasureSpec) widthMeasureSpec = 1073743152 heightMeasureSpec = 1073743820

I/TestView: onMeasure(int widthMeasureSpec, int heightMeasureSpec) widthMeasureSpec = 1073743152 heightMeasureSpec = 1073743820

I/TestView: onLayout(boolean changed, int left, int top, int right, int bottom) changed = false left = 56 top = 56 right = 1384 bottom = 2052

I/TestView: onDraw(Canvas canvas)
销毁
I/TestView: onWindowFocusChanged(boolean hasWindowFocus) hasWindowFocus = false

I/TestView: onWindowVisibilityChanged(int visibility) visibility = 8

I/TestView: onDetachedFromWindow()
2、android:visibility=invisible
创建
I/TestView: onVisibilityChanged(View changedView, int visibility) changedView = com.example.junyizhou.rxjavademo.TestView{3ead3d52 I.ED.... ........ 0,0-0,0} visibility = 4

I/TestView: TestView(Context context, AttributeSet attrs)

I/TestView: onFinishInflate()

I/TestView: onVisibilityChanged(View changedView, int visibility) changedView = com.android.internal.policy.impl.PhoneWindow$DecorView{3aeb2b95 I.E..... R.....ID 0,0-0,0} visibility = 4

I/TestView: onVisibilityChanged(View changedView, int visibility) changedView = com.android.internal.policy.impl.PhoneWindow$DecorView{3aeb2b95 V.E..... R.....ID 0,0-0,0} visibility = 0

I/TestView: onAttachedToWindow()

I/TestView: onWindowVisibilityChanged(int visibility) visibility = 0

I/TestView: onMeasure(int widthMeasureSpec, int heightMeasureSpec) widthMeasureSpec = 1073743152 heightMeasureSpec = 1073743848

I/TestView: onMeasure(int widthMeasureSpec, int heightMeasureSpec) widthMeasureSpec = 1073743152 heightMeasureSpec = 1073743848

I/TestView: onMeasure(int widthMeasureSpec, int heightMeasureSpec) widthMeasureSpec = 1073743152 heightMeasureSpec = 1073744016

I/TestView: onMeasure(int widthMeasureSpec, int heightMeasureSpec) widthMeasureSpec = 1073743152 heightMeasureSpec = 1073744016

I/TestView: onSizeChanged(int w, int h, int oldw, int oldh) w = 1328 h = 2192 oldw = 0 oldh0

I/TestView: onLayout(boolean changed, int left, int top, int right, int bottom) changed = true left = 56 top = 56 right = 1384 bottom = 2248

I/TestView: onMeasure(int widthMeasureSpec, int heightMeasureSpec) widthMeasureSpec = 1073743152 heightMeasureSpec = 1073743820

I/TestView: onSizeChanged(int w, int h, int oldw, int oldh) w = 1328 h = 1996 oldw = 1328 oldh2192

I/TestView: onLayout(boolean changed, int left, int top, int right, int bottom) changed = true left = 56 top = 56 right = 1384 bottom = 2052

I/TestView: onWindowFocusChanged(boolean hasWindowFocus) hasWindowFocus = true

I/TestView: onMeasure(int widthMeasureSpec, int heightMeasureSpec) widthMeasureSpec = 1073743152 heightMeasureSpec = 1073743820

I/TestView: onMeasure(int widthMeasureSpec, int heightMeasureSpec) widthMeasureSpec = 1073743152 heightMeasureSpec = 1073743820

I/TestView: onLayout(boolean changed, int left, int top, int right, int bottom) changed = false left = 56 top = 56 right = 1384 bottom = 2052
销毁
I/TestView: onWindowFocusChanged(boolean hasWindowFocus) hasWindowFocus = false

I/TestView: onWindowVisibilityChanged(int visibility) visibility = 8

I/TestView: onDetachedFromWindow()
3、android:visibility=gone
创建
I/TestView: onVisibilityChanged(View changedView, int visibility) changedView = com.example.junyizhou.rxjavademo.TestView{3ead3d52 G.ED.... ......I. 0,0-0,0} visibility = 8

I/TestView: TestView(Context context, AttributeSet attrs)

I/TestView: onFinishInflate()

I/TestView: onVisibilityChanged(View changedView, int visibility) changedView = com.android.internal.policy.impl.PhoneWindow$DecorView{3aeb2b95 I.E..... R.....ID 0,0-0,0} visibility = 4

I/TestView: onVisibilityChanged(View changedView, int visibility) changedView = com.android.internal.policy.impl.PhoneWindow$DecorView{3aeb2b95 V.E..... R.....ID 0,0-0,0} visibility = 0

I/TestView: onAttachedToWindow()

I/TestView: onWindowVisibilityChanged(int visibility) visibility = 0

I/TestView: onWindowFocusChanged(boolean hasWindowFocus) hasWindowFocus = true
销毁
I/TestView: onWindowFocusChanged(boolean hasWindowFocus) hasWindowFocus = false I/TestView: onWindowVisibilityChanged(int visibility) visibility = 8 I/TestView: onDetachedFromWindow()
下面比较下LinearLayout和RelativeLayout的性能
一个实现垂直列表的布局测试数据如下:
LinearLayout
Measure:0.738ms
Layout:0.176ms
draw:7.655ms
RelativeLayout
Measure:2.280ms
Layout:0.153ms
draw:7.696ms
考虑到误差,两者layout和draw几乎差不多,主要区别在于Measure。
1、分析源码发现,在RelativeLayout中,由于布局可以是B横向依赖A,A横向依赖B, 所以,Measure中会被Measure两次,一次是横向的Measure,一次是纵向。
而在LinearLayout中,在测量之前就判断了是横向还是纵向布局。
@Override

    protected void onMeasure(int widthMeasureSpec, int heightMeasureSpec) {

        if (mOrientation == VERTICAL) {

            measureVertical(widthMeasureSpec, heightMeasureSpec);

        } else {

            measureHorizontal(widthMeasureSpec, heightMeasureSpec);

        }

    }
2、但是在Linearlayout中如果设置weight会影响性能,因为LinearLayout会避开设置过weight属性的view做第一次measure,完了再对设置过weight属性的view做第二次measure。
3、view中的Measure有个优化,但是如果RelativeLayout中设置的margin就会跳过这个优化,多以尽量使用padding而不是margin。
4、
最后再思考一下文章开头那个矛盾的问题,为什么Google给开发者默认新建了个RelativeLayout,而自己却在DecorView中用了个LinearLayout。因为DecorView的层级深度是已知而且固定的,上面一个标题栏,下面一个内容栏。采用RelativeLayout并不会降低层级深度,所以此时在根节点上用LinearLayout是效率最高的。而之所以给开发者默认新建了个RelativeLayout是希望开发者能采用尽量少的View层级来表达布局以实现性能最优,因为复杂的View嵌套对性能的影响会更大一些。
参考:
作者:尹star
链接:http://www.jianshu.com/p/8a7d059da746
链接:http://www.jianshu.com/p/08e6dab7886e
Relativelayout和LinearLayout对比分析的更多相关文章
- Android中RelativeLayout和LinearLayout性能分析
先看一些现象吧:用eclipse或者Android studio,新建一个Activity自动生成的布局文件都是RelativeLayout,或许你会认为这是IDE的默认设置问题,其实不然,这是由 a ...
- 如何优化你的布局层级结构之RelativeLayout和LinearLayout及FrameLayout性能分析
转载请注明出处:http://blog.csdn.net/hejjunlin/article/details/51159419 如何优化你的布局层级结构之RelativeLayout和LinearLa ...
- Android开发——LinearLayout和RelativeLayout的性能对比
0. 前言 我们都知道新建一个Android项目自动生成的Xml布局文件的根节点默认是RelativeLayout,这不是IDE默认设置,而是由android-sdk\tools\templates\ ...
- Android -------- RelativeLayout 和 LinearLayout 的性能分析
布局的绘制角度 RelativeLayout不如LinearLayout快的根本原因是: RelativeLayout需要对其子View进行两次measure过程, 而LinearLayout则只需一 ...
- 浅谈C++之冒泡排序、希尔排序、快速排序、插入排序、堆排序、基数排序性能对比分析之后续补充说明(有图有真相)
如果你觉得我的有些话有点唐突,你不理解可以想看看前一篇<C++之冒泡排序.希尔排序.快速排序.插入排序.堆排序.基数排序性能对比分析>. 这几天闲着没事就写了一篇<C++之冒泡排序. ...
- wait、notify、sleep、interrupt对比分析
对比分析Java中的各个线程相关的wait().notify().sleep().interrupt()方法 方法简述 Thread类 sleep:暂停当前正在执行的线程:(类方法) yield:暂停 ...
- Android和Linux应用综合对比分析
原文地址:http://www.cnblogs.com/beer/p/3325242.html 免责声明: 当时写完这篇调查报告,给同事看了后,他觉得蛮喜欢,然后想把这篇文章修改一下,然后往期刊上发表 ...
- GitHub & Bitbucket & GitLab & Coding 的对比分析
目前基于 Git 做版本控制的代码托管平台有很多种,比较流行的服务有 Github.Bitbucket. GitLab. Coding,他们各自有什么特点,个人使用者和开发团队又该如何选择? 在这篇文 ...
- ArrayList和LinkedList的几种循环遍历方式及性能对比分析(转)
主要介绍ArrayList和LinkedList这两种list的五种循环遍历方式,各种方式的性能测试对比,根据ArrayList和LinkedList的源码实现分析性能结果,总结结论. 通过本文你可以 ...
随机推荐
- XML配置spring session jdbc实现session共享
概述 session的基础知识就不再多说. 通常,我们会把一个项目部署到多个tomcat上,通过nginx进行负载均衡,提高系统的并发性.此时,就会存在一个问题.假如用户第一次访问tomcat1,并登 ...
- JS 两个对象数组合并并去重
JS两个对象数组合并并去重 <!DOCTYPE html> <html> <head> <meta charset="utf-8"> ...
- react中根据后台值动态配置
业务中我们要实现对应的数据是1是男,2是女,这就要根据键来进行动态匹配,通常后台来给你一个1或者2,你来进行匹配,这样的数据一般在表格中比较常见. <Card title="Mock- ...
- C# 处理文件,视频,音频,压缩包下载
文章介绍了通过HttpWebRequest和HttpWebResponse实现视频下载的功能:首先HttpWebRequest类利用HTTP 协议和服务器交互,再由HttpWebResponse返回来 ...
- React 轮播图实现
接到项目, 用react和material-ui实现轮播图. 搜索了一些方法参考, 不论语言/框架的使用,大体上分为两种思路 超宽列表实现法 在原生JS或者JQuery中,轮播图的实现一般是这样子的 ...
- 使用scrapy爬虫,爬取17k小说网的案例-方法一
无意间看到17小说网里面有一些小说小故事,于是决定用爬虫爬取下来自己看着玩,下图这个页面就是要爬取的来源. a 这个页面一共有125个标题,每个标题里面对应一个内容,如下图所示 下面直接看最核心spi ...
- 帆软认证BI工程师FCBA-部分题目
1.安装32位系统的FineBI,最多只能支持2G内存. 正确 错误 2.Spider数据引擎中适合内存化的表通常为数据量小且更新频率较低的表. 正确 错误 3.Spider数据引擎支持跨数据源进行数 ...
- react給變量賦值并列元素
今天在使用react時發現一個問題:我在給一個變量賦值多個元素,但不能用div包含起來. 如: var p = <div> <p></p> <p>< ...
- Oracle DBA 必须掌握的 查询脚本:
Oracle DBA 必须掌握的 查询脚本: 0:启动与关闭 orcle 数据库的启动与关闭 1:连接数据库 2:数据库开启状态的实现步骤: 2-1:启动数据库 2- ...
- MTV 和 MVC
MTV:(Django中用) M:models T:templates V:views MVC M:models V:views C:control(urls+views)