SciTech-BigDataAI-ImageProcessing-Numerical Analysis-Useful Operations-Color Image Channels with OpenCV+NumPy+Pandas
Links:
- https://pyimagesearch.com/2021/01/23/splitting-and-merging-channels-with-opencv/
- OpenCV Official:
https://docs.opencv.org/3.4/d3/df2/tutorial_py_basic_ops.html - Background Subtraction Tutorial:
https://docs.opencv.org/3.4/d1/dc5/tutorial_background_subtraction.html - OpenCV Examples:
https://docs.opencv.org/3.4/d5/de8/samples_2cpp_2segment_objects_8cpp-example.html - 多看open CV的"示例代码"和"官方文档"
Shortpath Codes
Remove Background Color
# Usage: ipython --pdb removeColor.py 18
#! /usr/bin/env python

import itertools as it

import collections as ct

import cv2 as cv

import numpy as np

import pandas as pd

def calculate_top_color(image):

   a = image.copy()

   cnt = ct.Counter(a)

   topTen = cnt.most_common(10)

   topTenColors=[k for k,v in topTen]

   topColor=np.array(topTenColors).mean()

   return topColor

def replace_color(image, top=None, threshold=5, color=255):

   color_threshold = threshold

   a = image.copy()

   s = pd.Series(image.flatten())

   rows, cols = image.shape

   topColor0 = top or calculate_top_color(s)

   topColor = top or int(s.describe()['50%'])

   colorMin = topColor - color_threshold

   colorMax = topColor + color_threshold

   print(s.describe(), '\n', "TopColor: %s, %s\n" % (topColor, topColor0))

   for r in range(rows):

      for c in range(cols):

         val = a.item(r, c)

         if  colorMin <= val < colorMax:

            a.itemset((r, c), color)

   return a

def remove_top_color(img, top=None, threshold=18, color=255):

   b, g, r =img[:, :, 0], img[:, :, 1], img[:, :, 2]

   print("\nProcessing Color Channel: BLUE")

   b = replace_color(b, top, threshold, color)

   print("\nProcessing Color Channel: GREEN")

   g = replace_color(g, top, threshold, color)

   print("\nProcessing Color Channel: RED")

   r = replace_color(r, top, threshold, color)

   img0 = cv.merge((b, g, r))

   return img0

if __name__ == "__main__":

   import os,sys

   threshold = int(sys.argv[1]) if len(sys.argv) > 1 else 18

   # Load the image first

   img_path = './Signature.jpg'

   img0 = cv.imread(img_path)

   assert img0 is not None, "file could not be read, check with os.path.exists('%s')" % img_path

   cv.imwrite('Original.jpg', img0)

   img1 = remove_top_color(img0, threshold=threshold)

   cv.imwrite('Output.jpg', img1)
import itertools as it

import collections as ct

import cv2 as cv

import numpy as np

import pandas as pd

# Load the image first

img_path = './Signature.jpg'

img = cv.imread(img_path)

assert img is not None, "file could not be read, check with os.path.exists('%s')" % img_path

# Color Channels Splitting and merging

b, g, r =img[:, :, 0], img[:, :, 1], img[:, :, 2] # faster than cv.split(img)

a = b.flatten()

# Save the original image

img0 = cv.merge((b, g, r))

cv.imwrite('Original.jpg', img0)

# Using Python's collections.Counter()

import collections as ct

topTen = ct.Counter(a).most_common(10)

# Using Pandas for Number Analysis and Statistics

ss, df = pd.Series(a), pd.DataFrame(b)

# Pandas Descriptive statistics Summarizing data: describe

ss.describe()

# Pandas: **select specific percentiles**:

#    By default, the median is always included

percentiles = [0.05, 0.25, 0.75, 0.95]

ss.describe(percentiles=percentiles)

# Graystyle

gray_img = cv.cvtColor(img, cv.COLOR_BGR2GRAY)

# bgSubtractor for background removal

bgSuber = cv.bgsegm.createBackgroundSubtractorMOG()

bgSuber.apply(img)

bgSuber_img = bgSuber.apply(img)

cv.imwrite('bgSuber.jpg', bgSuber_img)

# Perform morphology operation

morph_kernel = cv.getStructuringElement(cv.MORPH_ELLIPSE, (5, 5))

mask = cv.morphologyEx(bgSuber_img, cv.MORPH_CLOSE, morph_kernel)

res = cv.bitwise_and(img, img, mask=mask)

cv.imwrite('Result.jpg', res)
Accessing Image Properties
- Image properties include "number of rows, columns, and channels"; "type of image data"; "number of pixels"; etc.
- Note:
- it is a good method to check whether the loaded image is grayscale or color.
img.dtypeis very important while debugging,
because a large number of errors in OpenCV-Python code are caused by invalid datatype.
#1. **Total number of pixels** is accessed by `img.size`:

#2. **Image datatype** is obtained by `img.dtype`:

#3. **shape of an image** is accessed by `img.shape`, It returns

#    a tuple of the number of rows, columns, and channels(if the image is color)

#    a tuple of the number of rows and columns ONLY**if an image is grayscale**.

#    **check whether the loaded image is grayscale or color** first by Using `3 == len(img.shape)` .

print( img.shape, img.size, img.dtype)

(342, 548, 3)  562248  uint8
Splitting and Merging Image Channels
Sometimes you will need to work separately on the B,G,R channels of an image.
- In this case, you need to split the BGR image into single channels.
- In other cases, you may need to join these individual channels to create a BGR image.
- Warning:
cv.split()is a time costly operation. So use it only if necessary.
Otherwise go for Numpy indexing.
You can do this simply by:
b, g, r = cv.split(img)

img = cv.merge((b, g, r))

# OR a better faster way by using **Numpy indexing**

b, g, r =img[:,:,0], img[:,:,0] img[:,:,0]

img = cv.merge((b, g, r))

# Suppose you want to set all the red pixels to zero

#   **Numpy indexing is faster**,

# so you do not need to split the channels first.:

img[:,:,2] = 0
Accessing and Modifying pixel values
You can access a pixel value by its row and column coordinates.
- For BGR image, it returns an array of Blue, Green, Red values.
- For grayscale image, just corresponding intensity is returned.
# Access a pixel value by its row and column coordinates

px = img[100, 100]

print( px )

[157 166 200] # an array of Blue, Green, Red values for BGR image

# accessing only blue pixel

blue = img[100, 100, 0]

print( blue )

157

#You can modify the pixel values the same way.

img[100, 100] = [255, 255, 255]

print( img[100, 100] )

[255 255 255]

# **Better pixel accessing and editing method** :

# accessing only RED value

img.item(10, 10, 2)

59

# modifying RED value

img.itemset((10, 10, 2), 100)

img.item(10, 10, 2)

100
- Warning: Numpy is an optimized library for fast array calculations.
So simply accessing each and every pixel value and modifying it will be very slow and it is discouraged. - Note
- The above coordinates method is normally used for selecting a region of an array,
say the first 5 rows and last 3 columns. - For individual pixel access, the Numpy array methods, array.item() and array.itemset() are considered better.
They always return a scalar, however, so if you want to access all the B,G,R values, you will need to call array.item() separately for each value.
- The above coordinates method is normally used for selecting a region of an array,
ROI of Image
Sometimes, you will have to play with certain regions of images. For eye detection in images:
- first face detection is done over the entire image.
- when a face is obtained, we select the face region alone and search for eyes inside it instead of searching the whole image. It improves:
- accuracy, because eyes are always on faces ,
- performance, because we search in a small area.
ROI is again obtained using Numpy indexing.
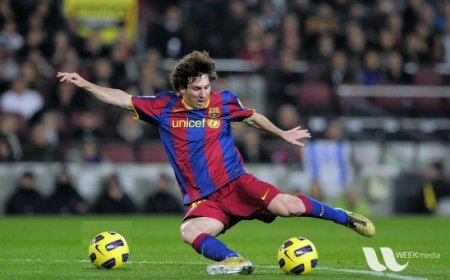
# Here I am selecting the ball and copying it to another region in the image:

ball = img[280:340, 330:390]

img[273:333, 100:160] = ball
Check the results below
Making Borders for Images (Padding)
If you want to create a border around an image, something like a photo frame,
you can use cv.copyMakeBorder(). But it has more applications for convolution operation, zero padding etc. This function takes following arguments:
- src - input image
- top, bottom, left, right - border width in number of pixels in corresponding directions
- borderType - Flag defining what kind of border to be added. It can be following types:
- cv.BORDER_CONSTANT - Adds a constant colored border. The value should be given as next argument.
- cv.BORDER_REFLECT - Border will be mirror reflection of the border elements, like this : fedcba|abcdefgh|hgfedcb
- cv.BORDER_REFLECT_101 or cv.BORDER_DEFAULT - Same as above, but with a slight change, like this : gfedcb|abcdefgh|gfedcba
- cv.BORDER_REPLICATE - Last element is replicated throughout, like this: aaaaaa|abcdefgh|hhhhhhh
- cv.BORDER_WRAP - Can't explain, it will look like this : cdefgh|abcdefgh|abcdefg
- value - Color of border if border type is cv.BORDER_CONSTANT
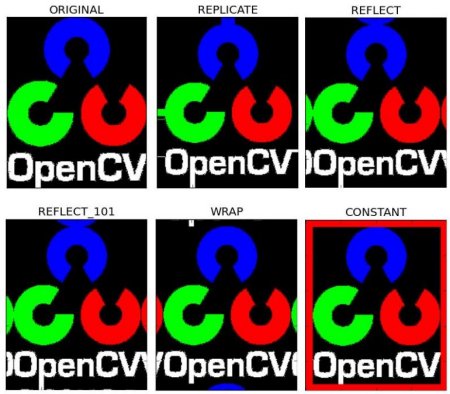
Below is a sample code demonstrating all these border types for better understanding:
import cv2 as cv

import numpy as np

from matplotlib import pyplot as plt

BLUE = [255, 0, 0]

img1 = cv.imread('opencv-logo.png')

assert img1 is not None, "file could not be read, check with os.path.exists()"

replicate = cv.copyMakeBorder(img1, 10,10,10,10, cv.BORDER_REPLICATE)

reflect = cv.copyMakeBorder(img1, 10,10,10,10, cv.BORDER_REFLECT)

reflect101 = cv.copyMakeBorder(img1, 10,10,10,10, cv.BORDER_REFLECT_101)

wrap = cv.copyMakeBorder(img1, 10,10,10,10, cv.BORDER_WRAP)

constant= cv.copyMakeBorder(img1, 10,10,10,10, cv.BORDER_CONSTANT,value=BLUE)

plt.subplot(231),plt.imshow(img1,'gray'),plt.title('ORIGINAL')

plt.subplot(232),plt.imshow(replicate,'gray'),plt.title('REPLICATE')

plt.subplot(233),plt.imshow(reflect,'gray'),plt.title('REFLECT')

plt.subplot(234),plt.imshow(reflect101,'gray'),plt.title('REFLECT_101')

plt.subplot(235),plt.imshow(wrap,'gray'),plt.title('WRAP')

plt.subplot(236),plt.imshow(constant,'gray'),plt.title('CONSTANT')

plt.show()
See the result below. (Image is displayed with matplotlib. So RED and BLUE channels will be interchanged):
SciTech-BigDataAI-ImageProcessing-Numerical Analysis-Useful Operations-Color Image Channels with OpenCV+NumPy+Pandas的更多相关文章
- 为什么要学习Numerical Analysis
前几日我发了一个帖子,预告自己要研究一下 Numerical Analysis 非常多人问我为啥,我统一回答为AI-----人工智能 我在和教授聊天的时候,忽然到了语言发展上 我说:老S啊(和我关系 ...
- <<Numerical Analysis>>笔记
2ed, by Timothy Sauer DEFINITION 1.3A solution is correct within p decimal places if the error is l ...
- <Numerical Analysis>(by Timothy Sauer) Notes
2ed, by Timothy Sauer DEFINITION 1.3A solution is correct within p decimal places if the error is l ...
- Numerical Analysis
PART1 <求解方程> 1,二分法 def bisect(f,a,b,TOL=0.000004): u_a = a u_b = b while(u_b-u_a)/2.0 > TO ...
- Residual (numerical analysis)
In many cases, the smallness of the residual means that the approximation is close to the solution, ...
- List of numerical libraries,Top Numerical Libraries For C#
Top Numerical Libraries For C# AlgLib (http://alglib.net) ALGLIB is a numerical analysis and data pr ...
- 【翻译】Kinect v2程序设计(C++) Color篇
Kinect SDK v2预览版,获取数据的基本流程的说明.以及取得Color图像的示例程序的介绍. 上一节,是关于当前型号Kinect for Windows(后面称作Kinect v1)和次世代型 ...
- 常用python机器学习库总结
开始学习Python,之后渐渐成为我学习工作中的第一辅助脚本语言,虽然开发语言是Java,但平时的很多文本数据处理任务都交给了Python.这些年来,接触和使用了很多Python工具包,特别是在文本处 ...
- (自用)专业排版套装:CTeX + TeXStudio
\documentclass[UTF8,landscape]{ctexart}%UTF8,ctexart中文支持,landscape横向版面 \usepackage{tikz}%画图 \usepack ...
- CG&CAD resource
Computational Geometry The Geometry Center (UIUC) Computational Geometry Pages (UIUC) Geometry in Ac ...
随机推荐
- 异步IO与Tortoise-ORM的数据库
title: 异步IO与Tortoise-ORM的数据库 date: 2025/04/29 13:21:47 updated: 2025/04/29 13:21:47 author: cmdragon ...
- MCP 实践系列:EdgeOne 在线部署HTML页面
今天,我们将专门讲解一下 EdgeOne 在线部署 HTML 页面时所提供的 MCP 功能.这个功能对于个人用户来说非常实用,尤其适合一些小型应用场景,比如开发一个简单的小游戏,或者搭建一个小型网站, ...
- k8s之serviceaccount,登录账号创建
kubectl --> 认证 --->授权 -->准入控制 认证:证书 身份识别 授权:rbac 权限检查 准入控制: 补充授权机制 多个插件实现 只在创建 删除 修改 或做代 ...
- 应用间通信(一):详解Linux进程IPC
进程之间是独立的.隔离的,使得应用程序之间绝对不可以互相"侵犯"各自的领地. 但,应用程序之间有时是需要互相通信,相互写作,才能完成相关的功能,这就不得不由操作系统介入,实现一种通 ...
- Sublimetext3 配置C语言环境
1.MinGW下载 2.设置MinGW环境变量 - Path C:\MinGW\bin 3.在sublime工具栏中,选择"工具"->" ...
- ctf知识积累
(1)url解码: python解码函数: from urllib.parse import unquote(quote:编码) url_code="" url_code1=unq ...
- java LocalDateTime 加减当前时间
LocalDateTime 可以对当前时间进行加减,在LocalDateTime类中,以plus打头的方法是增加某项时间,如plusDays的请求参数表示将要增加的天数,但是可以为负值:以minu ...
- 把PDF转换成指定后缀名的图片
生活中难免遇到各种文件类型转换的问题,尤其是在办理一些证件的时候.例如,申请居住证积分的时候,把PDF版本的毕业证扫描件转换成jpg或者png等.下面提供一个工具,用于把PDF转换成指定后缀名的图 ...
- K8S对Pod调度失败,Schdule控制器报错1 scheduling_queue.go:346] Unable to find backoff value for pod default/engine-video-process-worker-face-face-24902-t4-6b5bcf6d9c-swdwp in backoffQ
问题描述: 1.生产环境,基于K8s部署的应用,某个应用按要求需要运行9个副本,项目成功运行50余天后,应用的pod突然由9个变为6个,其他3个变为Pengding状态: 2.9个Pod需要消耗服务器 ...
- python 多进程通讯三种方法性能对比(queue, pipe, zeromq)
当然,这三种办法都会在两个进程之间把数据复制一遍,效率肯定没有 shared memory 高,但是考虑到这三种方式都不用考虑锁之类东西,用起来是比较方便的.这三种方式的实现的功能都是差不多的,但是在 ...