Tomcat源码分析--转
一、架构
下面谈谈我对Tomcat架构的理解
总体架构:
1、面向组件架构
2、基于JMX
3、事件侦听
1)面向组件架构
tomcat代码看似很庞大,但从结构上看却很清晰和简单,它主要由一堆组件组成,如Server、Service、Connector等,并基于JMX管理这些组件,另外实现以上接口的组件也实现了代表生存期的接口Lifecycle,使其组件履行固定的生存期,在其整个生存期的过程中通过事件侦听LifecycleEvent实现扩展。Tomcat的核心类图如下所示:
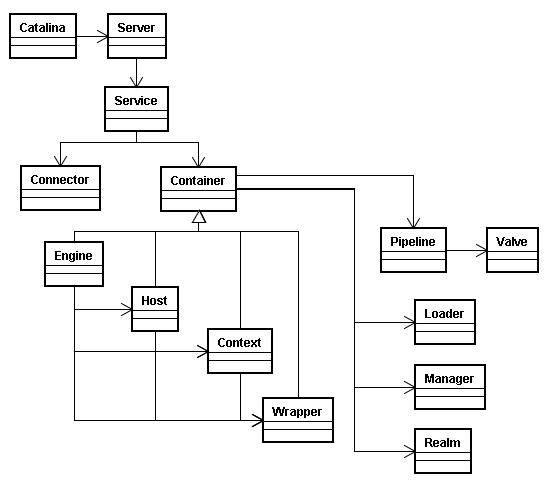
1、Catalina:与开始/关闭shell脚本交互的主类,因此如果要研究启动和关闭的过程,就从这个类开始看起。
2、Server:是整个Tomcat组件的容器,包含一个或多个Service。
3、Service:Service是包含Connector和Container的集合,Service用适当的Connector接收用户的请求,再发给相应的Container来处理。
4、Connector:实现某一协议的连接器,如默认的有实现HTTP、HTTPS、AJP协议的。
5、Container:可以理解为处理某类型请求的容器,处理的方式一般为把处理请求的处理器包装为Valve对象,并按一定顺序放入类型为Pipeline的管道里。Container有多种子类型:Engine、Host、Context和Wrapper,这几种子类型Container依次包含,处理不同粒度的请求。另外Container里包含一些基础服务,如Loader、Manager和Realm。
6、Engine:Engine包含Host和Context,接到请求后仍给相应的Host在相应的Context里处理。
7、Host:就是我们所理解的虚拟主机。
8、Context:就是我们所部属的具体Web应用的上下文,每个请求都在是相应的上下文里处理的
9、Wrapper:Wrapper是针对每个Servlet的Container,每个Servlet都有相应的Wrapper来管理。
可以看出Server、Service、Connector、Container、Engine、Host、Context和Wrapper这些核心组件的作用范围是逐层递减,并逐层包含。
下面就是些被Container所用的基础组件:
1、Loader:是被Container用来载入各种所需的Class。
2、Manager:是被Container用来管理Session池。
3、Realm:是用来处理安全里授权与认证。
分析完核心类后,再看看Tomcat启动的过程,Tomcat启动的时序图如下所示:
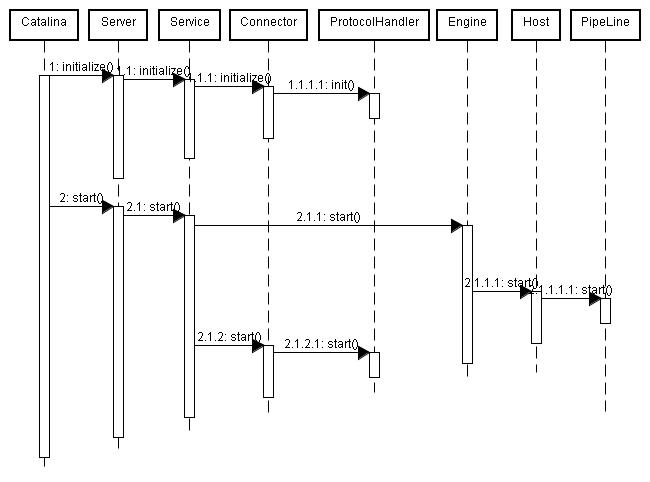
从上图可以看出,Tomcat启动分为init和start两个过程,核心组件都实现了Lifecycle接口,都需实现start方法,因此在start过程中就是从Server开始逐层调用子组件的start过程。
2)基于JMX
Tomcat会为每个组件进行注册过程,通过Registry管理起来,而Registry是基于JMX来实现的,因此在看组件的init和start过程实际上就是初始化MBean和触发MBean的start方法,会大量看到形如:
Registry.getRegistry(null, null).invoke(mbeans, "init", false); Registry.getRegistry(null, null).invoke(mbeans, "start", false); |
这样的代码,这实际上就是通过JMX管理各种组件的行为和生命期。
3)事件侦听
各个组件在其生命期中会有各种各样行为,而这些行为都有触发相应的事件,Tomcat就是通过侦听这些时间达到对这些行为进行扩展的目的。在看组件的init和start过程中会看到大量如:
lifecycle.fireLifecycleEvent(AFTER_START_EVENT, null); |
这样的代码,这就是对某一类型事件的触发,如果你想在其中加入自己的行为,就只用注册相应类型的事件即可。
二、一次完整请求的里里外外
前几天分析了一下Tomcat的架构和启动过程,今天开始研究它的运转机制。Tomcat最本质就是个能运行JSP/Servlet的Web服务器 ,因此最典型的应用就是用户通过浏览器访问服务器,Tomcat接收到请求后转发给Servlet,由Servlet处理完后,把结果返回给客户端。今天就专门解析一下这么一个完整的请求的内部机理。
通过DEBUG,一路跟下来,发现Tomcat处理请求的核心过程是以下几点:
1、启动的时候启动预支持协议的Endpoint,Endpoint会起专门的线程监听相应协议的请求,默认的情况下,会启动JIoEndpoint,JIoEndpoint基于Java ServerSocket接收Http的请求
2、ServerSocket接收到客户端请求的Socket后,一路包装,并一路从Host一直传递到Wrapper,再请求到相应的Servlet
下面将重点解析以上两个过程。
通过以前的分析(Tomcat源码分析一)可知道当Tomcat启动的时候会启动Connector,此时Connector会通过ProtocolHandler把Endpoint启动起来。默认情况下,Tomcat会启动两种Connector,分别是Http协议和AJP协议的,依次对应Http11Protocol和AjpProtocol,两者都是启动JIoEndpoint。下面看看JIoEndpoint的start方法:
public void start() throws Exception {
|
以上代码很清晰地表示启动acceptorThreadCount个线程,每个线程由Acceptor代理,具体看看Acceptor的run方法:
public void run() {
|
由此可得到这么一个结论:Tomcat就是通过ServerSocket监听Socket的方式来接收客户端请求的。具体代码就无需我解析了,稍微了解Java net的人都能看懂以上代码,Tomcat就是用最标准和最基础的Socket调用方法来处理网络请求的。找到处理请求的源头后下面要做的是事情就简单了,打好断点,在浏览器里请求一个最简单的Hello world,一路debug下去。一路跟下来,主流程的时序图如下所示:
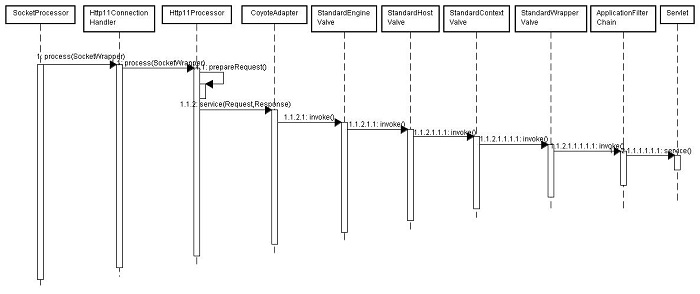
从上图可知,以上过程可分解成以下三个最主要的核心点:
1、基于Http1.1协议对Socket的解析和包装
2、StandardEngineValve、StandardHostValve、StandardContextValve和StandardWrapperValve四种Valve的一路inoke。四种不同层次的Valve做了不同层次的处理和封装
3、基于责任链模式ApplicationFilterChain实现Filter拦截和实际Servlet的请求
以上三个核心点都是内容非常丰富的可研究点,会在以后几天逐一进行剖析。
三、可携带状态的线程池
最近想实现一个可携带状态的线程池,具体需求就是池中的线程被用来处理某种信息,而此信息可视为线程所依赖的外部状态。如果用简单的线程池来实现,线程初始化时就得赋予某些信息,使得线程无法被再次利用。在看老版Tomcat的源码时,找到了答案,其实现思路主要是利用了线程的等待和唤起,HttpProcessor的实现正好基于此思路,时序图如下所示:
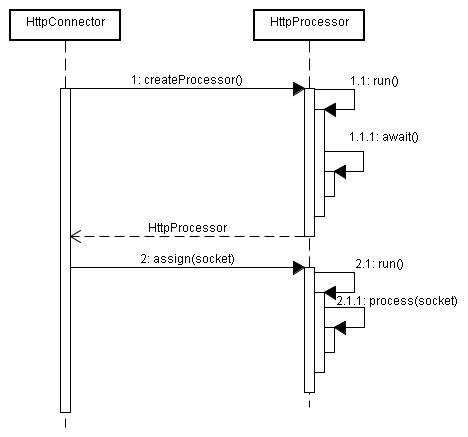
初始化HttpProcessor线程时,没法赋予所需的Socket对象,因为如果在初始化阶段就赋予Socket会导致此线程没法回收用来处理其他Socket。因此,在HttpProcessor的run阶段,先把线程给wait住,具体在await方法里体现,代码如下所示:
/** |
/** |
当HttpConnector调用HttpProcessor.assign(socket)方法时,会给此线程赋予Socket对象,并唤起此线程,使其继续执行,assign方法的源码如下所示:
/** |
/** |
线程被唤起和赋予socket对象后,继续执行核心的process方法,HttpProcessor.run的完整源码如下所示:
/** |
/** |
四、Request和Response处理的全过程
从Tomcat源码分析(二)可知,用户的一个请求会经过n个环节的处理,最后到达开发人员写的Servlet,传给Servlet也就是HttpServletRequest和HttpServletResponse,因此可以认为这一路走下来无非就是把最原始的Socket包装成Servlet里用到的HttpServletRequest和HttpServletResponse,只不过每个环节完成的包装功能和部分不一样而已,信息流如下图所示:

其中,Request与Response的类图如下所示:
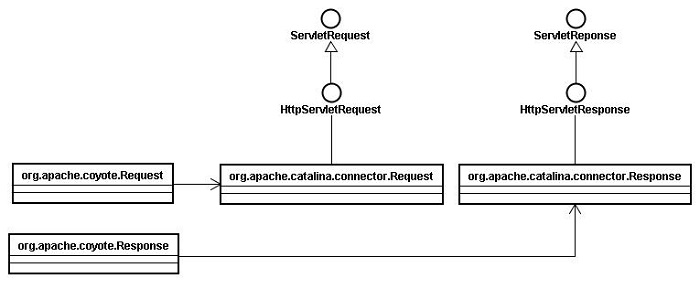
org.apache.coyote.Request和org.apache.coyote.Response是Tomcat内部使用的,不提供给开发者调用,类是final类型的。下面结合一次完整请求的时序图来看看从Socket到org.apache.catalina.connector.Request的加工过程:
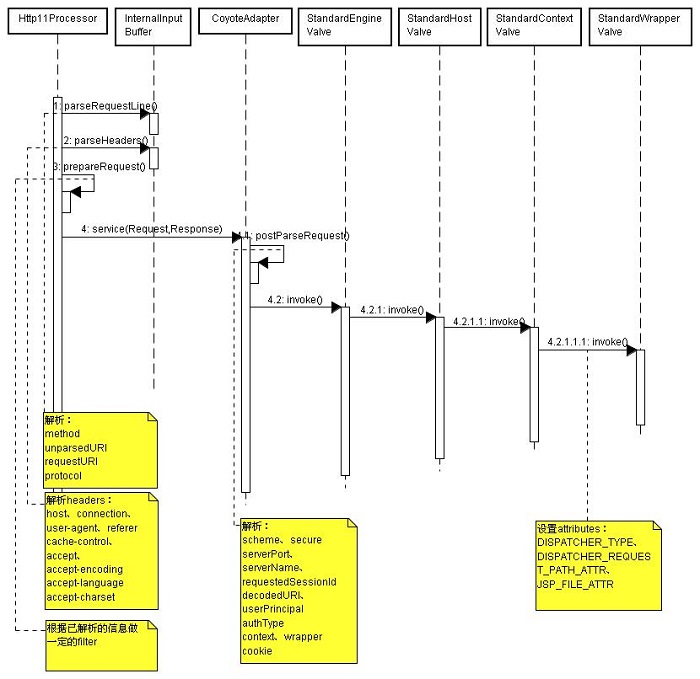
由上图可见,Request的解析和加工过程不是在一个方法里搞定,而是信息流动过程中逐步解析的,不同层次的处理器解析不同层次的信息,在解析过程同时做了些判断和拦截的工作,比如当发现是要访问WEB-INF的资源,会直接返回错误给客户端等等。
来自:
http://www.uml.org.cn/j2ee/201306285.asp
Tomcat源码分析--转的更多相关文章
- tomcat源码分析(三)一次http请求的旅行-从Socket说起
p { margin-bottom: 0.25cm; line-height: 120% } tomcat源码分析(三)一次http请求的旅行 在http请求旅行之前,我们先来准备下我们所需要的工具. ...
- [Tomcat 源码分析系列] (二) : Tomcat 启动脚本-catalina.bat
概述 Tomcat 的三个最重要的启动脚本: startup.bat catalina.bat setclasspath.bat 上一篇咱们分析了 startup.bat 脚本 这一篇咱们来分析 ca ...
- Tomcat源码分析
前言: 本文是我阅读了TOMCAT源码后的一些心得. 主要是讲解TOMCAT的系统框架, 以及启动流程.若有错漏之处,敬请批评指教! 建议: 毕竟TOMCAT的框架还是比较复杂的, 单是从文字上理解, ...
- Tomcat源码分析之—具体启动流程分析
从Tomcat启动调用栈可知,Bootstrap类的main方法为整个Tomcat的入口,在init初始化Bootstrap类的时候为设置Catalina的工作路径也就是Catalina_HOME信息 ...
- tomcat 源码分析
Tomcat源码分析——Session管理分析(下) Tomcat源码分析——Session管理分析(上) Tomcat源码分析——请求原理分析(下) Tomcat源码分析——请 ...
- Tomcat源码分析——Session管理分析(下)
前言 在<TOMCAT源码分析——SESSION管理分析(上)>一文中我介绍了Session.Session管理器,还以StandardManager为例介绍了Session管理器的初始化 ...
- Tomcat源码分析——Session管理分析(上)
前言 对于广大java开发者而已,对于J2EE规范中的Session应该并不陌生,我们可以使用Session管理用户的会话信息,最常见的就是拿Session用来存放用户登录.身份.权限及状态等信息.对 ...
- Tomcat源码分析——请求原理分析(下)
前言 本文继续讲解TOMCAT的请求原理分析,建议朋友们阅读本文时首先阅读过<TOMCAT源码分析——请求原理分析(上)>和<TOMCAT源码分析——请求原理分析(中)>.在& ...
- Tomcat源码分析——请求原理分析(中)
前言 在<TOMCAT源码分析——请求原理分析(上)>一文中已经介绍了关于Tomcat7.0处理请求前作的初始化和准备工作,请读者在阅读本文前确保掌握<TOMCAT源码分析——请求原 ...
随机推荐
- 简单学C——第五天
结构体 首先明确,结构体是一种构造的数据类型,是一种由多个数据类型如 int,char,double,数组或者结构体......组成的类型,现在告诉大家如何定义一个结构体.在定义int整型变量时,大家 ...
- sql如果存在就修改不存在就新增
FROM 表名 WHERE 条件) UPDATE 表名 SET 字段=值 WHERE 条件 ELSE INSERT INTO 表名(字段) VALUES(值) 真实使用举例: from [UserRu ...
- servlet跳转jsp
ackage com.monkey.servlet; import javax.servlet.*; import javax.servlet.http.*; import java.io.*; im ...
- PS证件照换背景
综述 博主原创内容. 在PS里,对于抠图,比较有技术含量的便是抠头发丝了,下面为大家带来一个比较详细的抠头发丝的教程. 素材准备 在这里我们用这张图片作为抠图素材,下面让我们一步步来演示抠图的过程,并 ...
- android学习(2) 多线程的理解
多线程操作UI的运行原理: UI线程:首先启动app时,系统会自动启动一个UI线程,然后此线程会创建一个Looper(注:Looper构造函数会实例化一个MessageQueue的消息队列存在变量mQ ...
- 趣味C程序100.1 .1 绘制余弦曲线
说明:1.本问题来源于<C语言经典.趣味.实用程序设计编程百例精解>,所有程序为本人自己编写.与原程序不同之处作有标记. 2.本系列所有程序均使用codeblocks编译,操作系统为Win ...
- hadoo namenode format 异常 java.net.UnknownHostException: localhost.localdomain: localhost.localdomain
/etc/sysconfig/network换成你在hosts里设置的值 /etc/rc.d/init.d/network restart 重启网络 hostname后就会发现hostname变了,也 ...
- 无插件Vim编程技巧
无插件Vim编程技巧 http://bbs.byr.cn/#!article/buptAUTA/59钻风 2014-03-24 09:43:46 发表于:vim 相信大家看过<简明Vim教程& ...
- 【UVA11478】Halum (最短路解差分约束)
题目: Sample Input2 11 2 102 11 2 -103 31 2 42 3 23 1 54 52 3 44 2 53 4 23 1 01 2 -1Sample OutputInfin ...
- NOIP2014酱油记
尘埃落定,来补一下酱油记吧... day-1 晚上老师说有xyz的noip模拟赛,于是果断请假来做(shou)题(nve),题目真是理(S)性(X)愉(B)悦(K),然后就爆零了!感觉noip要爆零滚 ...