Nginx Web 基础入门
Nginx Web 基础入门
nginx简述
Nginx是一个开源且高性能、可靠的Http Web服务、代理服务。
开源: 直接获取源代码
高性能: 支持海量并发
可靠: 服务稳定
我们为什么选择Nginx服务
Nginx非常轻量
功能模块少 (源代码仅保留http与核心模块代码,其余不够核心代码会作为插件来安装)
代码模块化 (易读,便于二次开发,对于开发人员非常友好)
互联网公司都选择 Nginx
1.Nginx技术成熟,具备的功能是企业最常使用而且最需要的
2.适合当前主流架构趋势, 微服务、云架构、中间层
3.统一技术栈, 降低维护成本,* 降低技术更新成本。
Nginx 采用 Epool 网络模型, Apache 采用 Select 模型
Select: 当用户发起一次请求,select模型就会进行一次遍历扫描,从而导致性能低下。
Epool: 当用户发起请求,epool模型会直接进行处理,效率高效,并无连接限制。
Nginx典型应用场景
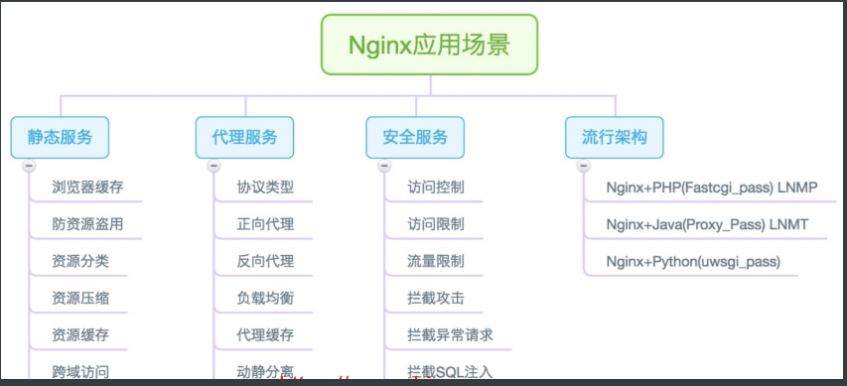
# 静态WEB软件

nginx    apache    IIS    lighttpd     tengine     openresty-nginx

动态WEB软件

Tomcat   Resin   weblogic   Jboss
Nginx快速安装
Nginx的安装方式
1.源码编译=>Nginx (1.版本随意 2.安装复杂 3.升级繁琐 4.规范 5.便于管理)
2.epel仓库=>Nginx (1.版本较低 2.安装简单 3.配置不易读)
3.官方仓库=>Nginx (1.版本较新 2.安装简单 3.配置易读)安装Nginx依赖
两种方式部署Nginx
1.yum 安装
1)安装依赖
[root@web ~]# yum install -y gcc gcc-c++ autoconf pcre pcre-devel make automake wget httpd-tools vim tree
2)修改官方的yum源
[root@web01 ~]# vim /etc/yum.repos.d/nginx.repo

[nginx]

name=nginx repo

baseurl=http://nginx.org/packages/centos/7/$basearch/

gpgcheck=0

enabled=1
3)使用yum安装nginx
[root@web01 ~]# yum install -y nginx
4)启动nginx并设置开机自启
[root@web01 ~]# systemctl start nginx

[root@web01 ~]# systemctl enable nginx
启动报错:
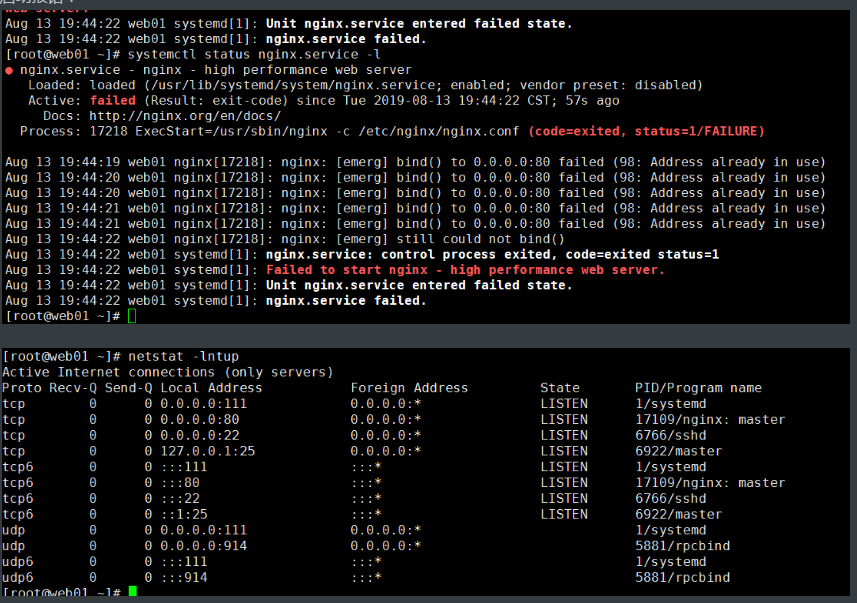
报错原因:80端口被占用或者产生僵尸进程
解决方法:谁占用的,干掉谁
[root@web01 ~]# systemctl stop httpd

[root@web01 ~]# systemctl start nginx

#杀掉所有进程

[root@web01 ~]# pidof nginx |xargs kill -9
5)监测nginx是否启动成功
#方法一:监测进程

[root@web01 ~]# ps -ef|grep [n]ginx

root      12457      1  0 11:44 ?        00:00:00 nginx: master process /usr/sbin/nginx -c /etc/nginx/nginx.conf

nginx     12458  12457  0 11:44 ?        00:00:00 nginx: worker process

#方法二:监测端口

[root@web01 ~]# netstat -lntup|grep 80

tcp        0      0 0.0.0.0:80              0.0.0.0:*               LISTEN      12457/nginx: master

#方法三:systemd

[root@web01 ~]# systemctl status nginx

● nginx.service - nginx - high performance web server

   Loaded: loaded (/usr/lib/systemd/system/nginx.service; enabled; vendor preset: disabled)

   Active: active (running) since Tue 2019-08-13 11:44:03 CST; 8min ago

     Docs: http://nginx.org/en/docs/

  Process: 12456 ExecStart=/usr/sbin/nginx -c /etc/nginx/nginx.conf (code=exited, status=0/SUCCESS)

 Main PID: 12457 (nginx)

   CGroup: /system.slice/nginx.service

           ├─12457 nginx: master process /usr/sbin/nginx -c /etc/nginx/nginx.conf

           └─12458 nginx: worker process

#方法四:打开浏览器访问

10.0.0.7
#方法五:curl命令

[root@web01 ~]# curl 10.0.0.7

[root@web01 ~]# curl www.driverzeng.com
6)查看nginx的版本
[root@web01 ~]# nginx -v

nginx version: nginx/1.16.0
- 查询nginx 的站点目录
[root@web01 ~]# rpm -ql nginx |grep html
- 修改nginx配置文件
[root@web01 ~]# vim /usr/share/nginx/html/index.html
放入动态的静页面
<html>

<head>

<body>

<meta http-equiv="Content-Type" content="text/html"; charset="utf-8">

<div style="">

<marquee border="0" class="float-content-title-left-up" onmouseout="this.start();" onmouseover="this.stop();" direction="up" scrolldelay="50" style="border:1px solid pink; height: 500px;">

<center><h1><font color='black'>魔道祖师</font></h1></center>

<b><p>

<font color='red'>

明月清风晓星尘,傲雪凌霜宋子琛

</font>

	<br>

<br><font color='orange'>

心狠手辣金光瑶,十恶不赦薛成美

</font>

	<br>

<br><font color='yellow'>

温润如玉蓝曦臣,冷若冰霜蓝忘机

</font>

	<br>

<br><font color='green'>

伶牙俐齿魏无羡,口嫌体正江晚吟

</font>

	<br>

<br><font color='red'>

清风双道魂不复,兰陵双花无人念

</font>

	<br>

<br><font color='orange'>

云梦双杰剩一人,姑苏双壁谁人伤

</font>

	<br>

<br><font color='yellow'>---------------------------------------------------------------------------</font>

	<br>

<br><font color='green'>

只羡忘羡不羡仙,魔道独成全忘羡

</font>

	<br>

<br><font color='red'>

心中悲苦谁人晓,待到他年花开时

</font>

	<br>

<br><font color='orange'>

世人皆知鬼将军,不识白衣温琼林

</font>

	<br>

<br><font color='yellow'>

问灵十三载,等一不归人 ------蓝忘机

</font>

	<br>

<br><font color='green'>

守一无人城,候一不归魂 -----薛洋

</font>

	<br>

<br><font color='red'>

忘羡一曲远,曲终人不散。

</font>

	<br>

<br><font color='orange'>

是非在己,毁誉由人,得失不论。

</font>

	<br>

<br><font color='yellow'>

</font>

	<br>

</p></b>

</marquee>

</div>

<script>

	var titleCtx = document.querySelector('.float-content-title-left-up');

	document.onscroll = function() {

		// t是上滚距离

		var t = document.documentElement.scrollTop || document.body.scrollTop;

		window.console.log(t)

		// 开始变化的节点

		if (t > 500) {

			titleCtx.style.marginTop = t - 500 + 'px'

		} else {

			titleCtx.style.marginTop = '0px'

		}

	}

</script>

</body>

</head>

</html>
2.使用源码包安装nginx
- 官方下载安装包
wget http://nginx.org/download/nginx-1.16.0.tar.gz
- 解压安装包
[root@web02 ~]# tar xf nginx-1.16.0.tar.gz

[root@web02 ~]# ll

total 1020

drwxr-xr-x  8 1001 1001     158 Apr 23 21:13 nginx-1.16.0

-rw-r--r--  1 root root 1032345 Apr 23 21:58 nginx-1.16.0.tar.gz
- 指定编译参数,可自选参数,路径,方便管理
[root@web02 ~]# cd nginx-1.16.0

#创建www用户

groupadd www -g 666

useradd www -u 666 -g 666 -s /sbin/nologin -M
4)缺少依赖包,安装依赖包,然后指定编译参数
[root@web02 nginx-1.16.0]# yum install -y openssl-devel  pcre-devel

[root@web02 nginx-1.16.0]#   ./configure --prefix=/usr/local/nginx-1.16.0 \

--user=www \

--group=www \

--with-http_ssl_module \

--with-http_stub_status_module \

--with-stream
5)编译并安装
[root@web02 nginx-1.16.0]# make & make install
6)查询版本
#查询版本

[root@web02 nginx-1.16.0]# /usr/local/nginx-1.16.0/sbin/nginx -v

nginx version: nginx/1.16.0

#检查语法

[root@web02 nginx-1.16.0]# /usr/local/nginx-1.16.0/sbin/nginx -t

nginx: the configuration file /usr/local/nginx-1.16.0/conf/nginx.conf syntax is ok

nginx: configuration file /usr/local/nginx-1.16.0/conf/nginx.conf test is successful
如何升级nginx或者添加功能
#源版本先做个软连接

[root@web02 nginx-1.16.0]# ln -s /usr/local/nginx-1.16.0 /usr/local/nginx

[root@web02 nginx-1.16.0]# cd /usr/local/

#查看软连接

[root@web02 local]# ll

total 0

lrwxrwxrwx   1 root root  23 Aug 15 00:26 nginx -> /usr/local/nginx-1.16.0

drwxr-xr-x  11 root root 151 Aug 15 00:25 nginx-1.16.0
1.升级
#升级版本

官方下载1.7版本---->解压---->安装----->生成

[root@web02 nginx-1.17.2]# ./configure --prefix=/usr/local/nginx-1.17.2 \

--user=www \

--group=www \

--with-http_ssl_module \

--with-http_stub_status_module \

--with-stream \

--with-http_mp4_module

#编译安装之后

#重新软链接

[root@web02 nginx-1.17.2]# cd /usr/local/

[root@web02 local]# rm -f /usr/local/nginx && ln -s /usr/local/nginx-1.17.2 /usr/local/nginx

[root@web02 local]# ll

total 0

lrwxrwxrwx   1 root root  23 Aug 15 00:56 nginx -> /usr/local/nginx-1.17.2

drwxr-xr-x  11 root root 151 Aug 15 00:42 nginx-1.16.0

drwxr-xr-x   6 root root  54 Aug 15 00:48 nginx-1.17.2
2.添加新功能
[root@web02 ~]# cd nginx-1.16.0

把编译好的文件先删除

[root@web02 nginx-1.16.0]# rm -f Makefile

#添加模块

[root@web02 nginx-1.16.0]# ./configure --prefix=/usr/local/nginx_new-1.16.0 \

--user=www \

--group=www \

--with-http_ssl_module \

--with-http_stub_status_module \

--with-stream \

--with-http_mp4_module

#编译安装后

#重新软链接

[root@web02 nginx-1.17.2]# cd /usr/local/

[root@web02 local]# ll

total 0

lrwxrwxrwx   1 root root  23 Aug 15 00:56 nginx -> /usr/local/nginx-1.17.2

drwxr-xr-x  11 root root 151 Aug 15 00:42 nginx-1.16.0

drwxr-xr-x   6 root root  54 Aug 15 00:48 nginx-1.17.2

drwxr-xr-x   6 root root  54 Aug 15 01:02 nginx_new-1.16.0

[root@web02 local]#  rm -f /usr/local/nginx && ln -s /usr/local/nginx_new-1.16.0 /usr/local/nginx

[root@web02 local]# ll

total 0

lrwxrwxrwx   1 root root  27 Aug 15 01:04 nginx -> /usr/local/nginx_new-1.16.0

drwxr-xr-x  11 root root 151 Aug 15 00:42 nginx-1.16.0

drwxr-xr-x   6 root root  54 Aug 15 00:48 nginx-1.17.2

drwxr-xr-x   6 root root  54 Aug 15 01:02 nginx_new-1.16.0
Ansible,SaltStack
先源码安装,然后打rpm包,放到yum仓库,然后yum安装
使用systemd管理nginx
[root@web02 local]# vim /usr/lib/systemd/system/nginx.service

[Unit]

Description=nginx - high performance web server

Documentation=http://nginx.org/en/docs/

After=network-online.target remote-fs.target nss-lookup.target

Wants=network-online.target

[Service]

Type=forking

PIDFile=/usr/local/nginx/logs/nginx.pid

ExecStart=/usr/local/nginx/sbin/nginx -c /usr/local/nginx/conf/nginx.conf

ExecReload=/bin/kill -s HUP $MAINPID

ExecStop=/bin/kill -s TERM $MAINPID

[Install]

WantedBy=multi-user.target

#启动nginx

[root@web02 local]# systemctl start nginx

#关闭nginx

[root@web02 local]# systemctl stop nginx
nginx相关配置文件
1.Nginx主配置文件
| 路径 | 类型 | 作用 |
|---|---|---|
| /etc/nginx/nginx.conf | 配置文件 | nginx主配置文件 |
| /etc/nginx/conf.d/default.conf | 配置文件 | 默认网站配置文件 |
2.Nginx代理相关参数文件
| 路径 | 类型 | 作用 |
|---|---|---|
| /etc/nginx/fastcgi_params | 配置文件 | Fastcgi代理配置文件 |
| /etc/nginx/scgi_params | 配置文件 | scgi代理配置文件 |
| /etc/nginx/uwsgi_params | 配置文件 | uwsgi代理配置文件 |
3.Nginx编码相关配置文件
| 路径 | 类型 | 作用 |
|---|---|---|
| /etc/nginx/win-utf | 配置文件 | Nginx编码转换映射文件 |
| /etc/nginx/koi-utf | 配置文件 | Nginx编码转换映射文件 |
| /etc/nginx/koi-win | 配置文件 | Nginx编码转换映射文件 |
| /etc/nginx/mime.types | 配置文件 | Content-Type与扩展名 |
4.Nginx管理相关命令
| 路径 | 类型 | 作用 |
|---|---|---|
| /usr/sbin/nginx | 命令 | Nginx命令行管理终端工具 |
| /usr/sbin/nginx-debug | 命令 | Nginx命令行与终端调试工具 |
4.Nginx日志相关目录与文件
| 路径 | 类型 | 作用 |
|---|---|---|
| /var/log/nginx | 目录 | Nginx默认存放日志目录 |
| /etc/logrotate.d/nginx | 配置文件 | Nginx默认的日志切割 |
nginx的配置文件详解
Nginx主配置文件整体分为三块进行学习,分别是CoreModule(核心模块),EventModule(事件驱动模块),HttpCoreModule(http内核模块)
Nginx主配置文件/etc/nginx/nginx.conf是一个纯文本类型的文件,整个配置文件是以区块的形式组织的。一般,每个区块以一对大括号{}来表示开始与结束。

Nginx主配置文件整体分为三块进行学习,分别是CoreModule(核心模块),EventModule(事件驱动模块),HttpCoreModule(http内核模块)

CoreModule核心模块

------------------核心模块------------------------

user www;                       #Nginx进程所使用的用户

worker_processes 1;             #Nginx运行的work进程数量(建议与CPU数量一致或auto)

error_log /log/nginx/error.log  #Nginx错误日志存放路径

pid /var/run/nginx.pid          #Nginx服务运行后产生的pid进程号

--------------EventModule(事件驱动模块)----------

events {

    worker_connections 25535;   #每个worker进程支持的最大连接数

    use epoll;                  #事件驱动模型, epoll默认

}

#最重要的模块

----------HttpCoreModule(http内核模块)------------

#http层开始

http {

#包含资源类型文件,记录nginx可加载的所有文件类型

    include       /etc/nginx/mime.types;

#默认以下载方式传输给浏览器(前提是该资源在mime.types中无法找到),默认情况下,nginx会将请求的内容下载

    default_type  application/octet-stream;

#日志格式

    log_format  main  '$remote_addr - $remote_user [$time_local] "$request" '

                      '$status $body_bytes_sent "$http_referer" '

                      '"$http_user_agent" "$http_x_forwarded_for"';

#访问日志

    access_log  /var/log/nginx/access.log  main;

#高效文件传输

    sendfile        on;

#搭配sendfile使用

    #tcp_nopush     on;

#长连接超时时间

    keepalive_timeout  65;

#是否开启压缩

    #gzip  on;

    #使用Server配置网站, 每个Server{}代表一个网站(简称虚拟主机)

    'server' {

        listen       80;            #监听端口, 默认80

        server_name  driverzeng.com;    #提供的域名

        access_log  access.log;     #该网站的访问日志

        #控制网站访问路径

        'location' / {

            root   /usr/share/nginx/html;   #存放网站源代码的位置

            index  index.html index.htm;    #默认返回网站的文件

        }

    }

    ...

    #第二个虚拟主机配置

    'server' {

    ...

    }

    include /etc/nginx/conf.d/*.conf;  #包含/etc/nginx/conf.d/目录下所有以.conf结尾的文件

} #http结束层
虚拟主机配置方案
[root@web01 conf.d]# vim game.conf

#虚拟主机

server {

        listen 80;      #监听80端口

        server_name localhost;    #域名

        location / {             #控制网站访问路径

                root /code;        #存放网站源代码的位置

                index index.html;     #默认返回网站的文件

        }

}

#创建站点目录

[root@web01 conf.d]# mkdir /code

#授权www用户给站点目录

[root@web01 ~]# vim /etc/nginx/nginx.conf    #改用户为www

#重启

[root@web01 ~]# systemctl restart nginx

#查看nginx进程用户

[root@web01 ~]# ps -ef |grep nginx

#给/code目录授权

[root@web01 conf.d]# chown -R www.www /code

#手动创建index

[root@web01 code]# echo game > /code/index.html
[root@web01 code]# ll /code/

total 18860

-rw-r--r-- 1 root root 19304923 Aug 14 11:36 h5_games.zip

-rw-r--r-- 1 www  www         5 Aug 14 11:51 index.html

[root@web01 code]# pwd

/code

#放置游戏源代码文件到nginx配置文件root指定的目录

[root@web01 code]# rz  h5_games.zip

[root@web01 code]# unzip h5_games.zip
方式1:基于IP(很少用)
修改总配置文件IP和名称
#进到配置文件目录

[root@web01 ~]# cd /etc/nginx/conf.d/

[root@web01 conf.d]# ll

total 8

-rw-r--r-- 1 root root 1092 Aug 14 12:40 default.conf

-rw-r--r-- 1 root root  168 Aug 14 12:12 game.conf

#编辑总配置文件,修改端口和名称

[root@web01 conf.d]# vim default.conf

server {

    listen      10.0.0.7:80;

    server_name  _;

        location / {             #控制网站访问路径

                root /code;        #存放网站源代码的位置

                index index.html;     #默认返回网站的文件

        }

}
修改内网IP 和名称
[root@web01 conf.d]# vim game.conf

server {

       listen 172.16.1.7:80;

       server_name _;

        location / {             #控制网站访问路径

                root /code;        #存放网站源代码的位置

                index index.html;     #默认返回网站的文件

        }

}

#检查语法

[root@web01 conf.d]# nginx -t

nginx: the configuration file /etc/nginx/nginx.conf syntax is ok

nginx: configuration file /etc/nginx/nginx.conf test is successful

#启动

[root@web01 conf.d]# nginx -s reload
访问10.0.0.7,如果访问不了
解决方法:
#检查端口

[root@web01 conf.d]# netstat -lntup

Active Internet connections (only servers)

Proto Recv-Q Send-Q Local Address           Foreign Address         State       PID/Program name

tcp        0      0 0.0.0.0:80              0.0.0.0:*               LISTEN      18057/nginx: master

tcp        0      0 0.0.0.0:22              0.0.0.0:*               LISTEN      6744/sshd

tcp        0      0 127.0.0.1:25            0.0.0.0:*               LISTEN      6903/master

tcp6       0      0 :::22                   :::*                    LISTEN      6744/sshd

tcp6       0      0 ::1:25                  :::*                    LISTEN      6903/master

#重启

[root@web01 conf.d]# systemctl restart nginx

#重新载入 systemd,扫描新的或有变动的单元

[root@web01 conf.d]# systemctl daemon-reload

[root@web01 conf.d]# systemctl restart nginx

#如果有报错,查看进程

[root@web01 conf.d]# pidof nginx

18320 18319

#杀掉所有nginx进程

[root@web01 conf.d]# pidof nginx | xargs kill -9

#再次查看进程

[root@web01 conf.d]# pidof nginx

#重新启动

[root@web01 conf.d]# systemctl restart nginx
再次访问10.0.0.7, 会出下面index.html 的内容
访问不了172.16.1.7 ,内网不通,可以在另一台虚拟机
curl 172.16.1.7 ,会出现h5_games的界面
[root@web01 code]# ll

total 18860

drwxr-xr-x 6 nginx nginx      108 May  3 14:11 h5_games

-rw-r--r-- 1 nginx nginx        5 Aug 14 11:52 index.html
方式2:基于端口(公司用,用于测试环节)
[root@web01 conf.d]# vim default.conf

server {

    listen      80;

    server_name  localhost;

        location / {             #控制网站访问路径

                root /code;        #存放网站源代码的位置

                index index.html;     #默认返回网站的文件

        }

}
[root@web01 conf.d]# vim game.conf

server{

       listen 81;

       server_name localhost;

        location / {             #控制网站访问路径

                root /code;        #存放网站源代码的位置

                index index.html;     #默认返回网站的文件

        }

}
重启
[root@web01 conf.d]# nginx -t

nginx: the configuration file /etc/nginx/nginx.conf syntax is ok

nginx: configuration file /etc/nginx/nginx.conf test is successful

[root@web01 conf.d]# nginx -s reload
访问10.0.0.7
10.0.0.7:81
如果访问不到,解决方法:
#查看端口 (两个80端口,81没显示)

[root@web01 conf.d]# netstat -lntup

Active Internet connections (only servers)

Proto Recv-Q Send-Q Local Address           Foreign Address         State       PID/Program name

tcp        0      0 172.16.1.7:80           0.0.0.0:*               LISTEN      18338/nginx: master

tcp        0      0 10.0.0.7:80             0.0.0.0:*               LISTEN      18338/nginx: master

tcp        0      0 0.0.0.0:22              0.0.0.0:*               LISTEN      6744/sshd

tcp        0      0 127.0.0.1:25            0.0.0.0:*               LISTEN      6903/master

tcp6       0      0 :::22                   :::*                    LISTEN      6744/sshd

tcp6       0      0 ::1:25                  :::*                    LISTEN      6903/master

#查看防火墙状态

[root@web01 conf.d]# systemctl status firewalld

● firewalld.service - firewalld - dynamic firewall daemon

   Loaded: loaded (/usr/lib/systemd/system/firewalld.service; disabled; vendor preset: enabled)

   Active: inactive (dead)

     Docs: man:firewalld(1)

#重启nginx

[root@web01 conf.d]# systemctl restart nginx

#查看端口,有显示81

[root@web01 conf.d]# netstat -lntup

Active Internet connections (only servers)

Proto Recv-Q Send-Q Local Address           Foreign Address         State       PID/Program name

tcp        0      0 0.0.0.0:80              0.0.0.0:*               LISTEN      18377/nginx: master

tcp        0      0 0.0.0.0:81              0.0.0.0:*               LISTEN      18377/nginx: master

tcp        0      0 0.0.0.0:22              0.0.0.0:*               LISTEN      6744/sshd

tcp        0      0 127.0.0.1:25            0.0.0.0:*               LISTEN      6903/master

tcp6       0      0 :::22                   :::*                    LISTEN      6744/sshd

tcp6       0      0 ::1:25                  :::*                    LISTEN      6903/master
再次访问10.0.0.7
10.0.0.81
方式3:基于域名(生产环节)
[root@web01 conf.d]# vim default.conf

server {

    listen      80;

    server_name  www.gjy.com;

.....

[root@web01 conf.d]# vim game.conf

server{

       listen 80;

       server_name game.gjy.com;

        location / {             #控制网站访问路径

                root /code;        #存放网站源代码的位置

                index index.html;     #默认返回网站的文件

        }

}
检查及重启
#检查

[root@web01 conf.d]# nginx -t

nginx: the configuration file /etc/nginx/nginx.conf syntax is ok

nginx: configuration file /etc/nginx/nginx.conf test is successful

#重启

[root@web01 conf.d]# systemctl restart nginx

#查看端口

[root@web01 conf.d]# netstat -lntup

Active Internet connections (only servers)

Proto Recv-Q Send-Q Local Address           Foreign Ad

tcp        0      0 0.0.0.0:80              0.0.0.0:*

tcp        0      0 0.0.0.0:22              0.0.0.0:*

tcp        0      0 127.0.0.1:25            0.0.0.0:*

tcp6       0      0 :::22                   :::*

tcp6       0      0 ::1:25                  :::*
Windows+r-------> 搜索 drivers ---------> 找到etc目录------>hosts
添加 10.0.0.7 www.gjy.com game.gjy.com
即可域名访
Nginx Web 基础入门的更多相关文章
- Nginx web基础入门
目录 Nginx web基础入门 如何升级nginx或者添加功能 使用systemd管理nginx nginx相关配置文件 nginx的配置文件详解 日志格式 game日志记录实战 日志切割 手写虚拟 ...
- Linux架构之Nginx Web基础1
第41章 Nginx Web基础入门 41.1 Nginx部署 41.1.1 Nginx的安装方式 源码编译 官方仓库 epel仓库 优点 规范 安装简单 安装简单 便于管理 配置易读 缺 ...
- Java Web基础入门
前言 语言都是相通的,只要搞清楚概念后就可以编写代码了.而概念是需要学习成本的. Java基础 不用看<编程思想>,基础语法看 http://www.runoob.com/java/jav ...
- Tengine是由淘宝网发起的Web服务器项目。它在Nginx的基础上,针对大访问量网站的需求,添加了很多高级功能和特性
简介 Tengine是由淘宝网发起的Web服务器项目.它在Nginx的基础上,针对大访问量网站的需求,添加了很多高级功能和特性.Tengine的性能和稳定性已经在大型的网站如淘宝网,天猫商城等得到了很 ...
- Nginx 基础入门
目录 Nginx 基础入门 1.Nginx简介 1.1.相关名词解释 2.Nginx优势 3.Nginx部署 4.Nginx配置文件 5.Nginx模块 6.Nginx配置文件 6.1.Locatio ...
- Linux下一键安装包的基础上安装SVN及实现nginx web同步更新
Linux下一键安装包的基础上安装SVN及实现nginx web同步更新 一.安装 1.查看是否安装cvs rpm -qa | grep subversion 2.安装 yum install sub ...
- nginx实现基础web
目录 nginx实现基础web 什么是lnmp lnmp架构如何工作 Nginx与Fast-CGO详细工作流程 LNMP环境准备 一,部署LNMP 1.使用nginx官方源 2.创建nginx用户 3 ...
- Web安全之Web 安全介绍与基础入门知识
web安全介绍与基础入门知识 安全与安全圈 甲方与乙方 甲方:如腾讯,阿里等需要安全服务的公司 乙方:提供安全服务产品的服务型安全公司 web与二进制 web,研究web安全 二进制,研究如客户端安全 ...
- 小迪安全 Web安全 基础入门 第六天 - 信息打点-Web架构篇&域名&语言&中间件&数据库&系统&源码获取
一 . Web架构 语言.常用的Web开发语言有PHP,Java,Python,JavaScript,.net等.具体可参考w3school的介绍. 中间件. (1)常见的Web服务器中间件:IIS. ...
随机推荐
- Linux使用rarcrack暴力破解RAR,ZIP,7Z压缩包
1.下载http://rarcrack.sourceforge.net/ 2.安装依赖 gcc libxml2-devel libxslt-devel 3.使用rarcrack your_encry ...
- java类使用
package java04; /* * 通常情况下,一个类不能直接使用,需要创建一个对象,才能使用 * *步骤: * 1.导包:就是指出需要使用的类在什么位置 * import 包名称.类名称: * ...
- webstorm9.0.3 注册码
William 45550-12042010 00001SzFN0n1bPII7FnAxnt0DDOPJA INauvJkeVJBuE5bqLEznccE4tet6tr RiyoMxDK8oDY93t ...
- Linux中Hard link和Symbol link的区别
Hard link Hard link不能指向不在同一磁盘的文件 Hard link不能指向目录 Hard link与源文件几乎没有区别.只能通过ls -li看出link关系.另外,删除源文件后,Ha ...
- Web项目改名的带来的404not found问题
为了保留上一次编辑的billsys web项目,把项目复制一份到同一个工作空间后,对原来项目名进行了重命名,如右图: 结果再去访问,一直报404错误 解决思路如下: 其实仔细观察,会在项目部署界面发现 ...
- hdu 5181 numbers——思路+区间DP
题目:http://acm.hdu.edu.cn/showproblem.php?pid=5181 题解:https://www.cnblogs.com/Miracevin/p/10960717.ht ...
- shell 截取变量的字符串
假设有变量 var=http://www.linuxidc.com/test.htm一 # 号截取,删除左边字符,保留右边字符.echo ${var#*//}其中 var 是变量名,# 号是运算符,* ...
- response.setHeader();小结
response.setHeader():1. HTTP消息头 (1)通用信息头 即能用于请求消息中,也能用于响应信息中,但与被传输的实体内容没有关系的信息头,如Data,Pragma 主要: Cac ...
- 面试题57:数组中2个数的和(也是leetcode题目)
题目:给定一个整数数列,找出其中和为特定值的那两个数. 你可以假设每个输入都只会有一种答案,同样的元素不能被重用. 示例: 给定 nums = [2, 7, 11, 15], target = 9 因 ...
- 中介者模式(Mediator Pattern)
用于减少多个对象或类之间的通信复杂性. 此模式提供了一个中介类,它通常处理不同类之间的所有通信,并支持通过松散耦合来维护代码.中介者模式属于行为模式类别. 实现实例 在这里通过一个聊天室的示例来演示中 ...