实验 4 :Open vSwitch 实验 —— Mininet 中使用 OVS 命令
实验 4 :Open vSwitch 实验 —— Mininet 中使用 OVS 命令
一、实验目的
Mininet 安装之后,会连带安装 Open vSwitch,可以直接通过 Python 脚本调用 Open vSwitch 命令,从而直接控制 Open vSwitch,通过实验了解调用控制的方法。
二 、实验任务
在本实验中,使用 Mininet 基于 Python 的脚本,调用“ovs-vsctl”命令直接控制Open vSwitch。使用默认的交换机泛洪规则,设置更高的优先级规则进行预先定义 IP 报文的转发。在多个交换机中通过设置不同 TOS 值的数据包将通过不同的方式到达目的地址,验证主机间的连通性及到达目的地址的时间。
三 、 实验步骤
1. 实验环境
安装了 Ubuntu 18.04.5 Desktop amd64 的虚拟机
2. 实验过程
SDNLAB 实验参考资料:https://www.sdnlab.com/15083.html
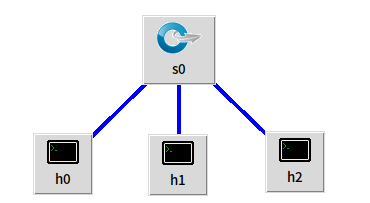
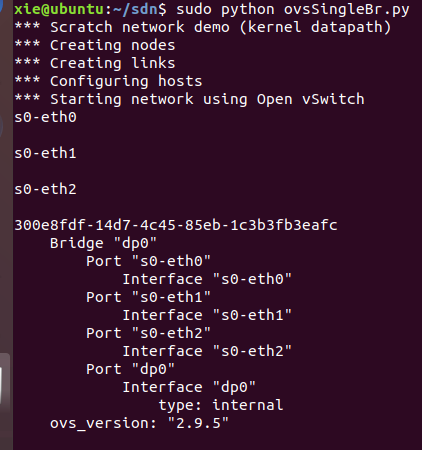
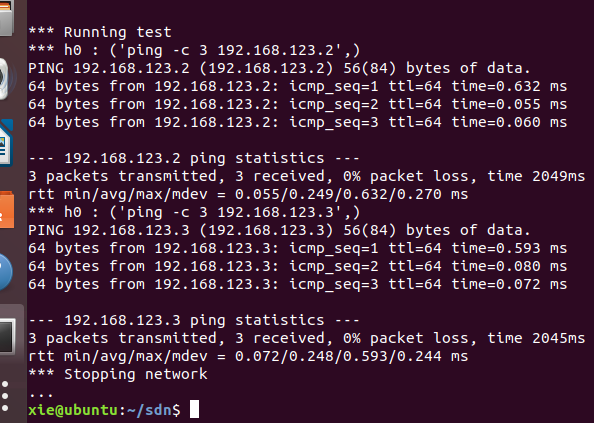
( 1 )创建 ovsSingleBr.py 脚本并添加内容,代码参考SDNLAB脚本对应的拓扑如上图所示,执行 ovsSingleBr.py,在没有控制器的情况下,在 Mininet 脚本中通过调用 ovs 命令直接向 switch0 交换机下发流表,将入端口号为 1/2/3 的数据包泛洪广播,并对目的地址为 192.168.123.1/2/3 的数据包分别从1/2/3 端口转发出去。之后测试 h0 ping h1,h0 ping h2,网络连通。
# ovsSingleBr.py

#!/usr/bin/python

from mininet.net import Mininet

from mininet.node import Node

from mininet.link import Link

from mininet.log import  setLogLevel, info

def myNet():

    "Create network from scratch using Open vSwitch."

    info( "*** Creating nodes\n" )

    switch0 = Node( 's0', inNamespace=False )

    h0 = Node( 'h0' )

    h1 = Node( 'h1' )

    h2 = Node( 'h2' )

    info( "*** Creating links\n" )

    Link( h0, switch0)

    Link( h1, switch0)

    Link( h2, switch0)

    info( "*** Configuring hosts\n" )

    h0.setIP( '192.168.123.1/24' )

    h1.setIP( '192.168.123.2/24' )

    h2.setIP( '192.168.123.3/24' )

    info( "*** Starting network using Open vSwitch\n" )

    switch0.cmd( 'ovs-vsctl del-br dp0' )

    switch0.cmd( 'ovs-vsctl add-br dp0' )

    for intf in switch0.intfs.values():

        print intf

        print switch0.cmd( 'ovs-vsctl add-port dp0 %s' % intf )

    # Note: controller and switch are in root namespace, and we

    # can connect via loopback interface

    #switch0.cmd( 'ovs-vsctl set-controller dp0 tcp:127.0.0.1:6633' )

    print switch0.cmd(r'ovs-vsctl show')

    print switch0.cmd(r'ovs-ofctl add-flow dp0 idle_timeout=0,priority=1,in_port=1,actions=flood' )

    print switch0.cmd(r'ovs-ofctl add-flow dp0 idle_timeout=0,priority=1,in_port=2,actions=flood' )

    print switch0.cmd(r'ovs-ofctl add-flow dp0 idle_timeout=0,priority=1,in_port=3,actions=flood' )

    print switch0.cmd(r'ovs-ofctl add-flow dp0 idle_timeout=0,priority=10,ip,nw_dst=192.168.123.1,actions=output:1' )

    print switch0.cmd(r'ovs-ofctl add-flow dp0 idle_timeout=0,priority=10,ip,nw_dst=192.168.123.2,actions=output:2' )

    print switch0.cmd(r'ovs-ofctl add-flow dp0 idle_timeout=0,priority=10,ip,nw_dst=192.168.123.3,actions=output:3')

    #switch0.cmd('tcpdump -i s0-eth0 -U -w aaa &')

    #h0.cmd('tcpdump -i h0-eth0 -U -w aaa &')

    info( "*** Running test\n" )

    h0.cmdPrint( 'ping -c 3 ' + h1.IP() )

    h0.cmdPrint( 'ping -c 3 ' + h2.IP() )

    #print switch0.cmd( 'ovs-ofctl show dp0' )

    #print switch0.cmd( 'ovs-ofctl dump-tables  dp0' )

    #print switch0.cmd( 'ovs-ofctl dump-ports   dp0' )

    #print switch0.cmd( 'ovs-ofctl dump-flows  dp0' )

    #print switch0.cmd( 'ovs-ofctl dump-aggregate  dp0' )

    #print switch0.cmd( 'ovs-ofctl queue-stats dp0' )

    info( "*** Stopping network\n" )

    switch0.cmd( 'ovs-vsctl del-br dp0' )

    switch0.deleteIntfs()

    info( '\n' )

if __name__ == '__main__':

    setLogLevel( 'info' )

    info( '*** Scratch network demo (kernel datapath)\n' )

    Mininet.init()

    myNet()
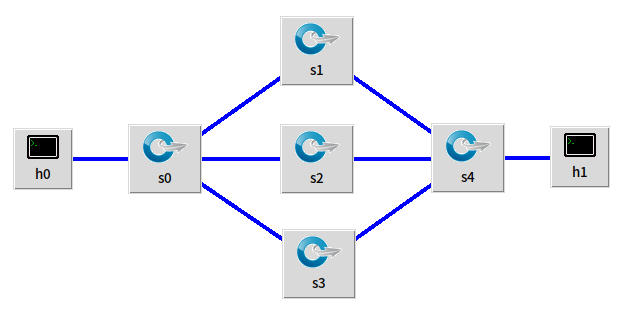
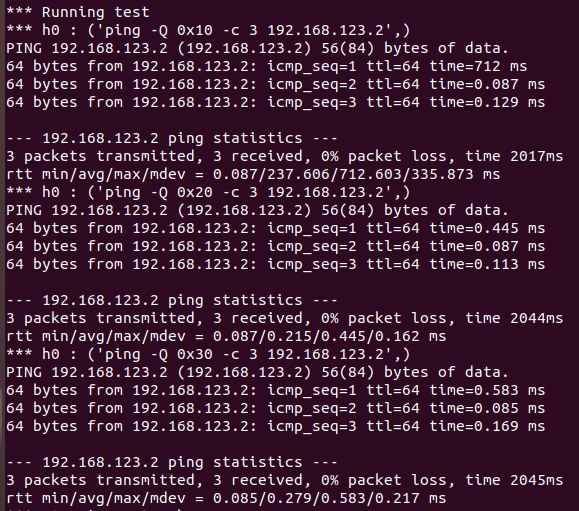
( 2 ) 创建 ovsMultiBr.py 脚本并添加内容,代码参考 SDNLAB 脚本对应的拓扑如上图所示,执行 ovsMultiBr.py,在没有控制器的情况下,在Mininet 脚本中通过调用 ovs 命令给多个交换机下发流表,通过 h0 ping h1 操作测试验证主机间的连通性,并通过 -Q 参数设置不通的 tos 值查看主机间的连通性。通过验证发现,tos 值设置越大,时间使用越少。

# ovsMultiBr.py

#!/usr/bin/python

from mininet.net import Mininet

from mininet.node import Node

from mininet.link import TCLink

from mininet.log import  setLogLevel, info

def myNet():

    "Create network from scratch using Open vSwitch."

    info( "*** Creating nodes\n" )

    switch0 = Node( 's0', inNamespace=False )

    switch1 = Node( 's1', inNamespace=False )

    switch2 = Node( 's2', inNamespace=False )

    switch3 = Node( 's3', inNamespace=False )

    switch4 = Node( 's4', inNamespace=False )

    h0 = Node( 'h0' )

    h1 = Node( 'h1' )

    info( "*** Creating links\n" )

    linkopts0=dict(bw=100, delay='1ms', loss=0)

    linkopts1=dict(bw=1, delay='100ms', loss=0)

    linkopts2=dict(bw=10, delay='50ms', loss=0)

    linkopts3=dict(bw=100, delay='1ms', loss=0)

    TCLink( h0, switch0, **linkopts0)

    TCLink( switch0, switch1, **linkopts0)

    TCLink( switch0, switch2, **linkopts0)

    TCLink( switch0, switch3, **linkopts0)

    TCLink( switch1, switch4,**linkopts1)

    TCLink( switch2, switch4,**linkopts2)

    TCLink( switch3, switch4,**linkopts3)

    TCLink( h1, switch4, **linkopts0)

    info( "*** Configuring hosts\n" )

    h0.setIP( '192.168.123.1/24' )

    h1.setIP( '192.168.123.2/24' )

    info( str( h0 ) + '\n' )

    info( str( h1 ) + '\n' )

    info( "*** Starting network using Open vSwitch\n" )

    switch0.cmd( 'ovs-vsctl del-br dp0' )

    switch0.cmd( 'ovs-vsctl add-br dp0' )

    switch1.cmd( 'ovs-vsctl del-br dp1' )

    switch1.cmd( 'ovs-vsctl add-br dp1' )

    switch2.cmd( 'ovs-vsctl del-br dp2' )

    switch2.cmd( 'ovs-vsctl add-br dp2' )

    switch3.cmd( 'ovs-vsctl del-br dp3' )

    switch3.cmd( 'ovs-vsctl add-br dp3' )

    switch4.cmd( 'ovs-vsctl del-br dp4' )

    switch4.cmd( 'ovs-vsctl add-br dp4' )

    for intf in switch0.intfs.values():

        print intf

        print switch0.cmd( 'ovs-vsctl add-port dp0 %s' % intf )

    for intf in switch1.intfs.values():

        print intf

        print switch1.cmd( 'ovs-vsctl add-port dp1 %s' % intf )

    for intf in switch2.intfs.values():

        print intf

        print switch2.cmd( 'ovs-vsctl add-port dp2 %s' % intf )

    for intf in switch3.intfs.values():

        print intf

        print switch3.cmd( 'ovs-vsctl add-port dp3 %s' % intf )

    for intf in switch4.intfs.values():

        print intf

        print switch4.cmd( 'ovs-vsctl add-port dp4 %s' % intf )

    print switch1.cmd(r'ovs-ofctl add-flow dp1 idle_timeout=0,priority=1,in_port=1,actions=flood' )

    print switch1.cmd(r'ovs-ofctl add-flow dp1 idle_timeout=0,priority=1,in_port=1,actions=output:2' )

    print switch1.cmd(r'ovs-ofctl add-flow dp1 idle_timeout=0,priority=1,in_port=2,actions=output:1' )

    print switch2.cmd(r'ovs-ofctl add-flow dp2 idle_timeout=0,priority=1,in_port=1,actions=output:2' )

    print switch2.cmd(r'ovs-ofctl add-flow dp2 idle_timeout=0,priority=1,in_port=2,actions=output:1' )

    print switch3.cmd(r'ovs-ofctl add-flow dp3 idle_timeout=0,priority=1,in_port=1,actions=output:2' )

    print switch3.cmd(r'ovs-ofctl add-flow dp3 idle_timeout=0,priority=1,in_port=2,actions=output:1' )

    print switch4.cmd(r'ovs-ofctl add-flow dp4 idle_timeout=0,priority=1,in_port=1,actions=output:4' )

    print switch4.cmd(r'ovs-ofctl add-flow dp4 idle_timeout=0,priority=1,in_port=2,actions=output:4' )

    print switch4.cmd(r'ovs-ofctl add-flow dp4 idle_timeout=0,priority=1,in_port=3,actions=output:4' )

    print switch4.cmd(r'ovs-ofctl add-flow dp4 idle_timeout=0,priority=1,in_port=4,actions=output:3' )

    #print switch0.cmd(r'ovs-ofctl add-flow dp0 idle_timeout=0,priority=10,ip,nw_dst=192.168.123.2,actions=output:4')

    print switch0.cmd(r'ovs-ofctl add-flow dp0 idle_timeout=0,priority=10,ip,nw_dst=192.168.123.2,nw_tos=0x10,actions=output:2')

    print switch0.cmd(r'ovs-ofctl add-flow dp0 idle_timeout=0,priority=10,ip,nw_dst=192.168.123.2,nw_tos=0x20,actions=output:3')

    print switch0.cmd(r'ovs-ofctl add-flow dp0 idle_timeout=0,priority=10,ip,nw_dst=192.168.123.2,nw_tos=0x30,actions=output:4')

    #print switch0.cmd(r'ovs-ofctl add-flow dp0 idle_timeout=0,priority=10,ip,nw_dst=192.168.123.1,actions=output:1')

    #switch0.cmd('tcpdump -i s0-eth0 -U -w aaa &')

    #h0.cmd('tcpdump -i h0-eth0 -U -w aaa &')

    info( "*** Running test\n" )

    h0.cmdPrint( 'ping -Q 0x10 -c 3 ' + h1.IP() )

    h0.cmdPrint( 'ping -Q 0x20 -c 3 ' + h1.IP() )

    h0.cmdPrint( 'ping -Q 0x30 -c 3 ' + h1.IP() )

    #h1.cmdPrint('iperf -s -p 12345 -u &')

    #h0.cmdPrint('iperf -c ' + h1.IP() +' -u -b 10m -p 12345 -t 10 -i 1')

    #print switch0.cmd( 'ovs-ofctl show dp0' )

    #print switch1.cmd( 'ovs-ofctl show dp1' )

    #print switch2.cmd( 'ovs-ofctl show dp2' )

    #print switch3.cmd( 'ovs-ofctl show dp3' )

    #print switch4.cmd( 'ovs-ofctl show dp4' )

    #print switch0.cmd( 'ovs-ofctl dump-tables  dp0' )

    #print switch0.cmd( 'ovs-ofctl dump-ports   dp0' )

    #print switch0.cmd( 'ovs-ofctl dump-flows  dp0' )

    #print switch0.cmd( 'ovs-ofctl dump-aggregate  dp0' )

    #print switch0.cmd( 'ovs-ofctl queue-stats dp0' )

    #print "Testing video transmission between h1 and h2"

    #h1.cmd('./myrtg_svc -u > myrd &')

    #h0.cmd('./mystg_svc -trace st 192.168.123.2')

    info( "*** Stopping network\n" )

    switch0.cmd( 'ovs-vsctl del-br dp0' )

    switch0.deleteIntfs()

    switch1.cmd( 'ovs-vsctl del-br dp1' )

    switch1.deleteIntfs()

    switch2.cmd( 'ovs-vsctl del-br dp2' )

    switch2.deleteIntfs()

    switch3.cmd( 'ovs-vsctl del-br dp3' )

    switch3.deleteIntfs()

    switch4.cmd( 'ovs-vsctl del-br dp4' )

    switch4.deleteIntfs()

    info( '\n' )

if __name__ == '__main__':

    setLogLevel( 'info' )

    info( '*** Scratch network demo (kernel datapath)\n' )

    Mininet.init()

    myNet()
四 、实验 要求
1. 学习 ovsSingleBr.py 和 ovsMultiBr.py,在下图拓扑中实现一个 VLAN。
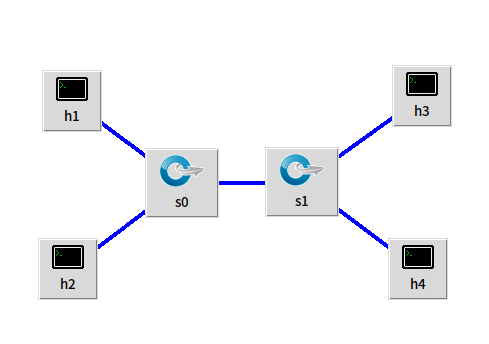
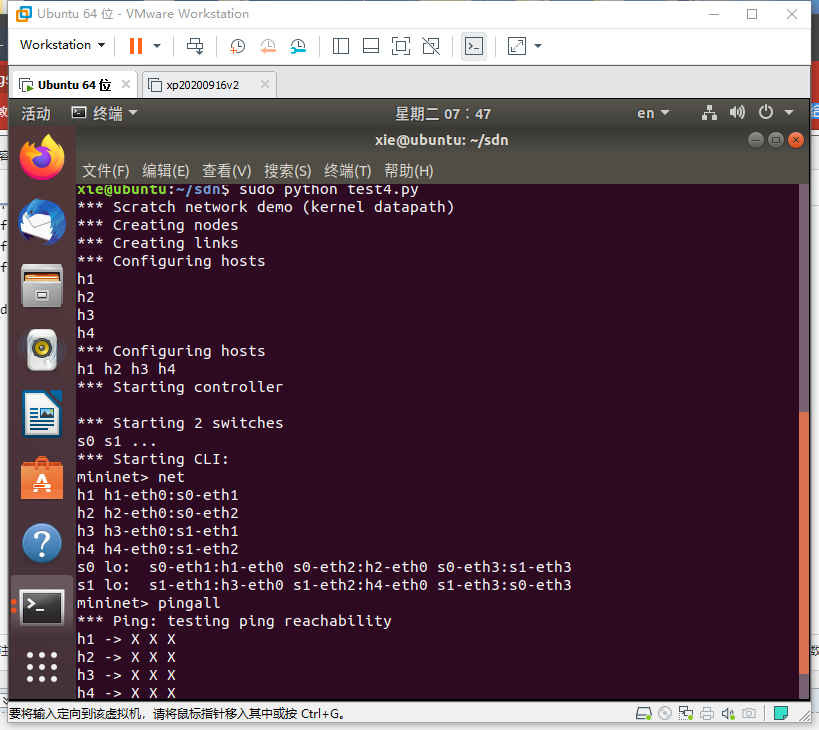
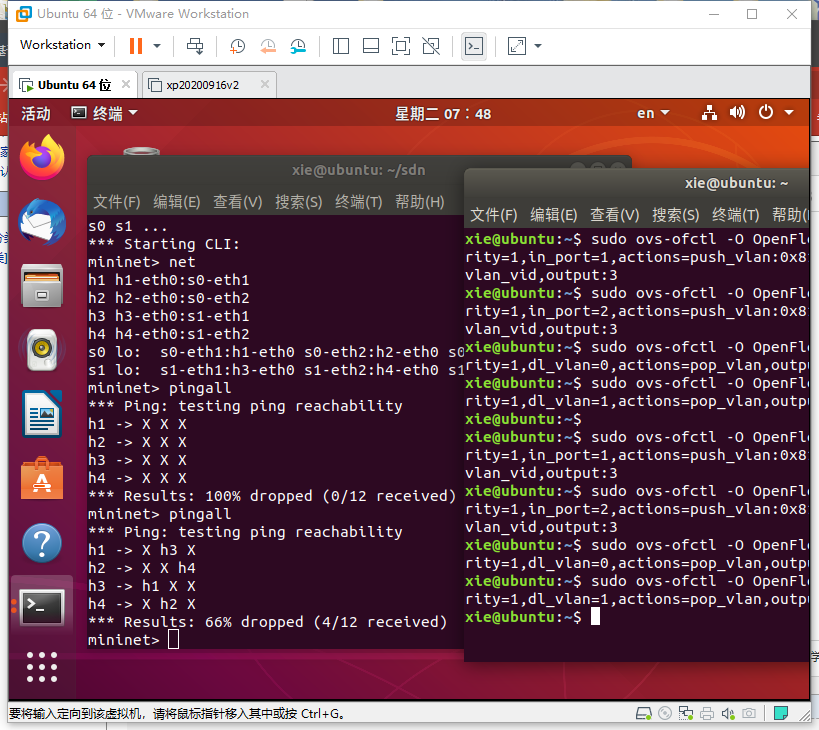
上述代码将 h0 和 h2 划分在 VLAN0 中,h1 和 h3 划分在 VLAN1 中,由于拓扑没有控制器,并且初始化时删除了交换机中的所有流表,因此除非下发流表,否则主机之间网络无法连通。请尝试修改代码,利用 ovs 命令直接下发 VLAN 设置的流表项,最终测试 h0 和 h2 互通,h1 和 h3 互通,其余主机均不通,结果如下图。
(这里用h1和h3互通,h2和h4互通)
# test4.py

# coding=UTF-8

#!/usr/bin/python

from mininet.net import Mininet

from mininet.link import TCLink

from mininet.node import Node

from mininet.log import setLogLevel, info

from mininet.cli import CLI

def test4():

    "Create network from scratch using Open vSwitch."

    net = Mininet()

    info( "*** Creating nodes\n" )

    switch0 = net.addSwitch( 's0' )

    switch1 = net.addSwitch( 's1' )

    h1 = net.addHost( 'h1' )

    h2 = net.addHost( 'h2' )

    h3 = net.addHost( 'h3' )

    h4 = net.addHost( 'h4' )

    info( "*** Creating links\n" )

    net.addLink( h1, switch0 )

    net.addLink( h2, switch0 )

    net.addLink( h3, switch0 )

    net.addLink( h4, switch0 )

    net.addLink( switch1, switch0 )

    info( "*** Configuring hosts\n" )

    h1.setIP( '192.168.123.1/24' )

    h2.setIP( '192.168.123.2/24' )

    h3.setIP( '192.168.123.3/24' )

    h4.setIP( '192.168.123.4/24' )

    info( str( h1 ) + '\n' )

    info( str( h2 ) + '\n' )

    info( str( h3 ) + '\n' )

    info( str( h4 ) + '\n' )

    net.start()

    CLI(net)

    net.stop()

if __name__=='__main__':

    setLogLevel( 'info' )

    info( '*** Scratch network demo (kernel datapath)\n' )

    Mininet.init()

    test4()
sudo ovs-ofctl -O OpenFlow13 add-flow s0 priority=1,in_port=1,actions=push_vlan:0x8100,set_field:4096-\>vlan_vid,output:3

sudo ovs-ofctl -O OpenFlow13 add-flow s0 priority=1,in_port=2,actions=push_vlan:0x8100,set_field:4097-\>vlan_vid,output:3

sudo ovs-ofctl -O OpenFlow13 add-flow s0 priority=1,dl_vlan=0,actions=pop_vlan,output:1

sudo ovs-ofctl -O OpenFlow13 add-flow s0 priority=1,dl_vlan=1,actions=pop_vlan,output:2

sudo ovs-ofctl -O OpenFlow13 add-flow s1 priority=1,in_port=1,actions=push_vlan:0x8100,set_field:4096-\>vlan_vid,output:3

sudo ovs-ofctl -O OpenFlow13 add-flow s1 priority=1,in_port=2,actions=push_vlan:0x8100,set_field:4097-\>vlan_vid,output:3

sudo ovs-ofctl -O OpenFlow13 add-flow s1 priority=1,dl_vlan=0,actions=pop_vlan,output:1

sudo ovs-ofctl -O OpenFlow13 add-flow s1 priority=1,dl_vlan=1,actions=pop_vlan,output:2
OVS 实现 VLAN 可参考博客:https://www.cnblogs.com/fjlinww/p/11791846.html
实验 4 :Open vSwitch 实验 —— Mininet 中使用 OVS 命令的更多相关文章
- 软件定义网络实验记录④--Open vSwitch 实验——Mininet 中使用 OVS 命令
一.实验目的 Mininet 安装之后,会连带安装 Open vSwitch,可以直接通过 Python 脚本调用 Open vSwitch 命令,从而直接控制 Open vSwitch,通过实验了解 ...
- 实验 4:Open vSwitch 实验——Mininet 中使用 OVS 命令
一.安装目的 Mininet 安装之后,会连带安装 Open vSwitch,可以直接通过 Python 脚本调用Open vSwitch 命令,从而直接控制 Open vSwitch,通过实验了解调 ...
- 实验 4:Open vSwitch 实验——Mininet 中使用 OVS 命令
一.实验目的 Mininet 安装之后,会连带安装 Open vSwitch,可以直接通过 Python 脚本调用Open vSwitch 命令,从而直接控制 Open vSwitch,通过实验了解调 ...
- Android实验一(在Android Studio中创建项目和模拟器)
北京电子科技学院(BESTI) 实 验 报 告 课程:移动平台开发 班级:1592 姓名:苏泽楠 学号:20159207 成绩: 指导教师 ...
- SDUT OJ 数据结构实验之二叉树八:(中序后序)求二叉树的深度
数据结构实验之二叉树八:(中序后序)求二叉树的深度 Time Limit: 1000 ms Memory Limit: 65536 KiB Submit Statistic Discuss Probl ...
- SDUT-2804_数据结构实验之二叉树八:(中序后序)求二叉树的深度
数据结构实验之二叉树八:(中序后序)求二叉树的深度 Time Limit: 1000 ms Memory Limit: 65536 KiB Problem Description 已知一颗二叉树的中序 ...
- 实验 6 :OpenDaylight 实验——OpenDaylight 及 Postman实现流表下发
实验 6 :OpenDaylight 实验--OpenDaylight 及 Postman实现流表下发 一.实验目的 熟悉 Postman 的使用:熟悉如何使用 OpenDaylight 通过 Pos ...
- [nRF51822] 10、基础实验代码解析大全 · 实验15 - RTC
一.实验内容: 配置NRF51822 的RTC0 的TICK 频率为8Hz,COMPARE0 匹配事件触发周期为3 秒,并使能了TICK 和COMPARE0 中断. TICK 中断中驱动指示灯D1 翻 ...
- [nRF51822] 9、基础实验代码解析大全 · 实验12 - ADC
一.本实验ADC 配置 分辨率:10 位. 输入通道:5,即使用输入通道AIN5 检测电位器的电压. ADC 基准电压:1.2V. 二.NRF51822 ADC 管脚分布 NRF51822 的ADC ...
随机推荐
- py脚本 获取当前运行服务的相关信息
一.简介 最近在统计系统中都部署了什么服务,但服务器太多,在没有标准化之前进行整理,还是写脚本收集方便一些. 当然还是需要人工去判断整理表格,为后面标准化做准备.脚本是python2.7的,默认的ce ...
- pycharm的破解和基本使用
pycharm的破解 pycharm的账号注册 在完成安装后打开pycharm软件,需要选择购买或是使用.点击试用,选择进入官网注册账号. 进入官网后选择邮箱登录,输入自己的邮箱,点击sign up ...
- sctf_2019_easy_heap(off-by-null在2.27的利用)
题目的例行检查我就不放了 将程序放入ida中 漏洞也较为明显 可以看到 if这里多一个null ,明显的off by null 漏洞 程序在最开始的地方给了我们一个很大的空间,并且权限是rwx,所以我 ...
- 【Redis的那些事 · 上篇】Redis的介绍、五种数据结构演示和分布式锁
Redis是什么 Redis,全称是Remote Dictionary Service,翻译过来就是,远程字典服务. redis属于nosql非关系型数据库.Nosql常见的数据关系,基本上是以key ...
- 『忘了再学』Shell基础 — 2、Shell的作用与分类
目录 1.Shell的作用 2.Shell的分类 1.Shell的作用 Shell除了能解释用户输入的命令,将它传递给内核,还可以: 调用其他程序,给其他程序传递数据或参数,并获取程序的处理结果. 在 ...
- 新建任务(Project)
<Project2016 企业项目管理实践>张会斌 董方好 编著 新建任务,这操作简单得就跟在Excel的单元格里输入个数据一样,不过也不是一点讲究都没有. 首先得选对视图. 不是所有的视 ...
- CF1428A Box is Pull 题解
Content 有一个兔子拖着一个盒子在走,每秒钟可以带着盒子走一个单位,也可以不带着盒子走一个单位.当且仅当兔子和盒子的距离不超过 \(1\) 时可以带着盒子走一个单位.现给出 \(t\) 次询问, ...
- 前端文本框插件KindEditor
KindEditor 1.进入官网 2.下载 官网下载:http://kindeditor.net/down.php 本地下载:http://files.cnblogs.com/files/wup ...
- SpringBoot简单整合Actuator监控
pom依赖 <dependency> <groupId>org.springframework.boot</groupId> <artifactId>s ...
- 串口之完整封装包含发送和接收(windows+ubuntu已通过初步测试)(持续更新)
这里下载源码 更新日志 16-08-2021 V1.0.3 1.修复接收数据没有将数据传递给应用层的bug 2.windows版本:设置接收数据相邻字节间间隔为5ms 24-09-2020 V1.0. ...