java框架之SpringBoot(14)-任务
使用 maven 创建 SpringBoot 项目,引入 Web 场景启动器。
异步任务
1、编写异步服务类,注册到 IoC 容器:
package zze.springboot.task.service;

import org.springframework.scheduling.annotation.Async;
import org.springframework.stereotype.Service;

@Service
public class AsyncService {
    @Async // 标识方法将会异步执行
    public void hello() {
        try {
            Thread.sleep();
        } catch (InterruptedException e) {
            e.printStackTrace();
        }
        System.out.println("hello");
    }
}
zze.springboot.task.service.AsyncService
2、使用注解开启异步任务支持:
package zze.springboot.task;

import org.springframework.boot.SpringApplication;
import org.springframework.boot.autoconfigure.SpringBootApplication;
import org.springframework.scheduling.annotation.EnableAsync;

@EnableAsync // 开启异步任务支持
@SpringBootApplication
public class TaskApplication {

    public static void main(String[] args) {
        SpringApplication.run(TaskApplication.class, args);
    }

}
zze.springboot.task.TaskApplication
3、编写控制器测试:
package zze.springboot.task.controller;

import org.springframework.beans.factory.annotation.Autowired;
import org.springframework.web.bind.annotation.GetMapping;
import org.springframework.web.bind.annotation.RestController;
import zze.springboot.task.service.AsyncService;

@RestController
public class AsyncController {

    @Autowired
    private AsyncService asyncService;

    @GetMapping("/hello")
    public String testAsyncHello(){
        asyncService.hello();
        return "执行完毕";
        /*
        访问 localhost:8080/hello
            a、立即返回了 “执行完毕”,并没有因为 asyncService.hello() 方法中的线程 sleep 等待 3 秒。
            b、3 秒后控制台输出 hello
        OK,异步任务执行成功
         */
    }
}
zze.springboot.task.controller.AsyncController
定时任务
1、编写定时任务类,使用 Cron 表达式指定任务执行时机,注册到 IoC 容器:
package zze.springboot.task.service;

import org.springframework.scheduling.annotation.Scheduled;
import org.springframework.stereotype.Service;

import java.text.SimpleDateFormat;
import java.util.Date;

@Service
public class ScheduleService {
    @Scheduled(cron = "*/3 * * * * ?")  // 编写 cron 表达式,每 3 秒执行一次
    public void test(){
        Date now = new Date();
        SimpleDateFormat timeFormat = new SimpleDateFormat("HH:mm:ss");
        System.out.println(timeFormat.format(now));
    }
}
zze.springboot.task.service.ScheduleService
2、使用注解开启定时任务支持:
package zze.springboot.task;

import org.springframework.boot.SpringApplication;
import org.springframework.boot.autoconfigure.SpringBootApplication;
import org.springframework.scheduling.annotation.EnableScheduling;

@EnableScheduling // 开启定时任务支持
@SpringBootApplication
public class TaskApplication {

    public static void main(String[] args) {
        SpringApplication.run(TaskApplication.class, args);
    }

}
zze.springboot.task.TaskApplication
3、启动项目测试:
hello at ::
hello at ::
hello at ::
hello at ::
/*
每间隔 3 秒控制台会执行 hello 方法
*/
test
SpringBoot 中的定时任务 Cron 表达式与任务调度框架 Quartz 的 Cron 表达式规则相似,可参考【Quartz 表达式】。
但它们有一处区别是:
- SpringBoot 任务的 Cron 表达式中星期部分 1-6 为周一到周六,0 和 7都为周日。
- Quartz 框架的 Cron 表达式中星期部分 1-7 为周日到周六。
邮件任务
邮件的自动配置类为 org.springframework.boot.autoconfigure.mail.MailSenderAutoConfiguration 。
下面以 QQ 邮箱给 GMail 邮箱发送邮件为例。
1、引入 Mail 场景启动器:
<dependency>
    <groupId>org.springframework.boot</groupId>
    <artifactId>spring-boot-starter-mail</artifactId>
</dependency>
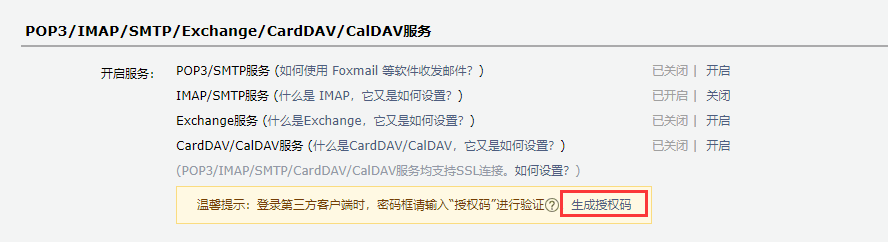
2、获取 qq 邮箱授权码,登录进入 qq 邮箱,进入设置,选择账户,选择生成授权码:
3、邮箱相关配置:
spring.mail.username=632404164@qq.com
// 使用生成的授权码
spring.mail.password=nffutccjfabdbchc
spring.mail.host=smtp.qq.com

# qq 邮箱需要开启 ssl
spring.mail.properties.mail.smtp.sll.enable=true
application.properties
4、测试:
package zze.springboot.mail;

import org.junit.Test;
import org.junit.runner.RunWith;
import org.springframework.beans.factory.annotation.Autowired;
import org.springframework.boot.test.context.SpringBootTest;
import org.springframework.mail.SimpleMailMessage;
import org.springframework.mail.javamail.JavaMailSender;
import org.springframework.mail.javamail.MimeMessageHelper;
import org.springframework.test.context.junit4.SpringRunner;

import javax.mail.MessagingException;
import javax.mail.internet.MimeMessage;
import java.io.File;

@RunWith(SpringRunner.class)
@SpringBootTest
public class MailApplicationTests {

    @Autowired
    JavaMailSender javaMailSender;

    // 发送普通文本内容
    @Test
    public void test1() {
        SimpleMailMessage mailMessage = new SimpleMailMessage();
        // 设置邮件标题
        mailMessage.setSubject("标题");
        // 设置邮件内容
        mailMessage.setText("hello");

        mailMessage.setFrom("632404164@qq.com");
        mailMessage.setTo("zhangzhongen326@gmail.com");
        javaMailSender.send(mailMessage);
    }

    // 发送 html 内容带附件
    @Test
    public void test2() throws MessagingException {
        MimeMessage mimeMessage = javaMailSender.createMimeMessage();
        MimeMessageHelper mimeMessageHelper = new MimeMessageHelper(mimeMessage, true);
        // 设置标题
        mimeMessageHelper.setSubject("标题");
        // 设置内容
        mimeMessageHelper.setText("<font color='red'>hello</font>",true);

        // 设置附件,可设置多个
        mimeMessageHelper.addAttachment("1.jpg", new File("C:\\Users\\Administrator\\Desktop\\1mail.png"));

        mimeMessageHelper.setFrom("632404164@qq.com");
        mimeMessageHelper.setTo("zhangzhongen326@gmail.com");
        javaMailSender.send(mimeMessage);
    }

}
test
java框架之SpringBoot(14)-任务的更多相关文章
- java框架之SpringBoot(1)-入门
简介 Spring Boot 用来简化 Spring 应用开发,约定大于配置,去繁从简,just run 就能创建一个独立的.产品级别的应用. 背景: J2EE 笨重的开发.繁多的配置.低下的开发效率 ...
- java框架之SpringBoot(2)-配置
规范 SpringBoot 使用一个全局的配置文件,配置文件名固定为 application.properties 或 application.yml .比如我们要配置程序启动使用的端口号,如下: s ...
- java框架之SpringBoot(3)-日志
市面上的日志框架 日志抽象层 日志实现 JCL(Jakarta Commons Logging).SLF4J(Simple Logging Facade For Java).JBoss-Logging ...
- java框架之SpringBoot(4)-资源映射&thymeleaf
资源映射 静态资源映射 查看 SpringMVC 的自动配置类,里面有一个配置静态资源映射的方法: @Override public void addResourceHandlers(Resource ...
- java框架之SpringBoot(5)-SpringMVC的自动配置
本篇文章内容详细可参考官方文档第 29 节. SpringMVC介绍 SpringBoot 非常适合 Web 应用程序开发.可以使用嵌入式 Tomcat,Jetty,Undertow 或 Netty ...
- java框架之SpringBoot(15)-安全及整合SpringSecurity
SpringSecurity介绍 Spring Security 是针对 Spring 项目的安全框架,也是 Spring Boot 底层安全模块默认的技术选型.它可以实现强大的 Web 安全控制.对 ...
- java框架之SpringBoot(16)-分布式及整合Dubbo
前言 分布式应用 在分布式系统中,国内常用 Zookeeper + Dubbo 组合,而 SpringBoot 推荐使用 Spring 提供的分布式一站式解决方案 Spring + SpringBoo ...
- Java - 框架之 SpringBoot 攻略day01
Spring-Boot 攻略 day01 spring-boot 一. 基本配置加运行 1. 导入配置文件(pom.xml 文件中) <parent> <gr ...
- 【java框架】SpringBoot(5)--SpringBoot整合分布式Dubbo+Zookeeper
1.理论概述 1.1.分布式 分布式系统是若干独立计算机的集合,这些计算机对于用户来讲就像单个系统. 由多个系统集成成一个整体,提供多个功能,组合成一个板块,用户在使用上看起来是一个服务.(比如淘宝网 ...
随机推荐
- 国外优秀C/C++网站
1.https://en.cppreference.com/w/ 2.https://www.geeksforgeeks.org/ 3.https://www.tutorialspoint.com/c ...
- fiddler的编程文章
https://www.cnblogs.com/trevan/p/9487223.html https://www.cnblogs.com/rufus-hua/p/5275980.html https ...
- Fluent动网格【9】:区域运动
本文所述的区域运动并非动网格中的运动域,而是指在多参考系(MRF)或滑移网格中所涉及到的区域的运动. 在滑移网格中指定区域运动时,除了能够指定绝对运动外,还能指定某一区域与其他区域间的相对运动,如图所 ...
- Cobalt Strike DNS通讯实例
一.域名设置 如果没有域名,可以参考另一篇博客,申请Freenom免费域名,并使用DNSPod解析 链接:https://www.cnblogs.com/ssooking/p/6364639.html ...
- 深度学习基础(CNN详解以及训练过程1)
深度学习是一个框架,包含多个重要算法: Convolutional Neural Networks(CNN)卷积神经网络 AutoEncoder自动编码器 Sparse Coding稀疏编码 Rest ...
- Linux 文件特殊权限_013
***Linux 系统文件除了9位基本权限,还有额外3位特殊权限,分别是SUID(setuid),SGID(setgid),SBIT(sticky bit) 一.Linux 系统文件3位特殊权限位说明 ...
- [踩坑日记]spring mvc
目录 找不到javax.servlet.ServletException的类文件 idea 清除tomcat缓存 IOException parsing XML document from Servl ...
- 【Jenkins】Jenkins安装
下载rpm包 wget http://pkg.jenkins-ci.org/redhat-stable/jenkins-2.7.3-1.1.noarch.rpm 安装 rpm -ivh jenkins ...
- LeetCode - 804. Unique Morse Code Words
International Morse Code defines a standard encoding where each letter is mapped to a series of dots ...
- vue2中使用transition
最终效果为 div元素从右向左出现, 然后从左向右消失. transition标签包裹要移动的元素: css 样式: 其中: 1: 为div元素显示时的状态 2: 为div元素移动的过程 (进入 ...