基于Verilog的按键检测实验
一、模块框图及基本思路
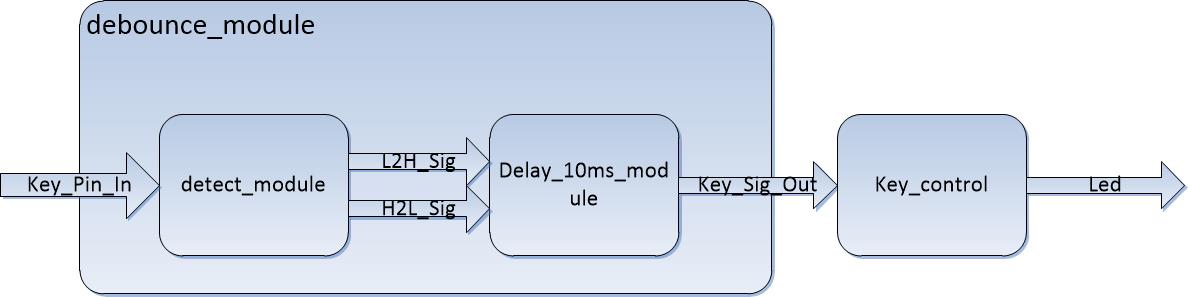
detect_module:检测按键输入脚的电平边沿变化
delay_10ms_module:延时消抖,输出按键有效信号
debounce_module:前两个模块的组合模块
key_control:按键信号控制Led
key_demo:顶层模块
二、软件部分
detect_module.v
 module detect_module(

     CLK,RSTn,

     Key_Pin_In,

     H2L_Sig,L2H_Sig

     );

     input CLK,RSTn;

     input Key_Pin_In;

     output H2L_Sig,L2H_Sig;

     /****************************************************/

     localparam T100us=50_000_000/1_000_000*-;

     reg [:] Count_100us;

     reg isEn;

     always @(posedge CLK or negedge RSTn)

     begin

         if(!RSTn)

         begin

             Count_100us<='d0;

             isEn<='b0;

         end

         else if(Count_100us==T100us)

             isEn<='b1;

         else Count_100us<=Count_100us+'b1;

     end

     /****************************************************/

     reg H2L_Sig_r1,H2L_Sig_r2;

     reg L2H_Sig_r1,L2H_Sig_r2;

     always @(posedge CLK or negedge RSTn)

     begin

         if(!RSTn)

         begin

             H2L_Sig_r1<='b1;

             H2L_Sig_r2<='b1;

             L2H_Sig_r1<='b0;

             L2H_Sig_r2<='b0;

         end

         else

         begin

             H2L_Sig_r1<=Key_Pin_In;

             H2L_Sig_r2<=H2L_Sig_r1;

             L2H_Sig_r1<=Key_Pin_In;

             L2H_Sig_r2<=L2H_Sig_r1;

         end

     end

     /****************************************************/

     assign H2L_Sig=isEn?(H2L_Sig_
delay_10ms_module.v
 module delay10ms_module(

     CLK,RSTn,

     H2L_Sig,L2H_Sig,

     Key_Sig_Out

     );

      input CLK,RSTn;

      input H2L_Sig,L2H_Sig;

      output Key_Sig_Out;

      /**********************************************/

      localparam T10ms=50_000_000/*-;

      reg[:] Count_10ms;

      reg isCount;

      always @(posedge CLK or negedge RSTn)

      begin

         if(!RSTn)

         begin

             Count_10ms<='d0;

         end

         else if(Count_10ms==T10ms) Count_10ms<='d0;

         else if(isCount) Count_10ms<=Count_10ms+'b1;

      end

      /**********************************************/

      reg Key_Sig_Out_r;

      reg [:]i;

      always @(posedge CLK or negedge RSTn)

      begin

         if(!RSTn)

         begin

             Key_Sig_Out_r<=;

             i<=;

             isCount<='b0;

         end

         else

             case(i)

                 'd0:if(H2L_Sig) i<=2'd1;

                         else if(L2H_Sig) i<='d2;

                 'd1:if(Count_10ms==T10ms) begin Key_Sig_Out_r<=1'b1;isCount<='b0;i<=2'd0;end

                         else isCount<='b1;

                 'd2:if(Count_10ms==T10ms) begin Key_Sig_Out_r<=1'b0;isCount<='b0;i<=2'd0;end

                         else isCount<='b1;

             endcase

      end

      /***************************************************/

     assign Key_Sig_Out=Key_Sig_Out_r;

 endmodule
debounce_module.v
 module debounce_module(

     CLK,RSTn,

     Key_Pin_In,

     Key_Sig_Out

     );

      input CLK,RSTn;

      input Key_Pin_In;

      output Key_Sig_Out;

     wire H2L_Sig;

     wire L2H_Sig;

     detect_module U0(

         .CLK(CLK),

         .RSTn(RSTn),

         .Key_Pin_In(Key_Pin_In),

         .H2L_Sig(H2L_Sig),

         .L2H_Sig(L2H_Sig)

     );

     delay10ms_module U1(

         .CLK(CLK),

         .RSTn(RSTn),

         .H2L_Sig(H2L_Sig),

         .L2H_Sig(L2H_Sig),

         .Key_Sig_Out(Key_Sig_Out)

     );

 endmodule
key_control.v
 module key_control(

     CLK,RSTn,

     Key_Sig,

     Led

     );

      input CLK,RSTn;

      input Key_Sig;

      output Led;

      /***********************************/

      reg Key_Sig_r1,Key_Sig_r2;

      wire Led_Sig;

      always @(posedge CLK or negedge RSTn)

      begin

         if(!RSTn)

         begin

             Key_Sig_r1<='b0;

             Key_Sig_r2<='b0;

         end

         else

         begin

             Key_Sig_r1<=Key_Sig;

             Key_Sig_r2<=Key_Sig_r1;

         end

      end

      assign Led_Sig=Key_Sig_r1&!Key_Sig_r2;

      /************************************/

      reg rLed;

      always @(posedge CLK or negedge RSTn )

      begin

          if(!RSTn) rLed<='b0;

          else if(Led_Sig) rLed<=~rLed;

      end

     assign Led=rLed;

 endmodule
key_demo.v
 module key_demo(

     CLK,RSTn,

     Key_Pin_In,Led

     );

      input CLK,RSTn;

      input [:]Key_Pin_In;

      output [:]Led;

     wire Key_Sig1;

     key_control U0 (

         .CLK(CLK),

         .RSTn(RSTn),

         .Key_Sig(Key_Sig1),

         .Led(Led[])

     );

     debounce_module U1 (

         .CLK(CLK),

         .RSTn(RSTn),

         .Key_Pin_In(Key_Pin_In[]),

         .Key_Sig_Out(Key_Sig1)

     );

     wire Key_Sig2;

     key_control U2 (

         .CLK(CLK),

         .RSTn(RSTn),

         .Key_Sig(Key_Sig2),

         .Led(Led[])

     );

     debounce_module U3 (

         .CLK(CLK),

         .RSTn(RSTn),

         .Key_Pin_In(Key_Pin_In[]),

         .Key_Sig_Out(Key_Sig2)

     );

    wire Key_Sig3;

     key_control U4 (

         .CLK(CLK),

         .RSTn(RSTn),

         .Key_Sig(Key_Sig3),

         .Led(Led[])

     );

     debounce_module U5 (

         .CLK(CLK),

         .RSTn(RSTn),

         .Key_Pin_In(Key_Pin_In[]),

         .Key_Sig_Out(Key_Sig3)

     );

     wire Key_Sig4;

     key_control U6 (

         .CLK(CLK),

         .RSTn(RSTn),

         .Key_Sig(Key_Sig4),

         .Led(Led[])

     );

     debounce_module U7 (

         .CLK(CLK),

         .RSTn(RSTn),

         .Key_Pin_In(Key_Pin_In[]),

         .Key_Sig_Out(Key_Sig4)

     );

 endmodule
三、硬件部分
黑金SPARTAN-6开发板
 NET "CLK" LOC = T8;

 NET "RSTn" LOC = L3;

 NET "Led[0]" LOC = P4;

 NET "Led[1]" LOC = N5;

 NET "Led[2]" LOC = P5;

 NET "Led[3]" LOC = M6;

 NET "Key_Pin_In[0]" LOC = C3;

 NET "Key_Pin_In[1]" LOC = D3;

 NET "Key_Pin_In[2]" LOC = E4;

 NET "Key_Pin_In[3]" LOC = E3;
基于Verilog的按键检测实验的更多相关文章
- 基于Verilog的带FIFO输出缓冲的串口接收接口封装
一.模块框图及基本思路 rx_module:串口接收的核心模块,详细介绍请见“基于Verilog的串口接收实验” rx2fifo_module:rx_module与rx_fifo之间的控制模块,其功能 ...
- 基于Verilog的带FIFO写入缓冲的串口发送接口封装
一.模块框图及基本思路 tx_module:串口发送的核心模块,详细介绍请参照前面的“基于Verilog的串口发送实验” fifo2tx_module:当fifo不为空时,读取fifo中的数据并使能发 ...
- 第33章 TIM—电容按键检测—零死角玩转STM32-F429系列
第33章 TIM—电容按键检测 全套200集视频教程和1000页PDF教程请到秉火论坛下载:www.firebbs.cn 野火视频教程优酷观看网址:http://i.youku.com/fir ...
- zigbee学习之路(十五):基于协议栈的按键实验
一.前言 经过上次的学习,相信大家已经初步学会使用zigbee协议进行发送和接受数据了.今天,我们要进行的实验是按键的实验,学会如何在协议栈里实现按键中断. 二.实验功能 在协议栈上实现按键中断,BU ...
- 基于Arduino的按键控制LED实验
I/O 口的意思即为INPUT 接口和OUTPUT 接口,到目前为止我们设计的小灯实验都还只是应用到Arduino 的I/O 口的输出功能,这个实验我们来尝试一下使用Arduino的I/O 口的输入功 ...
- 基于Verilog HDL 各种实验
菜鸟做的的小实验链接汇总: 1.基于Verilog HDL 的数字时钟设计 2.乘法器 3.触发器(基本的SR触发器.同步触发器.D触发器) 4.基于Verilog HDL的ADC ...
- 基于Verilog HDL 的数字时钟设计
基于Verilog HDL的数字时钟设计 一.实验内容: 利用FPGA实现数字时钟设计,附带秒表功能及时间设置功能.时间设置由开关S1和S2控制,分别是增和减.开关S3是模式选择:0是正常时钟 ...
- 基于FPGA的按键扫描程序
最近在学习FPGA,就试着写了个按键扫描的程序.虽说有过基于单片机的按键扫描处理经验,对于按键的处理还是有一些概念.但是单片机程序的编写通常都采用C写,也有用汇编,而FPGA却是采用VHDL或者Ver ...
- 基于Verilog HDL 的数字电压表设计
本次实验是在“基于Verilog HDL的ADC0809CCN数据采样”实验上进一步改进,利用ADC0809采集到的8位数据,进行BCD编码,以供查表方式相加进行显示,本次实验用三位数码管. ADC0 ...
随机推荐
- CentOS 6.5系统中安装配置MySQL数据库
就像Windows server 2003,2008中一般安装的是Sql Server 数据库,在linux系统中一般安装的是mysql数据库,而且Mysql数据库的第一个版本就是发行在Linux系统 ...
- 腾讯云主机如何使用root账号登录,不能使用root登录怎么办
1.先用ubuntu账号登录,执行sudo passwd root 2.按要求输入密码,请牢记. 3.执行sudo vi /etc/ssh/sshd_config 4.找到PermitRootLogi ...
- go语言切片切片与指针
go语言 1.切片的定义 切片不是真正意义上的动态数组,是引用类型. var arraySlice []int
- charles License
ubuntu charles 配置 Ubuntu16.04系统Charles的配置 key1: Registered Name: https://zhile.io License Key: 488 ...
- 如何使用JavaScript UI控件(WijmoJS)构建Electron应用程序
概述 What is Electron? Electron是一个使用JavaScript.HTML和CSS构建跨平台桌面应用程序的框架. 您可以将Electron与纯JavaScript或您选择的Ja ...
- jsp/servlet学习五之jsp表达式语言初窥
EL表达式是jsp中最常用的表达式之一.EL表达式以${开头,并以}结束,例如${1+1}.el表达式可以返回任意类型的值,如果el表达式的结果是一个带属性的对象,则可以利用[]或者.运算来访问该属性 ...
- Thinkphph 使用RelationModel的三表关联查询机制
有如下三个表 a表 b表 c表id bid other id cid other id other a表的bid关联b表的id,b表的cid关联c表的id 现在需要查询a表的时候顺带把b表和c表的相关 ...
- js 数组原型
Array.isArray( Array.prototype ) // A. true // B. false // C. error // D. other 答案是A. 其实 Array.proto ...
- mongodb ----> 从入门到。。。
环境: centos6.8,jdk1.8.0_u172,mongodb-4.0.0,spring boot-1.5.15 1.环境搭建 tar -zxvf mongodb-linux-x86_64-r ...
- 异步核心接口IAsyncResult的实现
要实现异步编程,就需要正确的实现IAsyncResult接口.IAsyncResult共有四个属性: public interface IAsyncResult { object AsyncState ...