使用 Nginx + Tomcat 搭建负载均衡
1. 需要的工具
nginx-1.8.1.zip 点击下载
tomcat 8 点击下载
2. 实现的步骤
(1)解压 nginx 至相应的目录(本人目录: F:\jd\tomcat_nginx\nginx-1.8.1);
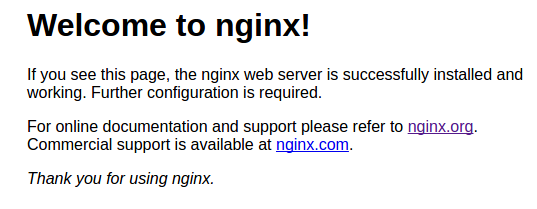
(2)打开文件夹 nginx-1.8.1 找到 nginx.exe 运行文件双击,如果界面一闪而过,输入地址: http://localhost 则会出现以下页面,nginx 的默认端口为 80;
(3) 解压 tomcat 至相应的目录(本人目录:F:\jd\tomcat_nginx\apache-tomcat-8.0.47-18080 和 F:\jd\tomcat_nginx\apache-tomcat-8.0.47-28080);
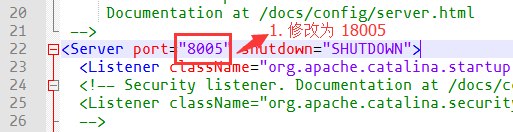
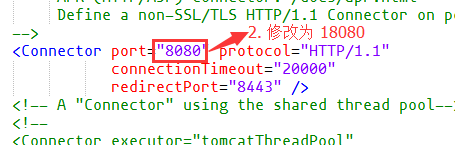
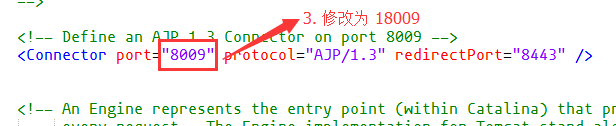
(4)修改 tomcat 端口为 18080 的 server.xml 文件(目录: F:\jd\tomcat_nginx\apache-tomcat-8.0.47-18080\conf)为以下内容,为避免启动程序出现错误,共修改了三处位置:
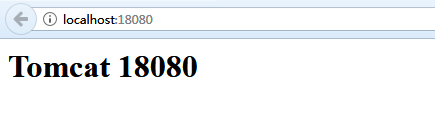
(5)为了区别两个 tomcat 的差别,删除所有 apache-tomcat-8.0.47-18080\webapps\ROOT 目录下的所有文件,并且新建一个 index.jsp ,添加内容为 <h1>Tomcat 18080</h1>,启动 tomcat 服务输入 http://localhost:18080,如果成功则出现以下页面:
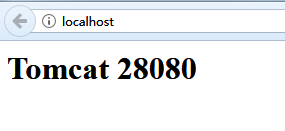
(6)修改 tomcat 端口为 28080 的 server.xml 文件,修改步骤重复第(4)(5)步;
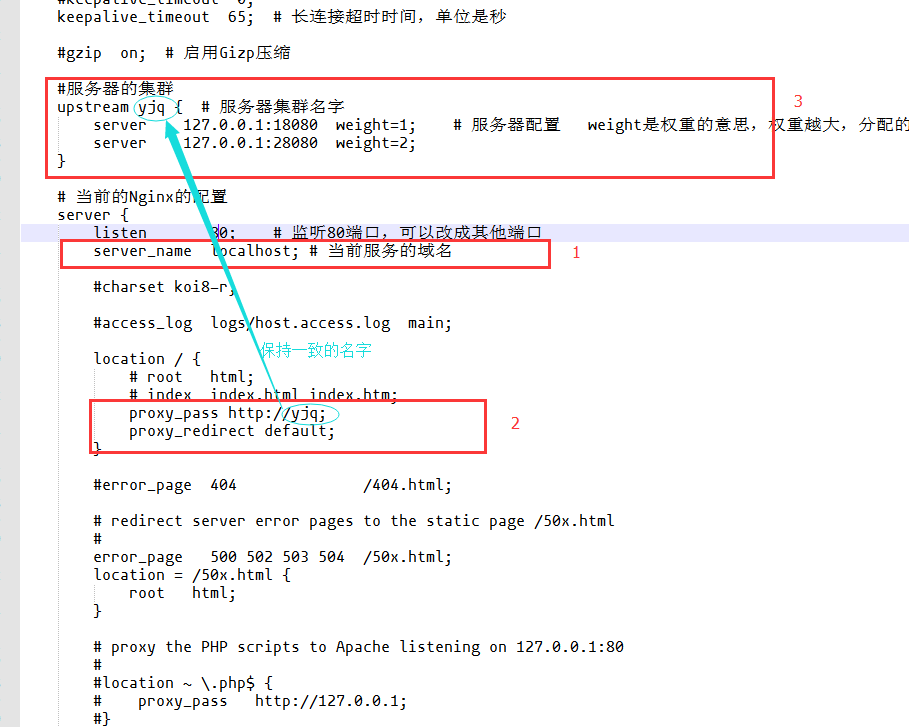
(7)配置 nginx 来实现负载均衡,打开目录 F:\jd\tomcat_nginx\nginx-1.8.1\conf 找到 nginx.conf 文件并进行如下修改:
以上为主要的修改位置,下面是该文件的全部文件信息,添加了注解:
 #user  nobody;

 worker_processes  1;    # 工作进程的个数,一般与计算机的cpu核数一致

 #error_log  logs/error.log;

 #error_log  logs/error.log  notice;

 #error_log  logs/error.log  info;

 #pid        logs/nginx.pid;

 events {

     worker_connections  1024;    # 单个进程最大连接数(最大连接数 = 连接数 * 进程数)

 }

 http {

     include       mime.types;     # 文件扩展名与文件类型映射表

     default_type  application/octet-stream;    # 默认文件类型

     #log_format  main  '$remote_addr - $remote_user [$time_local] "$request" '

     #                  '$status $body_bytes_sent "$http_referer" '

     #                  '"$http_user_agent" "$http_x_forwarded_for"';

     #access_log  logs/access.log  main;

     sendfile        on;    # 开启高效文件传输模式,sendfile指令指定nginx是否调用sendfile函数来输出文件,对于普通应用设为on,如果用来进行下载等应用磁盘IO重负载应用,可设置为off,以平衡磁盘与网络I/O处理速度,降低系统的负载。注意:如果图片显示不正常把这个改成off。

     #tcp_nopush     on;

     #keepalive_timeout  0;

     keepalive_timeout  65;    # 长连接超时时间,单位是秒

     #gzip  on;    # 启用Gizp压缩

     #服务器的集群

     upstream yjq {  # 服务器集群名字

         server    127.0.0.1:18080  weight=1;    # 服务器配置   weight是权重的意思,权重越大,分配的概率越大。

         server    127.0.0.1:28080  weight=2;

     }

     # 当前的Nginx的配置

     server {

         listen       80;    # 监听80端口,可以改成其他端口

         server_name  localhost;    # 当前服务的域名

         #charset koi8-r;

         #access_log  logs/host.access.log  main;

         location / {

             # root   html;

             # index  index.html index.htm;

             proxy_pass http://yjq;

             proxy_redirect default;

         }

         #error_page  404              /404.html;

         # redirect server error pages to the static page /50x.html

         #

         error_page   500 502 503 504  /50x.html;

         location = /50x.html {

             root   html;

         }

         # proxy the PHP scripts to Apache listening on 127.0.0.1:80

         #

         #location ~ \.php$ {

         #    proxy_pass   http://127.0.0.1;

         #}

         # pass the PHP scripts to FastCGI server listening on 127.0.0.1:9000

         #

         #location ~ \.php$ {

         #    root           html;

         #    fastcgi_pass   127.0.0.1:9000;

         #    fastcgi_index  index.php;

         #    fastcgi_param  SCRIPT_FILENAME  /scripts$fastcgi_script_name;

         #    include        fastcgi_params;

         #}

         # deny access to .htaccess files, if Apache's document root

         # concurs with nginx's one

         #

         #location ~ /\.ht {

         #    deny  all;

         #}

     }

     # another virtual host using mix of IP-, name-, and port-based configuration

     #

     #server {

     #    listen       8000;

     #    listen       somename:8080;

     #    server_name  somename  alias  another.alias;

     #    location / {

     #        root   html;

     #        index  index.html index.htm;

     #    }

     #}

     # HTTPS server

     #

     #server {

     #    listen       443 ssl;

     #    server_name  localhost;

     #    ssl_certificate      cert.pem;

     #    ssl_certificate_key  cert.key;

     #    ssl_session_cache    shared:SSL:1m;

     #    ssl_session_timeout  5m;

     #    ssl_ciphers  HIGH:!aNULL:!MD5;

     #    ssl_prefer_server_ciphers  on;

     #    location / {

     #        root   html;

     #        index  index.html index.htm;

     #    }

     #}

 }
补充说明:
在http节点里添加:
# 定义负载均衡设备的 Ip及设备状态
upstream myServer {
server 127.0.0.1:9090 down;
server 127.0.0.1:8080 weight=2;
server 127.0.0.1:6060;
server 127.0.0.1:7070 backup;
}
在需要使用负载的Server节点下添加
proxy_pass http://myServer;
upstream 每个设备的状态;
down 表示当前的 server 暂时不参与负载 ;
weight 默认为 1,weight 越大,负载的权重就越大;
max_fails 允许请求失败的次数默认为 1,当超过最大次数时,返回 proxy_next_upstream 模块定义的错误 ;
fail_timeout:max_fails 次失败后,暂停的时间;
backup 其它所有的非 backup 机器 down 或者忙的时候,请求 backup 机器,所以这台机器压力会最轻;
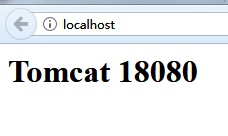
(8)最后输入网址 http://localhost 检测(三个服务都必须打开,tomcat18080、tomcat28080、nginx.exe)
第一次打开的页面:
第二次打开的页面:
第三次打开的页面:
第四次打开的页面:
所以,现在基本上完成了Nginx + Tomcat 搭建负载均衡;
附录:
如果系统占用了 80 端口,导致 nginx 不能启动,可以通过 netstat -aon | findstr :80 命令查看80端口被谁占用,如果是系统占用,通过以下步骤解决:
Nginx 常用命令(切换到 nginx 安装目录来执行):
start nginx.exe: 启动 nginx;
nginx.exe -s stop: 停止 nginx;
nginx.exe -s reload: 配置文件修改,重新加载配置文件;
nginx -t: 查看nginx是否启动成功;
nginx -v: 查看nginx版本;
使用 Nginx + Tomcat 搭建负载均衡的更多相关文章
- Nginx+Tomcat搭建负载均衡
一. 工具 nginx-1.8.0 apache-tomcat-6.0.33 二. 目标 实现高性能负载均衡的Tomcat集群: 三. 步骤 1.首先下载Nginx,要下载稳定 ...
- Nginx+Tomcat搭建负载均衡集群
Nginx ("engine x") 是一个高性能的HTTP和反向代理服务器, 使用 Nginx 可以使得程序在高并发的情况下依旧可以保持良好的性能.使用 Nginx+Tomcat ...
- Nginx+Tomcat+Memcached负载均衡集群服务搭建
操作系统:CentOS6.5 本文档主要讲解,如何在CentOS6.5下搭建Nginx+Tomcat+Memcached负载均衡集群服务器,Nginx负责负载均衡,Tomcat负责实际服务,Memc ...
- nginx+tomcat+redis负载均衡及session共享
概述 本文档是用来详细描述 nginx+tomcat+redis负载均衡实现session共享 所需软件及下载地址 软件名称 下载地址 功能说明 Nginx-v1.6.0 http://nginx.o ...
- Docker + Nginx + Tomcat 实现负载均衡简单演示
Docker + Nginx + Tomcat 实现负载均衡 环境 [root@pinyoyougou-docker ~]# docker -v Docker version 1.12.6, buil ...
- nginx+tomcat实现负载均衡以及双机热备
还记得那些年吗? 还记得更新代码之后,服务器起不来被领导训斥吗?还记得更新代码,需要停机过多的时间被渠道部们埋怨吗?还记得更新代码,代码出错时自己吓个半死吗?于是我们聪明勤快的程序员,看着电影待到夜深 ...
- Ubuntu下实现Nginx+Tomcat实现负载均衡
先说一下为什么写这个文章,在性能测试过程中,我们可能会关注很多指标,比如CPU.IO.网络.磁盘等,通过这些指标大致可以判断哪个环节遇到了性能瓶颈,但是当这些指标无法判断出性能瓶颈时,我们可能就需要对 ...
- 简单的 Nginx+Tomcat 配置负载均衡集群
简单 Nginx+Tomcat 配置负载均衡集群 前期准备 解压两个tomcat,修改端口号 server1:8081 server:8082 同时启动 nginx官网下载解压版nginx 创建一个简 ...
- Nginx+Tomcat 实现负载均衡 ,动静分离集群部署
Nginx + Tomcat 实现负载均衡,动静分离集群部署 1.Nginx实现负载均衡原理 2.Nginx配置反向代理主要参数 3.实验 1.Nginx实现负载均衡原理: Nginx服务器作为前端, ...
随机推荐
- 使用FFMpeg命令行录屏推rtmp流
最近在做局域网内屏幕分享方面的东西,要把录制一台设备的屏幕然后实时推送给内网的一个或多个用户. 做了很多实验,效果还没有达到要求,这里分享一下推rtmp流的实验. 实验使用到的各种工具:FFmpeg. ...
- 获取form表单元素值的4种方式
<html><head><title></title><script type="text/javascript"> f ...
- Notification通知栏的使用
一.基础的知识了解 1.pendingIntent : 它是Intent的封装,可以跳转某个Activity.给Service发送一个命令.还可以发送一个广播 2.进度条的使用方法 3.更新通知栏的信 ...
- 【文文殿下】CF1098C Construct a tree 题解
题解 挺水的一道题. Rating $ \color{orange} {2300}$ 以下送命题. 首先我们知道,所有子树大小之和就是节点个数加上从根到所有节点的路径长度之和. 他要求度数尽可能小,所 ...
- jzoj5879. 【NOIP2018提高组模拟9.22】电路图 B
tj:一道好題 看區間操作可以想到線段樹 並聯操作公式:a1∗a2/(a1+a2)a1*a2/(a1+a2)a1∗a2/(a1+a2) 串聯操作公式:a1+a2a1+a2a1+a2 我們發現,一個區間 ...
- 一次对webshell的后门的查看
本文作者i春秋作家——非主流 昨天晚上突发奇想的想去看看github上面tennc的webshell收集项目中的shell有没有漏洞,比如未授权啊啥的,结果找半天都没找到...但是机缘巧合下,居然给我 ...
- cobbler 自定义安装系统
1.自定义安装系统(根据mac地址)--name=定义名称--mac=客户端的mac地址--ip-address=需求的ip--subnet=掩码 --gateway=网关--interface=网口 ...
- 服务器端 安装svn
趁着这波比较闲的时候来划一波水,想起自己那都快生会的腾讯云服务器 到现在还不能通过版本控制系统上传文件,于是趁这波功夫在服务器上安装个svn来管理代码. 首先就简单的介绍一波 svn : 首先svn不 ...
- POJ 2339
#include <iostream> #include <algorithm> #define MAXN 205 using namespace std; char _m[M ...
- easyui 中iframe嵌套页面,提示弹窗遮罩的解决方法,parent.$.messager.alert和parent.$.messager.confirm
项目中用到easyui 布局,用到north,west,center三个区域,且在center中间区域嵌入iframe标签.在主内容区做一些小提示弹窗(例如删除前的弹窗提示确认)时,会遇到遮罩问题,由 ...