
springboot之cas客户端
一、CAS Client 与受保护的客户端应用部署在一起,以 Filter 方式保护受保护的资源。对于访问受保护资源的每个 Web 请求,CAS Client 会分析该请求的 Http 请求中是否包含 Service Ticket,如果没有,则说明当前用户尚未登录,于是将请求重定向到指定好的 CAS Server 登录地址,并传递 Service (也就是要访问的目的资源地址),以便登录成功过后转回该地址。用户在第 3 步中输入认证信息,如果登录成功,CAS Server 随机产生一个相当长度、唯一、不可伪造的 Service Ticket,并缓存以待将来验证,之后系统自动重定向到 Service 所在地址,并为客户端浏览器设置一个 Ticket Granted Cookie(TGC),CAS Client 在拿到 Service 和新产生的 Ticket 过后,在第 5,6 步中与 CAS Server 进行身份核实,以确保 Service Ticket 的合法性。
二、在该协议中,所有与 CAS 的交互均采用 SSL 协议,确保,ST 和 TGC 的安全性。协议工作过程中会有 2 次重定向的过程,但是 CAS Client 与 CAS Server 之间进行 Ticket 验证的过程对于用户是透明的。
三、cas客户端主要提供的是业务支持,我们在使用的时候更多是通过cas服务端来做认证支持。这里主要讲的是如何搭建cas客户端,配置的东西其实是通过spring的security来进行过滤。然后达到登录的目的,认证中主要是通过Ticket的票据进行认证的,当用户登录成功。会获取到登录的username,然后做进一步处理。
四、服务端的部署参考:https://www.cnblogs.com/ll409546297/p/10410972.html
五、客户端的搭建(这里服务端采用的https的方式)
1)需要的依赖包
  <parent>

        <groupId>org.springframework.boot</groupId>

        <artifactId>spring-boot-starter-parent</artifactId>

        <version>2.0.0.RELEASE</version>

    </parent>

    <dependencies>

        <dependency>

            <groupId>org.springframework.boot</groupId>

            <artifactId>spring-boot-starter-web</artifactId>

        </dependency>

        <dependency>

            <groupId>org.springframework.boot</groupId>

            <artifactId>spring-boot-starter-security</artifactId>

        </dependency>

        <dependency>

            <groupId>org.springframework.security</groupId>

            <artifactId>spring-security-cas</artifactId>

        </dependency>

    </dependencies>
  <dependencies>

        <dependency>

            <groupId>org.springframework.boot</groupId>

            <artifactId>spring-boot-configuration-processor</artifactId>

            <optional>true</optional>

        </dependency>

    </dependencies>
说明:下面这个依赖包主要是用于配置
2)目录结构

3)cas的参数配置(cas.properties、CasProperties)
cas.clientUrl=http://localhost:${server.port}

cas.clientLogin=/login

cas.clientLogout=/logout

cas.serverUrl=https://www.casserver.com:8443/cas

cas.serverLogin=/login

cas.serverLogout=/logout

cas.trustStorePath=cas/cas.keystore

cas.trustStorePassword=changeit
@PropertySource(value = "classpath:config/cas.properties")

@ConfigurationProperties(prefix = "cas")

public class CasProperties {

    //客户端url(本机)

    private String clientUrl;

    //登录接口

    private String clientLogin;

    //登出接口

    private String clientLogout;

    //服务端url

    private String serverUrl;

    //登录接口

    private String serverLogin;

    //登出接口

    private String serverLogout;

    //证书密匙路径

    private String trustStorePath;

    //密码

    private String trustStorePassword;

    public String getClientUrl() {

        return clientUrl;

    }

    public void setClientUrl(String clientUrl) {

        this.clientUrl = clientUrl;

    }

    public String getClientLogin() {

        return clientLogin;

    }

    public void setClientLogin(String clientLogin) {

        this.clientLogin = clientLogin;

    }

    public String getClientLogout() {

        return clientLogout;

    }

    public void setClientLogout(String clientLogout) {

        this.clientLogout = clientLogout;

    }

    public String getServerUrl() {

        return serverUrl;

    }

    public void setServerUrl(String serverUrl) {

        this.serverUrl = serverUrl;

    }

    public String getServerLogin() {

        return serverLogin;

    }

    public void setServerLogin(String serverLogin) {

        this.serverLogin = serverLogin;

    }

    public String getServerLogout() {

        return serverLogout;

    }

    public void setServerLogout(String serverLogout) {

        this.serverLogout = serverLogout;

    }

    public String getTrustStorePath() {

        return trustStorePath;

    }

    public void setTrustStorePath(String trustStorePath) {

        this.trustStorePath = trustStorePath;

    }

    public String getTrustStorePassword() {

        return trustStorePassword;

    }

    public void setTrustStorePassword(String trustStorePassword) {

        this.trustStorePassword = trustStorePassword;

    }

}
说明:1、trustStorePath:这个主要使用的服务器上面生成的cas.keystore密钥、在服务器搭建中我们生成了cas.keystore、域名改成www.casserver.com。目的不支持直接使用IP。
本地修改hosts:C:\Windows\System32\drivers\etc\hosts

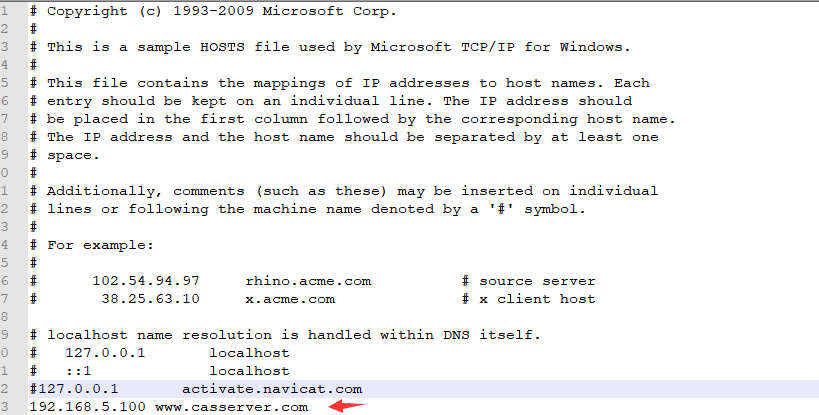
2、cas.keystore:服务器生成密钥,tomcat进行部署,https访问时需要的私密密钥
3、当然可以不使用cas.keystore,通过服务器上面生成的cas.crt证书然后客户端的jdk也是可以验证通过的。
keytool -import -keystore "E:\Java\jdk1.8.0_192\jre\lib\security\cacerts" -file cas.crt -alias cas -storepass changeit
4)cas相关配置(CasConfiguration、SecurityConfiguration)
@Configuration

@Import(CasProperties.class)

public class CasConfiguration {

    //cas相关参数

    @Autowired

    private CasProperties casProperties;

    //客户端的服务配置,主要用于跳转

    @Bean

    public ServiceProperties serviceProperties() {

        ServiceProperties serviceProperties = new ServiceProperties();

        //该项目的登录地址

        serviceProperties.setService(casProperties.getClientUrl() + casProperties.getClientLogin());

        serviceProperties.setAuthenticateAllArtifacts(true);

        return serviceProperties;

    }

    //cas认证点

    @Bean

    public CasAuthenticationEntryPoint casAuthenticationEntryPoint() {

        CasAuthenticationEntryPoint casAuthenticationEntryPoint = new CasAuthenticationEntryPoint();

        //cas的登录地址

        casAuthenticationEntryPoint.setLoginUrl(casProperties.getServerUrl() + casProperties.getServerLogin());

        //入口

        casAuthenticationEntryPoint.setServiceProperties(serviceProperties());

        return casAuthenticationEntryPoint;

    }

    //票据

    @Bean

    public Cas30ServiceTicketValidator cas30ServiceTicketValidator() {

        return new Cas30ServiceTicketValidator(casProperties.getServerUrl());

    }

    //认证支持

    @Bean

    public CasAuthenticationProvider casAuthenticationProvider(AuthDetailsService authDetailsService) {

        CasAuthenticationProvider casAuthenticationProvider = new CasAuthenticationProvider();

        casAuthenticationProvider.setKey("client1");

        casAuthenticationProvider.setServiceProperties(serviceProperties());

        casAuthenticationProvider.setTicketValidator(cas30ServiceTicketValidator());

        //本地登录后的操作,走security体系

        casAuthenticationProvider.setUserDetailsService(authDetailsService);

        //这里也可以使用setAuthenticationUserDetailsService管理

        //casAuthenticationProvider.setAuthenticationUserDetailsService();

        return casAuthenticationProvider;

    }

    //单点登录过滤

    @Bean

    public SingleSignOutFilter singleSignOutFilter() {

        SingleSignOutFilter singleSignOutFilter = new SingleSignOutFilter();

        singleSignOutFilter.setCasServerUrlPrefix(casProperties.getServerUrl());

        singleSignOutFilter.setIgnoreInitConfiguration(true);

        return singleSignOutFilter;

    }

    //登出过滤

    @Bean

    public LogoutFilter logoutFilter() {

        //重定向地址

        String logoutRedirectPath = casProperties.getServerUrl() + casProperties.getServerLogout() + "?service=" + casProperties.getClientUrl();

        LogoutFilter logoutFilter = new LogoutFilter(logoutRedirectPath, new SecurityContextLogoutHandler());

        //登出接口

        logoutFilter.setFilterProcessesUrl(casProperties.getServerLogout());

        return logoutFilter;

    }

}
@Configuration

@EnableWebSecurity

@EnableGlobalMethodSecurity(prePostEnabled = true, jsr250Enabled = true)

@Import(CasProperties.class)

public class SecurityConfiguration extends WebSecurityConfigurerAdapter {

    //认证

    @Autowired

    private CasAuthenticationProvider authenticationProvider;

    //认证点

    @Autowired

    private CasAuthenticationEntryPoint authenticationEntryPoint;

    //登出过滤

    @Autowired

    private LogoutFilter logoutFilter;

    //单点登出

    @Autowired

    private SingleSignOutFilter singleSignOutFilter;

    //cas配置

    @Autowired

    private CasProperties casProperties;

    @Override

    protected void configure(HttpSecurity http) throws Exception {

        http

            .csrf().disable()

            .exceptionHandling()

            .authenticationEntryPoint(authenticationEntryPoint)

        .and()

            .authorizeRequests()

            .anyRequest().authenticated()

        .and()

            //添加认证过滤(这里我遇到一个坑,如果通过注入方式加入,会出现循环依赖问题)

            .addFilter(casAuthenticationFilter())

            //登出过滤

            .addFilterBefore(logoutFilter, LogoutFilter.class)

            //单点登出过滤

            .addFilterBefore(singleSignOutFilter, CasAuthenticationFilter.class);

    }

    @Override

    protected void configure(AuthenticationManagerBuilder auth) throws Exception {

        //认证方式

        auth.authenticationProvider(authenticationProvider);

    }

    @Bean

    public CasAuthenticationFilter casAuthenticationFilter() throws Exception {

        //过滤器配置

        CasAuthenticationFilter casAuthenticationFilter = new CasAuthenticationFilter();

        //使用security的认证管理

        casAuthenticationFilter.setAuthenticationManager(authenticationManager());

        //拦截登录接口

        casAuthenticationFilter.setFilterProcessesUrl(casProperties.getClientLogin());

        return casAuthenticationFilter;

    }

}
5)登录后的username处理(AuthDetailsService)
@Service

public class AuthDetailsService implements UserDetailsService {

    @Override

    public UserDetails loadUserByUsername(String username) throws UsernameNotFoundException {

        if (username == null){

            throw new UsernameNotFoundException("用户不存在!");

        }

        List<SimpleGrantedAuthority> simpleGrantedAuthorities = new ArrayList<>();

        simpleGrantedAuthorities.add(new SimpleGrantedAuthority("ADMIN"));

        return new org.springframework.security.core.userdetails.User(username, username, simpleGrantedAuthorities);

    }

}
说明:这里只是简单处理,实际可以自己绑定用户处理
6)https处理(CasIinitTask)
@Component

@Import(CasProperties.class)

public class CasIinitTask {

    @Autowired

    private CasProperties casProperties;

    @PostConstruct

    public void loadKeystore() throws IOException {

        //如果使用https,则必须加入密钥

        Assert.isTrue(!(casProperties.getServerUrl().startsWith("https") && casProperties.getTrustStorePath() == null),

                "trustStorePath must not null to configuration https");

        //密钥

        if (!StringUtils.isEmpty(casProperties.getTrustStorePath())) {

            Resource resource = new ClassPathResource(casProperties.getTrustStorePath());

            System.setProperty("javax.net.ssl.trustStore", resource.getFile().getAbsolutePath());

        }

        //有可能密码的情况

        if (StringUtils.isEmpty(casProperties.getTrustStorePassword())) {

            System.setProperty("javax.net.ssl.trustStorePassword", casProperties.getTrustStorePassword());

        }

    }

}
7)启动项目测试:

六、源码:https://github.com/lilin409546297/springboot-cas
七、这里只是简单的搭建过程,实际cas还需要做二次开发。相比于cas和oauth2我个人更加喜欢oauth2,个人看法。
springboot之cas客户端的更多相关文章
- CAS学习笔记三:SpringBoot自动配置与手动配置过滤器方式集成CAS客户端
本文目标 基于SpringBoot + Maven 分别使用自动配置与手动配置过滤器方式集成CAS客户端. 需要提前搭建 CAS 服务端,参考 https://www.cnblogs.com/hell ...
- Springboot security cas整合方案-实践篇
承接前文Springboot security cas整合方案-原理篇,请在理解原理的情况下再查看实践篇 maven环境 <dependency> <groupId>org.s ...
- Springboot security cas整合方案-原理篇
前言:网络中关于Spring security整合cas的方案有很多例,对于Springboot security整合cas方案则比较少,且有些仿制下来运行也有些错误,所以博主在此篇详细的分析cas原 ...
- CAS5.3服务器搭建及SpringBoot整合CAS实现单点登录
1.1 什么是单点登录 单点登录(Single Sign On),简称为 SSO,是目前比较流行的企业业务整合的解决方案之一.SSO的定义是在多个应用系统中,用户只需要登录一次就可以访问所有相互信任的 ...
- CAS客户端服务器端配置步骤
来自我的个人网站:http://lkf.22web.org/ cas介绍: CAS 是 Yale 大学发起的一个开源项目,旨在为 Web 应用系统提供一种可靠的单点登录方法,CAS 在 2004 年 ...
- 如何利用tomcat和cas实现单点登录(2):配置cas数据库验证和cas客户端配置
接(1),上一篇主要讲述了tomcat和cas server端的部署. 接下来主要还有两个步骤. 注意:为了开启两个tomcat,要把直接配置的tomcat的环境变量取消!!!!!!!!!! 客户端配 ...
- 配置php的CAS客户端
1.下载安装xmapp 2.开启Apache服务. 3.下载php的CAS客户端源码包(我使用的是CAS-1.2.0.tgz),解压到xmap的htdocs目录下(D:\xmapp\htdocs),进 ...
- cas sso单点登录系列2:cas客户端和cas服务端交互原理动画图解,cas协议终极分析
转:http://blog.csdn.net/ae6623/article/details/8848107 1)PPT流程图:ppt下载:http://pan.baidu.com/s/1o7KIlom ...
- Springboot security cas源码陶冶-ExceptionTranslationFilter
拦截关键的两个异常,对异常进行处理.主要应用异常则跳转至cas服务端登录页面 ExceptionTranslationFilter#doFilter-逻辑入口 具体操作逻辑如下 public void ...
随机推荐
- Azure Document DB Repository 的实现
阅读 需要大约 5 分钟. 前景: Azure Cosmos DB 由 Microsoft 提供,是全球分布式多模型数据库. 通过 Azure Cosmos DB 跨任意数量的 Azure 地理区域 ...
- CATransform3D的m34使用
CATransform3D的m34使用 效果图 源码 // // ViewController.m // StarWars // // Created by YouXianMing on 15/11/ ...
- Ardunio led呼吸灯
#include <Adafruit_NeoPixel.h> #define PIN 9#define LED_NUM 16Adafruit_NeoPixel strip = Adafru ...
- September 19th 2017 Week 38th Tuesday
Live boldly. Push yourself. Don't settle. 勇敢生活,突破自我,永不设限! Don't indulge in the past, whether it was ...
- #002 Emmet完整API
介绍 这里包含了,所有的Emmet API,非常的详细,但是有一点详细过头了,如果只想快速上手,那么推荐<#001 Emmet的API图片> Emmet (前身为 Zen Coding) ...
- Java重写&重载
在学习完类和对象后,接下来就要进入面向对象的内容了,先从重写和重载开始吧.重写(Override)和重载(Overload)是两个不同的概念,也是两个容易混淆的概念,下面具体来说说这两者. 重写( ...
- jupyter notebook设置主题背景,字体和扩展插件
windows上安装Anaconda (IPython notebook) Anaconda是一个包与环境的管理器,一个Python发行版,以及一个超过1000多个开源包的集合.它是免费和易于安装的, ...
- 1297. [SCOI2009]迷路【矩阵乘法】
Description windy在有向图中迷路了. 该有向图有 N 个节点,windy从节点 0 出发,他必须恰好在 T 时刻到达节点 N-1. 现在给出该有向图,你能告诉windy总共有多少种不同 ...
- Docker实战(八)之Web服务与应用
1.Apache 官方提供了名为httpd的Apache镜像,可以作为基础web服务镜像 Dockerfile(安装apache2) FROM httpd:2.4 COPY ./public-html ...
- ROS計算圖級(通訊架構)
查看节点构成的计算图 rqt_graph 节点node就是运行了的可执行文件