
widget 常用UI控件介绍
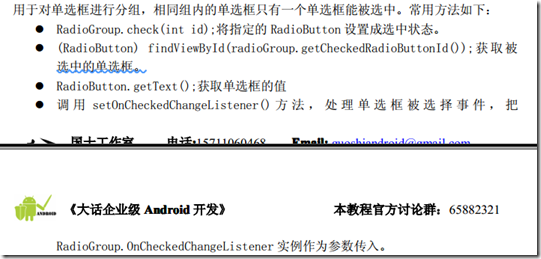
单选框实例程序:

<LinearLayout xmlns:android="http://schemas.android.com/apk/res/android"
xmlns:tools="http://schemas.android.com/tools"
android:layout_width="fill_parent"
android:layout_height="fill_parent"
android:orientation="vertical"
tools:context=".MainActivity" >
<!-- checkedButton 表示默认为woman的意思,它能够自动识别下面id为woman的控件 -->
<RadioGroup
android:layout_width="fill_parent"
android:layout_height="fill_parent"
android:orientation="vertical"
android:checkedButton="@+id/woman"
android:id="@+id/sex"
>
<RadioButton
android:text="@string/man"
android:id="@+id/man"
></RadioButton>
<RadioButton
android:text="@string/woman"
android:id="@id/woman"
/>
</RadioGroup>
</LinearLayout>
.csharpcode, .csharpcode pre
{
font-size: small;
color: black;
font-family: consolas, "Courier New", courier, monospace;
background-color: #ffffff;
/*white-space: pre;*/
}
.csharpcode pre { margin: 0em; }
.csharpcode .rem { color: #008000; }
.csharpcode .kwrd { color: #0000ff; }
.csharpcode .str { color: #006080; }
.csharpcode .op { color: #0000c0; }
.csharpcode .preproc { color: #cc6633; }
.csharpcode .asp { background-color: #ffff00; }
.csharpcode .html { color: #800000; }
.csharpcode .attr { color: #ff0000; }
.csharpcode .alt
{
background-color: #f4f4f4;
width: 100%;
margin: 0em;
}
.csharpcode .lnum { color: #606060; }

二、复选框
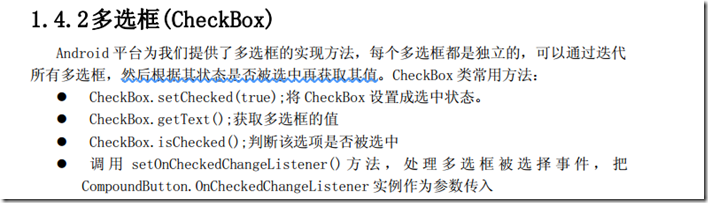
<LinearLayout xmlns:android="http://schemas.android.com/apk/res/android"
xmlns:tools="http://schemas.android.com/tools"
android:layout_width="fill_parent"
android:layout_height="fill_parent"
android:orientation="vertical"
tools:context=".MainActivity" >
<!-- checkedButton 表示默认为woman的意思,它能够自动识别下面id为woman的控件 -->
<TextView
android:layout_width="fill_parent"
android:layout_height="wrap_content"
android:text="@string/favoriteString"
android:id="@+id/favorite"/>
<RelativeLayout
android:layout_width="fill_parent"
android:layout_height="fill_parent"
>
<CheckBox
android:layout_width="wrap_content"
android:layout_height="wrap_content"
android:text="@string/pingpong"
android:id="@+id/my"
></CheckBox>
<CheckBox
android:layout_width="wrap_content"
android:layout_height="wrap_content"
android:text="@string/pingpong"
android:layout_toRightOf="@id/my"
android:id="@+id/my2"
></CheckBox>
</RelativeLayout>
</LinearLayout>
.csharpcode, .csharpcode pre
{
font-size: small;
color: black;
font-family: consolas, "Courier New", courier, monospace;
background-color: #ffffff;
/*white-space: pre;*/
}
.csharpcode pre { margin: 0em; }
.csharpcode .rem { color: #008000; }
.csharpcode .kwrd { color: #0000ff; }
.csharpcode .str { color: #006080; }
.csharpcode .op { color: #0000c0; }
.csharpcode .preproc { color: #cc6633; }
.csharpcode .asp { background-color: #ffff00; }
.csharpcode .html { color: #800000; }
.csharpcode .attr { color: #ff0000; }
.csharpcode .alt
{
background-color: #f4f4f4;
width: 100%;
margin: 0em;
}
.csharpcode .lnum { color: #606060; }
三、ListView
下面我们来学习 ListView 类的常用方法。
� setAdapter(ListAdapter adapter)
为 ListView 绑定一个 Adapter
� setChoiceMode(int choiceMode)
为 ListView 指定一个显示的模式,可选值有三个 CHOICE_MODE_NONE(默认值,没
有单选或多选效果) 、 CHOICE_MODE_SINGLE (单选框效果) 、 CHOICE_MODE_MULTIPLE
(多选框效果) ;
� setOnItemClickListener (AdapterView.OnItemClickListener listener)
为其注册一个元素被点击事件的监听器,当其中某一项被点击时调用其参 数
listener 中的 onItemClick()方法。
package com.buu.listview;
import android.os.Bundle;
import android.app.Activity;
import android.view.Menu;
import android.view.View;
import android.view.View.OnClickListener;
import android.widget.AdapterView.OnItemClickListener;
import android.widget.AdapterView;
import android.widget.ArrayAdapter;
import android.widget.ListAdapter;
import android.widget.ListView;
import android.widget.Toast;
public class MainActivity extends Activity {
private String[] options;
ListView lView;
@Override
protected void onCreate(Bundle savedInstanceState) {
super.onCreate(savedInstanceState);
setContentView(R.layout.activity_main); //主界面必须先显示,不然listview也就不存在了。
options = getResources().getStringArray(R.array.options);
lView =(ListView) findViewById(R.id.listView1);
// ListAdapter adapter = new ArrayAdapter<String>(MainActivity.this, R.layout.main_lv_text, options);
ListAdapter adapter = new ArrayAdapter<String>(MainActivity.this, android.R.layout.simple_list_item_1, options);
lView.setAdapter(adapter);
lView.setOnItemClickListener(new OnItemClickListener() {
@Override
public void onItemClick(AdapterView<?> parent, View view, int position,
long id) {
// TODO Auto-generated method stub
String option = options[position];
Toast.makeText(MainActivity.this, "你选择的是:"+option, 2000).show();
}
});
}
@Override
public boolean onCreateOptionsMenu(Menu menu) {
// Inflate the menu; this adds items to the action bar if it is present.
getMenuInflater().inflate(R.menu.main, menu);
return true;
}
}
.csharpcode, .csharpcode pre
{
font-size: small;
color: black;
font-family: consolas, "Courier New", courier, monospace;
background-color: #ffffff;
/*white-space: pre;*/
}
.csharpcode pre { margin: 0em; }
.csharpcode .rem { color: #008000; }
.csharpcode .kwrd { color: #0000ff; }
.csharpcode .str { color: #006080; }
.csharpcode .op { color: #0000c0; }
.csharpcode .preproc { color: #cc6633; }
.csharpcode .asp { background-color: #ffff00; }
.csharpcode .html { color: #800000; }
.csharpcode .attr { color: #ff0000; }
.csharpcode .alt
{
background-color: #f4f4f4;
width: 100%;
margin: 0em;
}
.csharpcode .lnum { color: #606060; }
注意比较下面的方式:
listView = (ListView) findViewById(R.id.listview);
//创建一个ArrayAdapter
ArrayAdapter adapter =
new ArrayAdapter(this, android.R.layout.simple_list_item_1,name);
listView.setAdapter(adapter);
//listView注册一个元素点击事件监听器
listView.setOnItemClickListener(new AdapterView.OnItemClickListener() {
@Override
//当某个元素被点击时调用该方法
public void onItemClick(AdapterView<?> arg0, View arg1, int arg2,long
arg3) {
Toast.makeText(ListViewActivity.this,name[arg2] ,
Toast.LENGTH_LONG).show();
}
.csharpcode, .csharpcode pre
{
font-size: small;
color: black;
font-family: consolas, "Courier New", courier, monospace;
background-color: #ffffff;
/*white-space: pre;*/
}
.csharpcode pre { margin: 0em; }
.csharpcode .rem { color: #008000; }
.csharpcode .kwrd { color: #0000ff; }
.csharpcode .str { color: #006080; }
.csharpcode .op { color: #0000c0; }
.csharpcode .preproc { color: #cc6633; }
.csharpcode .asp { background-color: #ffff00; }
.csharpcode .html { color: #800000; }
.csharpcode .attr { color: #ff0000; }
.csharpcode .alt
{
background-color: #f4f4f4;
width: 100%;
margin: 0em;
}
.csharpcode .lnum { color: #606060; }
说明:
ArrayAdapter adapter = new ArrayAdapter(Context context, int
textViewResourceId, Object[] objects);
ArrayAdapter构造方法的参数解释:
context :当前的Context对象
textViewResourceId:一个包含了TextView元素的布局文件,用来指定ListView中的每一
项的显示格式。如前面介绍过的,
android.R.layout.simple_list_item_1是Android平台自带的一个
布局文件,里面只包含一个TextView标签。其内容如下:
<?xml version="1.0" encoding="utf-8"?>
<TextView xmlns:android="http://schemas.android.com/apk/res/android"
android:id="@android:id/text1"
android:layout_width="fill_parent"
android:layout_height="wrap_content"
android:textAppearance="?android:attr/textAppearanceLarge"
android:gravity="center_vertical"
android:paddingLeft="6dip"
android:minHeight="?android:attr/listPreferredItemHeight"
/>
objects:要显示的数据,为一个数组
� onItemClick(AdapterView<?> parent, View view, int position, long id)
参数介绍:
parent:被点击的ListView对象
view:被点击的那一项
position:被点击的那一项在ListView中的位置
id :被选中的那一行的id
四、下拉列表框(Spinner)
手机的屏幕较小,因此使用下拉列表来进行选择式输入是一个非常好的方式。Spinner
与 ListView 一样,也是 AdapterView 的一个间接子类,是一个显示数据的窗口。
Spinner 类常用的方法如下:
� Spinner.getItemAtPosition(Spinner.getSelectedItemPosition()); 获取下拉列
表框的值
� 调 用 setOnItemSelectedListener() 方 法, 处理 下拉 列表 框被 选择 事件 , 把
AdapterView.OnItemSelectedListener 实例作为参数传入
可以在 Java 代码中通过 Adapter 绑定数据,也可以在布局文件中直接引用在资源文件
中定义的数组。
编写arrays.xml文件
<?xml version="1.0" encoding="utf-8"?>

<resources>

<string-array name="colors">

<item>red</item>

<item>orange</item>

<item>yellow</item>

<item>green</item>

<item>blue</item>

<item>violet</item>

</string-array>
.csharpcode, .csharpcode pre
{
font-size: small;
color: black;
font-family: consolas, "Courier New", courier, monospace;
background-color: #ffffff;
/*white-space: pre;*/
}
.csharpcode pre { margin: 0em; }
.csharpcode .rem { color: #008000; }
.csharpcode .kwrd { color: #0000ff; }
.csharpcode .str { color: #006080; }
.csharpcode .op { color: #0000c0; }
.csharpcode .preproc { color: #cc6633; }
.csharpcode .asp { background-color: #ffff00; }
.csharpcode .html { color: #800000; }
.csharpcode .attr { color: #ff0000; }
.csharpcode .alt
{
background-color: #f4f4f4;
width: 100%;
margin: 0em;
}
.csharpcode .lnum { color: #606060; }
编写main.xml文件
<?xml version="1.0" encoding="utf-8"?>

<LinearLayout xmlns:android="http://schemas.android.com/apk/res/android"

    android:layout_width="fill_parent"

    android:layout_height="fill_parent"

    android:orientation="vertical" >

    <TextView

        android:layout_width="fill_parent"

        android:layout_height="wrap_content"

        android:text="@string/colors"

        ></TextView>

    <Spinner

        android:id="@+id/spinner"

        android:layout_width="fill_parent"

        android:layout_height="wrap_content"

        android:prompt="@string/red"

        android:entries="@array/colors"

        >

    </Spinner>

</LinearLayout>
.csharpcode, .csharpcode pre
{
font-size: small;
color: black;
font-family: consolas, "Courier New", courier, monospace;
background-color: #ffffff;
/*white-space: pre;*/
}
.csharpcode pre { margin: 0em; }
.csharpcode .rem { color: #008000; }
.csharpcode .kwrd { color: #0000ff; }
.csharpcode .str { color: #006080; }
.csharpcode .op { color: #0000c0; }
.csharpcode .preproc { color: #cc6633; }
.csharpcode .asp { background-color: #ffff00; }
.csharpcode .html { color: #800000; }
.csharpcode .attr { color: #ff0000; }
.csharpcode .alt
{
background-color: #f4f4f4;
width: 100%;
margin: 0em;
}
.csharpcode .lnum { color: #606060; }
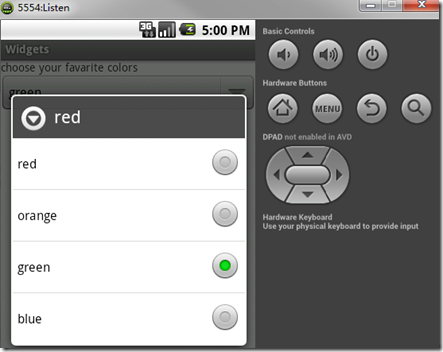
其中:
说明:
android:prompt="@string/color_prompt"
设置弹出下拉列表的标题。
android:entries="@array/colors"
指定下拉列表中的数据。本例为在arrays.xm文件中定义的colors数组。
widget 常用UI控件介绍的更多相关文章
- iOS基础UI控件介绍-Swift版
iOS基础UI控件总结 iOS基础控件包括以下几类: 1.继承自NSObject:(暂列为控件) UIColor //颜色 UIImage //图像 2.继承自UIView: 只能相应手势UIGest ...
- Android 常用UI控件之TabHost(5)Tab栏在底部且在最上层也不盖tab页
tab栏在底部 <TabHost android:id="@android:id/tabhost" android:layout_width="match_pare ...
- 常用Tables控件介绍(一)
1.DataTables Datatables是一款jquery表格插件.它是一个高度灵活的工具,可以将任何HTML表格添加高级的交互功能. 分页,即时搜索和排序 几乎支持任何数据源:DOM, jav ...
- Android 常用UI控件之TabHost(4)实现当Tab栏有多个tab时,可以左右滑动
<!-- <HorizontalScrollView android:id="@+id/horizontalScrollView1" android:layout_wi ...
- Android 常用UI控件之TabHost(3)在4.0不显示图标的解决方案
1,自定义 TabWidget 上每个tab的view 2,用多个图片
- Android 常用UI控件之TabHost(2)简单示例
1,布局 <FrameLayout xmlns:android="http://schemas.android.com/apk/res/android" xmlns:tool ...
- Android 常用UI控件之TabHost(1)TabHost的两种布局方式
TabHost是Android中的tab组件. TabHost布局文件的基本结构 TabHost下有个layout,这个layout中有TabWidget与FrameLayout.TabWidget是 ...
- Android 常用UI控件之Tab控件的实现方案
实现Tab的方式有多种 1,ActionBar有两种模式可以实现,但是已经过期 tab模式tab在顶部,分裂模式tab在底部(同时所有action item都在底部). 2,PagerTitleStr ...
- 常用Tables控件介绍(三)
向datagrid中添加临时记录: 代码: $(function(){ fun={ add:function(){ $.ajaxSettings.async=false; var rows=$('#d ...
随机推荐
- 【bzoj2280】[Poi2011]Plot 二分+倍增+二分+最小圆覆盖
题目描述 给出一系列点p_1, p_2, ... , p_n,将其分成不多余m个连续的段,第i段内求一个点q_i,使得q_i到这段内点的距离的最大值的最大值最小 输入 第一行,n m下面n行,每行两个 ...
- ZigBee学习一 任务处理函数_ProcessEvent
ZigBee学习一 任务处理函数_ProcessEvent //任务处理函数UINT16 GenericApp_ProcessEvent( byte task_id, UINT16 events ){ ...
- [NOI2014][bzoj3670] 动物园 [kmp+next数组应用]
题面 传送门 思路 首先,这题最好的一个地方,在于它给出的关于$next$的讲解实在是妙极......甚至可以说我的kmp是过了这道题以后才脱胎换骨的 然后是正文: 如何求$num$数组? 这道题的输 ...
- Codeforces Round #364 (Div. 2) A 水
A. Cards time limit per test 1 second memory limit per test 256 megabytes input standard input outpu ...
- 在razor中使用递归,巧用递归
原文发布时间为:2011-04-20 -- 来源于本人的百度文章 [由搬家工具导入] Learning Razor–Writing an Inline Recursive HTML Helper Wr ...
- 归并排序Merge sort(转)
原理,把原始数组分成若干子数组,对每一个子数组进行排序, 继续把子数组与子数组合并,合并后仍然有序,直到全部合并完,形成有序的数组 举例 无序数组[6 2 4 1 5 9] 先看一下每个步骤下的状态, ...
- gpio 預設值
若 gpio 預設值只寫 pull-down or pull-up or no-pull or keeper, 代表 是 input mode.
- Android启动过程深入解析【转】
转自:http://www.open-open.com/lib/view/open1403250347934.html 当按下Android设备电源键时究竟发生了什么? Android的启动过程是怎么 ...
- 记录: 一次解决整型溢出攻击(使用scala,隐式转换)
最近项目遇到一次整型溢出攻击 有一个功能,玩家购买num个物品. 每个物品花费14货币. 客户端限制玩家只能购买 1-9999个该物品. 但是某玩家通过技术手段,获得了客户端的运行权限. 于是发送协议 ...
- /* Dr黄的技术博客开通啦 */
以前懒得写技术日志, 现在终于发现重要性.. mark一下这个里程碑.