
Linux 搭建 nexus 私服【转】
原文:https://yq.aliyun.com/articles/5981
第8章 私服nexus
本章详细介绍了nexus的安装过程,设置maven从私服下载构件,以及发布构件至nexus。
8.1 什么是nexus
nexus是一个web版的仓库管理软件
8.2 nexus安装
nexus安装非常简单。
下载地址:http://www.sonatype.org/nexus/go
本文以Linux环境为例,安装nexus:
1. 首先在/usr/local下建nexus目录
2. 将下载的zip包解压,将其中的nexus-2.11.4-01解压至nexus如图:

- 进入bin目录,将nexus设置为可执行权限:
cd bin
chmod +x nexus

设置root可执行nexus
默认的nexus是不让root用户直接启动的,会报出如下错误`WARNING - NOT RECOMMENDED TO RUN AS ROOT`
`If you insist running as root, then set the environment variable RUN_AS_USER=root before running this script.`

需要设置root执行权限
export set RUN_AS_USER=root
此语句仅临时设置root变量,重启linux后会无效,如需持久设置,需要修改环境变量,见以下步骤。
- 此时执行
./nexus start即可启动nexus。

- 停止nexus
./nexus stop

配置环境变量,设置开机启动
- 设置环境变量:
vim /etc/profile
在最后一行添加export set RUN_AS_USER=root

- 设置开机启动
进入到配置目录:
cd /etc/init.d
复制脚本cp /usr/local/nexus/bin/nexus nexus
添加系统服务:chkconfig --add nexus
设置启动级别为345:chkconfig --levels 345 nexus on
查看是否添加成功:chkconfig --list|grep nexus,如图

- 修改脚本
vim /etc/init.d/nexus
第一行添加:
RUN_AS_USER="root"
然后,将NEXUS_HOME=".."修改为NEXUS_HOME="/usr/local/nexus"
如图:
- 重启Linux
reboot - 访问地址:
http://<LinuxIP>:8081/nexus/#welcome
注意:重启Linux需要一段时间,不断刷新此地址即可。
查看nexus是否启动,`ps –ef|grep nexus`。

8.3 nexus仓库设置
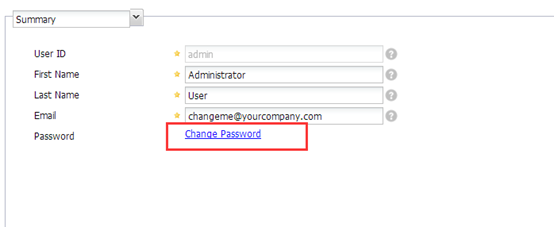
8.3.1 登录系统,修改密码
nexus默认的管理员密码是admin/admin123,为了安全起见,第一件事就是上来修改管理员密码。



8.3.2 nexus内置仓库介绍
1、 仓库类型介绍

| 仓库类型 | 介绍 |
|---|---|
| group | 仓库组 |
| hosted | 宿主仓库 |
| proxy | 代理仓库 |
| virtual | 虚拟仓库 |
2、 仓库介绍
| 仓库 | 介绍 |
|---|---|
| 3rd party | 这是一个策略为Releases的宿主仓库,用来部署无法从公共仓库获得的第三方发布版本构件 |
| Apache Snapshots | 这是一个策略为Snapshots的代理仓库,用来代理ApacheMaven仓库的快照版本构件 |
| Central | 这是一个策略为Releases的代理仓库,用来代理maven中央仓库中发布的版本构件 |
| Central M1 shadow | 这是一个策略为Releases的虚拟仓库,用来提供中央仓库中M1格式的发布版本的构件 |
| Codehaus Snapshots | 这是一个策略为Snapshots的代理仓库,用来代理Codehaus Snapshots仓库的快照版本构件的仓库 |
| Releases | 这是一个策略为Releases的宿主仓库,用来部署管理内部的发布版本构件 |
| Snapshots | 这是一个策略为Snapshots的宿主仓库,用来部署管理内部的快照版本构件 |
8.3.3 索引
开启远程索引
一个新搭建的nexus,是一个空的仓库,nexus默认是关闭远程索引下载,打开步骤如图:注意:3个proxy类型的远程索引都需要打开

然后在3个proxy类型的仓库上,点击右键,Repair Index,nexus就会去下载远程的索引文件。

测试
在Browse Remote 中搜索任意jar

8.3.4 创建宿主仓库


8.3.5 仓库组设置
- 什么是仓库组?
仓库组是将多个仓库聚合成一个仓库地址,为maven提供服务。maven配置中,只需要配置仓库组的链接,即可同时得到多个仓库的构件。
仓库组中仓库的顺序决定了仓库组遍历其所含仓库的次序,所以应该将常用的仓库放在前面。
仓库组设置很简单:

点击type为group类型的仓库,configuration标签页中Ordered Group Repositories为当前组包含仓库,available repositories为可继续添加的仓库。

8.4 配置maven从私服下载构件
前面安装了nexus,目的就是让开发人员的maven链接私服下载构件。
修改maven配置文件setting.xml
找到profiles标签,设置代码:
<profiles>

    <profile>

      <id>nexus</id>

      <repositories>

        <repository>

          <id>nexus</id>

          <name>crop-nexus</name>

          <url>http://你的NexusIP:8081/nexus/content/groups/public/</url>

          <releases>

                <!-- true表示开启仓库发布版本下载,false表示禁止 -->

                <enabled>true</enabled>

        </releases>

        <snapshots>

            <!-- true表示开启仓库快照版本下载,false表示禁止 -->

            <enabled>true</enabled>

        </snapshots>

       </repository>

     </repositories>

    <pluginRepositories>

        <pluginRepository>

            <id>nexus</id>

            <url> http://你的NexusIP:8081/nexus/content/groups/public/</url>

            <releases>

                <enabled>true</enabled>

            </releases>

            <snapshots>

                <!-- 禁止快照版本,防止不稳定的插件影响项目构建 -->

                <enabled>false</enabled>

            </snapshots>

        </pluginRepository>

    </pluginRepositories>

   </profile>

 </profiles>

<!-- 激活nexus私服 -->

 <activeProfiles>

   <activeProfile>nexus</activeProfile>

 </activeProfiles>
这样配置,maven就可以从私服下载构件了,但是会有个问题,他还会时不时的请求中央仓库,如果想完全让maven访问nexus私服,需要设置镜像mirrors来支持。
8.5 maven的镜像配置
maven配置镜像后,所有的构件都只会从镜像服务器下载。
<mirrors>

    <mirror>

         <id>nexus</id>

         <mirrorOf>*</mirrorOf>

         <name>crop-nexus</name>

         <url>http://你的nexusIP:8081/nexus/content/groups/public/</url>

   </mirror>

 </mirrors>
8.6 发布构件至nexus
8.6.1 配置distributionManagement
发布仓库一般分为Releases版和snapshot版,所以要配置2个仓库地址
注意:这个是在项目的pom.xml中配置的
<!-- 发布构件至私服nexus -->

    <distributionManagement>

        <repository>

            <id>nexus-releases</id>

            <name>corp nexus-releases</name>

            <url>http://你的nexusIP:8081/nexus/content/repositories/releases/</url>

        </repository>

        <snapshotRepository>

            <id>nexus-snapshot</id>

            <name>corp nexus-snapshot</name>

            <url>http://你的nexusIP:8081/nexus/content/repositories/snapshots/</url>

        </snapshotRepository>

    </distributionManagement>
8.6.2 设置用户
配置好pom.xml后,需要指定发布用户,在setting.xml中设置:
<servers>

    <!-- 发布Releases版的账号,ID要与distributionManagement中的Releases ID一致 -->

    <server>

      <id>nexus-releases</id>

      <username>admin</username>

      <password>******</password>

    </server>

    <!-- 发布snapshot版的账号,ID要与distributionManagement中的snapshot ID一致 -->

    <server>

      <id>nexus-snapshot</id>

      <username>admin</username>

      <password>******</password>

    </server>

 </servers>
设置完成,使用命令发布至nexus
mvn deploy

在nexus中查看

Linux 搭建 nexus 私服【转】的更多相关文章
- linux 搭建 nexus 私服及配置
安装篇 1.tar -zxvf nexus-latest-bundle.tar.gz 2.cd nexus-2.13.0-01/bin 3../nexus start 这时可能提示 ********* ...
- Linux安装配置maven以及搭建nexus私服(编写启动脚本)
2011年07月12日16:32 下面介绍在Linux操作系统下安装配置maven和搭建nexus私服. 一.安装前的准备 下载 jdk http://www.oracle.com/technetw ...
- Linux 安装配置maven3.0 以及搭建nexus私服
http://carvin.iteye.com/blog/785365 一.软件准备 1.apache-maven-3.0-bin.tar.gz 下载地址:http://www.apache.org/ ...
- Linux 搭建Nexus
Linux 安装Maven和nexus代理仓库 1 说明 环境:redhat Enterprise Linux Server5.3-x64. 版本:Maven 3.0.5 ,Nexus-2.5. ...
- Linux_Centos中搭建nexus私服
1.在Linux下搭建Nexus私服 1).下载并且解压 下载 nexus-2.11.2-03-bundle.zip unzip nexus-2.11.2-03-bundle.z ...
- 搭建nexus私服,无法下载相关jar包,报错Repository proxy-mode is BLOCKED_AUTO
在搭建nexus私服的时候,之前没直接用来下载maven的相关插件jar包,一直可以使用, 结果今天要编译hadoop的时候,在linux上新用maven就报错了,无法下载maven的相关插件(如下) ...
- 搭建nexus私服(maven)
这里提供nexus的直接下载页面的链接: https://www.sonatype.com/download-oss-sonatype maven获取依赖jar包是从中央仓库获取,但很莫名的出现jar ...
- Linux搭建Nexus仓库+高可用方案
Linux搭建nexus仓库 1.安装jdk 1.1 获取安装包,解压到指定目录: tar xf jdk.tar.gz -C /opt/export 1.2 配置环境变量: # vim /etc/pr ...
- 搭建nexus私服
一.安装 1.从网上下载nexus软件https://www.sonatype.com/download-oss-sonatype 下载Nexus Repository Manager OSS软件包 ...
随机推荐
- MT【225】两平行直线夹曲线
已知函数$f(x)=x^3-3ax,(x\in(0,1))$若关于$x$的不等式$|f(x)|\le \dfrac{1}{4}$恒成立,求实数$a=$____ 方法一:代数法,转化成恒成立问题,略.方 ...
- 算法学习——决策单调性优化DP
update in 2019.1.21 优化了一下文中年代久远的代码 的格式…… 什么是决策单调性? 在满足决策单调性的情况下,通常决策点会形如1111112222224444445555588888 ...
- 丢手帕问题 (约瑟夫问题)Java实现
问题: 丢手帕游戏是约瑟夫问题的一个变种,游戏很简单,N个小孩围成一个圈,标号为1到N,从编号为m的小孩开始报数,报到第L个小孩退出游戏,然后下一个小孩继续从1开始报数,数到第L个小孩退出游戏,如此循 ...
- CAN总线疑惑与解答
1 CAN总线2根数据线是怎么表示数据信息1和0的? Can总线采用差分数据表示方法,平时2个数据线为2.5V,表示隐性(1).当用数据0(显性)需要发送时1跟数据线上升到3.5V另一个下降到1 ...
- WEB入门之十三 jQuery选择器
学习内容 jQuery层次选择器 jQuery属性选择器 jQuery表单选择器 jQuery过滤选择器 能力目标 熟悉jQuery各种选择器的使用场合 能熟练使用jQuery各种选择器 本章简介 上 ...
- 【loj3043】【zjoi2019】线段树
题目 描述 有\(m\)个操作一次发生,每个操作有\(\frac{1}{2}\)的概率被执行 ; 一次操作为线段树([1,n])上的 \(modify(Node,l,r,ql,qr)\) ; ...
- .net跨防火墙链接oracle连接池链接长时间无通讯数据被断开后报错问题解决
环境: .net 4.0以上使用Oracle.ManagedDataAccess组件链接oracle数据库,应用程序与数据库之间存在硬件防火墙. 症状:应用程序启动后正常访问,如果出现长时间无数据库请 ...
- java.sql.SQLException: [Microsoft][ODBC Microsoft Access Driver] 不能使用 '(未知的)';文件已在使用中
最近查看程序输入的日志时发现一个java连接Access的程序时不时的抛出: java.sql.SQLException: [Microsoft][ODBC Microsoft Access Driv ...
- javascript:window.location.replace 与 window.location.reload() 刷新页面的不同效果
今天早上我发现一个问题,当一个网页的地址最后面是一个#时(比如:http://www.baidu.com/go.asp#), 执行:window.location.replace(window.loc ...
- c/c++ 整形转字符串
int findex;char instr[10]; sprintf(instr,"%d",findex); 好像ltoa用不了...