
搭建nexus私服
一、安装
1、从网上下载nexus软件
https://www.sonatype.com/download-oss-sonatype 下载Nexus Repository Manager OSS软件包
目前我使用的是3.0的版本,下面均是以安装3.0的版本位例子
2、将下载下来的nexus-3.13.0-01-win64.zip解压缩到目标路径,官网建议windows不要放在Program files 下,那么本人放在D:/develop下面
3、
(1) 未注册成系统服务,直接运行:
a)进入bin目录,运行cmd 命令 :nexus.exe /run 此时运行私有仓库;linux版本可以执行:nexus /run
b)按ctrl-c可以停止运行私服;
(2) 注册成系统服务(需要确保jdk已经在系统中安装过):
a) 进入bin目录,运行cmd:nexus.exe /install 此时会安装私有仓库;
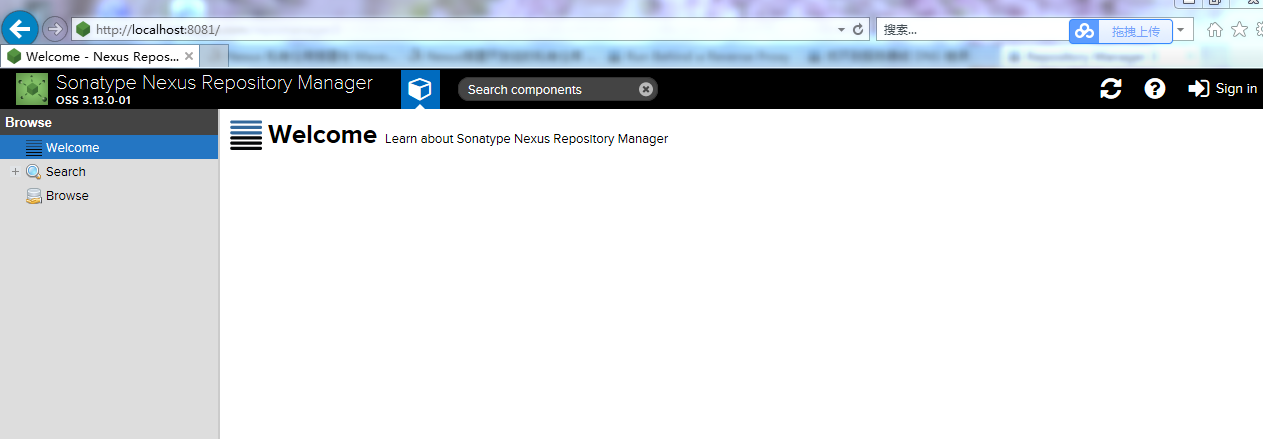
b) 安装完成之后,默认访问端口未8081,上下文为 /
c) 进入页面之后,直接登录,账号:admin admin123
d) 在访问的时候,请使用ip访问
4、关于Nexus Repository Manager 更多介绍 可参考网址:https://help.sonatype.com
二、配置
按照以上的方法搭建好私服之后,此时需要对私服里面的内容进行配置,用户通用浏览器(http://127.0.0.1:8001/)访问私服。
1、以管理员身份登入私服
在首页的右上角点击"Sign In" 进入登入页面,账号为:admin 密码为:admin123;
2、配置代理仓库
本地maven(已安装Maven软件)setting.xml 中在没有私服的情况下,需要配置各种代理或镜像(通过这些将需要的第三方提供的jar包下载到本地仓库供maven工程直接引用)。但是由于网速原因或在不同电脑项目中都需要连接网络通过镜像将所需jar包下载下来,一方面速度较慢,另一方面不好管理。因此需要私服,让setting.xml直接配置私服的仓库地址即可。
(1) 在私服中配置各种市面上常见的仓库地址(增加新的代理源)
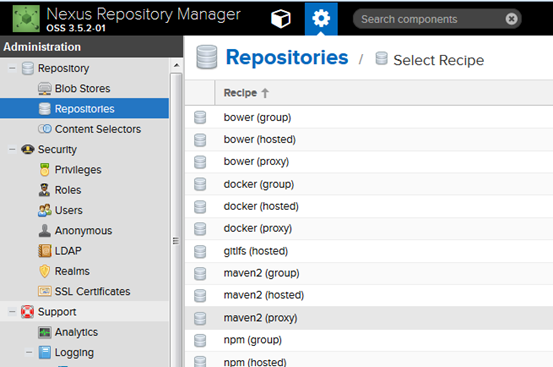
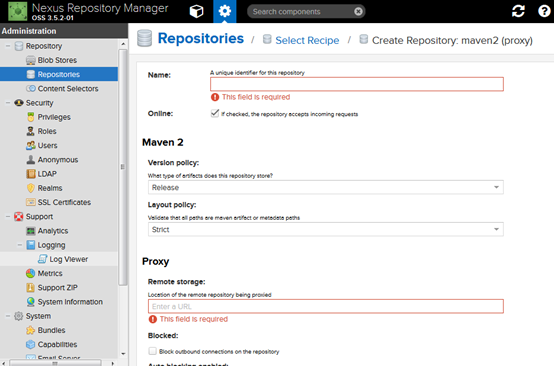
- 设置名称和URL
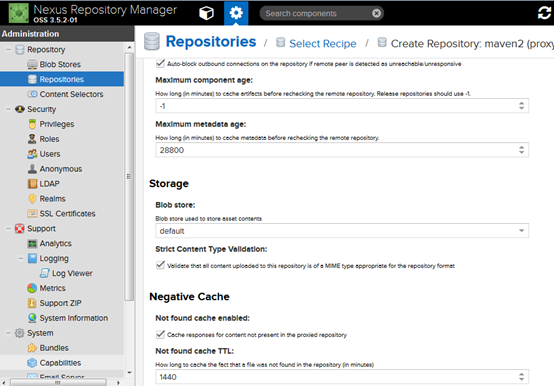
Cache统一设置为200天 288000
- 逐个增加常用代理
1. aliyun

http://maven.aliyun.com/nexus/content/groups/public

2. apache_snapshot

https://repository.apache.org/content/repositories/snapshots/

3. apache_release

https://repository.apache.org/content/repositories/releases/

4. atlassian

https://maven.atlassian.com/content/repositories/atlassian-public/

5. central.maven.org

http://central.maven.org/maven2/

6. datanucleus

http://www.datanucleus.org/downloads/maven2

7. maven-central (安装后自带,仅需设置Cache有效期即可)

https://repo1.maven.org/maven2/

8. nexus.axiomalaska.com

http://nexus.axiomalaska.com/nexus/content/repositories/public

9. oss.sonatype.org

https://oss.sonatype.org/content/repositories/snapshots

10.pentaho

https://public.nexus.pentaho.org/content/groups/omni/

11. spring-snapshots

https://repo.spring.io/snapshot

//在配置这个代理源的时候,Version pollcy 要设置成 Snapshot,Layout pollcy 要设置成 Permissive.

12. spring-milestones

https://repo.spring.io/milestone
再次强调,在
How long (in minutes) to cache metadata before rechecking the remote repository.处
统一设置为
288000 即200天,当然可以设置为更长的时间
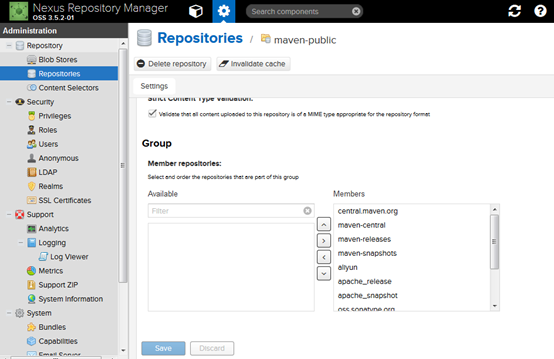
设置maven-public
- 将这些代理加入Group
- 设置私用仓库可重复发布
Nexus安装后自带maven-releases,maven-snapshots两个仓库,用于将生成的jar包发布在这两个仓库中,在实际开发中需要将maven-releases设置为可以重复发布。
maven-releases
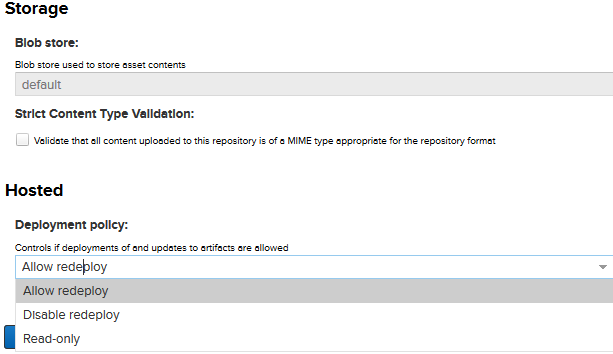
注:maven-snapshots缺省是可以重新部署的。
(2) 在maven的安装路径下conf/Setting.xml中配置如下内容:
<settings>

  <pluginGroups>

     <pluginGroup>org.sonatype.plugins</pluginGroup>

  </pluginGroups>

  <mirrors>

    <mirror>

      <id>nexus</id>

      <mirrorOf>*</mirrorOf>

      <url>http://localhost:8081/repository/maven-public/</url>

    </mirror>

  </mirrors>

  <profiles>

    <profile>

      <id>nexus</id>

      <!--Enable snapshots for the built in central repo to direct -->

      <!--all requests to nexus via the mirror -->

      <repositories>

        <repository>

          <id>central</id>

          <url>http://central</url>

          <releases><enabled>true</enabled></releases>

          <snapshots><enabled>true</enabled></snapshots>

        </repository>

      </repositories>

     <pluginRepositories>

        <pluginRepository>

          <id>central</id>

          <url>http://central</url>

          <releases><enabled>true</enabled></releases>

          <snapshots><enabled>true</enabled></snapshots>

        </pluginRepository>

      </pluginRepositories>

    </profile>

  </profiles>

  <activeProfiles>

    <!--make the profile active all the time -->

    <activeProfile>nexus</activeProfile>

  </activeProfiles>

  <servers>

    <server>

      <id>nexus</id>

      <username>admin</username>

      <password>admin123</password>

    </server>

  </servers>

</settings>
(3) 测试
将settings.xml中记录的maven仓库地址中的之前下载下来的jar包全部删除。在maven 工程右键 Maven ---> update product,在出来的弹出框中选择 "force update of snapshorts/releases",重新下载所需依赖的jar包即可。
PS:私服配置的内容参考了:https://www.cnblogs.com/fanzhenyong/p/7709434.html
搭建nexus私服的更多相关文章
- Linux_Centos中搭建nexus私服
1.在Linux下搭建Nexus私服 1).下载并且解压 下载 nexus-2.11.2-03-bundle.zip unzip nexus-2.11.2-03-bundle.z ...
- Linux 安装配置maven3.0 以及搭建nexus私服
http://carvin.iteye.com/blog/785365 一.软件准备 1.apache-maven-3.0-bin.tar.gz 下载地址:http://www.apache.org/ ...
- 搭建nexus私服(maven)
这里提供nexus的直接下载页面的链接: https://www.sonatype.com/download-oss-sonatype maven获取依赖jar包是从中央仓库获取,但很莫名的出现jar ...
- Linux安装配置maven以及搭建nexus私服(编写启动脚本)
2011年07月12日16:32 下面介绍在Linux操作系统下安装配置maven和搭建nexus私服. 一.安装前的准备 下载 jdk http://www.oracle.com/technetw ...
- 搭建nexus私服,无法下载相关jar包,报错Repository proxy-mode is BLOCKED_AUTO
在搭建nexus私服的时候,之前没直接用来下载maven的相关插件jar包,一直可以使用, 结果今天要编译hadoop的时候,在linux上新用maven就报错了,无法下载maven的相关插件(如下) ...
- Linux 搭建 nexus 私服【转】
原文:https://yq.aliyun.com/articles/5981 第8章 私服nexus 本章详细介绍了nexus的安装过程,设置maven从私服下载构件,以及发布构件至nexus. 8. ...
- linux 搭建 nexus 私服及配置
安装篇 1.tar -zxvf nexus-latest-bundle.tar.gz 2.cd nexus-2.13.0-01/bin 3../nexus start 这时可能提示 ********* ...
- 用Docker搭建Nexus私服
搜索Nexus 在docker容器中加载Nexus镜像 发布本地项目到Nexus私服 配置连接方式 发布指令 打源码包上传插件 搜索Nexus 在我们打算使用Nexus时,我们先搜索一下docke ...
- Docker 环境下搭建nexus私服
一.安装docker 1.脚本安装 本机环境CentOS7,用户为root 下载脚本到工作目录 curl -fsSL https://get.docker.com -o get-docker.sh 执 ...
随机推荐
- 订Pizza(Java)
帮朋友改的一个订pizza的作业 大概要求就是输入判断,选择pizza的个数和种类,然后返回一个价格 代码放在下面,如果有刚学Java的同学可以参考一下,没有什么难度 public class Piz ...
- 大规模SDN云计算数据中心组网的架构设计
本文首先分析了在大规模SDN数据中心组网中遇到的问题.一方面Underlay底层组网规模受限于设备实际的转发能力和端口密度,单一Spine-leaf的Fabric架构无法满足大规模组网的需求:另一方面 ...
- scrapy基础知识之下载中间件使用案例:
1. 创建middlewares.py文件. Scrapy代理IP.Uesr-Agent的切换都是通过DOWNLOADER_MIDDLEWARES进行控制,我们在settings.py同级目录下创建m ...
- 寻觅Azure上的Athena和BigQuery (二):神奇的PolyBase
前情回顾 在“数据湖”概念与理论逐渐深入人心的今天,面向云存储的交互式查询这个需求场景显得愈发重要.这是因为原生的云存储(主要指S3这样的对象存储)既能够容纳大容量的明细数据,又能在性能和成本间取得一 ...
- struts2入门Demo
一.引入必要的jar包,所需jar包如下: 二.配置web.xml.主要目的是拦截请求 <?xml version="1.0" encoding="UTF-8&qu ...
- Java面试总结(一)
1.equals和==和hashcode “==”是运算符,比较两个变量的值是否相等 equals是Object类的方法.比较两个对象是否相等 hashcode是Object类的方法,返回一个 ...
- python接口自动化(三十一)--html测试报告通过邮件发出去——下(详解)
简介 本篇总结了 QQ (SSL)邮箱和 163(非SSL) 邮箱发送邮件,专治各种不行,总之看完这篇以后麻麻再也不用担心我的邮件收不到了.以下代码兼容 python2 和 python3,运行无异常 ...
- 20141209-基本概念-BlogEngine.NET(1)-笔记
最近在读BlogEngine.NET3.1源代码,希望能坚持到底吧. 刚接触源代码,没有思路,于是读了14篇关于BlogEngine.Net1.4.5的系列博客,地址:http://www.cnblo ...
- 20131207-ADO.NET-第十六天
[1]快捷键 工具箱:ctrl+w+x 首字母定位控件范围 属性:F4 或ctrl+w+p Tab跳转 ,home 与end也有效 [2]连接字符串 string str = "Data S ...
- MongoDB基础教程[菜鸟教程整理]
MongoDB基础教程 ======================================================================================== ...