
Spring Boot实践——多线程
多线程
Spring通过任务执行器(TaskExecutor)来实现多线程和并发编程。使用ThreadPoolTaskExecutor可实现一个基于线程池的TaskExecutor。而实际开发中任务一般是非阻碍的,即异步的,所以我们要在配置类中通过@EnableAsync开启对异步任务的支持,并通过在实际执行的Bean的方法中使用@Async注解声明其是一个异步任务。
此外,还提供一种Java的实现方式,多种方式去尝试如何去实现多线程。
实现
一、基于Spring
1、配置类
import java.util.concurrent.Executor;

import org.springframework.aop.interceptor.AsyncUncaughtExceptionHandler;

import org.springframework.context.annotation.ComponentScan;

import org.springframework.context.annotation.Configuration;

import org.springframework.scheduling.annotation.AsyncConfigurer;

import org.springframework.scheduling.annotation.EnableAsync;

import org.springframework.scheduling.concurrent.ThreadPoolTaskExecutor;

/**

 * @Description: 配置类实现AsyncConfigurer接口,并重写getAsyncExecutor方法,并返回一个ThreadPoolTaskExecutor,

 * 这样我们就获得一个基于线程池TaskExecutor

 * @ClassName: CustomMultiThreadingConfig

 * @Author: OnlyMate

 * @Date: 2018年9月21日 下午2:50:14

 */

@Configuration

@ComponentScan("com.only.mate.springboot.multithreading")

@EnableAsync//利用@EnableAsync注解开启异步任务支持

public class CustomMultiThreadingConfig implements AsyncConfigurer{

    @Override

    public Executor getAsyncExecutor() {

        ThreadPoolTaskExecutor taskExecutor = new ThreadPoolTaskExecutor();

        taskExecutor.setCorePoolSize(5);

        taskExecutor.setMaxPoolSize(10);

        taskExecutor.setQueueCapacity(25);

        taskExecutor.initialize();

        return taskExecutor;

    }

    @Override

    public AsyncUncaughtExceptionHandler getAsyncUncaughtExceptionHandler() {

        return AsyncConfigurer.super.getAsyncUncaughtExceptionHandler();

    }

}
2、创建线程任务
import org.slf4j.Logger;

import org.slf4j.LoggerFactory;

import org.springframework.scheduling.annotation.Async;

import org.springframework.stereotype.Service;

/**

 * @Description: 创建线程任务服务

 * @ClassName: CustomMultiThreadingService

 * @Author: OnlyMate

 * @Date: 2018年9月21日 下午3:17:57

 */

@Service

public class CustomMultiThreadingService {

    private Logger logger = LoggerFactory.getLogger(CustomMultiThreadingService.class);

    /**

     * @Description:通过@Async注解表明该方法是一个异步方法,

     * 如果注解在类级别上,则表明该类所有的方法都是异步方法,而这里的方法自动被注入使用ThreadPoolTaskExecutor作为TaskExecutor

     * @Title: executeAysncTask1

     * @Date: 2018年9月21日 下午2:54:32

     * @Author: OnlyMate

     * @Throws

     * @param i

     */

    @Async

    public void executeAysncTask1(Integer i){

        logger.info("CustomMultiThreadingService ==> executeAysncTask1 method: 执行异步任务{} ", i);

    }

    /**

     * @Description:通过@Async注解表明该方法是一个异步方法,

     * 如果注解在类级别上,则表明该类所有的方法都是异步方法,而这里的方法自动被注入使用ThreadPoolTaskExecutor作为TaskExecutor

     * @Title: executeAsyncTask2

     * @Date: 2018年9月21日 下午2:55:04

     * @Author: OnlyMate

     * @Throws

     * @param i

     */

    @Async

    public void executeAsyncTask2(Integer i){

        logger.info("CustomMultiThreadingService ==> executeAsyncTask2 method: 执行异步任务{} ", i);

    }

}
3、触发线程任务
import org.springframework.beans.factory.annotation.Autowired;

import org.springframework.stereotype.Controller;

import org.springframework.web.bind.annotation.RequestMapping;

import org.springframework.web.bind.annotation.ResponseBody;

import com.only.mate.springboot.multithreading.CustomMultiThreadingService;

/**

 * @Description:自定义多线程Controller

 * @ClassName: CustomMultiThreadingController

 * @Author: OnlyMate

 * @Date: 2018年9月21日 下午3:02:49

 */

@Controller

@RequestMapping(value="/multithreading")

public class CustomMultiThreadingController {

    @Autowired

    private CustomMultiThreadingService customMultiThreadingService;

    @ResponseBody

    @RequestMapping(value="/dotask")

    public String doTask() {

        for (int i=0;i<10;i++){

            customMultiThreadingService.executeAysncTask1(i);

            customMultiThreadingService.executeAsyncTask2(i);

        }

        return "success";

    }

}
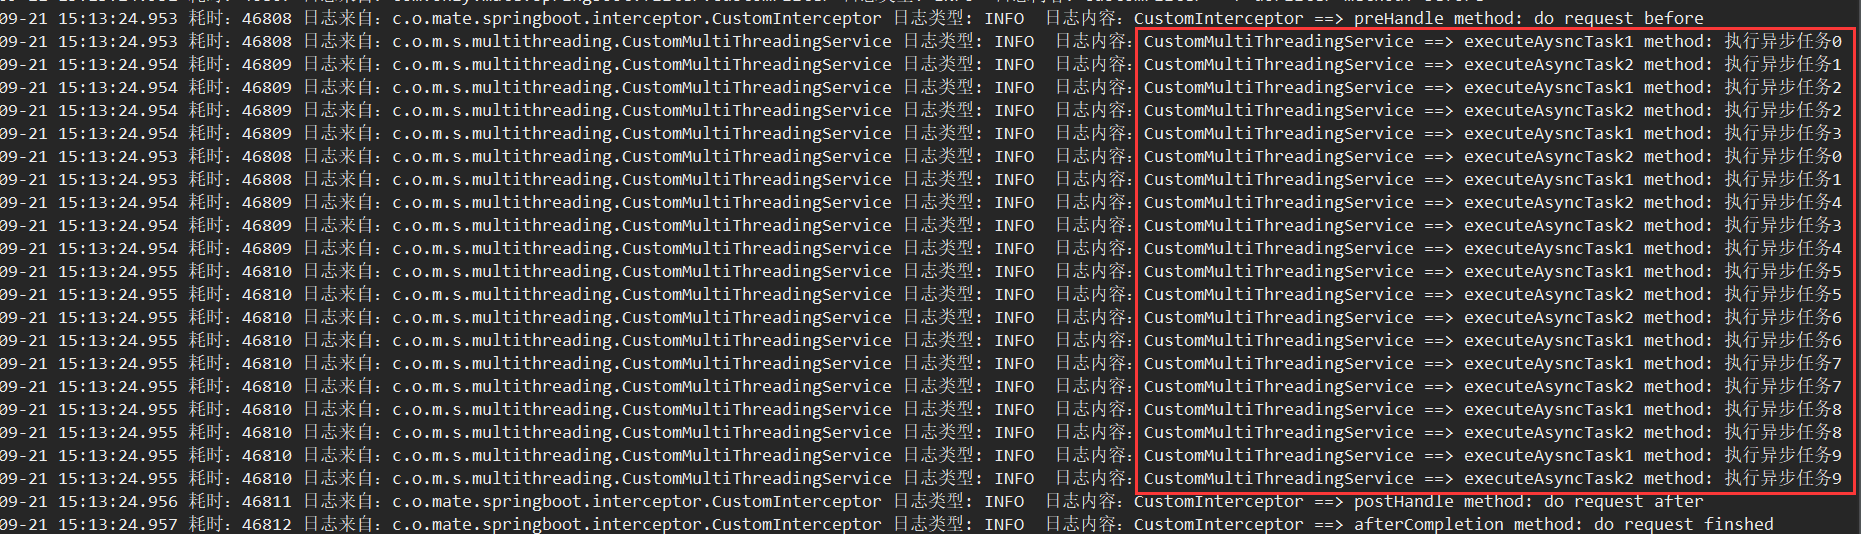
4、效果图
访问http://localhost:8088/springboot/multithreading/dotask
二、基于Java
1、异步线程调度管理器
import java.util.concurrent.BlockingQueue;

import java.util.concurrent.LinkedBlockingQueue;

import java.util.concurrent.ThreadPoolExecutor;

import java.util.concurrent.TimeUnit;

/**

 * @Description: 异步线程调度管理器

 * @ClassName: CustomAsyncScheduler

 * @Author: OnlyMate

 * @Date: 2018年9月21日 下午3:25:40

 */

public class CustomAsyncScheduler {

    private volatile static CustomAsyncScheduler instance;

    private static ThreadPoolExecutor chnlBackendQueryPool;

    private CustomAsyncScheduler() {

    }

    @SuppressWarnings({ "rawtypes", "static-access", "unchecked" })

    public static CustomAsyncScheduler getInstance() {

        if (instance == null) {

            synchronized (CustomAsyncScheduler.class) {

                if (instance == null) {

                    instance = new CustomAsyncScheduler();

                    BlockingQueue queue = new LinkedBlockingQueue();

                    chnlBackendQueryPool = new ThreadPoolExecutor(50, 100, 30, TimeUnit.SECONDS, queue);

                    chnlBackendQueryPool.allowCoreThreadTimeOut(true);

                    instance.setChnlBackendQueryPool(chnlBackendQueryPool);

                }

            }

        }

        return instance;

    }

    public ThreadPoolExecutor getChnlBackendQueryPool() {

        return chnlBackendQueryPool;

    }

    public static void setChnlBackendQueryPool(ThreadPoolExecutor chnlBackendQueryPool) {

        CustomAsyncScheduler.chnlBackendQueryPool = chnlBackendQueryPool;

    }

    public static void setInstance(CustomAsyncScheduler instance) {

        CustomAsyncScheduler.instance = instance;

    }

}
2、创建线程任务
import org.slf4j.Logger;

import org.slf4j.LoggerFactory;

import org.springframework.scheduling.annotation.Async;

import org.springframework.stereotype.Service;

/**

 * @Description: 创建线程任务服务

 * @ClassName: CustomMultiThreadingService

 * @Author: OnlyMate

 * @Date: 2018年9月21日 下午3:17:57

 */

@Service

public class CustomMultiThreadingService {

    private Logger logger = LoggerFactory.getLogger(CustomMultiThreadingService.class);

    /**

     * @Description:通过@Async注解表明该方法是一个异步方法,

     * 如果注解在类级别上,则表明该类所有的方法都是异步方法,而这里的方法自动被注入使用ThreadPoolTaskExecutor作为TaskExecutor

     * @Title: executeAysncTask1

     * @Date: 2018年9月21日 下午2:54:32

     * @Author: OnlyMate

     * @Throws

     * @param i

     */

    @Async

    public void executeAysncTask1(Integer i){

        logger.info("CustomMultiThreadingService ==> executeAysncTask1 method: 执行异步任务{} ", i);

    }

    /**

     * @Description:通过@Async注解表明该方法是一个异步方法,

     * 如果注解在类级别上,则表明该类所有的方法都是异步方法,而这里的方法自动被注入使用ThreadPoolTaskExecutor作为TaskExecutor

     * @Title: executeAsyncTask2

     * @Date: 2018年9月21日 下午2:55:04

     * @Author: OnlyMate

     * @Throws

     * @param i

     */

    @Async

    public void executeAsyncTask2(Integer i){

        logger.info("CustomMultiThreadingService ==> executeAsyncTask2 method: 执行异步任务{} ", i);

    }

    /**

     * @Description: 异步线程调度管理器创建线程任务

     * @Title: executeAsyncTask3

     * @Date: 2018年9月21日 下午3:32:28

     * @Author: OnlyMate

     * @Throws

     * @param i

     */

    public void executeAsyncTask3(Integer i){

        CustomAsyncScheduler.getInstance().getChnlBackendQueryPool().execute(new Runnable() {

            @Override

            public void run() {

                logger.info("CustomMultiThreadingService ==> executeAsyncTask3 method: 执行异步任务{} ", i);

            }

        });

    }

}
3、触发线程任务
import org.springframework.beans.factory.annotation.Autowired;

import org.springframework.stereotype.Controller;

import org.springframework.web.bind.annotation.RequestMapping;

import org.springframework.web.bind.annotation.ResponseBody;

import com.only.mate.springboot.multithreading.CustomMultiThreadingService;

/**

 * @Description:自定义多线程Controller

 * @ClassName: CustomMultiThreadingController

 * @Author: OnlyMate

 * @Date: 2018年9月21日 下午3:02:49

 */

@Controller

@RequestMapping(value="/multithreading")

public class CustomMultiThreadingController {

    @Autowired

    private CustomMultiThreadingService customMultiThreadingService;

    @ResponseBody

    @RequestMapping(value="/dotask")

    public String doTask() {

        for (int i=0;i<10;i++){

            customMultiThreadingService.executeAysncTask1(i);

            customMultiThreadingService.executeAsyncTask2(i);

        }

        return "success";

    }

    @ResponseBody

    @RequestMapping(value="/dojob")

    public String doJob() {

        for (int i=0;i<10;i++){

            customMultiThreadingService.executeAysncTask1(i);

            customMultiThreadingService.executeAsyncTask2(i);

            customMultiThreadingService.executeAsyncTask3(i);

        }

        return "success";

    }

}
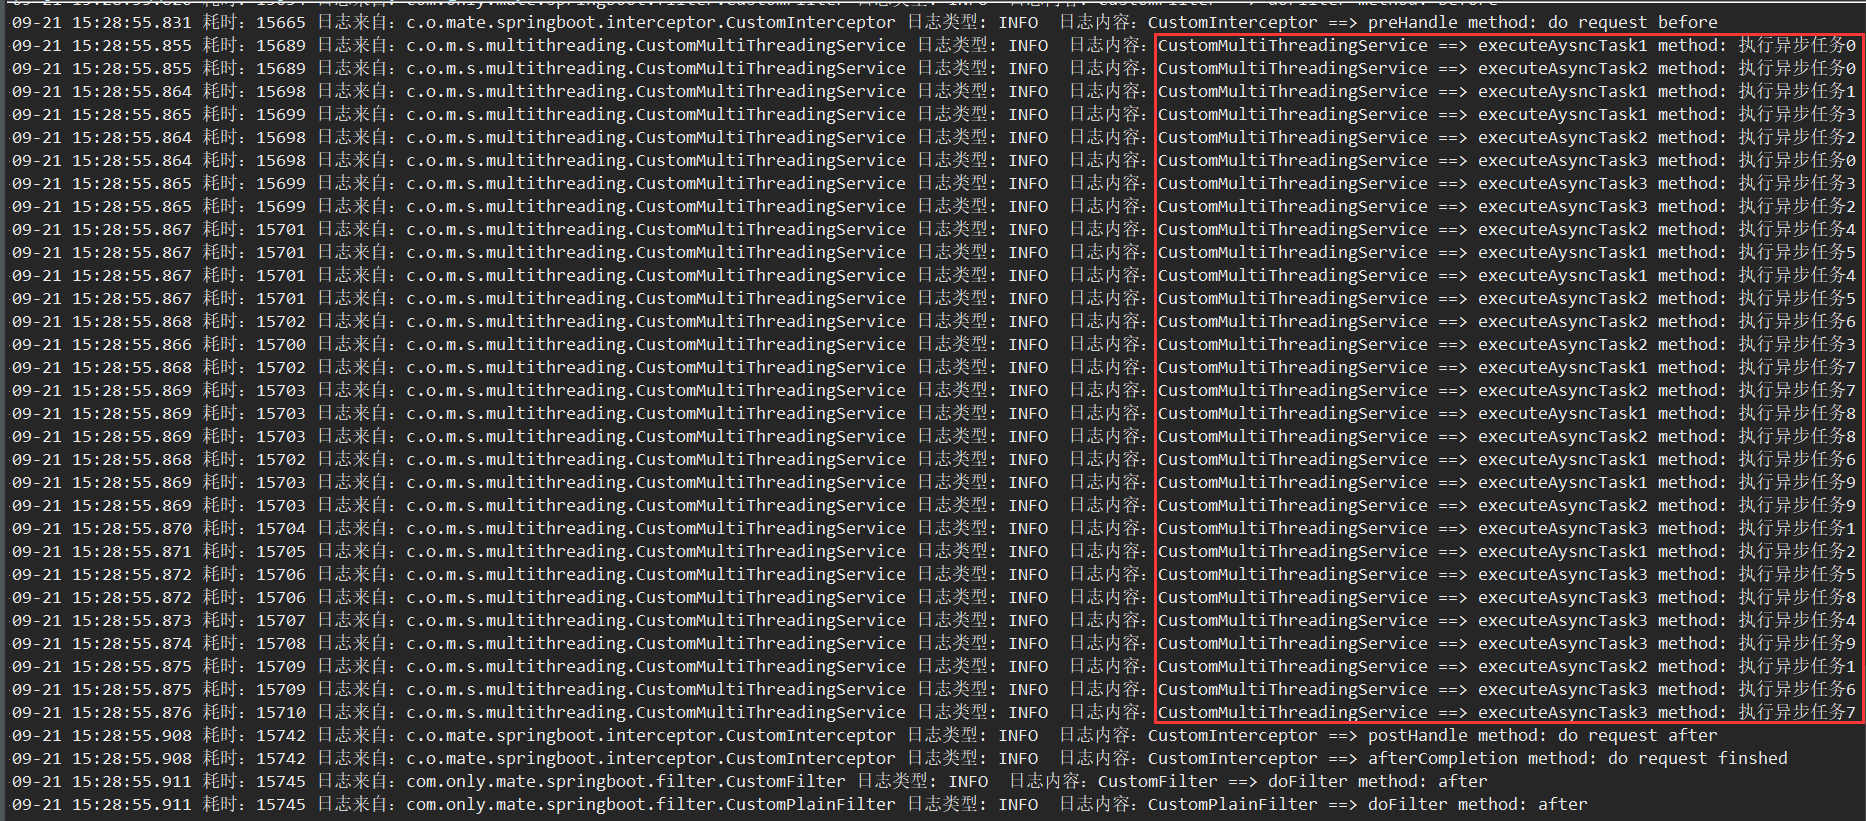
4、效果图
访问http://localhost:8088/springboot/multithreading/dojob
Spring Boot实践——多线程的更多相关文章
- Spring Boot实践——Spring AOP实现之动态代理
Spring AOP 介绍 AOP的介绍可以查看 Spring Boot实践——AOP实现 与AspectJ的静态代理不同,Spring AOP使用的动态代理,所谓的动态代理就是说AOP框架不会去修改 ...
- Spring Boot实践——AOP实现
借鉴:http://www.cnblogs.com/xrq730/p/4919025.html https://blog.csdn.net/zhaokejin521/article/detai ...
- Spring Boot 实践 :Spring Boot + MyBatis
Spring Boot 实践系列,Spring Boot + MyBatis . 目的 将 MyBatis 与 Spring Boot 应用程序一起使用来访问数据库. 本次使用的Library spr ...
- spring boot 实践
二.实践 一些说明: 项目IDE采用Intellij(主要原因在于Intellij颜值完爆Eclipse,谁叫这是一个看脸的时代) 工程依赖管理采用个人比较熟悉的Maven(事实上SpringBoot ...
- spring boot 实践总结(转)
pring Boot是最流行的用于开发微服务的Java框架.在本文主要分享的是在专业开发中使用Spring Boot所采用的最佳实践.这些内容是基于个人经验和一些熟知的Spring Boot专家的文章 ...
- Spring Boot 定时+多线程执行
Spring Boot 定时任务有多种实现方式,我在一个微型项目中通过注解方式执行定时任务. 具体执行的任务,通过多线程方式执行,单线程执行需要1小时的任务,多线程下5分钟就完成了. 执行效率提升10 ...
- Spring Boot实践——用外部配置填充Bean属性的几种方法
引用:https://blog.csdn.net/qq_17586821/article/details/79802320 spring boot允许我们把配置信息外部化.由此,我们就可以在不同的环境 ...
- Spring Boot实践——事件监听
借鉴:https://blog.csdn.net/Harry_ZH_Wang/article/details/79691994 https://blog.csdn.net/ignorewho/arti ...
- Spring Boot实践——基础和常用配置
借鉴:https://blog.csdn.net/j903829182/article/details/74906948 一.Spring Boot 启动注解说明 @SpringBootApplica ...
随机推荐
- bzoj-4887-dp+矩阵快速幂
4887: [Tjoi2017]可乐 Time Limit: 10 Sec Memory Limit: 64 MBSubmit: 247 Solved: 170[Submit][Status][D ...
- 兼容360模式自动播放视频【需要flvpalyer.swf】
<object classid="clsid:D27CDB6E-AE6D-11cf-96B8-444553540000" codebase="http://down ...
- Spring学习10- bean的生命周期(阿里面试题目两次面试均提到)
找工作的时候有些人会被问道Spring中Bean的生命周期,其实也就是考察一下对Spring是否熟悉,工作中很少用到其中的内容,那我们简单看一下. 在说明前可以思考一下Servlet的生命周期:实例化 ...
- 利用Bomb打造自己的小程序
小程序开发 Bomb免费后端云开发 首先,小程序的开发已是热门,一个前段技术人员必备的技术就是开发小程序.在这里推荐一个入门小程序文章(连胜出品). 对于小程序的入门开发就不再做详细介绍,这里针对Bm ...
- JS之replace
<!DOCTYPE html> <html lang="en"> <head> <meta charset="UTF-8&quo ...
- hdu3572
题解: 网络流 判断是否为漫流 代码: #include <cstdio> #include <cstring> #include <algorithm> #inc ...
- window和Linux下Redis的安装及运行
Window篇 Redis的官方目前公开的版本分为三个类别Stable.Beta和Unstable.这些版本一般只是针对Linux.Unix内核的系统,虽然官方的不支持Window系统,但是微软开源 ...
- Property 'submit' of object #<HTMLFormElement> is not a function
<form action="" type="get" id="form"> <input type="butto ...
- websocket 缺点
当时用 python 做的服务器,后来回去想再工作项目上用,但新的技术升级,随之而来还是要解决很多非技术问题, 服务器带宽,并发服务器性能方方面面考虑之后还是没有用上,十分可惜, 一个新的技术推动,尤 ...
- 分布式机器学习系统笔记(一)——模型并行,数据并行,参数平均,ASGD
欢迎转载,转载请注明:本文出自Bin的专栏blog.csdn.net/xbinworld. 技术交流QQ群:433250724,欢迎对算法.技术.应用感兴趣的同学加入. 文章索引::"机器学 ...