
Spring Boot实践——基础和常用配置
借鉴:https://blog.csdn.net/j903829182/article/details/74906948
一、Spring Boot 启动注解说明
@SpringBootApplication开启了Spring的组件扫描和Spring Boot的自动配置功能。实际上, @SpringBootApplication将三个有用的注解组合在了一起。
- Spring的@Configuration:标明该类使用Spring基于Java的配置。虽然本书不会写太多配置,但我们会更倾向于使用基于Java而不是XML的配置。
- Spring的@ComponentScan:启用组件扫描,这样你写的Web控制器类和其他组件才能被自动发现并注册为Spring应用程序上下文里的Bean。默认扫描
@SpringBootApplication所在类的同级目录以及它的子目录。本章稍后会写一个简单的Spring MVC控制器,使用@Controller进行注解,这样组件扫描才能找到它。 - Spring Boot 的 @EnableAutoConfiguration: 这 个 不 起 眼 的 小 注 解 也 可 以 称 为@Abracadabra①,就是这一行配置开启了Spring Boot自动配置的魔力,让你不用再写成篇的配置了。
在Spring Boot的早期版本中,你需要在ReadingListApplication类上同时标上这三个注解,但从Spring Boot 1.2.0开始,有@SpringBootApplication就行了。
二、Bean的scope
scope描述了spring容器如何新建bena的实例,spring的scope有以下几种,通过@Scope注解来实现
- Singleton:一个spring容器中只有一个bena的实例,此为spring的默认配置,全容器共享一个实例的bean。
- Prototype:每次调用新建一个bean的实例。
- Request:web项目中,给每一个http request新建一个Bean实例。
- Session :web项目中,给每一个http session新建一个实例。
- GlobalSession:这个只在portal应用中有用,给每一个global http session新建一个bean实例。
另外,在spring batch中还有一个Scope是使用@StepScope,用在批处理中。
实例:
定义一个Single的Bean
/**

 * @Description: 自定义Single实例

 * @ClassName: CustomSingleService

 * @author OnlyMate

 * @Date 2018年9月13日 上午10:34:36

 *

 */

@Service

//默认为Sinleton,相当于@Scope("singleton")

@Scope(value="singleton")

public class CustomSingleService {

}
定义一个Prototype的Bean
/**

 * @Description: 自定义Prototype实例

 * @ClassName: CustomPrototypeService

 * @author OnlyMate

 * @Date 2018年9月13日 上午10:34:36

 *

 */

@Service

@Scope(value="prototype")

public class CustomPrototypeService {

}
Bean的Scope配置
import org.springframework.context.annotation.ComponentScan;

import org.springframework.context.annotation.Configuration;

/**

 * @Description: 自定义Bean的Scope配置类

 * @ClassName: CustomScopConfig

 * @author OnlyMate

 * @Date 2018年9月13日 上午10:59:54

 *

 */

@Configuration

@ComponentScan(value="com.only.mate.springboot.basic.scope")

public class CustomScopConfig {

}
测试类
import org.springframework.context.annotation.AnnotationConfigApplicationContext;

import com.only.mate.springboot.configure.basic.CustomScopConfig;

public class CustomScopeMain {

    public static void main(String[] args) {

        // AnnotationConfigApplicationContext作为spring容器,接受一个配置类作为参数

        AnnotationConfigApplicationContext context = new AnnotationConfigApplicationContext(CustomScopConfig.class);

        CustomSingleService cs1 = context.getBean(CustomSingleService.class);

        CustomPrototypeService cp1 = context.getBean(CustomPrototypeService.class);

        CustomSingleService cs2 = context.getBean(CustomSingleService.class);

        CustomPrototypeService cp2 = context.getBean(CustomPrototypeService.class);

        System.out.println("cs1与cs2是否相等:" + cs1.equals(cs2));

        System.out.println("cp1与cp2是否相等:" + cp1.equals(cp2));

        context.close();

    }

}
结果:

三、Bean的初始化和销毁
在我们实际开发的时候,经常会遇到在bean使用之前或者之后做一些必要的操作,spring 对bean的生命周期的操作提供了支持。在使用java配置和注解配置下提供如下两种方式:
- java配置方式:使用@Bean的initMethod和destroyMethod(相当于xml配置的init-method和destory-method)
- 注解方式:利用JSR-250的@PostConstruct和@PreDestroy
1、增加JSR250支持
<!--增加JSR250支持-->

<dependency>

    <groupId>javax.annotation</groupId>

    <artifactId>jsr250-api</artifactId>

    <version>1.0</version>

</dependency>
2、使用@Bean形式的bean
/**

 * @Description: 自定义@Bean方式的初始化和销毁方法

 * @ClassName: CustomBeanWay

 * @author OnlyMate

 * @Date 2018年9月13日 上午11:15:41

 *

 */

public class CustomBeanWay {

    public CustomBeanWay() {

        super();

        System.out.println("@Bean初始化构造方法 ==> CustomBeanWay method");

    }

    public void init() {

        System.out.println("@Bean初始化方法 ==> init method");

    }

    public void destroy() {

        System.out.println("@Bean销毁方法 ==> destroy method");

    }

}
3、使用JSR250形式的bean
/**

 * @Description: 自定义JSR250方式的初始化和销毁方法

 * @ClassName: CustomJSR250Way

 * @author OnlyMate

 * @Date 2018年9月13日 上午11:15:41

 *

 */

public class CustomJSR250Way {

    public CustomJSR250Way() {

        super();

        System.out.println("JSR250初始化构造方法 ==> CustomJSR250Way method");

    }

    @PostConstruct

    public void init() {

        System.out.println("JSR250初始化方法 ==> init method");

    }

     @PreDestroy

    public void destroy() {

        System.out.println("JSR250销毁方法 ==> destroy method");

    }

}
4、配置
import org.springframework.context.annotation.Bean;

import org.springframework.context.annotation.ComponentScan;

import org.springframework.context.annotation.Configuration;

import com.only.mate.springboot.basic.lifecycle.CustomBeanWay;

import com.only.mate.springboot.basic.lifecycle.CustomJSR250Way;

@Configuration

@ComponentScan(value="com.only.mate.springboot.basic.lifecycle")

public class CustomLifeCycleConfig {

    @Bean(initMethod = "init",destroyMethod = "destroy")

    public CustomBeanWay customBeanWay(){

        return new CustomBeanWay();

    }

    @Bean

    public CustomJSR250Way customJSR250Way(){

        return new CustomJSR250Way();

    }

}
5、启动
import org.springframework.context.annotation.AnnotationConfigApplicationContext;

import com.only.mate.springboot.configure.lifecycle.CustomLifeCycleConfig;

@SuppressWarnings("unused")

public class CustomLifeCycleMain {

    public static void main(String[] args) {

        // AnnotationConfigApplicationContext作为spring容器,接受一个配置类作为参数

        AnnotationConfigApplicationContext context = new AnnotationConfigApplicationContext(CustomLifeCycleConfig.class);

        CustomBeanWay customBeanWay = context.getBean(CustomBeanWay.class);

        CustomJSR250Way customJSR250Way = context.getBean(CustomJSR250Way.class);

        context.close();

    }

}
6、效果图
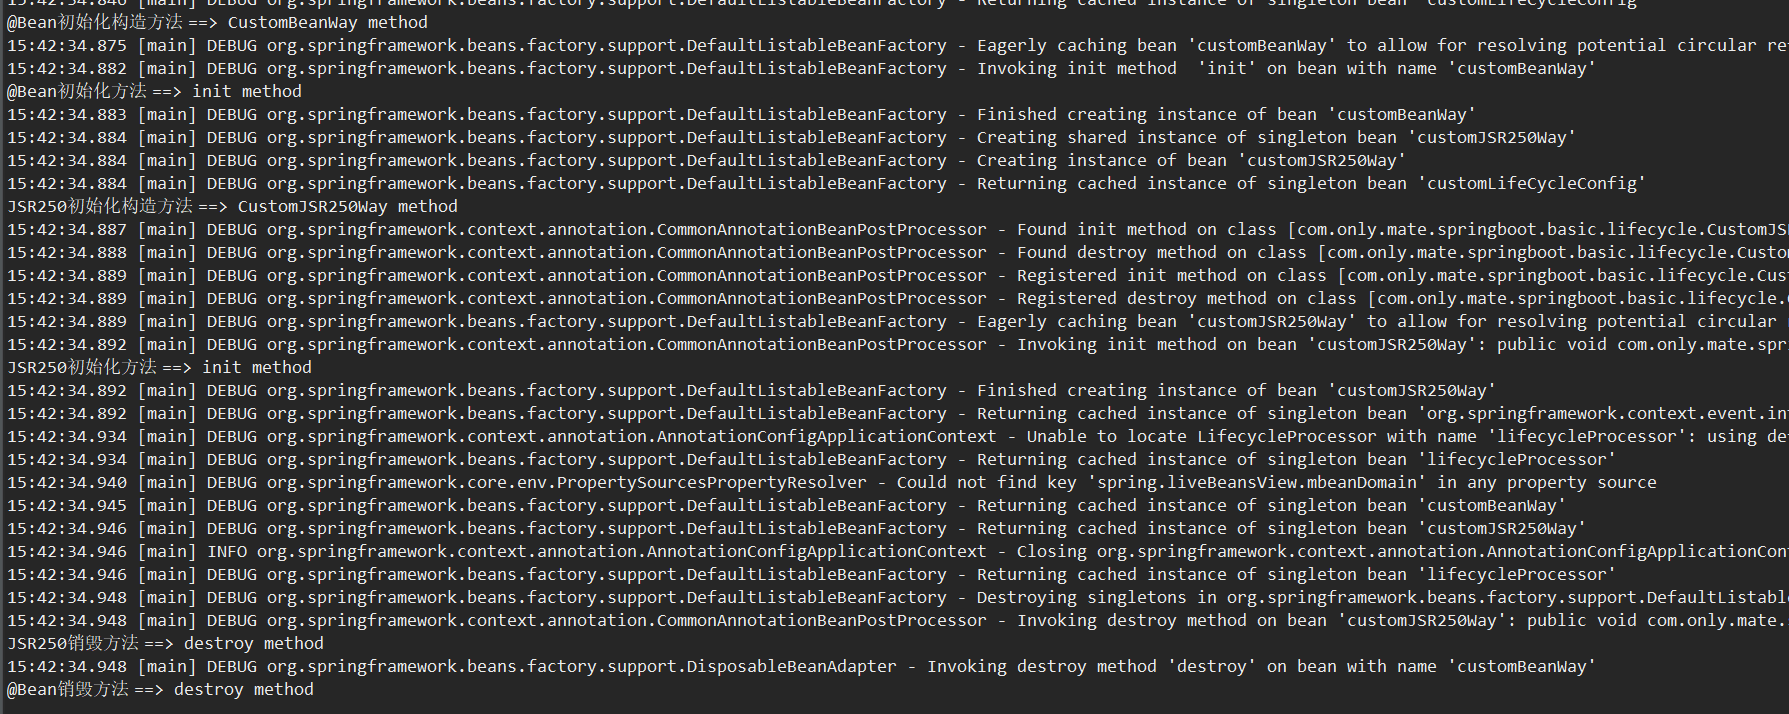
可见init方法和destory方法在构造方法之后,bean销毁之前执行。
四、Spring EL和资源调用
spring EL-Spring表达式语言,支持在xml和注解中使用表达式,类似于jsp的EL表达式语言。
spring开发中经常涉及调用各种资源的情况,包含普通文件,网址,配置文件,系统环境变量等,我们可以使用 spring表达式语言实现资源的注入。
spring主要在注解@Vavle的参数中使用表达式。
下面演示一下几种情况:
- 注入普通字符串
- 注入操作系统属性
- 注入表达式运算结果
- 注入其他Bean的属性
- 注入文件内容
- 注入网址内容
- 注入属性文件
1、准备,增加commons-io可简化文件相关的操作,本例使用commons-io将file转换成字符串。
<!--增加commons-io可简化文件相关操作-->

<dependency>

    <groupId>commons-io</groupId>

    <artifactId>commons-io</artifactId>

    <version>2.3</version>

</dependency>
2、创建文件
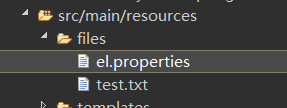
在resources下简历files文件夹,并创建el.properties和test.txt文件
内容如下:
el.properties
book.author=onlymate

book.name=Java is s magic
test.txt
这是test.txt里面的内容,很高兴认识大家
3、需被注入的bean
@Component

public class CustomElBean {

    //注入普通字符串

    @Value("其他类属性")

    private String another;

    public String getAnother() {

        return another;

    }

    public void setAnother(String another) {

        this.another = another;

    }

}
4、配置类
import java.nio.charset.Charset;

import org.apache.commons.io.IOUtils;

import org.springframework.beans.factory.annotation.Autowired;

import org.springframework.beans.factory.annotation.Value;

import org.springframework.context.annotation.Bean;

import org.springframework.context.annotation.ComponentScan;

import org.springframework.context.annotation.Configuration;

import org.springframework.context.annotation.PropertySource;

import org.springframework.context.support.PropertySourcesPlaceholderConfigurer;

import org.springframework.core.env.Environment;

import org.springframework.core.io.Resource;

/**

 * @Description: 自定义el配置类

 * @ClassName: CustomElConfig

 * @author OnlyMate

 * @Date 2018年9月13日 上午10:59:54

 *

 */

@Configuration

@ComponentScan(basePackages="com.only.mate.springboot.basic.el")

//注入配置文件需要使用@PropertySource指定文件地址,若使用@Value注入,则要配置一个PropertySourcesPlaceholderConfigurer的bean

//注意,@ @Value("${book.name}")使用的是$而不是#

//注入Properties还可以从Environment中获得

@PropertySource("classpath:files/el.properties")

public class CustomElConfig {

    //注入普通字符串

    @Value("I Love YOU!")

    private String normal;

    //注入操作系统属性

    @Value("#{systemProperties['os.name']}")

    private String osName;

    //注入表达式结果

    @Value("#{T(java.lang.Math).random()*100.0}")

    private double randomNumber;

    //注入其他的bean属性

    @Value("#{customElBean.another}")

    private String fromAnother;

    //注入文件资源

    @Value("classpath:files/test.txt")

    private Resource testFile;

    //注入网址资源

    @Value("http://www.baidu.com")

    private Resource testUrl;

    //注入配置文件

    @Value("${book.name}")

    private String bookNmame;

    //注入环境

    @Autowired

    private Environment environment;

    @Bean

    public static PropertySourcesPlaceholderConfigurer propertyConfigure(){

        return new PropertySourcesPlaceholderConfigurer();

    }

    public void outputResource(){

        try {

            System.out.println(normal);

            System.out.println(osName);

            System.out.println(randomNumber);

            System.out.println(fromAnother);

            System.out.println(IOUtils.toString(testFile.getInputStream(), Charset.defaultCharset()));

            System.out.println(IOUtils.toString(testUrl.getInputStream(), Charset.defaultCharset()));

            System.out.println(bookNmame);

            System.out.println(environment.getProperty("book.author"));

        }catch (Exception e){

            e.printStackTrace();

            System.out.println(e);

        }

    }

}
5、启动运行
import org.springframework.context.annotation.AnnotationConfigApplicationContext;

import com.only.mate.springboot.configure.el.CustomElConfig;

public class CustomElMain {

    public static void main(String [] args){

        //AnnotationConfigApplicationContext作为spring容器,接受一个配置类作为参数

        AnnotationConfigApplicationContext context = new AnnotationConfigApplicationContext(CustomElConfig.class);

        CustomElConfig elConfig = context.getBean(CustomElConfig.class);

        elConfig.outputResource();

        context.close();

    }

}
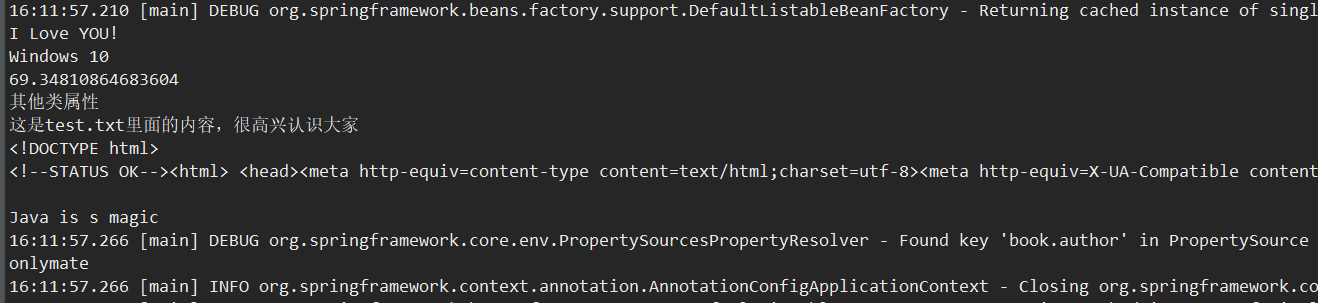
6、效果图
五、Profile
1、基础练习
Profile为在不同环境下使用不同的配置提供了支持(开发环境下的配置和生产环境下的配置不同,比如数据库)
- 通过设定Enviroment的ActiveProfiles来设定当前context需要使用的配置环境。在开发中使用@Profile注解类或者方法,达到在不同情况下选择实例化不同的Bean
- 通过设定jvm的spring.profiles.active参数来设置配置环境
- Web项目设置在Servlet的context parameter中
1、定义一个bean
/**

 * @Description: 定义一个bean

 * @ClassName: CustomProfileBean

 * @author OnlyMate

 * @Date 2018年9月13日 下午4:26:22

 *

 */

public class CustomProfileBean {

    private String content;

    public CustomProfileBean(String content) {

        super();

        this.content = content;

    }

    public String getContent() {

        return content;

    }

    public void setContent(String content) {

        this.content = content;

    }

}
2、配置
/**

 * @Description: 自定义Profile的配置类

 * @ClassName: CustomProfileConfig

 * @author OnlyMate

 * @Date 2018年9月13日 下午4:27:17

 *

 */

@Configuration

public class CustomProfileConfig {

    @Bean

    @Profile("dev")//Profile为dev时实例化devCustomProfileBean

    public CustomProfileBean devCustomProfileBean(){

        return new CustomProfileBean("from development pfofile");

    }

    @Bean

    @Profile("prod")//Profile为prod时实例化prodCustomProfileBean

    public CustomProfileBean prodCustomProfileBean(){

        return new CustomProfileBean("from  production profile");

    }

}
3、启动运行
/**

 * @Description:

 * @ClassName: CustomProfileMain

 * @author OnlyMate

 * @Date 2018年9月13日 下午4:26:22

 *

 */

public class CustomProfileMain {

    public static void main(String [] args){

        //AnnotationConfigApplicationContext作为spring容器,接受一个配置类作为参数

        AnnotationConfigApplicationContext context = new AnnotationConfigApplicationContext();

        //先将活动的Profile设置为prod

        context.getEnvironment().setActiveProfiles("prod");

        //后置注册Bean配置类,不然会报bean未定义的错误

        context.register(CustomProfileConfig.class);

        //刷新容器

        context.refresh();

        CustomProfileBean demoBean = context.getBean(CustomProfileBean.class);

        System.out.println(demoBean.getContent());

        context.close();

    }

}
4、效果图

2、日志信息的配置
logback-spring.xml
<?xml version="1.0" encoding="UTF-8"?>

<configuration debug="true"><!-- debug="true"设置调试模式 -->

    <!--定义日志文件的存储地址 勿在 LogBack 的配置中使用相对路径,文件要以logback-spring.xml命名-->

    <springProfile name="test">

        <property name="catalina.base" value="/home/webapp/logs/spring-boot" />

    </springProfile>

    <springProfile name="prod">

        <property name="catalina.base" value="/app/webapp/logs/spring-boot" />

    </springProfile>

    <springProfile name="dev">

        <property name="catalina.base" value="H:/logs/spring-boot" />

    </springProfile>

    <!--<springProperty scope="context" name="catalina.base" source="catalina.base"/>-->

    <!-- 日志地址 -->

    <!--<property name="catalina.base" value="H:/logs"></property>-->

    <!-- 控制台输出 -->

    <appender name="STDOUT" class="ch.qos.logback.core.ConsoleAppender">

        <encoder class="ch.qos.logback.classic.encoder.PatternLayoutEncoder">

            <pattern>%d{yyyy-MM-dd HH:mm:ss.SSS} 耗时:%r 日志来自:%logger{50} 日志类型: %-5p 日志内容:%m%n</pattern>

        </encoder>

    </appender>

    <!-- 按照每天生成日志文件 -->

    <appender name="DEFAULT-APPENDER" class="ch.qos.logback.core.rolling.RollingFileAppender">

        <File>${catalina.base}/logs/common-default.log</File>

        <rollingPolicy class="ch.qos.logback.core.rolling.TimeBasedRollingPolicy">

            <!--日志文件输出的文件名 -->

            <FileNamePattern>${catalina.base}/logs/common-default-%d{yyyy-MM-dd}.log</FileNamePattern>

            <!--日志文件保留天数 -->

            <MaxHistory>30</MaxHistory>

        </rollingPolicy>

        <encoder class="ch.qos.logback.classic.encoder.PatternLayoutEncoder">

            <!--格式化输出:%d表示日期,%thread表示线程名,%-5level:级别从左显示5个字符宽度%msg:日志消息,%n是换行符 -->

            <pattern>%d{yyyy-MM-dd HH:mm:ss.SSS} [%thread] %-5level %logger{50} - %msg%n</pattern>

        </encoder>

        <!--日志文件最大的大小 -->

        <triggeringPolicy class="ch.qos.logback.core.rolling.SizeBasedTriggeringPolicy">

            <MaxFileSize>10MB</MaxFileSize>

        </triggeringPolicy>

    </appender>

    <!-- 按照每天生成日志文件 -->

    <appender name="INFO-APPENDER" class="ch.qos.logback.core.rolling.RollingFileAppender">

        <File>${catalina.base}/logs/info-log.log</File>

        <rollingPolicy class="ch.qos.logback.core.rolling.TimeBasedRollingPolicy">

            <!--日志文件输出的文件名 -->

            <FileNamePattern>${catalina.base}/logs/info-log-%d{yyyy-MM-dd}.log</FileNamePattern>

            <!--日志文件保留天数 -->

            <MaxHistory>30</MaxHistory>

        </rollingPolicy>

        <encoder class="ch.qos.logback.classic.encoder.PatternLayoutEncoder">

            <!-- 格式化输出:%d表示日期,%thread表示线程名,%-5level:级别从左显示5个字符宽度%msg:日志消息,%n是换行符 -->

            <pattern>%d{yyyy-MM-dd HH:mm:ss.SSS} [%thread] %-5level %logger{50} - %msg%n</pattern>

        </encoder>

        <!--日志文件最大的大小 -->

        <triggeringPolicy class="ch.qos.logback.core.rolling.SizeBasedTriggeringPolicy">

            <MaxFileSize>10MB</MaxFileSize>

        </triggeringPolicy>

    </appender>

    <logger name="com.google.code.yanf4j"  level="ERROR" />

    <!-- show parameters for hibernate sql 专为 Hibernate 定制 -->

    <logger name="org.hibernate.type.descriptor.sql.BasicBinder"  level="TRACE" />

    <logger name="org.hibernate.type.descriptor.sql.BasicExtractor"  level="DEBUG" />

    <logger name="org.hibernate.SQL" level="DEBUG" />

    <logger name="org.hibernate.engine.QueryParameters" level="DEBUG" />

    <logger name="org.hibernate.engine.query.HQLQueryPlan" level="DEBUG" />

    <!--myibatis log configure-->

    <logger name="org.apache.ibatis" level="DEBUG"/>

    <logger name="java.sql.Connection" level="DEBUG"/>

    <logger name="java.sql.Statement" level="DEBUG"/>

    <logger name="java.sql.PreparedStatement" level="DEBUG"/>

    <logger name="net.rubyeye.xmemcached" level="INFO"/>

    <logger name="org.springframework" level="INFO"/>

    <logger name="net.sf.ehcache" level="INFO"/>

    <logger name="org.apache.zookeeper"  level="INFO" />

    <!-- 指定某一个包或者某一个类的打印级别以及是否传入root进行打印 -->

    <!-- addtivity:是否向上级loger传递打印信息。默认是true。-->

    <!-- <loger>可以包含零个或多个<appender-ref>元素,标识这个appender将会添加到这个loger。-->

    <!-- name:用来指定受此loger约束的某一个包或者具体的某一个类。-->

    <!-- level:

            用来设置打印级别,大小写无关:TRACE, DEBUG, INFO, WARN, ERROR, ALL 和 OFF,还有一个特俗值INHERITED或者同义词NULL,代表强制执行上级的级别。

            如果未设置此属性,那么当前loger将会继承上级的级别。-->

    <!-- 为所有开头为dao的类打印sql语句 -->

    <!-- <logger name="dao" level="DEBUG">

        <appender-ref ref="INFO-APPENDER" />

    </logger> -->

    <logger name="com.only.mate" level="DEBUG" additivity="true">

        <appender-ref ref="INFO-APPENDER" />

    </logger>

    <!-- 也是<loger>元素,但是它是根loger。只有一个level属性,应为已经被命名为"root". -->

    <root level="DEBUG">

        <appender-ref ref="STDOUT"/>

        <appender-ref ref="DEFAULT-APPENDER"/>

    </root>

</configuration>
这里有兴趣的自己自己尝试。
3、Java代码中根据系统环境处理逻辑
创建一个服务,实现ApplicationContextAware接口
import org.springframework.beans.BeansException;

import org.springframework.context.ApplicationContext;

import org.springframework.context.ApplicationContextAware;

import org.springframework.stereotype.Service;

@Service

public class CustomProfileService implements ApplicationContextAware{

    private ApplicationContext applicationContext = null;

    @Override

    public void setApplicationContext(ApplicationContext applicationContext) throws BeansException {

        this.applicationContext = applicationContext;

    }

    public void doSomething() {

        //获取当前系统环境

        String[] springActives = applicationContext.getEnvironment().getActiveProfiles();

        String springActive = "";

        if(springActives.length > 0) {

            springActive = springActives[0];

        }else {

            springActive = applicationContext.getEnvironment().getDefaultProfiles()[0];

        }

        System.out.println("当前的开发环境:"+ springActive);

    }

}
配置类
/**

 * @Description: 自定义Profile的配置类

 * @ClassName: CustomProfileConfig

 * @author OnlyMate

 * @Date 2018年9月13日 下午4:27:17

 *

 */

@Configuration

@ComponentScan(basePackages="com.only.mate.springboot.basic.profile")

public class CustomProfileConfig {

    @Bean

    @Profile("dev")//Profile为dev时实例化devCustomProfileBean

    public CustomProfileBean devCustomProfileBean(){

        return new CustomProfileBean("from development pfofile");

    }

    @Bean

    @Profile("prod")//Profile为prod时实例化prodCustomProfileBean

    public CustomProfileBean prodCustomProfileBean(){

        return new CustomProfileBean("from  production profile");

    }

}
启动类
/**

 * @Description:

 * @ClassName: CustomProfileMain

 * @author OnlyMate

 * @Date 2018年9月13日 下午4:26:22

 *

 */

public class CustomProfileMain {

    public static void main(String [] args){

        //AnnotationConfigApplicationContext作为spring容器,接受一个配置类作为参数

        AnnotationConfigApplicationContext context = new AnnotationConfigApplicationContext();

        //先将活动的Profile设置为prod

        context.getEnvironment().setActiveProfiles("prod");

        //后置注册Bean配置类,不然会报bean未定义的错误

        context.register(CustomProfileConfig.class);

        //刷新容器

        context.refresh();

        CustomProfileBean customProfileBean = context.getBean(CustomProfileBean.class);

        System.out.println(customProfileBean.getContent());

        CustomProfileService customProfileService = context.getBean(CustomProfileService.class);

        customProfileService.doSomething();

        context.close();

    }

}
效果图

Spring Boot实践——基础和常用配置的更多相关文章
- Spring Boot项目简单上手+swagger配置+项目发布(可能是史上最详细的)
Spring Boot项目简单上手+swagger配置 1.项目实践 项目结构图 项目整体分为四部分:1.source code 2.sql-mapper 3.application.properti ...
- Spring Boot实践——Spring Boot 2.0 新特性和发展方向
出自:https://mp.weixin.qq.com/s/EWmuzsgHueHcSB0WH-3AQw 以Java 8 为基准 Spring Boot 2.0 要求Java 版本必须8以上, Jav ...
- Spring Boot实践——Spring AOP实现之动态代理
Spring AOP 介绍 AOP的介绍可以查看 Spring Boot实践——AOP实现 与AspectJ的静态代理不同,Spring AOP使用的动态代理,所谓的动态代理就是说AOP框架不会去修改 ...
- Spring Boot实践——AOP实现
借鉴:http://www.cnblogs.com/xrq730/p/4919025.html https://blog.csdn.net/zhaokejin521/article/detai ...
- 自定义的Spring Boot starter如何设置自动配置注解
本文首发于个人网站: 在Spring Boot实战之定制自己的starter一文最后提到,触发Spring Boot的配置过程有两种方法: spring.factories:由Spring Boot触 ...
- Spring Boot应用的后台运行配置
酱油一篇,整理一下关于Spring Boot后台运行的一些配置方式.在介绍后台运行配置之前,我们先回顾一下Spring Boot应用的几种运行方式: 运行Spring Boot的应用主类 使用Mave ...
- Spring boot 的 properties 属性值配置 application.properties 与 自定义properties
配置属性值application.properties 文件直接配置: com.ieen.super.name="MDD" 自定义properties文件配置:src/main/r ...
- Spring Boot 启动(二) 配置详解
Spring Boot 启动(二) 配置详解 Spring 系列目录(https://www.cnblogs.com/binarylei/p/10198698.html) Spring Boot 配置 ...
- JAR(Spring Boot)应用的后台运行配置
酱油一篇,整理一下关于Spring Boot后台运行的一些配置方式.在介绍后台运行配置之前,我们先回顾一下Spring Boot应用的几种运行方式: 运行Spring Boot的应用主类 使用Mave ...
随机推荐
- @pathVariable的作用
//url中的id 可通过@pathVariable绑定到函数的参数中
- Tomcat : Invalid character found in the request target
Invalid character found in the request target. The valid characters are defined in RFC 7230 and RFC ...
- openfalcon源码分析之agent
本节内容 agent功能 1.1 agent上报数据 1.2 agent与HBS同步 1.3 agent Http服务 agent源码分析 2.1 初始化config配置 2.2 初始化根目录,本地I ...
- Date、DateFormat、SimpleDateFormat、Calendar
package com.Date; import java.util.Date; /* * Date 表示特定的瞬间,精确到毫秒 * JDK1.0开始 * 构造方法(常用的方法,过时的不管): * D ...
- Alpha阶段贡献分配规则
作业要求[https://edu.cnblogs.com/campus/nenu/2018fall/homework/2244] 分配规则: 1.每人有基础分3分. 2.每参加一次组内会议及活动加0. ...
- 【python】venv使用
virtualenvwrapper 比 virualenv 好用一些. 准备 export WORKON_HOME=~/venv source /usr/bin/virtualenvwrapper.s ...
- 【C++基础】sort函数
sort函数的时间复杂度为O(n*logn),排序方法类似于快排. # 头文件 #include<algorithm> using namespace std; # 参数 第一个参数:要排 ...
- 20155223 2016-2017-2 《Java程序设计》第8周学习总结
20155223 2016-2017-2 <Java程序设计>第8周学习总结 教材学习内容总结 第14章 Channel是Java NIO用来衔接数据节点的功能,可定义缓冲区容量.标记内容 ...
- juqery学习3之juqery对象条件筛选
代码例子:某个div块下的字体样式的控制. //script代码 <script src="${sitePath}/cec_wcp/js/jquery-1.8.2.min.js&quo ...
- php浮点数比较
本文实例讲述了PHP中两个float(浮点数)比较方法.分享给大家供大家参考.具体如下: 最近在开发一个合同管理系统的时候,涉及到两个浮点数比较,算是把我郁闷惨了.在N久以前,就不晓得从哪里听来的一个 ...