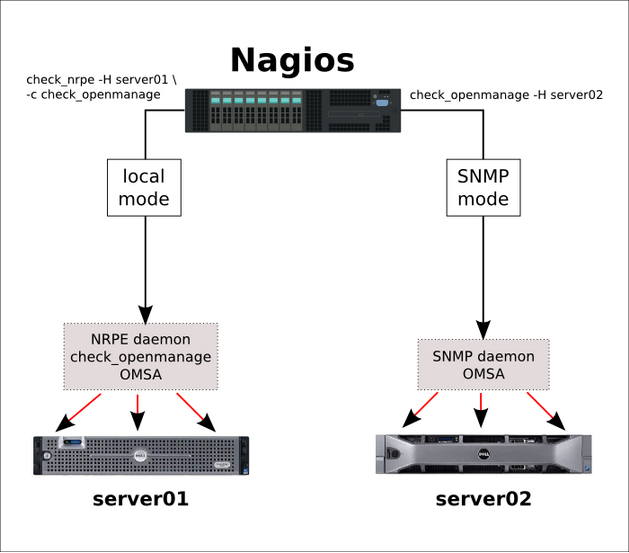
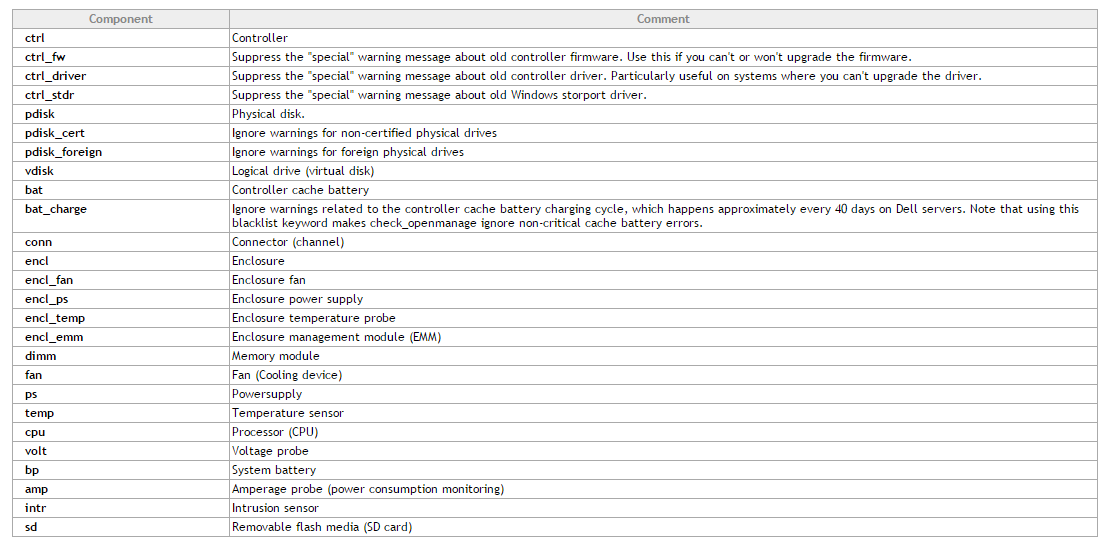
(Nagios)-check_openmanage[Dell]
插件下载地址:http://folk.uio.no/trondham/software/check_openmanage.html
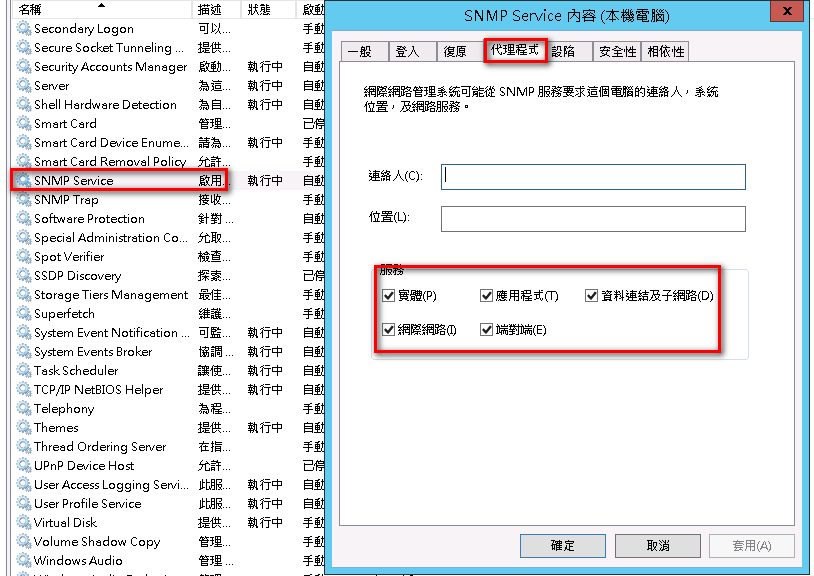
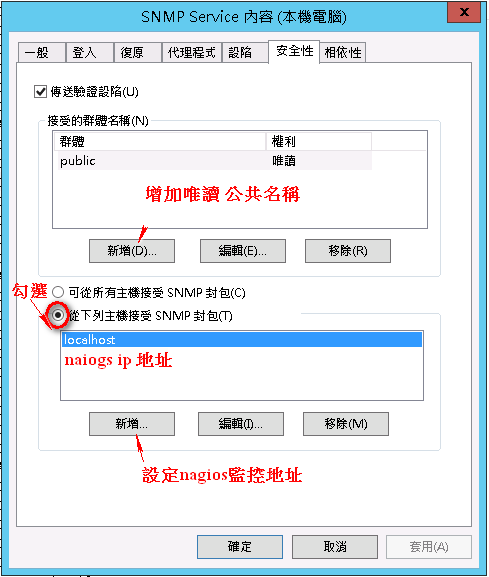
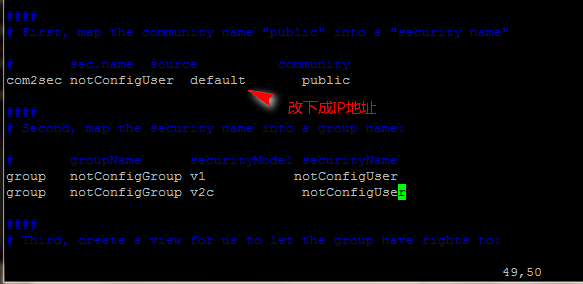
SNMP服务设定公共名称和Nagios监控主机地址,提高安全性
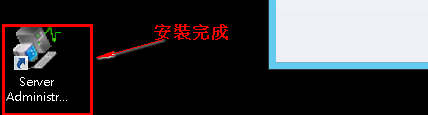
安装Dell Openmanage(默认端口1311)
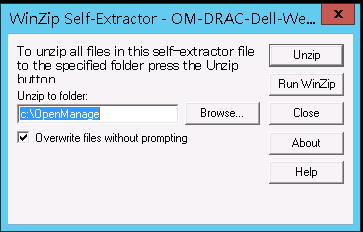
解压后安装Openmanage

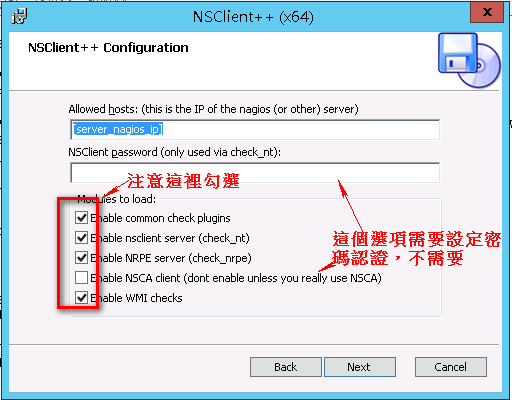

[/settings/NRPE/server]

; COMMAND ARGUMENT PROCESSING - This option determines whether or not the we will allow clients to specify arguments to commands that are executed.

allow arguments = true

; COMMAND ALLOW NASTY META CHARS - This option determines whether or not the we will allow clients to specify nasty (as in |`&><'"\[]{}) characters in arguments.

allow nasty characters = true

allow_nasty_meta_chars = 1

; ALLOWED HOSTS - A comaseparated list of allowed hosts. You can use netmasks (/ syntax) or * to create ranges. parent for this key is found under: /settings/default this is marked as advanced in favour of the parent.

;allowed hosts = 192.168.xx.xx/24(可以限制访问网段)

; PORT NUMBER - Port to use for NRPE.

port = 5666

[/settings/NRPE/server]

allow arguments=true

[/settings/external scripts]

allow arguments=true

;(这里也可以自己设定脚本 如vbs)

[/settings/external scripts/scripts]

timevbs = cscript.exe //T:30 //NoLogo scripts\\lib\\check_time.vbs $ARG1$ $ARG2$ $ARG3$
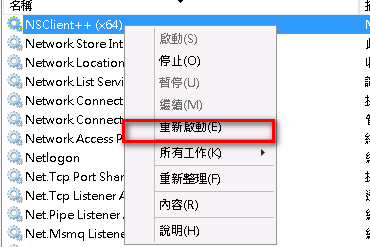
重启nagios代理服务
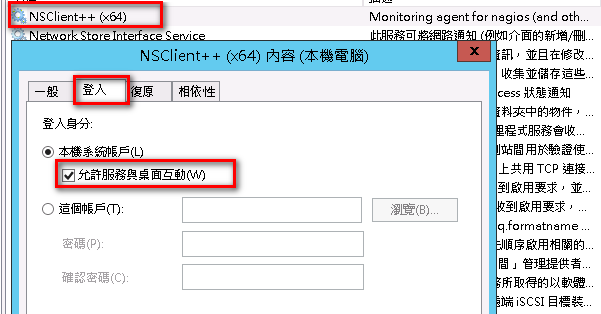
重启服务
- Make sure ESXi has patch 1 installed (at least build 175625)…if not, update it.
- Make sure the root user has a password.
- Download and install vSphere remote CLI from VMware’s website.
- Download oem-dell-openmanage-esxi_6.1-0000.zip from the Dell Support web site and copy it to C:\Program Files\VMware\VMware vSphere CLI\bin on the system you installed the vSphere remote CLI.
- On the system where you installed the vSphere remote CLI, open a command prompt and change directory to C:\Program Files\VMware\VMware vSphere CLI\bin
- Type the following command:
- vihostupdate.pl --server <esxhost> --username root -i -b c:\oem-dell-openmanage-esxi_6.1-0000.zip
- Enter the root password at the prompt and after a few minutes you should see "Host updated successfully".
- Reboot the server.
- From the vSphere client:
- Choose the Configuration tab on the host
- Click Advanced Settings under the Software section
- In the dialog that appears click "UserVars" on the left
- Change the value of CIMOEMProvidersEnabled to 1
- Click OK.
- From the DCUI: Restart Management Agents
~ # esxcli system snmp set -e true
(Nagios)-check_openmanage[Dell]的更多相关文章
- nagios监控安装esxi的服务器(宿主机)
首先,该博文大部分内容来自网络,少部分是自己监控过程中遇到的问题.如果有侵权,请联系告知!!! 现在互联网公司,有能力的都是自己研发监控系统,要么就是zabbix或者小米的监控,还都二次开发等等,可能 ...
- nagios监控实用教程
nagios监控实用教程 Nagios作为开源网络监视工具,它不但可以有效的监控内存.流量.数据库使用情况.它还可以Windows.Linux主机状态.本专题收录了有关Nagios监控相关文章,供大家 ...
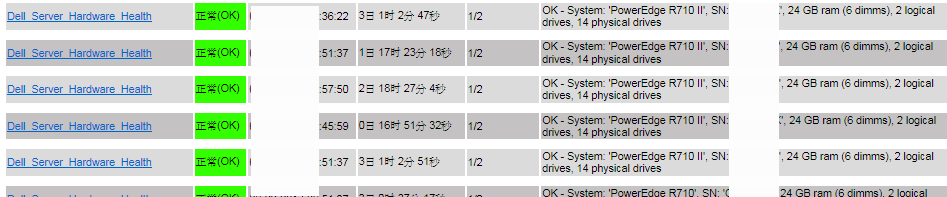
- 【硬件】DELLserver硬件监控及DELL系统管理工具OMSA介绍
1.1.1. DELLserver硬件监控及DELL系统管理工具OMSA介绍 本文介绍採用使用Nagios和OMSA监控DELLserver的硬件健康状态,Nagios监控的方式是NRPE模式,须要配 ...
- 【硬件】DELLserver硬件监控和DELL系统管理工具OMSA介绍
1.1.1. DELLserver硬件监控和DELL系统管理工具OMSA介绍 本文介绍了利用使用Nagios和OMSA显示器DELLserver硬件健康状况,Nagios监控的方式是NRPE模式,须要 ...
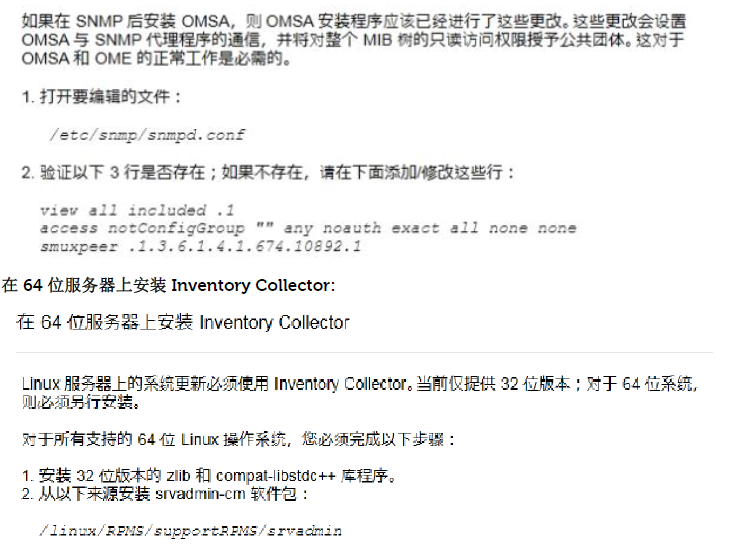
- Dell服务器安装OpenManage(OMSA)
公司上架了一批戴尔服务器,公司要求对这些服务器的硬件做一系列的监控,如CPU的温度,内存,风扇的状态,转速,磁盘等硬件的监控. 在对服务器的硬件监控上,目前业界主要基于如下两种: 1.服务器自带的工具 ...
- Zabbix使用Omsa来监控Dell服务器的硬件状态
OMSA(Open Manage Server Administrator)是Dell主机的硬件检测和维护软件 OpenManage系统管理方案是戴尔公司基于自主研发力量开发的IT系统管理解决方案,通 ...
- 监控部署nagios+snmp
参看是否有安装:rpm -q gcc glibc glibc-common gd gd-devel xinetd openssl-devel 未安装基础支持套件的先安装: yum install -y ...
- Nagios
什么是Nagios? Nagios是一款用于系统和网络监控的应用程序.它可以在你设定的条件下对主机和服务进行监控, 在状态变差和变好的时候给出告警信息. Nagios更进一步的特征包括: 1. 监控网 ...
- Nagios安装
在做安装之前确认要对该机器拥有root权限. 确认你安装好的Fedora系统上已经安装如下软件包再继续: Apache GCC编译器 GD库与开发库 可以用yum命令来安装这些软件包: yum ins ...
随机推荐
- eclipse svn使用
简单介绍一些基本操作 1.同步在Eclipse下,右击你要同步的工程->team->与资源库同步->这时会进入同步透视图,会显示出本机与SVN上内容有不同的文件,双击文件名,会显示出 ...
- 沙盒 sandbox 简记随笔
沙盒又称沙箱(sandbox),是一种按照 安全策略 限制 程序行为 的 执行环境. “沙盒”技术的实践运用流程是: 1. 让疑似病毒文件的可疑行为在虚拟的“沙盒”里充分运行,“沙盒”会记下 ...
- 信用卡精养卡POS机方案
所谓的精养卡,就是模仿有钱人的一种方式,提额难吗!真心不难,难就难在养卡消费 ,信用卡都有,但是不同费率的POS机你有吗,没有POS机难道你真的要去花费去消费吗,你消费的起吗?所以我们这个行业就出现了 ...
- 关于cookie的详解
http://www.cnblogs.com/fish-li/archive/2011/07/03/2096903.html
- leetcode-surrounded regions-ZZ
Problem Statement (link): Given a 2D board containing 'X' and 'O', capture all regions surrounded by ...
- IntelliJ IDEA下"Cannot resolve symbol 'log'"的解决方法
转自:https://my.oschina.net/greatqing/blog/703989 最近接手了一个Maven项目,IDE使用的是IntelliJ IDEA,导入后可以编译运行.但是输出日志 ...
- Oracle日常性能查看
判断回滚段竞争的SQL语句:(当Ratio大于2时存在回滚段竞争,需要增加更多的回滚段)select rn.name, rs.GETS, rs.WAITS, (rs.WAITS / rs.GETS) ...
- 【深入理解JAVA虚拟机】第4部分.程序编译与代码优化.1.编译期优化。这章编译和实战部分没理解通,以后再看。
1.概述 1.1.编译器的分类 前端编译器:Sun的Javac. Eclipse JDT中的增量式编译器(ECJ)[1]. 把*.java文件转变成*.class文件 JIT编译器:HotSpot ...
- Lovable eccentric
It took him four years to stage this elaborate joke simply to prove that critics do not always know ...
- 轮播图3D效果--roundabout(兼容IE8)升级版
<!DOCTYPE html> <html> <head lang="en"> <meta charset="UTF-8&quo ...