NetScaler VLAN’s Demystified
NetScaler VLAN’s Demystified
https://www.citrix.com/blogs/2014/12/29/netscaler-vlans-demystified/
The Citrix NetScaler appliance is an amazingly flexible application delivery controller (ADC). It’s capable of performing both simple and very complex tasks, positioning it solidly for the eighth consecutive year in the Gartner Leaders Quadrant for ADC’s: http://www.citrix.com/news/announcements/oct-2014/citrix-positioned-for-the-eighth-consecutive-year-in-the-leaders.html
Unlike many networking devices the NetScaler uses ‘floating’ IP addresses, which means that any NetScaler-owned IP address can egress any NetScaler interface with the generic default ‘vanilla’ configuration in place.
This may actually be the desired configuration, but if there is a need to ensure that ingress and egress traffic flows out one particular interface on the NetScaler, this can simply be configured by using layer three (L3) VLAN’s to bind IP subnets to specific interfaces. With L3 VLAN’s configured, all traffic destined for a particular network/subnet will be forced out the desired interface.
Note: VLAN’s are actually layer two constructs, but the term L3 VLAN is used to describe the VLAN-to-IP subnet binding occurring.
How Does This All Work?
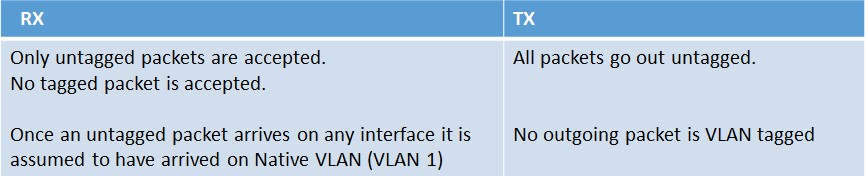
By default all interfaces are members of Native VLAN 1. That being said, specific to RX and TX, there are a few different rules to understand.
Below shows the structure of a VLAN packet:

Port-Based VLAN’s
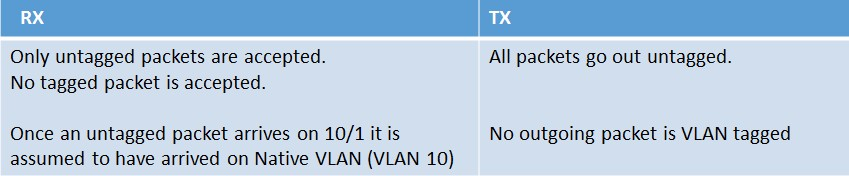
Let’s add a new VLAN to the NetScaler (VLAN 10). This new VLAN is created with the following command: ‘add vlan 10’
Then let’s bind interface 10/1 to the newly created VLAN 10 natively. This is accomplished with the following command: ‘bind vlan 10 -ifnum 10/1’
When bound natively, interface 10/1 is removed automatically from VLAN 1, the current native VLAN. It is then added to VLAN 10. When this configuration is implemented the following rules will then apply:
Tagged VLAN’s
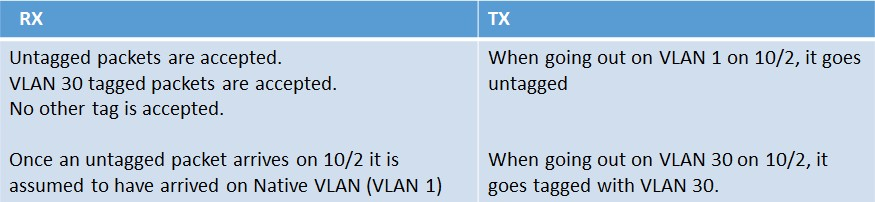
Let’s add a tagged VLAN to the NetScaler (VLAN 30). This new VLAN is created with the following command: ‘add vlan 30’
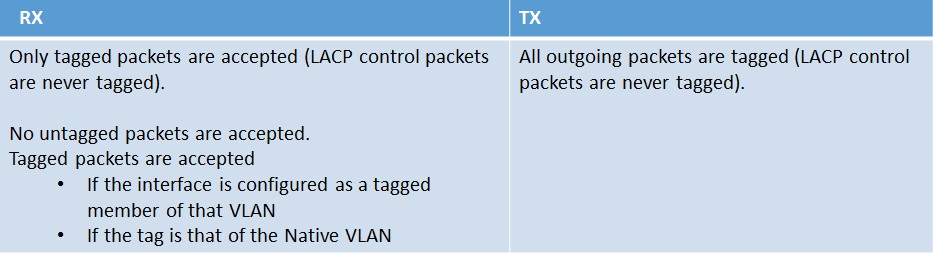
Then let’s bind interface 10/2 to the newly created VLAN 30 as a tagged member. This is accomplished with the following command: ‘bind vlan 30 -ifnum 10/2 –tagged’
When VLAN 30 is bound as a tagged member of interface 10/2, it is kept in VLAN 1 as a native member, but also added to VLAN 30 as a tagged member. When this configuration is implemented the following rules will then apply.
Summary
- An interface can have only one (hence also referred to as ‘port based’) Native VLAN.
- Untagged packets arriving on an interface are assumed to have arrived on that Native VLAN.
- An interface can be part of any number of tagged VLANs.
- When an interface is bound to a VLAN Natively, its Native VLAN changes from the current one to new one.
- When an interface is bound to a particular VLAN as a tagged member, it’s just added to the new VLAN as a tagged member.
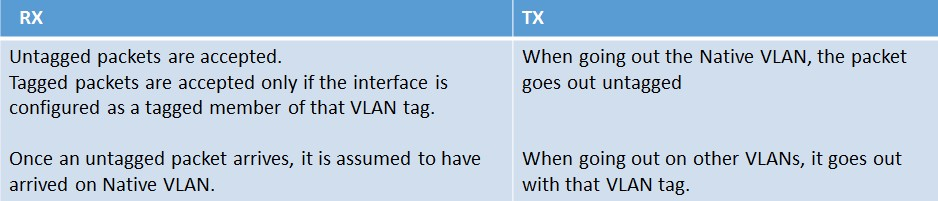
An overview of the rules are as follows:
The Interface TAGALL Configuration
The TAGALL configuration on the NetScaler is specific only to the interface. The following rules apply when leveraging the TAGALL feature:
Link Aggregation (LA)
Let’s create a new link aggregation channel. This new LA channel is created with the following command: ‘add channel LA/1’
Then let’s bind interfaces 10/1 and 10/2 to the newly created channel with the following command: ‘bind channel LA/1 -ifnum 10/1 10/2’
Then following rules will apply for the default LA channel:

Link Aggregation (LA) and VLANs
Let’s create a new link aggregation channel (LA/2). This new LA channel is created with the following command: ‘add channel LA/2’
Then let’s bind interfaces 10/1 and 10/2 to the newly created channel with the following command: bind channel LA/2 -ifnum 10/1 10/2’ (as referenced previously the VLAN bindings of 10/1 and 10/2 are lost once they are part of an LA channel – unless specifically configured as such as we’ll see in the following example).
We can bind the new LA channel to a new VLAN with the following commands: ‘add vlan 2’ and then ‘bind vlan 2 –ifnum LA/2’
NOTES:
- If we unbind interfaces 10/1 and 10/2 (for example) from an LA channel (e.g. ‘unbind channel LA/1 -ifnum 10/1 10/2’) and then remove the channel with the following command: ‘rm channel LA/1’, then interfaces 10/1 and 10/2 will be moved to VLAN 1 as Native members again.
- The NetScaler does not have the concept of “trunk ports”, which by default will accept all VLAN IDs and only accept tagged traffic. Further restrictions on which VLANs to accept can be controlled by configuring an ‘allowed list’ of VLAN IDs on a particular interface.
Additional References:
How to Associate an IP Subnet with a NetScaler Interface by Using VLANs:http://support.citrix.com/article/CTX136926
How to Restrict the Management Access to a NetScaler Appliance from a Specific Interface: http://support.citrix.com/article/CTX126038
NetScaler VLAN’s Demystified的更多相关文章
- NetScaler SNIPs Bound To An Interface Without A VLAN
NetScaler SNIPs Bound To An Interface Without A VLAN https://www.citrix.com/blogs/2014/04/09/work-yo ...
- hd loadBalanceServer F5 BIG-IP / Citrix NetScaler / Radware / Array / HAProxy /
s 五.Citrix NetScaler 和 CDN 案例 问题描述: Citrix 10.5.66.9软件版本下,存在计时器bug,此bug会造成CDN长连接回源超过设备默认的180S,会发fin包 ...
- Spanning Tree Protocol (STP) in NetScaler Appliance
Spanning Tree Protocol (STP) in NetScaler Appliance 来源 https://support.citrix.com/article/CTX112341 ...
- NetScaler + Wireshark = A Perfect Combination!
NetScaler + Wireshark = A Perfect Combination! https://www.citrix.com/blogs/2014/05/03/netscaler-wir ...
- NetScaler Best Practice With VMAC In A High Availability Configuration
NetScaler Best Practice With VMAC In A High Availability Configuration https://www.citrix.com/blogs/ ...
- SNMP OID Reference - NetScaler 10
SNMP OID Reference - NetScaler 10 https://docs.citrix.com/content/dam/docs/en-us/netscaler/10/downlo ...
- NetScaler Active-Active模式
NetScaler Active-Active模式 NetScaler Active-Active模式 (此文档基于版本:NS9.3: Build 55.6 nc) By ShingTan Activ ...
- Citrix NetScaler HA(高可用性)解析
Citrix NetScaler HA(高可用性)解析 来源 https://www.iyunv.com/thread-172259-1-1.html 1.1 NetScaler高可用概述 我 ...
- Configure a VLAN on top of a team with NetworkManager (nmcli) in RHEL7
SOLUTION VERIFIED September 13 2016 KB1248793 Environment Red Hat Enterprise Linux 7 NetworkManager ...
随机推荐
- 武汉ber优步司机奖励政策(1月4日~1月10日)
滴快车单单2.5倍,注册地址:http://www.udache.com/ 如何注册Uber司机(全国版最新最详细注册流程)/月入2万/不用抢单:http://www.cnblogs.com/mfry ...
- 青岛Uber优步司机奖励政策(12月28日到1月3日)
滴快车单单2.5倍,注册地址:http://www.udache.com/ 如何注册Uber司机(全国版最新最详细注册流程)/月入2万/不用抢单:http://www.cnblogs.com/mfry ...
- python字符串格式化符号及转移字符含义
博文出自鱼C论坛文章 http://bbs.fishc.com/thread-39140-1-1.html
- LimitedConcurrencyLevelTaskScheduler
//-------------------------------------------------------------------------- // // Copyright (c) Mic ...
- 追书神器API
由于自己喜欢看小说,有的时候不方便手机看的时候希望在电脑上面看,但很多网站有广告啊,于是封装了套手机版的追书神器API 目前只做了搜索 详情 书评 换源 正文 调用方式: //搜索小说 var sea ...
- Qt-QML-关于两个平级的qml文件中的函数调用问题
这几天还在继续搞我的QML,感悟就QML是坑的同时,也是一门很号的语言,用于快速搭界面是很好的.那么,这几天, 遇到一个问题,在下用一个框框画一下,希望可以理解 抽象派,解释一下,QML1和QML3是 ...
- tpo-08 C2 A strategy for attracting customers
第 1 段 1.Listen to a conversation between a student and a business professor. 听一段学生和教授的对话. 第 2 段 1.So ...
- commons-lang源码解析之StringUtils
apache的commons工具包是平时使用最多的工具包之一,对其实现方式需要具体了解.commons-lang version 3.1 empty和blank的区别 StringUtils中判断St ...
- c++容器 STL
2019-01-24 22:30:32 记录学习PAT的一些知识,有待更新 注:本文是对Algorithm 算法笔记 的总结 C++标准库模板(Standard Template Library,ST ...
- 预分配内存fifo实现可变长度字节序列存储
预分配内存fifo实现可变长度字节序列存储 github链接https://github.com/gexin1023/utils/tree/master/fifo fifo即先进先出队列,可以用链表来 ...