
(二)Three光线检测-实现摄像机向鼠标点击位置滑动动画
(二)Three.js光线检测
摘要:使用three.js中的光线检测 Raycaster() ,实现一下效果:
- 通过点击处的坐标,修改摄像机位置,实现摄像机由远及近的过渡动态效果(由远景到近景)
1、鼠标点击—摄像机过渡动画
1.1 THREE.Raycaster对象
官网:Raycaster – three.js docs (threejs.org)
因为使用鼠标对模型点击获取,那么,再three中可以使用Raycaster()光线检测来实现。再three官网上对Raycaster的解释为“此类旨在协助进行光线投射。Raycasting用于鼠标拾取(计算鼠标在3D空间中的哪些对象)等”,其原理便是
THREE.Raycaster对象从屏幕上的点击位置向场景中发射一束光线,与摄像机的位置形成一条光线,在这条光线路径上的物体,都会被检测到
1.1.1参数
Raycaster( origin : Vector3, direction : Vector3, near : Float, far : Float )

origin —— 光线投射的原点向量。

direction —— 向射线提供方向的方向向量,应当被标准化。

near —— 返回的所有结果比near远。near不能为负值,其默认值为0。

far —— 返回的所有结果都比far近。far不能小于near,其默认值为Infinity(正无穷。)
1.2 使用到的方法
1.2.1 setFromCamera()
这个方法中有两个变量,
第一个是在标准化设备坐标中鼠标的二维坐标 —— X分量与Y分量应当在-1到1之间;
第二个是场景摄像机
.setFromCamera ( coords : Vector2, camera : Camera ) : undefined

coords —— 在标准化设备坐标中鼠标的二维坐标 —— X分量与Y分量应当在-1到1之间。

camera —— 射线所来源的摄像机。
1.2.2intersectObject()
这个方法是用来检测与射线相交的物体,返回值是一个Array数组;
检测所有在射线与物体之间,包括或不包括后代的相交部分。返回结果时,相交部分将按距离进行排序,最近的位于第一个。
.intersectObject ( object : Object3D, recursive : Boolean, optionalTarget : Array ) : Array

object —— 检查与射线相交的物体。

recursive —— 若为true,则同时也会检查所有的后代。否则将只会检查对象本身。默认值为true。

optionalTarget — (可选)设置结果的目标数组。如果不设置这个值,则一个新的Array会被实例化;如果设置了这个值,则在每次调用之前必须清空这个数组(例如:array.length = 0;)。
返回的数组如下所示:
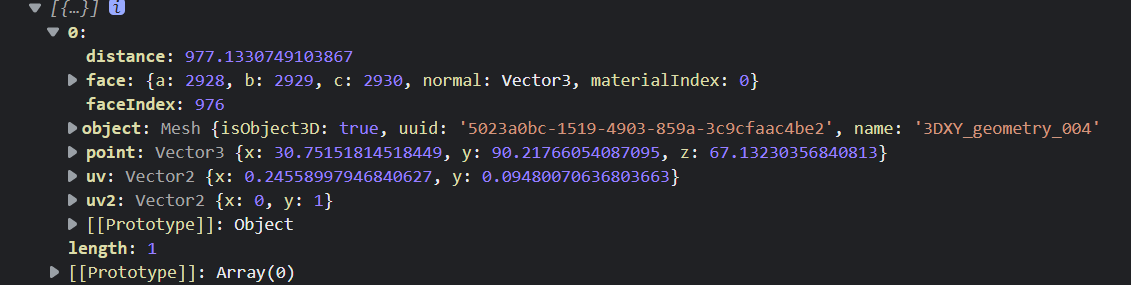
参数解释:
distance —— 射线投射原点和相交部分之间的距离。

point —— 相交部分的点(世界坐标)

face —— 相交的面

faceIndex —— 相交的面的索引

object —— 相交的物体

uv —— 相交部分的点的UV坐标。

uv2 —— Second set of U,V coordinates at point of intersection

instanceId – The index number of the instance where the ray intersects the InstancedMesh

当计算这条射线是否和物体相交的时候,Raycaster将传入的对象委托给raycast方法。 这将可以让mesh对于光线投射的响应不同于lines和pointclouds。

请注意:对于网格来说,面必须朝向射线的原点,以便其能够被检测到。 用于交互的射线穿过面的背侧时,将不会被检测到。如果需要对物体中面的两侧进行光线投射, 你需要将material中的side属性设置为THREE.DoubleSide。
1.2.3 intersectObjects()
这个方法和上面的方法相差不多,本方法是用来检测一组物体;
检测所有在射线与这些物体之间,包括或不包括后代的相交部分。返回结果时,相交部分将按距离进行排序,最近的位于第一个),相交部分和.intersectObject所返回的格式是相同的。
.intersectObjects ( objects : Array, recursive : Boolean, optionalTarget : Array ) : Array

objects —— 检测和射线相交的一组物体。

recursive —— 若为true,则同时也会检测所有物体的后代。否则将只会检测对象本身的相交部分。默认值为true。

optionalTarget —— (可选)设置结果的目标数组。如果不设置这个值,则一个新的Array会被实例化;如果设置了这个值,则在每次调用之前必须清空这个数组(例如:array.length = 0;)。
1.3 gsap中的TweenMax动画
使用TweenMax动画,控制摄像机的变换速度,达到想要的平和效果;
TweenLite.fromTo('div', 5, {opacity:1}, {opacity:0});

//动画目标:div

//起始状态:opacity:1

//终点状态:opacity:0

//补间:5秒完成状态改变
1.4主要代码
1.4.1设置光线检测
//光线检测,获取点击物体的坐标值

  rayClick() {

    const raycaster = new THREE.Raycaster();

    const mouse = new THREE.Vector2();

    const camera = this.camera;

    const scene = this.scene;

    //对页面进行鼠标点击事件绑定

    window.addEventListener("mouseup", mouseup);

    //添加点击方法

    function mouseup(e) {

      // 将鼠标位置归一化为设备坐标。x 和 y 方向的取值范围是 (-1 to +1)

      mouse.x = (e.clientX / window.innerWidth) * 2 - 1;

      mouse.y = -(e.clientY / window.innerHeight) * 2 + 1;

      // 通过摄像机和鼠标位置更新射线

      //这里的摄像机要将外部定义的摄像机通过新的变量接受到,再次赋值使用,同下方的scene

      //因为鼠标点击事件的this指的是windows,不是这个场景Scene,解决办法可以在 const mouse = new THREE.Vector2();

      // 后重新赋值一下:const _this = this; 在点击函数中就可以使用_this.scene、_this.camera

      raycaster.setFromCamera(mouse, camera);

      // 计算物体和射线的焦点

      const intersects = raycaster.intersectObjects(scene.children);

      console.log(intersects);

      //选中后进行操作

      if (intersects.length) {

        var selected = intersects[0];

        //点击世界中的物体,改变摄像机位置到物体前,实现从远景到近景的切换效果

        TweenMax.to(camera.position, 2, {

            x: selected.point.x + 50,

            y: selected.point.y,

            z: selected.point.z + 100,

            ease:Expo.easeInOut,

            onComplete: function (){}

        })

        console.log("x坐标" + selected.point.x);

        console.log("y坐标" + selected.point.y);

        console.log("z坐标" + selected.point.z);

      }

    }

  }
1.5完整代码
html部分
<!DOCTYPE html>

<html lang="en">

<head>

    <meta charset="UTF-8">

    <meta http-equiv="X-UA-Compatible" content="IE=edge">

    <meta name="viewport" content="width=device-width, initial-scale=1.0">

    <title>Three实现摄像机动画</title>

    <link rel="stylesheet" href="./assets/css/index.css">

</head>

<body>

    <canvas id="canvasScene"></canvas>

    <script src="./js/index.js" type="module"></script>

</body>

</html>
index.js部分
import Scene from "./Scene";

const canvasEL = document.getElementById('canvasScene');

new Scene(canvasEL);
Scene.js部分
import * as THREE from "three";

//导入鼠标控制器控件

import { OrbitControls } from "three/examples/jsm/controls/OrbitControls";

//导入fbx模型加载器

import { FBXLoader } from "three/examples/jsm/loaders/FBXLoader";

//导入TweenMax动画控件

import { TweenMax } from "gsap/gsap-core";

import { Expo } from "gsap";

export default class Scene {

  canvas;

  scene;

  camera;

  render;

  controls;

  light;

  constructor(el) {

    this.canvas = el;

    this.init();

  }

  init() {

    this.setRender();

    this.setScene();

    this.setCamera();

    this.setControls();

    this.setLight();

    this.animate();

    this.setFbx();

    this.rayClick();

  }

  setScene() {

    this.scene = new THREE.Scene();

    this.scene.background = new THREE.Color(0x002222);

  }

  // 设置相机

  setCamera() {

    this.camera = new THREE.PerspectiveCamera(

      75,

      window.innerWidth / window.innerHeight,

      0.1,

      3000

    );

    this.camera.position.set(300, 200, 1000);

    this.camera.aspect = window.innerWidth / window.innerHeight;

    this.camera.updateProjectionMatrix();

    this.scene.add(this.camera);

  }

  // 设置渲染器

  setRender() {

    this.render = new THREE.WebGL1Renderer({

      canvas: this.canvas,

      //设置抗锯齿

      antialias: true,

    });

    //设置渲染编码

    this.render.outputEncoding = THREE.sRGBEncoding;

    //设置渲染宽高

    this.render.setSize(window.innerWidth, window.innerHeight);

    //监听页面大小变化,修改器的宽高、摄像机的比例

    window.addEventListener("resize", () => {

      this.camera.aspect = window.innerWidth / window.innerHeight;

      this.camera.updateProjectionMatrix();

      this.render.setSize(window.innerWidth, window.innerHeight);

    });

  }

  //设置控制器

  setControls() {

    this.controls = new OrbitControls(this.camera, this.render.domElement);

  }

  //设置灯光

  setLight() {

    this.light = new THREE.SpotLight();

    this.light.position.set(100, 500, 300);

    this.scene.add(this.light);

  }

  //设置渲染函数

  animate = () => {

    this.render.render(this.scene, this.camera);

    window.requestAnimationFrame(this.animate);

  };

  //添加fbx模型

  setFbx() {

    const fbxLoader = new FBXLoader();

    fbxLoader.load("./model/house.fbx", (house) => {

      const scale = 0.05;

      house.scale.set(scale, scale, scale);

      this.scene.add(house);

      house.position.set(0, 0, 0);

    });

  }

  //光线检测,获取点击物体的坐标值

  rayClick() {

    const raycaster = new THREE.Raycaster();

    const mouse = new THREE.Vector2();

    const camera = this.camera;

    const scene = this.scene;

    //对页面进行鼠标点击事件绑定

    window.addEventListener("mouseup", mouseup);

    //添加点击方法

    function mouseup(e) {

      // 将鼠标位置归一化为设备坐标。x 和 y 方向的取值范围是 (-1 to +1)

      mouse.x = (e.clientX / window.innerWidth) * 2 - 1;

      mouse.y = -(e.clientY / window.innerHeight) * 2 + 1;

      // 通过摄像机和鼠标位置更新射线

      //这里的摄像机要将外部定义的摄像机通过新的变量接受到,再次赋值使用,同下方的scene

      raycaster.setFromCamera(mouse, camera);

      // 计算物体和射线的焦点

      const intersects = raycaster.intersectObjects(scene.children);

      console.log(intersects);

      //选中后进行操作

      if (intersects.length) {

        var selected = intersects[0];

        //点击世界中的物体,改变摄像机位置到物体前,实现从远景到近景的切换效果

        TweenMax.to(camera.position, 2, {

            x: selected.point.x + 50,

            y: selected.point.y,

            z: selected.point.z + 100,

            ease:Expo.easeInOut,

            onComplete: function (){}

        })

        console.log("x坐标" + selected.point.x);

        console.log("y坐标" + selected.point.y);

        console.log("z坐标" + selected.point.z);

      }

    }

  }

}
(二)Three光线检测-实现摄像机向鼠标点击位置滑动动画的更多相关文章
- js 获取页面高度和宽度(兼容 ie firefox chrome),获取鼠标点击位置
<script> //得到页面高度 var yScroll = (document.documentElement.scrollHeight >document.documentEl ...
- u3d 鼠标点击位置,物体移动过去。 U3d mouse clicks position, objects move past.
u3d 鼠标点击位置,物体移动过去. U3d mouse clicks position, objects move past. 作者:韩梦飞沙 Author:han_meng_fei_sha 邮箱: ...
- 每天一个JavaScript实例-铺货鼠标点击位置并将元素移动到该位置
<!DOCTYPE html> <html> <head> <meta http-equiv="Content-Type" content ...
- C# winform 获取鼠标点击位置
说明:该篇随笔的代码内容并非出自本人,是在其他网站搜寻的,出处已经不记得了,本次随笔只为记录,目的帮助自己,帮助他人. 实现的原理也不做多的赘述,直接上代码. 第一个类是需要用到的Windows AP ...
- [QGLViewer]3D场景鼠标点击位置
重载鼠标事件: void AxMapControl::mousePressEvent(QMouseEvent* e) { switch(currentTool) { case AX_DRAW_DIRE ...
- JQuery------实现鼠标点击和滑动不同效果
如图: 代码: html <ul class="price-brand-right"> @foreach (Brand item in ViewBag.Brand) { ...
- unity中让摄像机移动到鼠标点击的位置和鼠标控制平移视角
private Vector3 targetVector3; private float movespeed=0.5f; private bool IsOver = true; private Gam ...
- unity中让物体移动到鼠标点击地面任一点的位置(单击移动和双击暂停移动)并生成图标
using UnityEngine; using System.Collections.Generic; using UnityEngine.EventSystems; using UnityEngi ...
- (原)python中matplot中获得鼠标点击的位置及显示灰度图像
转载请注明出处: http://www.cnblogs.com/darkknightzh/p/6182474.html 参考网址: http://matplotlib.org/examples/pyl ...
随机推荐
- 基于 Sequelize.js + Express.js 开发一套 Web 后端服务器
什么是 Sequelize 我们知道 Web 应用开发中的 Web 后端开发一般都是 Java.Python.ASP.NET 等语言.十年前,Node.js 的出现使得原本仅限于运行在浏览器中的 Ja ...
- 从0搭建Vue3组件库:button组件
button组件几乎是每个组件库都有的:其实实现一个button组件是很简单的.本篇文章将带你一步一步的实现一个button组件.如果你想了解完整的组件库搭建,你可以先看使用Vite和TypeScri ...
- B/S结构通信系统原理
本文介绍JavaWeb的B/S结构通信原理 概念: Javaweb中B/S架构是一种系统架构形式,这里的B是Browser(浏览器),S是Server(服务器),是一种系统的架构形式,有 ...
- 微软Azure配置中心 App Configuration (二):Feature Flag 功能开关特性
写在前面 Web服务开发过程中我们经常有这样的需求: 某些功能我必须我修改了配置才启用,比如新用户注册送券等: 某个功能需到特定的时间才启用,过后就失效,比如春节活动等: 某些功能,我想先对10%的用 ...
- 👍CleanShot X 3.1.1 破解版 (超强屏幕截图录像工具) (TNT + 免激活)
软件语言为ENGLISH,英文不好的劝退! 软件介绍/功能 CleanShot X 3 是一款Mac超强截图以及屏幕录制工具.支持:区域截图.窗口截图.滚动截图.延时截图.屏幕录制.贴图.截图时隐藏桌 ...
- [CF1536F] Omkar and Akmar(博弈论?组合数学)
题面 [CF1536F] Omkar and Akmar 甲乙轮流在一个有 N N N 个位置的环上放字母(环上每个位置不同),每次可以放一个 A 或 B ,要求不能有相同的字母相邻,轮到某个人时不能 ...
- NOI 2019 省选模拟赛 T1【JZOJ6082】 染色问题(color) (多项式,数论优化)
题面 一根长为 n 的无色纸条,每个位置依次编号为 1,2,3,-,n ,m 次操作,第 i 次操作把纸条的一段区间 [l,r] (l <= r , l,r ∈ {1,2,3,-,n})涂成颜色 ...
- ZZH与计数(矩阵加速,动态规划,记忆化搜索)
题面 因为出题人水平很高,所以这场比赛的题水平都很高. ZZH 喜欢计数. ZZH 有很多的数,经过统计,ZZH一共有 v 0 v_0 v0 个 0 , v 1 v_1 v1 个 1,-, v 2 ...
- KingbaseES V8R6单实例外部备份案例
案例说明: 本案例采用sys_backup.sh执行物理备份,备份使用如下逻辑架构:数据库主机采用CentOS 7系统,repo采用kylin V10 Server. 单实例+外部备份服务器 备份逻辑 ...
- 微服务系列之网关(二) konga配置操作
1.konga核心对象 Kong 的四大核心对象:upstream,target,service,route.下面分别说: (1)upstream,字面意思上游,实际项目理解是对某一个服务的一个或者多 ...