
机器学习: Tensor Flow with CNN 做表情识别
我们利用 TensorFlow 构造 CNN 做表情识别,我们用的是FER-2013 这个数据库, 这个数据库一共有 35887 张人脸图像,这里只是做一个简单到仿真实验,为了计算方便,我们用其中到 30000张图像做训练,5000张图像做测试集,我们建立一个3个convolution layer 以及 3个 pooling layer 和一个 FC layer 的CNN 来做训练。
FER-2013 提供的是数据包括图像与label都存储在 .csv文件中,我们可以从 .csv文件里提取我们需要的数据,
FER 2013 的数据集可以在我共享的资源网站上下载:
http://download.csdn.net/user/shinian1987
网络结构如下所示:
input -> conv 1 -> pool 1 -> conv 2 -> pool 2 -> conv 3 -> pool 3 -> fc 1 -> out
input -> 48×48
conv 1 -> filter size: 3×3, “SAME” padding, output: 48×48
pool 1 -> filter size: 2×2, output: 24×24
conv 2 -> filter size: 3×3, “SAME” padding output: 24×24
pool 2 -> filter size: 2×2, output: 12×12
conv 3 -> filter size: 3×3, “SAME” padding output: 12×12
pool 3 -> filter size: 2×2, output: 6×6
fc 1 -> hidden nodes: 200, output: 1×100
out -> 1×2
import string, os, sys

import numpy as np

import matplotlib.pyplot as plt

import scipy.io

import random

import tensorflow as tf

dir_name = '/media/chi/New Volume/Dataset/FER2013/Original Data'

print '----------- no sub dir'

print ('The folder path: ', dir_name)

files = os.listdir(dir_name)

for f in files:

    print (dir_name + os.sep + f)

file_path = dir_name + os.sep+files[2]

print file_path

data = pd.read_csv(file_path, dtype='a')

label = np.array(data['emotion'])

img_data = np.array(data['pixels'])

N_sample = label.size

# print label.size

Face_data = np.zeros((N_sample, 48*48))

Face_label = np.zeros((N_sample, 7), dtype=int)

for i in range(N_sample):

    x = img_data[i]

    x = np.fromstring(x, dtype=float, sep=' ')

    x_max = x.max()

    x = x/(x_max+0.0001)

#    print x_max

#    print x

    Face_data[i] = x

    Face_label[i, label[i]] = 1

#    img_x = np.reshape(x, (48, 48))

#    plt.subplot(10,10,i+1)

#    plt.axis('off')

#    plt.imshow(img_x, plt.cm.gray)

train_num = 30000

test_num = 5000

train_x = Face_data [0:train_num, :]

train_y = Face_label [0:train_num, :]

test_x =Face_data [train_num : train_num+test_num, :]

test_y = Face_label [train_num : train_num+test_num, :]

print ("All is well")

batch_size = 50

train_batch_num = train_num/batch_size

test_batch_num = test_num/batch_size

train_epoch = 100

learning_rate = 0.001

# Network Parameters

n_input = 2304  # data input (img shape: 48*48)

n_classes = 7   # total classes

dropout = 0.5   # Dropout, probability to keep units

# tf Graph input

x = tf.placeholder(tf.float32, [None, n_input])

y = tf.placeholder(tf.float32, [None, n_classes])

keep_prob = tf.placeholder(tf.float32) #dropout (keep probability)

# Create some wrappers for simplicity

def conv2d(x, W, b, strides=1):

    # Conv2D wrapper, with bias and relu activation

    x = tf.nn.conv2d(x, W, strides=[1, strides, strides, 1], padding='SAME')

    x = tf.nn.bias_add(x, b)

    return tf.nn.relu(x)

def maxpool2d(x, k=2):

    # MaxPool2D wrapper

    return tf.nn.max_pool(x, ksize=[1, k, k, 1], strides=[1, k, k, 1],

                          padding='VALID')

# Create model

def conv_net(x, weights, biases, dropout):

    # Reshape input picture

    x = tf.reshape(x, shape=[-1, 48, 48, 1])

    # Convolution Layer

    conv1 = conv2d(x, weights['wc1'], biases['bc1'])

    # Max Pooling (down-sampling)

    conv1 = maxpool2d(conv1, k=2)

    # Convolution Layer

    conv2 = conv2d(conv1, weights['wc2'], biases['bc2'])

    # Max Pooling (down-sampling)

    conv2 = maxpool2d(conv2, k=2)

    # Convolution Layer

    conv3 = conv2d(conv2, weights['wc3'], biases['bc3'])

    # Max Pooling (down-sampling)

    conv3 = maxpool2d(conv3, k=2)

    # Fully connected layer

    # Reshape conv2 output to fit fully connected layer input

    fc1 = tf.reshape(conv3, [-1, weights['wd1'].get_shape().as_list()[0]])

    fc1 = tf.add(tf.matmul(fc1, weights['wd1']), biases['bd1'])

    fc1 = tf.nn.relu(fc1)

    # Apply Dropout

    fc1 = tf.nn.dropout(fc1, dropout)

    # Output, class prediction

    out = tf.add(tf.matmul(fc1, weights['out']), biases['out'])

    return out

# Store layers weight & bias

weights = {

    # 3x3 conv, 1 input, 128 outputs

    'wc1': tf.Variable(tf.random_normal([3, 3, 1, 128])),

    # 3x3 conv, 128 inputs, 64 outputs

    'wc2': tf.Variable(tf.random_normal([3, 3, 128, 64])),

    # 3x3 conv, 64 inputs, 32 outputs

    'wc3': tf.Variable(tf.random_normal([3, 3, 64, 32])),

    # fully connected,

    'wd1': tf.Variable(tf.random_normal([6*6*32, 200])),

    # 1024 inputs, 10 outputs (class prediction)

    'out': tf.Variable(tf.random_normal([200, n_classes]))

}

biases = {

    'bc1': tf.Variable(tf.random_normal([128])),

    'bc2': tf.Variable(tf.random_normal([64])),

    'bc3': tf.Variable(tf.random_normal([32])),

    'bd1': tf.Variable(tf.random_normal([200])),

    'out': tf.Variable(tf.random_normal([n_classes]))

}

# Construct model

pred = conv_net(x, weights, biases, keep_prob)

# Define loss and optimizer

cost = tf.reduce_mean(tf.nn.softmax_cross_entropy_with_logits(pred, y))

optimizer = tf.train.AdamOptimizer(learning_rate=learning_rate).minimize(cost)

# Evaluate model

correct_pred = tf.equal(tf.argmax(pred, 1), tf.argmax(y, 1))

accuracy = tf.reduce_mean(tf.cast(correct_pred, tf.float32))

# Initializing the variables

init = tf.initialize_all_variables()

Train_ind = np.arange(train_num)

Test_ind = np.arange(test_num)

with tf.Session() as sess:

    sess.run(init)

    for epoch in range(0, train_epoch):

        Total_test_loss = 0

        Total_test_acc = 0

        for train_batch in range (0, train_batch_num):

            sample_ind = Train_ind[train_batch * batch_size:(train_batch + 1) * batch_size]

            batch_x = train_x[sample_ind, :]

            batch_y = train_y[sample_ind, :]

            # Run optimization op (backprop)

            sess.run(optimizer, feed_dict={x: batch_x, y: batch_y,

                                           keep_prob: dropout})

            if train_batch % batch_size == 0:

                # Calculate loss and accuracy

                loss, acc = sess.run([cost, accuracy], feed_dict={x: batch_x,

                                                              y: batch_y,

                                                              keep_prob: 1.})

                print("Epoch: " + str(epoch+1) + ", Batch: "+ str(train_batch) + ", Loss= " + \

                            "{:.3f}".format(loss) + ", Training Accuracy= " + \

                            "{:.3f}".format(acc))

        # Calculate test loss and test accuracy

        for test_batch in range (0, test_batch_num):

            sample_ind = Test_ind[test_batch * batch_size:(test_batch + 1) * batch_size]

            batch_x = test_x[sample_ind, :]

            batch_y = test_y[sample_ind, :]

            test_loss, test_acc = sess.run([cost, accuracy], feed_dict={x: batch_x,

                                                                        y: batch_y,

                                                                        keep_prob: 1.})

            Total_test_lost = Total_test_loss + test_loss

            Total_test_acc =Total_test_acc + test_acc

        Total_test_acc = Total_test_acc/test_batch_num

        Total_test_loss =Total_test_lost/test_batch_num

        print("Epoch: " + str(epoch + 1) + ", Test Loss= " + \

                      "{:.3f}".format(Total_test_loss) + ", Test Accuracy= " + \

                      "{:.3f}".format(Total_test_acc))

plt.subplot(2,1,1)

plt.ylabel('Test loss')

plt.plot(Total_test_loss, 'r')

plt.subplot(2,1,2)

plt.ylabel('Test Accuracy')

plt.plot(Total_test_acc, 'r')

print "All is well"

plt.show()
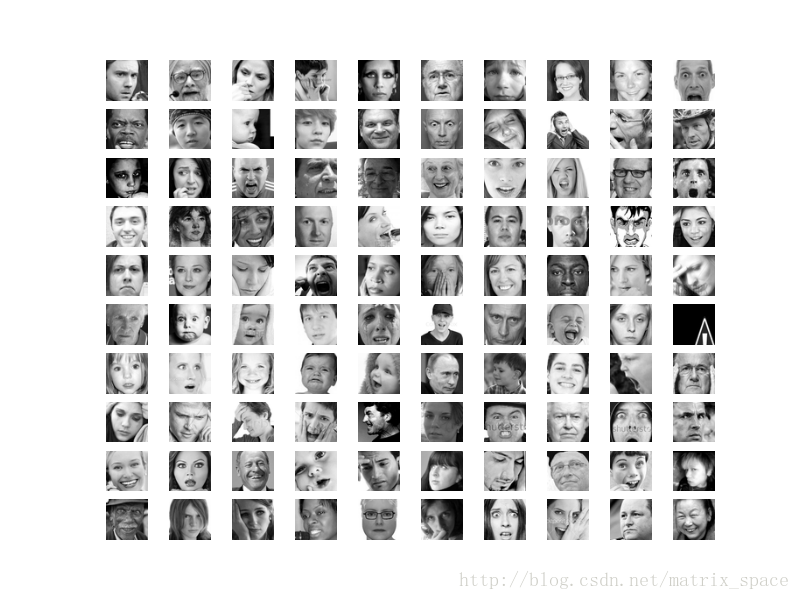
数据库的样图:
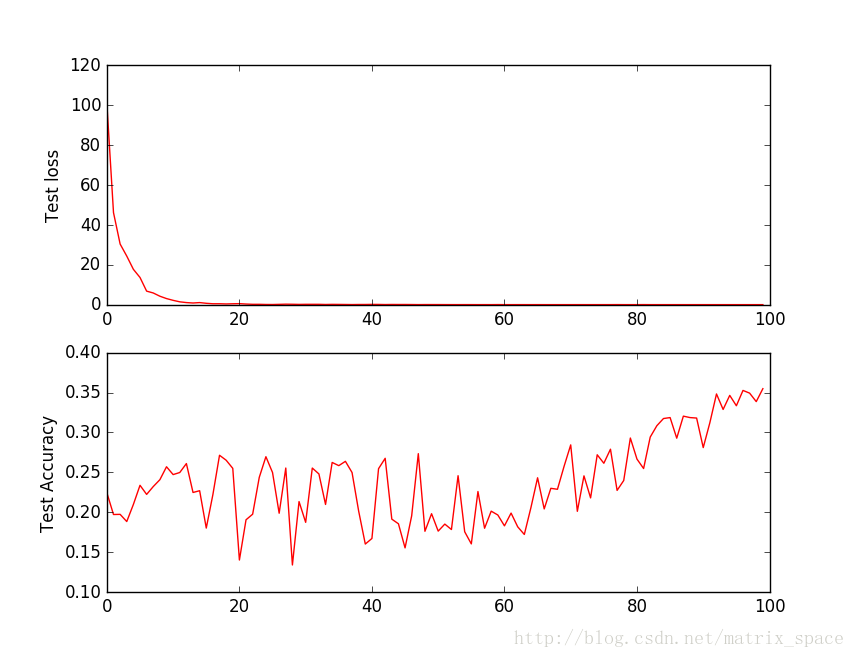
100个训练周期的仿真结果:
机器学习: Tensor Flow with CNN 做表情识别的更多相关文章
- 机器学习: Tensor Flow +CNN 做笑脸识别
Tensor Flow 是一个采用数据流图(data flow graphs),用于数值计算的开源软件库.节点(Nodes)在图中表示数学操作,图中的线(edges)则表示在节点间相互联系的多维数据数 ...
- 使用CNN做数字识别和人脸识别
上次写的一层神经网络也都贴这里了. 我有点困,我先睡觉,完了我再修改 这个代码写法不太符合工业代码的规范,仅仅是用来学习的的.还望各位见谅 import sys,ossys.path.append(o ...
- UWP通过机器学习加载ONNX进行表情识别
首先我们先来说说这个ONNX ONNX是一种针对机器学习所设计的开放式的文件格式,用于存储训练好的模型.它使得不同的人工智能框架(如Pytorch, MXNet)可以采用相同格式存储模型数据并交互. ...
- AI从入门到放弃:CNN的导火索,用MLP做图像分类识别?
欢迎大家前往腾讯云+社区,获取更多腾讯海量技术实践干货哦~ 作者:郑善友 腾讯MIG后台开发工程师 导语:在没有CNN以及更先进的神经网络的时代,朴素的想法是用多层感知机(MLP)做图片分类的识别:但 ...
- 机器学习:scikit-learn 做笑脸识别 (SVM, KNN, Logisitc regression)
scikit-learn 是 Python 非常强大的一个做机器学习的包,今天介绍scikit-learn 里几个常用的分类器 SVM, KNN 和 logistic regression,用来做笑脸 ...
- 机器学习实战:用nodejs实现人脸识别
机器学习实战:用nodejs实现人脸识别 在本文中,我将向你展示如何使用face-recognition.js执行可靠的人脸检测和识别 . 我曾经试图找一个能够精确识别人脸的Node.js库,但是 ...
- .NET做人脸识别并分类
.NET做人脸识别并分类 在游乐场.玻璃天桥.滑雪场等娱乐场所,经常能看到有摄影师在拍照片,令这些经营者发愁的一件事就是照片太多了,客户在成千上万张照片中找到自己可不是件容易的事.在一次游玩等活动或家 ...
- 【Gabor】基于多尺度多方向Gabor融合+分块直方图的表情识别
Topic:表情识别Env: win10 + Pycharm2018 + Python3.6.8Date: 2019/6/23~25 by hw_Chen2018 ...
- swift通过摄像头读取每一帧的图片,并且做识别做人脸识别
最近帮别人做一个项目,主要是使用摄像头做人脸识别 github地址:https://github.com/qugang/AVCaptureVideoTemplate 要使用IOS的摄像头,需要使用AV ...
随机推荐
- [TypeStyle] Use fallback values in TypeStyle for better browser support
You can increase the browser support of your CSS using fallback values and vendor prefixes. This les ...
- HDU 1210 Eddy's 洗牌问题(foj1062) || FOJ1050 Number lengths水
麻痹,感冒了. ------------------------------------------------感冒了的分割线------------------------------------- ...
- iOS中OC给Category加入属性
引: 非常多人知道能够用Category给已有的类加入一些新方法,可是不同于swift中的extension,Objective-C中的Category(类别)是不支持直接加入属性的.那假设就是须要加 ...
- 手机浏览器 input 输入框 数字
其实很简单了啦 type="tel"就行了呢 如果是type="number"其实不好用
- node+mongodb+WP构建的移动社交应用源码 分享
源码地址: https://github.com/kangkaisen/dreaming dreaming 详情介绍:http://www.bcmeng.com/dreaming/
- WP8.1:onedrive操作
小梦今天给大家分享一下windows phone 8.1开发 onedrive中的一些操作: Windows phone 8.1 中 onedrive 登录 Windows phone 8.1 中 o ...
- php实现 密码验证合格程序(复杂问题分类,超简单的)(分类+规范编码)
php实现 密码验证合格程序(复杂问题分类,超简单的)(分类+规范编码) 一.总结 一句话总结:复杂问题分类,超简单的.分类+规范编码. 1.写的时候判断 不能有相同长度超2的子串重复 的时候,子 ...
- js进阶正则表达式10-分组-多行匹配-正则对象的属性(小括号作用:分组,将小括号里面的东西看成一个整体,因为量词只对前一个字符有效)(多行匹配:m)(属性使用:reg.global)
js进阶正则表达式10-分组-多行匹配-正则对象的属性(小括号作用:分组,将小括号里面的东西看成一个整体,因为量词只对前一个字符有效)(多行匹配:m)(属性使用:reg.global) 一.总结 1. ...
- js实现金额小写转大写
function convertCurrency(currencyDigits) { var MAXIMUM_NUMBER = 1000000000000.00; var CN_ZERO = &quo ...
- Android菜鸟的成长笔记(26)——普通广播与有序广播
BroadcastReceiver是Android系统的四大组件之一,BroadcastReceiver是一个全局的系统级监听器,它拥有自己的独立进程. 我们来写一个最简单的广播接收过程 先在mani ...