
Spring声明式事务管理(基于注解方式实现)
----------------------siwuxie095
Spring 声明式事务管理(基于注解方式实现)
以转账为例
1、导入相关
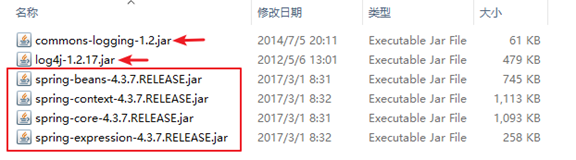
jar 包(共 10 个包)
(1)导入核心 jar 包和日志相关的 jar 包
(2)导入
JdbcTemplate 的 jar 包

(3)导入
MySQL 的 JDBC 驱动包

mysql-connector-java
下载链接:
https://dev.mysql.com/downloads/connector/j/
(4)导入 AOP 的 jar 包

2、在
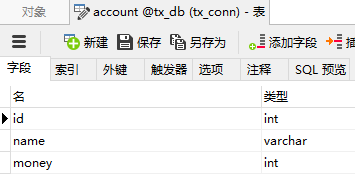
MySQL 中手动创建数据库和表
数据库名:tx_db,表名:account,字段:id、name、money
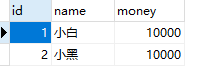
手动添加数据,用作测试
3、具体步骤
(1)配置事务管理器
|
<!-- 配置事务管理器 --> <bean class="org.springframework.jdbc.datasource.DataSourceTransactionManager"> <!-- 在 DataSourceTransactionManager 源代码中有 属性 dataSource 和其 set 方法,所以可以注入 --> <property </bean> |
(2)配置事务注解
|
<!-- 配置事务注解,即 <tx:annotation-driven |
(3)在使用事务的类上添加注解:@Transactional
「使用事务的类一般在业务层」
4、具体实现
编写一个
Dao 类
AccountDao.java:
|
package com.siwuxie095.dao; import org.springframework.jdbc.core.JdbcTemplate; public class AccountDao { private JdbcTemplate jdbcTemplate;
public this.jdbcTemplate = jdbcTemplate; }
/** * 转出 */ public String sql="update account set money=money-? where name=?"; jdbcTemplate.update(sql, money, from); }
/** * 转入 */ public String sql="update account set money=money+? where name=?"; jdbcTemplate.update(sql, money, to); }
} |
(2)编写一个
Service 类
AccountService.java:
|
package com.siwuxie095.service; import org.springframework.transaction.annotation.Transactional; import com.siwuxie095.dao.AccountDao; // 在使用事务的类上添加注解:@Transactional @Transactional public class AccountService { private AccountDao accountDao;
public this.accountDao = accountDao; }
/** * 转账 */ public
accountDao.lessMoney(from, money);
// 即便中间出现了什么异常,也会进行回滚 // 如:int num=10/0;
accountDao.moreMoney(to, money);
}
} |
(3)在配置文件中进行配置
applicationContext.xml:
|
<?xml <beans xmlns:xsi="http://www.w3.org/2001/XMLSchema-instance" xmlns:aop="http://www.springframework.org/schema/aop" xmlns:context="http://www.springframework.org/schema/context" xmlns:tx="http://www.springframework.org/schema/tx" xsi:schemaLocation=" http://www.springframework.org/schema/beans http://www.springframework.org/schema/beans/spring-beans.xsd http://www.springframework.org/schema/aop http://www.springframework.org/schema/aop/spring-aop.xsd http://www.springframework.org/schema/context http://www.springframework.org/schema/context/spring-context.xsd http://www.springframework.org/schema/tx http://www.springframework.org/schema/tx/spring-tx.xsd">
<!-- 配置内置连接池 --> <bean <property <!-- jdbc:mysql:///tx_db 是 jdbc:mysql://localhost:3306/tx_db 的简写 --> <property <property <property </bean>
<!-- 配置事务管理器 --> <bean class="org.springframework.jdbc.datasource.DataSourceTransactionManager"> <!-- 在 DataSourceTransactionManager 源代码中有 属性 dataSource 和其 set 方法,所以可以注入 --> <property </bean>
<!-- 配置事务注解,即 <tx:annotation-driven
<!-- 配置对象并注入属性 --> <bean <property </bean>
<bean <property </bean>
<bean <!-- 在 JdbcTemplate 源代码中有属性 dataSource 和其 set 方法,所以可以注入 --> <property </bean> </beans> |
(4)编写一个测试类
TestDemo.java:
|
package com.siwuxie095.test; import org.junit.Test; import org.springframework.context.ApplicationContext; import org.springframework.context.support.ClassPathXmlApplicationContext; import com.siwuxie095.service.AccountService; public class TestDmo { /** * 手动加上 @Test 以进行单元测试(将自动导入 JUnit 4 的 jar 包) * * 选中方法名,右键->Run As->JUint Test */ @Test public
ApplicationContext context=new ClassPathXmlApplicationContext("applicationContext.xml");
AccountService accountService=(AccountService) context.getBean("accountService");
accountService.transfer("小白", "小黑", 1000); }
} |
【made by siwuxie095】
Spring声明式事务管理(基于注解方式实现)的更多相关文章
- Spring声明式事务管理基于@Transactional注解
概述:我们已知道Spring声明式事务管理有两种常用的方式,一种是基于tx/aop命名空间的xml配置文件,另一种则是基于@Transactional 注解. 第一种方式我已在上文为大 ...
- Spring声明式事务管理基于tx/aop命名空间
目的:通过Spring AOP 实现Spring声明式事务管理; Spring支持编程式事务管理和声明式事务管理两种方式. 而声明式事务管理也有两种常用的方式,一种是基于tx/aop命名空间的xml配 ...
- Spring事务管理之声明式事务管理-基于注解的方式
© 版权声明:本文为博主原创文章,转载请注明出处 案例 - 利用Spring的声明式事务(TransactionProxyFactoryBean)管理模拟转账过程 数据库准备 -- 创建表 CREAT ...
- Spring声明式事务管理(基于XML方式实现)
--------------------siwuxie095 Spring 声明式事务管理(基于 XML 方式实现) 以转账为例 ...
- Spring 声明式事务管理方式
声明式事务管理,基于AOP对目标代理,添加环绕通知,比编码方案优势,不具有侵入式,不需要修改原来的代码. 1.基于XML配置的声明式事务管理方案(案例) 接口Service public i ...
- XML方式实现Spring声明式事务管理
1.首先编写一个实体类 public class Dept { private int deptId; private String deptName; public int getDeptId() ...
- Spring声明式事务管理与配置介绍
转至:http://java.9sssd.com/javafw/art/1215 [摘要]本文介绍Spring声明式事务管理与配置,包括Spring声明式事务配置的五种方式.事务的传播属性(Propa ...
- Spring声明式事务如何选择代理方式?
Spring声明式事务如何选择代理方式 解决方法: 1.基于注解方法: <tx:annotation-driven transaction-manager="txManager&q ...
- spring 声明式事务管理
简单理解事务: 比如你去ATM机取5000块钱,大体有两个步骤:首先输入密码金额,银行卡扣掉5000元钱:然后ATM出5000元钱.这两个步骤必须是要么都执行要么都不执行.如果银行卡扣除了5000块但 ...
随机推荐
- poj 3069 Saruman's Army(贪心)
Saruman's Army Time Limit : 2000/1000ms (Java/Other) Memory Limit : 131072/65536K (Java/Other) Tot ...
- ASP.NET Web Pages:页面布局
ylbtech-.Net-ASP.NET Web Pages:页面布局 1.返回顶部 1. ASP.NET Web Pages - 页面布局 通过 Web Pages ,创建一个布局一致的网站是很容易 ...
- 1036 Boys vs Girls (25 分)
1036 Boys vs Girls (25 分) This time you are asked to tell the difference between the lowest grade of ...
- centos7的web环境安装配置
1.安装基本东西安装apache yum install httpd安装mariadb yum install mariadb mariadb-server安装php yum install p ...
- Python预编译语句防止SQL注入
这个月太忙,最近不太太平,我的愿望是世界和平! ================================== 今天也在找python的预编译,早上写的sql是拼接来构成的.于是找了2篇文章,还 ...
- js-传送file
这是选择文件的标签 <input type="file" class="add-image-input"> 这是js实现传输文件 var addIm ...
- android提权
Android的内核就是Linux,所以Android获取root其实和Linux获取root权限是一回事儿. 你 想在Linux下获取root权限的时候就是执行sudo或者su,接下来系统会提示你输 ...
- 使用amaze ui模板全过程
amaze ui基于gulp构建,所以现在安装gulp需要的环境,gulp使用npm安装,npm基于node.js 所以一切从node.js开始 1 下载对应的node.js 打开 https://n ...
- 4. 纯 CSS 创作一个金属光泽 3D 按钮特效
原文地址:https://segmentfault.com/a/1190000014599280 HTML代码: <div class="box">BUTTON< ...
- 39. 在linux下装好Tomcat要给 tomcat/bin/下面所有.sh的文件执行权限
chmod a+x *.sh(赋予可执行的权限)