
Spring声明式事务管理(基于XML方式实现)
--------------------siwuxie095
Spring 声明式事务管理(基于 XML 方式实现)
以转账为例
1、基于
XML 配置文件的方式实现声明式事务管理,其思想就是 AOP 思想
2、导入相关
jar 包(共 13 个包)
(1)导入核心 jar 包和日志相关的 jar 包

(2)导入
JdbcTemplate 的 jar 包

(3)导入
MySQL 的 JDBC 驱动包

mysql-connector-java
下载链接:
https://dev.mysql.com/downloads/connector/j/
(4)导入 AOP 和
AspectJ 的 jar 包

其中:
aopalliance
下载链接:
http://mvnrepository.com/artifact/aopalliance/aopalliance
aspectjweaver
下载链接:
http://mvnrepository.com/artifact/org.aspectj/aspectjweaver
3、在
MySQL 中手动创建数据库和表
数据库名:tx_db,表名:account,字段:id、name、money

手动添加数据,用作测试
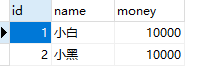
4、具体步骤
(1)配置事务管理器
|
<!-- 配置事务管理器 --> <bean class="org.springframework.jdbc.datasource.DataSourceTransactionManager"> <!-- 在 DataSourceTransactionManager 源代码中有 属性 dataSource 和其 set 方法,所以可以注入 --> <property </bean> |
(2)配置事务的通知(增强)
|
<!-- 配置事务的通知(增强) --> <tx:advice <tx:attributes> <!-- isolation="DEFAULT" 隔离级别 propagation="REQUIRED" 传播行为 read-only="false" 只读 timeout="-1" 过期时间 rollback-for="" -Exception no-rollback-for="" +Exception --> <!-- 对进行事务操作的方法(一般是业务层方法)设置匹配规则, 如:transfer* 即 --> <tx:method </tx:attributes> </tx:advice> |
(3)配置
AOP
|
<!-- 配置 AOP --> <aop:config> <!-- 配置切入点 --> <aop:pointcut <!-- 配置切面(增强 + 切入点) --> <aop:advisor </aop:config> |
5、具体实现
(1)编写一个
Dao 类
AccountDao.java:
|
package com.siwuxie095.dao; import org.springframework.jdbc.core.JdbcTemplate; public class AccountDao { private JdbcTemplate jdbcTemplate;
public this.jdbcTemplate = jdbcTemplate; }
/** * 转出 */ public String sql="update account set money=money-? where name=?"; jdbcTemplate.update(sql, money, from); }
/** * 转入 */ public String sql="update account set money=money+? where name=?"; jdbcTemplate.update(sql, money, to); }
} |
(2)编写一个
Service 类
AccountService.java:
|
package com.siwuxie095.service; import com.siwuxie095.dao.AccountDao; public class AccountService { private AccountDao accountDao;
public this.accountDao = accountDao; }
/** * 转账 */ public
accountDao.lessMoney(from, money);
// 即便中间出现了什么异常,也会进行回滚 // 如:int num=10/0;
accountDao.moreMoney(to, money);
}
} |
(3)在配置文件中进行配置
applicationContext.xml:
|
<?xml <beans xmlns:xsi="http://www.w3.org/2001/XMLSchema-instance" xmlns:aop="http://www.springframework.org/schema/aop" xmlns:context="http://www.springframework.org/schema/context" xmlns:tx="http://www.springframework.org/schema/tx" xsi:schemaLocation=" http://www.springframework.org/schema/beans http://www.springframework.org/schema/beans/spring-beans.xsd http://www.springframework.org/schema/aop http://www.springframework.org/schema/aop/spring-aop.xsd http://www.springframework.org/schema/context http://www.springframework.org/schema/context/spring-context.xsd http://www.springframework.org/schema/tx http://www.springframework.org/schema/tx/spring-tx.xsd">
<!-- 配置内置连接池 --> <bean <property <!-- jdbc:mysql:///tx_db 是 jdbc:mysql://localhost:3306/tx_db 的简写 --> <property <property <property </bean>
<!-- 配置事务管理器 --> <bean class="org.springframework.jdbc.datasource.DataSourceTransactionManager"> <!-- 在 DataSourceTransactionManager 源代码中有 属性 dataSource 和其 set 方法,所以可以注入 --> <property </bean>
<!-- 配置事务的通知(增强) --> <tx:advice <tx:attributes> <!-- isolation="DEFAULT" 隔离级别 propagation="REQUIRED" 传播行为 read-only="false" 只读 timeout="-1" 过期时间 rollback-for="" -Exception no-rollback-for="" +Exception --> <!-- 对进行事务操作的方法(一般是业务层方法)设置匹配规则, 如:transfer* 即 --> <tx:method </tx:attributes> </tx:advice>
<!-- 配置 AOP --> <aop:config> <!-- 配置切入点 --> <aop:pointcut <!-- 配置切面(增强 + 切入点) --> <aop:advisor </aop:config>
<!-- 配置对象并注入属性 --> <bean <property </bean>
<bean <property </bean>
<bean <!-- 在 JdbcTemplate 源代码中有属性 dataSource 和其 set 方法,所以可以注入 --> <property </bean> </beans> |
(4)编写一个测试类
TestDemo.java:
|
package com.siwuxie095.test; import org.junit.Test; import org.springframework.context.ApplicationContext; import org.springframework.context.support.ClassPathXmlApplicationContext; import com.siwuxie095.service.AccountService; public class TestDmo { /** * 手动加上 @Test 以进行单元测试(将自动导入 JUnit 4 的 jar 包) * * 选中方法名,右键->Run As->JUint Test */ @Test public
ApplicationContext context=new ClassPathXmlApplicationContext("applicationContext.xml");
AccountService accountService=(AccountService) context.getBean("accountService");
accountService.transfer("小白", "小黑", 1000); }
} |
【made by siwuxie095】
Spring声明式事务管理(基于XML方式实现)的更多相关文章
- Spring声明式事务管理基于@Transactional注解
概述:我们已知道Spring声明式事务管理有两种常用的方式,一种是基于tx/aop命名空间的xml配置文件,另一种则是基于@Transactional 注解. 第一种方式我已在上文为大 ...
- Spring声明式事务管理基于tx/aop命名空间
目的:通过Spring AOP 实现Spring声明式事务管理; Spring支持编程式事务管理和声明式事务管理两种方式. 而声明式事务管理也有两种常用的方式,一种是基于tx/aop命名空间的xml配 ...
- Spring声明式事务管理(基于注解方式实现)
----------------------siwuxie095 Spring 声明式事务管理(基于注解方式实现) 以转 ...
- XML方式实现Spring声明式事务管理
1.首先编写一个实体类 public class Dept { private int deptId; private String deptName; public int getDeptId() ...
- Spring 声明式事务管理方式
声明式事务管理,基于AOP对目标代理,添加环绕通知,比编码方案优势,不具有侵入式,不需要修改原来的代码. 1.基于XML配置的声明式事务管理方案(案例) 接口Service public i ...
- Spring声明式事务管理与配置介绍
转至:http://java.9sssd.com/javafw/art/1215 [摘要]本文介绍Spring声明式事务管理与配置,包括Spring声明式事务配置的五种方式.事务的传播属性(Propa ...
- Spring声明式事务如何选择代理方式?
Spring声明式事务如何选择代理方式 解决方法: 1.基于注解方法: <tx:annotation-driven transaction-manager="txManager&q ...
- spring 声明式事务管理
简单理解事务: 比如你去ATM机取5000块钱,大体有两个步骤:首先输入密码金额,银行卡扣掉5000元钱:然后ATM出5000元钱.这两个步骤必须是要么都执行要么都不执行.如果银行卡扣除了5000块但 ...
- spring声明式事务管理方式( 基于tx和aop名字空间的xml配置+@Transactional注解)
1. 声明式事务管理分类 声明式事务管理也有两种常用的方式, 一种是基于tx和aop名字空间的xml配置文件,另一种就是基于@Transactional注解. 显然基于注解的方式更简单易用,更清爽. ...
随机推荐
- POJ 2139 Six Degrees of Cowvin Bacon (floyd)
Six Degrees of Cowvin Bacon Time Limit : 2000/1000ms (Java/Other) Memory Limit : 131072/65536K (Ja ...
- document.write覆盖问题
1.不会覆盖页面: 如果仅仅是一句js语句:document.writeln('<span id=\'span1\'>嗯,你好</span>'); ps:\'是转义字符,代表' ...
- Linux设置history命令显示时间
效果如图: 设置方法如下: vim /etc/bashrc #command-->history set HISTFILESIZE=2000 #保存命令的总数默认总数为1000 HISTSIZE ...
- xshell连不上虚拟机linux的解决办法(用的默认NAT模式)
1.找到Linux系统的ip地址 输入命令 ifconfig 2.打开本地网络连接 将VMnet1的ip地址设置为和虚拟机ip同一网段的ip 比如虚拟机Linux系统的ip为 192.168. ...
- Ubuntu-14.04.1 desktop安装时遇到的小问题
su root认证失败:sudo passwd root,然后设置新密码. 重装linux导致g++显示已安装,但无法使用:将"系统设置"/"软件源"中所有更新 ...
- BigDecimal空指针异常——个人应用
背景: 将数据库统计的数据,封装成了两个BigDecimal,此时要将两个BigDecimal进行运算.其中有一个没有数据的话,会报null(不管null值在前在后) 先上解决: 我把数据库的数据进行 ...
- django 更新 模板语言
Django模板系统 官方文档 常用语法 只需要记两种特殊符号: {{ }}和 {% %} 变量相关的用{{}},逻辑相关的用{%%}. 变量 在Django的模板语言中按此语法使用:{{ 变量名 ...
- C# List<string>和ArrayList用指定的分隔符分隔成字符串
原文地址:https://www.cnblogs.com/ahwwmb/p/4166707.html 串联字符串数组的所有元素,其中在每个元素之间使用指定的分隔符 List<string> ...
- collections模块---(namedtuple、deque、OrderdDict、defaultdict、Counter)和configparser模块
在内置数据类型(dict. list.set.tuple)的基础上,collections模块还提供了几个额外的数据类型:Counter. deque.defaultdict.namedtuple 和 ...
- IPv4检验和计算
IP分组中的检验和仅覆盖首部,而不管数据,首部被划分为16位的段,把所有段相加,结果取反,塞进首部检验和里 在目的主机中,首部划分为16位,相加,结果肯定是16个1,然后取反,结果为0.如下 在目的主 ...