
cloud compare PCA插件开发详细步骤(二)附代码
在上一节 https://blog.csdn.net/csy1021/article/details/141200135
我们已经完成了 具体开发前的准备工作,包括 各级 CMakelists.txt 的设置,相关内容的修改,并已成功编译
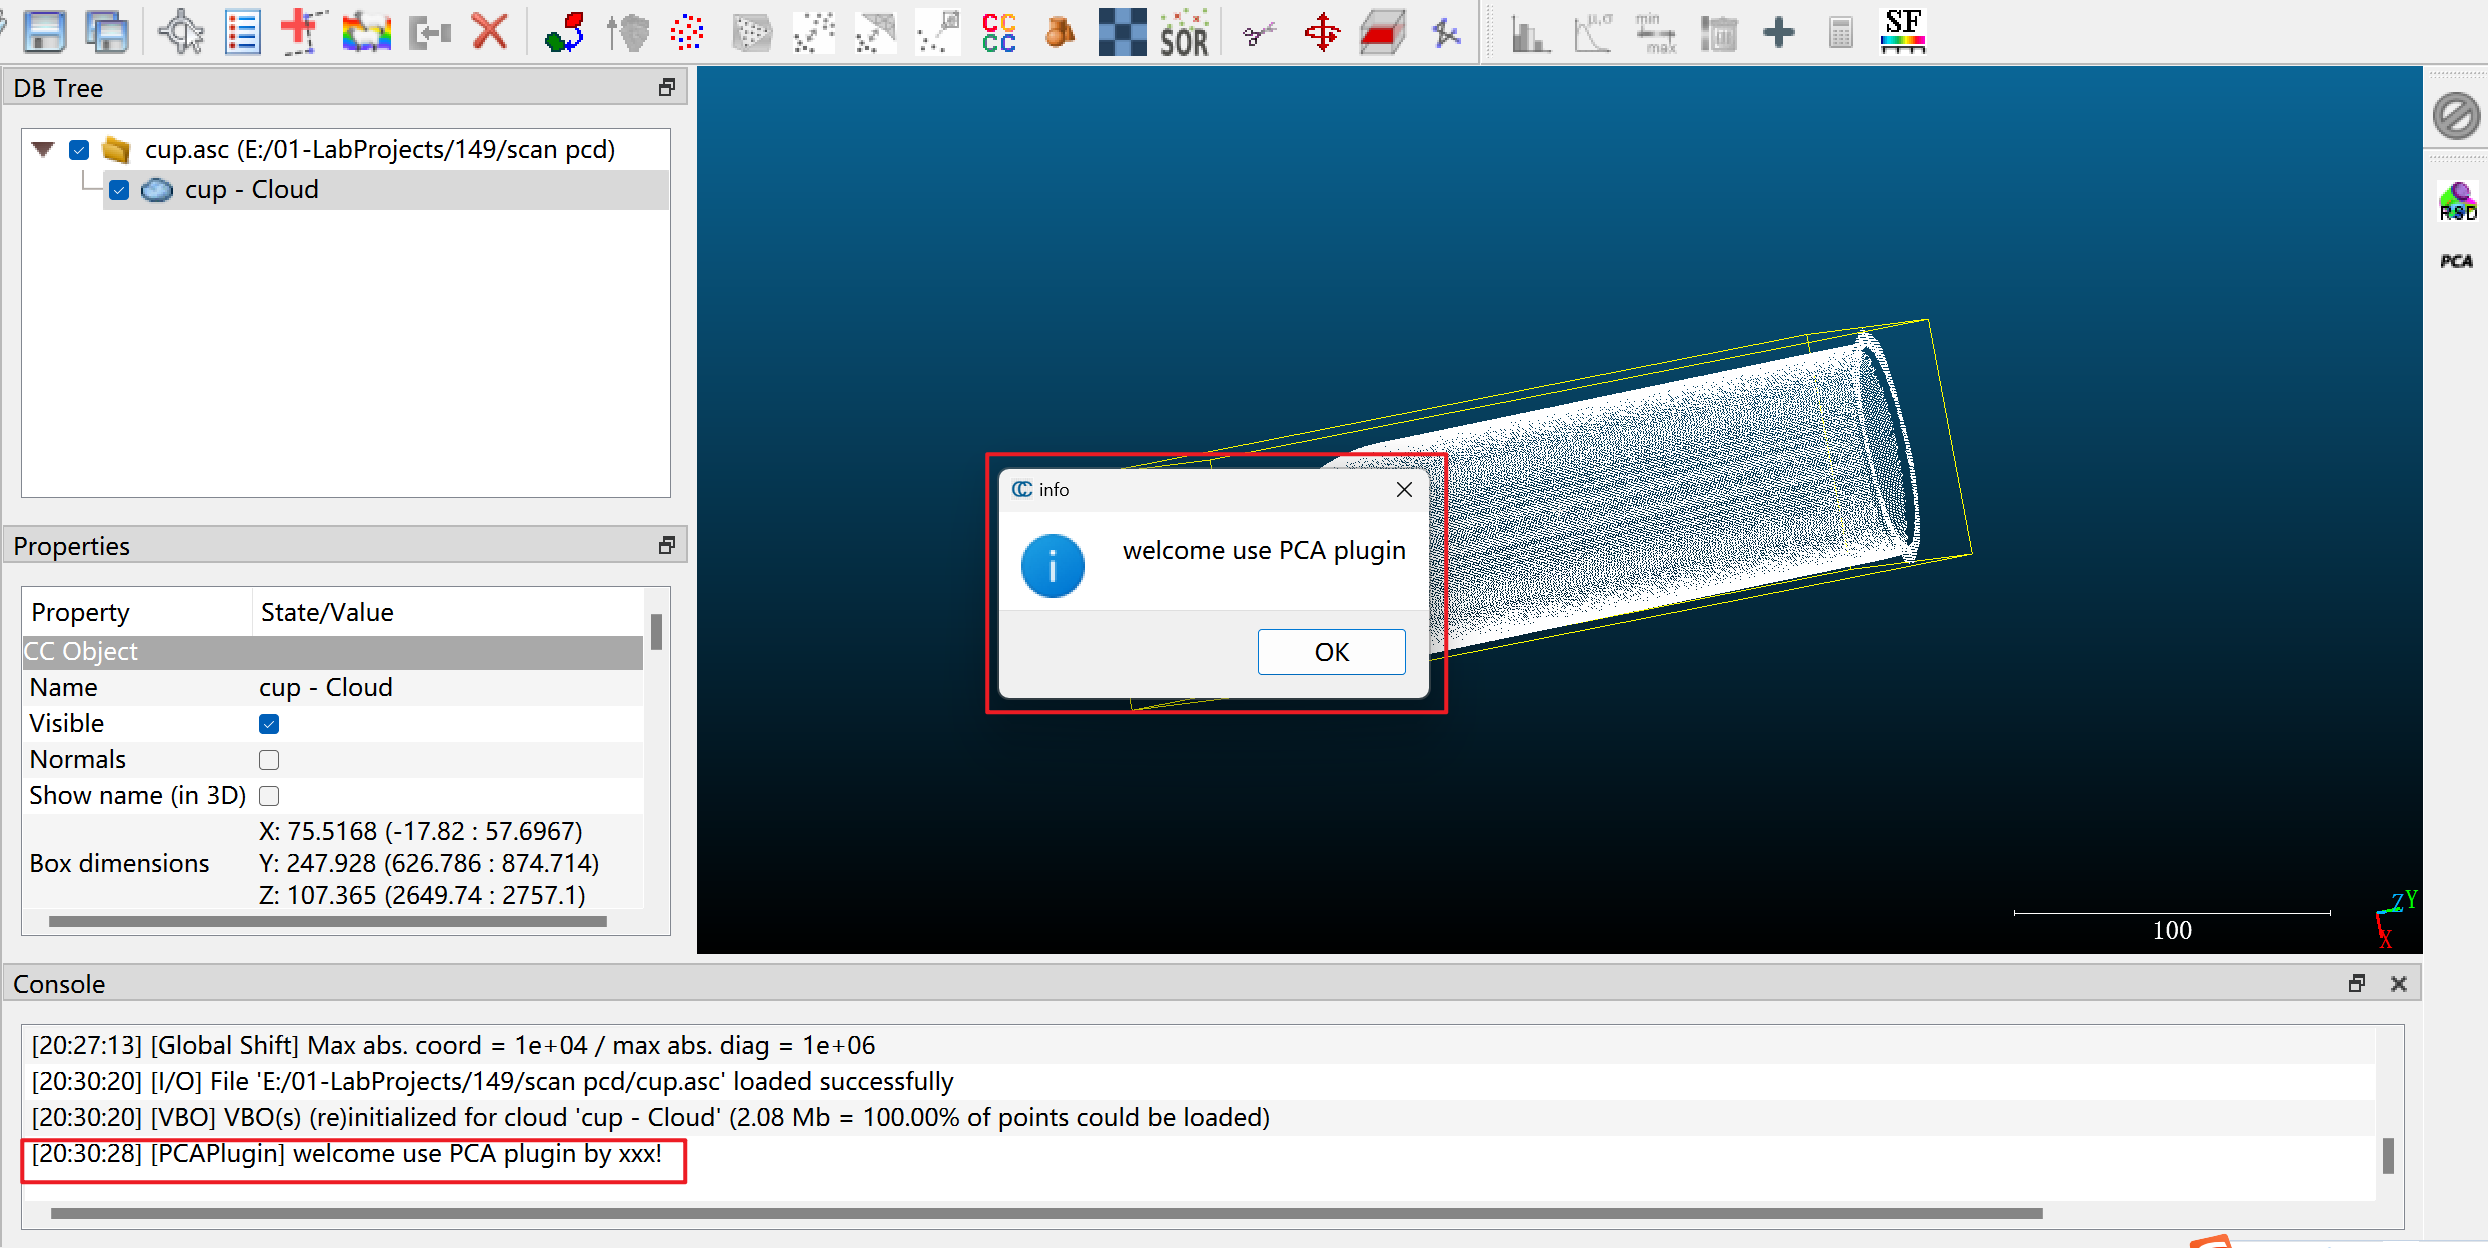
如需整个插件项目,编译后的 dll,或其他帮助,欢迎留言、私信或加群【群号:392784757】
这一节针对我们的 qPCA 插件,引入进阶内容,包括第三方库引入、设置用户输入参数界面以及具体逻辑的编写
最终整体的 qPCA 插件目录结构如下
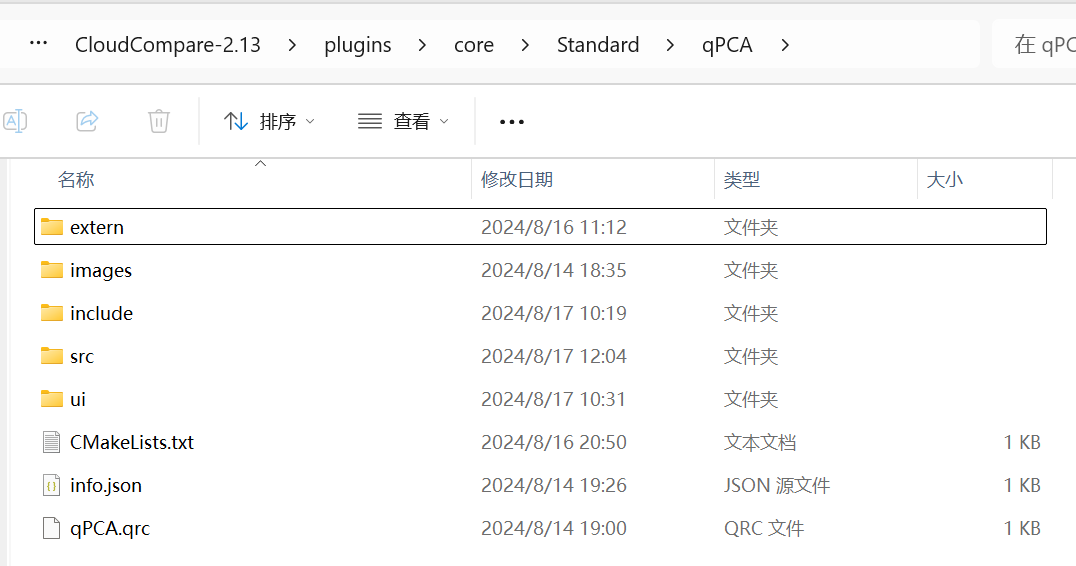
第三方库引入
由于 cc 处理的主要是点云、网格数据,较少涉及到大型矩阵的求解,而 PCA 分析需要去计算矩阵,在这里我们要引入第三方库 Eigen 帮助完成
Eigen 是一个轻量级的 C++ 数学库,主要用于矩阵和线性代数运算。它的一个优势就是它是头文件库,不需要编译成库文件,引入难度也会低一点
在这里使用的是 Eigen 3.4 版本 官方网站 https://eigen.tuxfamily.org/index.php?title=Main_Page
下载解压后在 extern 目录下
具体路径 形式 extern\eigen3\Eigen\**
然后修改 当前 qPCA 插件的 最高 CMakeLists.txt
添加内容
include_directories("${CMAKE_CURRENT_LIST_DIR}/extern/eigen3") # 设置包含目录
我在这里设置后发现 并不能成功引入
同时还在 include 文件夹下的 CMakeLists.txt 添加
include_directories("${CMAKE_CURRENT_LIST_DIR}/../extern/eigen3")
【最终版本 qPCA 插件的 最高 CMakeLists.txt 如下】
# CloudCompare example for standard plugins

option( PLUGIN_qPCA "Install PCA plugin" OFF )

if ( PLUGIN_qPCA )

	project( QPCA_PLUGIN )

	AddPlugin( NAME ${PROJECT_NAME} )

	add_subdirectory( include )

	add_subdirectory( src )

	add_subdirectory( ui )

	include_directories("${CMAKE_CURRENT_LIST_DIR}/extern/eigen3")

	# set dependencies to necessary libraries

	# target_link_libraries( ${PROJECT_NAME} LIB1 )

endif()
【最终版本 include 文件夹下的 CMakeLists.txt 如下】
include_directories("${CMAKE_CURRENT_LIST_DIR}/../extern/eigen3")

target_sources( ${PROJECT_NAME}

	PRIVATE

		#${CMAKE_CURRENT_LIST_DIR}/ActionA.h

		${CMAKE_CURRENT_LIST_DIR}/qPCA.h

		${CMAKE_CURRENT_LIST_DIR}/ccPCADlg.h

)

target_include_directories( ${PROJECT_NAME}

	PRIVATE

		${CMAKE_CURRENT_SOURCE_DIR}

)
插件基于 ExamplePlugin 而来,其中的 ActionA.h,ActionA.cpp 并未删除 相关内容被注释,不会引入到我们的插件中
然后 cmake 重新构建项目,测试是否引入成功
在 qPCA.h 中添加
#include <Eigen/Core>
在 qPCA.cpp 中添加 相关头文件,看能否找到
#include <Eigen/Core>

#include <Eigen/Eigenvalues>

#include <Eigen/Dense>
在 vs 中 ctrl 然后 点击引入的头文件,引入成功 可以看到 具体的头文件,否则就未引入成功
ui 用户参数设置接收框
针对 qPCA 插件我设置的用户参数是主方向和哪个坐标轴对齐,界面展示如下
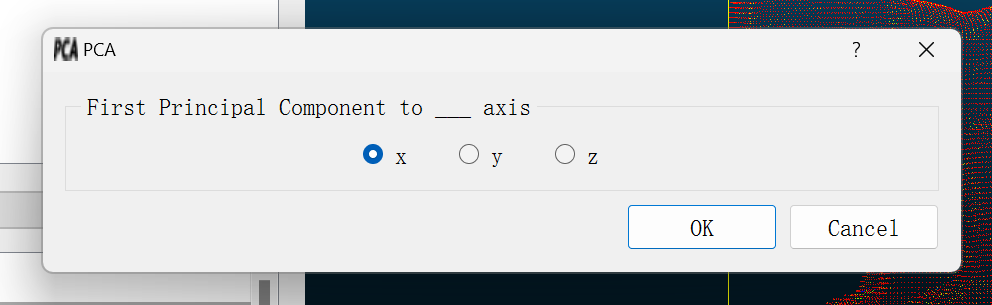
可以对齐到不同的轴上,在最开始开发时,可以不引入用户参数接收框,程序基本完成后,再引入 ui,提升用户体验
按照真实的开发情况,这一小节应放在最后,但放在中间行文也可以
ui 的设计
【略】
根据自己的插件设置不同的布局和对应输入组件,可基于 CC 已有的进行修改
结束后应由有一个 ui 文件,在本文是 ui/pcaDlg.ui
ui 文件夹下 cmakelists.txt 最终版如下
target_sources( ${PROJECT_NAME}

	PRIVATE

		${CMAKE_CURRENT_LIST_DIR}/pcaDlg.ui

)
其实也可以由代码来写界面,不需要.ui ,也就是.ui 编译后的 ui_xxx.h 头文件,这里是 qt 的知识了
ui 代码层面引入
新建 include/ccPCADlg.h,src/ccPCADlg.cpp
cmakelists.txt 修改
qPCA 插件的 最高 CMakeLists.txt 已在上文摆出
include 文件下 cmakelists.txt 已在上文摆出
src 文件夹下 cmakelists.txt 最终版如下
target_sources( ${PROJECT_NAME}

	PRIVATE

		# ${CMAKE_CURRENT_LIST_DIR}/ActionA.cpp

		${CMAKE_CURRENT_LIST_DIR}/qPCA.cpp

		${CMAKE_CURRENT_LIST_DIR}/ccPCADlg.cpp

)
ccPCADlg.h
#ifndef CC_PCA_DLG_HEADER

#define CC_PCA_DLG_HEADER

#include "ui_pcaDlg.h"

class ccPCADlg : public QDialog, public Ui::PCADialog

{

	Q_OBJECT

public:

	//! Default constructor

	explicit ccPCADlg(QWidget* parent = nullptr);

protected:

	//! Saves (temporarily) the dialog parameters on acceptation

	void saveSettings();

};

#endif
这里 ccPCADlg 会继承 ui 文件编译后 ui_pcaDlg.h 中的 Ui::PCADialog,声明的 ccPCADlg 可以拿到界面上的所有组件,进而可以获取用户设置的值
ccPCADlg.cpp
#include "ccPCADlg.h"

#include <QButtonGroup>

static bool axis_x_checeked  = true;

static bool axis_y_checeked = false;

static bool axis_z_checeked = false;

ccPCADlg::ccPCADlg(QWidget* parent)

	: QDialog(parent)

	, Ui::PCADialog()

{

	setupUi(this);

	connect(buttonBox, &QDialogButtonBox::accepted, this, &ccPCADlg::saveSettings);

	// 创建一个 QButtonGroup 逻辑上保证只有一个被选中

	QButtonGroup* buttonGroup = new QButtonGroup(this);

	buttonGroup->addButton(radioButton);

	buttonGroup->addButton(radioButton_2);

	buttonGroup->addButton(radioButton_3);

	radioButton->setChecked(true); // default x

}

void ccPCADlg::saveSettings()

{

	axis_x_checeked = radioButton->isChecked();

	axis_y_checeked = radioButton_2->isChecked();

	axis_z_checeked = radioButton_3->isChecked();

}
主程序逻辑
qPCA.h
#pragma once

#include "ccStdPluginInterface.h"

#include <Eigen/Core>

class qPCA : public QObject, public ccStdPluginInterface

{

	Q_OBJECT

	Q_INTERFACES(ccPluginInterface ccStdPluginInterface)

	Q_PLUGIN_METADATA(IID "cccorp.cloudcompare.plugin.qPCA" FILE "../info.json")

public:

	explicit qPCA(QObject *parent = nullptr);

	~qPCA() override = default;

	// Inherited from ccStdPluginInterface

	void onNewSelection(const ccHObject::Container &selectedEntities) override;

	QList<QAction *> getActions() override;

	ccHObject* executePCA(ccPointCloud* ccPC,

		Eigen::Vector3f& eigenValuesPCA,

		Eigen::Matrix3f& eigenVectorsPCA,

		Eigen::Vector3f& pcaCentroid,

		bool silent);

protected:

	void doAction();

private:

	QAction *m_action;

};
其中
ccHObject* executePCA(ccPointCloud* ccPC,

		Eigen::Vector3f& eigenValuesPCA,

		Eigen::Matrix3f& eigenVectorsPCA,

		Eigen::Vector3f& pcaCentroid,

		bool silent);
是我们的核心函数
qPCA.cpp
一一实现对应的函数
声明用于插件的 cc 提供的程序接口,暴露出来给后面函数使用
static ccMainAppInterface* s_app = nullptr;
构造函数
qPCA::qPCA( QObject *parent )

	: QObject( parent )

	, ccStdPluginInterface( ":/CC/plugin/qPCA/info.json" )

	, m_action( nullptr )

{

	s_app = m_app; // m_app 继承自 ccStdPluginInterface 接口 也是 ccMainAppInterface*

}
onNewSelection()
void qPCA::onNewSelection( const ccHObject::Container &selectedEntities )

{

	if (m_action)

		m_action->setEnabled(selectedEntities.size() == 1 && selectedEntities[0]->isA(CC_TYPES::POINT_CLOUD));

}
保证选到了一个实体,且是点云
getActions()
QList<QAction *> qPCA::getActions()

{

	// default action (if it has not been already created, this is the moment to do it)

	if ( !m_action )

	{

		// Here we use the default plugin name, description, and icon,

		// but each action should have its own.

		m_action = new QAction( getName(), this );

		m_action->setToolTip( getDescription() );

		m_action->setIcon( getIcon() );

		// Connect appropriate signal

		connect( m_action, &QAction::triggered, this, &qPCA::doAction);

	}

	return { m_action };

}
我们只有一个 action ,保持不变;
如需添加更多子功能 action 啥的,需要在这里链接对应信号和槽函数
doAction()
执行核心逻辑前的检查和准备,包括 实体检查和判断,获取用户设置值,实体类型转换为点云,核心函数的准备
static bool axis_x_checked = true;

static bool axis_y_checked = false;

static bool axis_z_checked = false;

void qPCA::doAction()

{

	assert(m_app);

	if (!m_app)

		return;

	m_app->dispToConsole("[qPCA] welcome use PCA plugin by xxx!", ccMainAppInterface::STD_CONSOLE_MESSAGE);

	QMessageBox::information(nullptr, "info", "welcome use PCA plugin");

	const ccHObject::Container& selectedEntities = m_app->getSelectedEntities();

	size_t selNum = selectedEntities.size();

	if (selNum != 1)

	{

		ccLog::Error("[qPCA] Select only one cloud!");

		return;

	}

	ccHObject* ent = selectedEntities[0];

	assert(ent);

	if (!ent || !ent->isA(CC_TYPES::POINT_CLOUD))

	{

		ccLog::Error("[qPCA] Select a real point cloud!");

		return;

	}

	ccPointCloud* pc = static_cast<ccPointCloud*>(ent);

	// input cloud

	CCVector3 bbMin, bbMax;

	pc->getBoundingBox(bbMin, bbMax);

	/*CCVector3 diff = bbMax - bbMin;

	float scale = std::max(std::max(diff[0], diff[1]), diff[2]);*/

	ccPCADlg pcaDlg(m_app->getMainWindow());

	if (!pcaDlg.exec())

	{

		return;

	}

	axis_x_checked = pcaDlg.radioButton->isChecked();

	axis_y_checked = pcaDlg.radioButton_2->isChecked();

	axis_z_checked = pcaDlg.radioButton_3->isChecked();

	Eigen::Vector3f eigenValuesPCA;

	Eigen::Matrix3f eigenVectorsPCA;

	Eigen::Vector3f pcaCentroid;

	ccHObject* group = executePCA(pc,eigenValuesPCA,eigenVectorsPCA, pcaCentroid,false);

	if (group)

	{

		m_app->addToDB(group);

		m_app->refreshAll();

	}

}
executePCA()
主要逻辑为
计算点云中心---> 计算点云协方差矩阵 ---> Eigen 求解奇异值和奇异向量 ---> 构建旋转矩阵 ---》 旋转变换到标准坐标系,主方向 与根据用户选择的轴 对齐,默认 x 轴
ccHObject* qPCA::executePCA(ccPointCloud* ccPC,

	Eigen::Vector3f& eigenValuesPCA,

	Eigen::Matrix3f& eigenVectorsPCA,

	Eigen::Vector3f& pcaCentroid,

	bool silent)

{

	ccHObject* group = nullptr;

	const CCVector3d& globalShift = ccPC->getGlobalShift();

	double globalScale = ccPC->getGlobalScale();

	auto toEigen = [](const CCVector3* vec) {

		return Eigen::Vector3f(vec->x, vec->y, vec->z);

	};

	pcaCentroid.setZero();

	for (unsigned i = 0; i < ccPC->size(); ++i)

	{

		const CCVector3* point = ccPC->getPoint(i);

		Eigen::Vector3f eigenPoint(point->x, point->y, point->z);

		pcaCentroid += eigenPoint;

	}

	pcaCentroid /= static_cast<float>(ccPC->size());

	Eigen::Matrix3f covarianceMatrix = Eigen::Matrix3f::Zero();

	for (unsigned i = 0; i < ccPC->size(); ++i)

	{

		Eigen::Vector3f diff = (toEigen(ccPC->getPoint(i))) - pcaCentroid;

		covarianceMatrix += diff * diff.transpose();

	}

	covarianceMatrix /= static_cast<float>(ccPC->size());

	// 进行 PCA:求解特征值和特征向量

	Eigen::SelfAdjointEigenSolver<Eigen::Matrix3f> solver(covarianceMatrix);

	eigenValuesPCA = solver.eigenvalues();   // 返回特征值

	eigenVectorsPCA = solver.eigenvectors(); // 返回特征向量

	// log

	Eigen::IOFormat CleanFmt(4, 0, ", ", "\n", "[", "]");

	std::stringstream vectorStream, matrixStream;

	vectorStream << pcaCentroid.format(CleanFmt);

	m_app->dispToConsole("[qPCA] pca center", ccMainAppInterface::STD_CONSOLE_MESSAGE);

	m_app->dispToConsole(QString::fromStdString(vectorStream.str()), ccMainAppInterface::STD_CONSOLE_MESSAGE);

	vectorStream.str("");

	m_app->dispToConsole("[qPCA] eigen values", ccMainAppInterface::STD_CONSOLE_MESSAGE);

	vectorStream << eigenValuesPCA.format(CleanFmt);

	matrixStream << eigenVectorsPCA.format(CleanFmt);

	m_app->dispToConsole(QString::fromStdString(vectorStream.str()), ccMainAppInterface::STD_CONSOLE_MESSAGE);

	m_app->dispToConsole("[qPCA] eigen vectors sorted by eigen value in descending order", ccMainAppInterface::STD_CONSOLE_MESSAGE);

	m_app->dispToConsole(QString::fromStdString(matrixStream.str()), ccMainAppInterface::STD_CONSOLE_MESSAGE);

	//m_app->forceConsoleDisplay();

	// 将点云主方向转换到 x y z 轴上

	char axis = axis_y_checked ? 'y' : (axis_z_checked ? 'z' : 'x');

	m_app->dispToConsole(QString::fromStdString("[qPCA] frist component 2 axis "+std::tolower(axis)), ccMainAppInterface::STD_CONSOLE_MESSAGE);

	//char axis = 'x'; //通过对话框获取 默认

	Eigen::Matrix4f rotationMatrix = Eigen::Matrix4f::Identity();

	Eigen::Matrix3f tmp;

	switch (axis)

	{

	case 'x':

		rotationMatrix.block<3, 3>(0, 0) = eigenVectorsPCA.transpose(); // x y z

		break;

	case 'y':

		tmp = eigenVectorsPCA;

		tmp.col(0).swap(tmp.col(1));

		rotationMatrix.block<3, 3>(0, 0) = tmp.transpose(); // y x z

		break;

	case 'z':

		tmp = eigenVectorsPCA;

		tmp.col(0).swap(tmp.col(2));

		rotationMatrix.block<3, 3>(0, 0) = tmp.transpose(); // z x y

		break;

	default:

		break;

	}

	matrixStream.str("");

	matrixStream << rotationMatrix.format(CleanFmt);

	m_app->dispToConsole(QString::fromStdString(matrixStream.str()), ccMainAppInterface::STD_CONSOLE_MESSAGE);

	rotationMatrix.block<3, 1>(0, 3) = -1.0f * ((axis_x_checked ? eigenVectorsPCA.transpose() : tmp.transpose()) * pcaCentroid);

	matrixStream.str("");

	matrixStream << rotationMatrix.format(CleanFmt);

	m_app->dispToConsole(QString::fromStdString(matrixStream.str()), ccMainAppInterface::STD_CONSOLE_MESSAGE);

	ccPointCloud* firstComponent = new ccPointCloud(

		QString("first  component - projecting to (%1) plane ").arg((axis_y_checked ? "xz" : (axis_z_checked ? "xy" : "yz")))

	);

	ccPointCloud* secondComponent = new ccPointCloud(

		QString("second component - projecting to (%1) plane ").arg((axis_y_checked ? "yz" : (axis_z_checked ? "zy" : "xz")))

	);

	ccPointCloud* thirdComponent = new ccPointCloud(

		QString("third  component - projecting to (%1) plane ").arg((axis_y_checked ? "yx" : (axis_z_checked ? "zx" : "xy")))

	); // 主成分

	ccPointCloud* stdAxisCloud = new ccPointCloud("2stdAxisCloud");

	if (!firstComponent->reserve(static_cast<unsigned>(ccPC->size())))

	{

		ccLog::Error("[qPCA] Not enough memory!");

		delete firstComponent;

		return nullptr;

	}

	if (!secondComponent->reserve(static_cast<unsigned>(ccPC->size())))

	{

		ccLog::Error("[qPCA] Not enough memory!");

		delete secondComponent;

		return nullptr;

	}

	if (!thirdComponent->reserve(static_cast<unsigned>(ccPC->size())))

	{

		ccLog::Error("[qPCA] Not enough memory!");

		delete thirdComponent;

		return nullptr;

	}

	if (!stdAxisCloud->reserve(static_cast<unsigned>(ccPC->size())))

	{

		ccLog::Error("[qPCA] Not enough memory!");

		delete stdAxisCloud;

		return nullptr;

	}

	// 遍历每个点并应用旋转矩阵

	std::stringstream pointStream;

	for (unsigned i = 0; i < ccPC->size(); ++i)

	{

		pointStream.str("");

		CCVector3* point = const_cast<CCVector3*>(ccPC->getPoint(i));

		// 将 CCVector3 转换为 Eigen::Vector3f

		Eigen::Vector4f eigenPoint(point->x, point->y, point->z, 1.0f);

		// 旋转点

		Eigen::Vector4f rotatedPoint = rotationMatrix * eigenPoint;

		// 将结果写回 CCVector3,// 还是不写回了

		/*point->x = rotatedPoint.x();

		point->y = rotatedPoint.y();

		point->z = rotatedPoint.z();*/

		//pointStream << point->x << "," << point->y << "," << point->z;

		//m_app->dispToConsole(QString::fromStdString(pointStream.str()), ccMainAppInterface::STD_CONSOLE_MESSAGE);

		stdAxisCloud->addPoint({ rotatedPoint[0],rotatedPoint[1],rotatedPoint[2] });

		if (axis_y_checked) // align to y // y x z

		{

			firstComponent->addPoint({ rotatedPoint[0],0.0f,rotatedPoint[2] });

			secondComponent->addPoint({ 0.0f,rotatedPoint[1],rotatedPoint[2] });

			thirdComponent->addPoint({ rotatedPoint[0],rotatedPoint[1],0.0f });

		}

		else if (axis_x_checked) // align to x // x y z

		{

			firstComponent->addPoint({ 0.0f,rotatedPoint[1],rotatedPoint[2] });

			secondComponent->addPoint({ rotatedPoint[0],0.0f,rotatedPoint[2] });

			thirdComponent->addPoint({ rotatedPoint[0],rotatedPoint[1],0.0f });

		}

		else if(axis_z_checked) // align to  z // z x y

		{

			firstComponent->addPoint({ rotatedPoint[0],rotatedPoint[1],0.0f });

			secondComponent->addPoint({ 0.0f,rotatedPoint[1],rotatedPoint[2] });

			thirdComponent->addPoint({ rotatedPoint[0],0.0f,rotatedPoint[2] });

		}

		else

		{

			ccLog::Error("[qPCA] axis error");

			return nullptr;

		}

	}

	// 更新点云

	//ccPC->invalidateBoundingBox();

	//ccPC->setVisible(false);

	// 设置 主成分 颜色 可视化

	for (auto pcShape : { stdAxisCloud ,firstComponent,secondComponent,thirdComponent })

	{

		ccColor::Rgb col = ccColor::Generator::Random();

		pcShape->setColor(col);

		pcShape->showSF(false);

		pcShape->showColors(true);

		pcShape->showNormals(true);

		pcShape->setVisible(true);

	}

	// 计算投影 各个方向 主成分 已经变换到标准坐标系下, 直接坐标赋0

	//ccPointCloud firstComponent, secondComponent, thirdComponent; // 合并到上面的循环完成

	if (!group)

	{

		group = new ccHObject(QString("PCA processed - align to %1 axis (%2)").arg((axis_y_checked?"y":(axis_z_checked?"z":"x")), ccPC->getName()));

	}

	if (group)

	{

		group->addChild(stdAxisCloud);

		group->addChild(firstComponent);

		group->addChild(secondComponent);

		group->addChild(thirdComponent);

	}

	return group;

}
至此 所有内容都完成
cmake 重新构建、然后编译
效果展示
感谢免费 GIF 压缩 - 专研免费“GIF 压缩”在线工具 (gifcompress.com) 提供的免费 gif 压缩服务
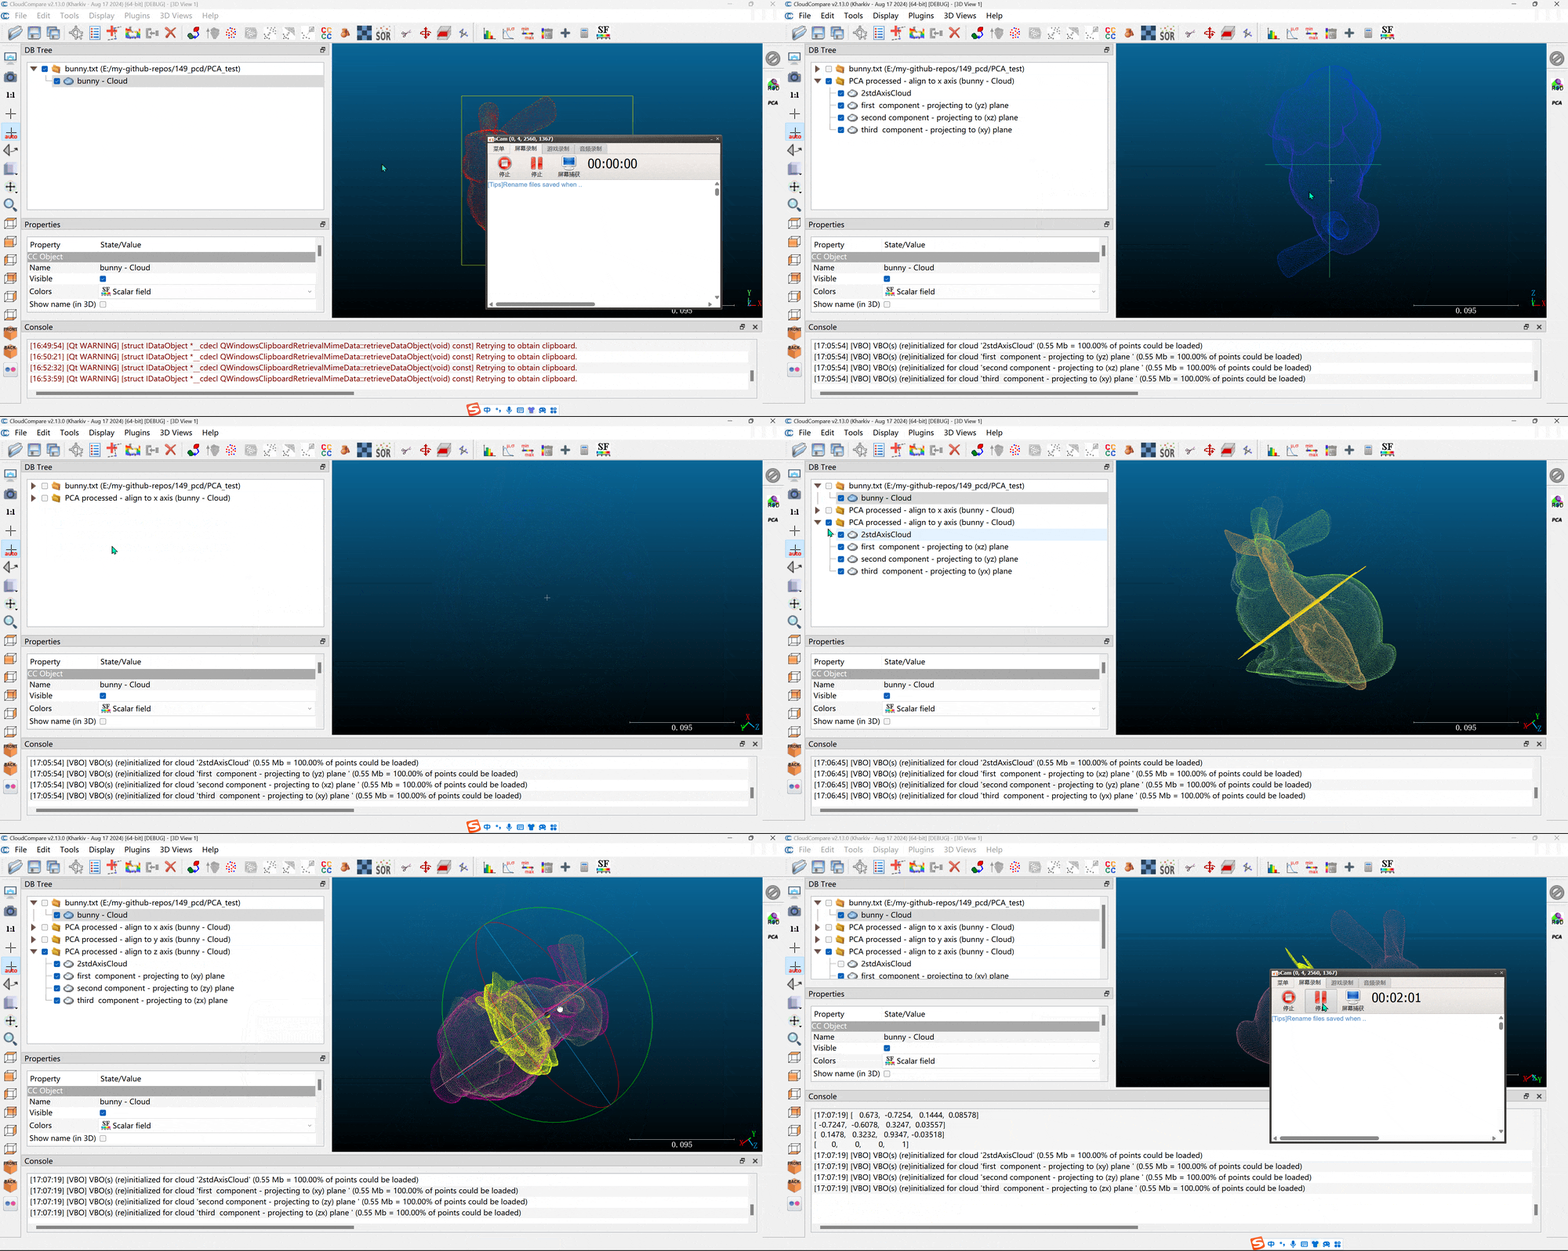
下一篇,我们一起学习一下 cc 的代码。
如需整个插件项目,编译后的 dll,或其他帮助,欢迎留言、私信或加群【群号:392784757】
cloud compare PCA插件开发详细步骤(二)附代码的更多相关文章
- 如何发布一个自定义Node.js模块到NPM(详细步骤,附Git使用方法)
咱们闲话不多说,直接开始! 由于我从没有使用过MAC,所以我不保证本文中介绍的操作与MAC一致. 文章开始我先假定各位已经在window全局安装了Node.js,下面开始进行详细步骤介绍: 本文本着, ...
- webpack+vue+vueRouter模块化构建小demo实例超详细步骤(附截图、代码、入门篇)
说明:本demo使用yarn代替npm指令来下载一系列依赖,有详细指令说明:使用WebStorm下Terminal来输入指令: >开始(确认已经安装node环境和yarn包管理工具) 1.新建项 ...
- Intellij IDEA 通过数据库表逆向生成带注释的实体类文件超级详细步骤,附详细解决方案
参考:https://blog.csdn.net/qq_34371461/article/details/80571281 https://blog.csdn.net/mqchenrong/arti ...
- SSM框架整合 详细步骤(备注) 附源码
整合思路 将工程的三层结构中的JavaBean分别使用Spring容器(通过XML方式)进行管理. 整合持久层mapper,包括数据源.会话工程及mapper代理对象的整合: 整合业务层Service ...
- 超好用的thinkphp5.0/thinkphp5.1分页插件!详细使用步骤(内附代码)
效果 tp5.0使用方法 page下载地址:进入下载页面 提取码:s75k 1,把page文件夹整个目录复制到 目录extend下 2,修改默认配置 app/config.php 把里面的 'pagi ...
- 【优化算法】Greedy Randomized Adaptive Search算法 超详细解析,附代码实现TSP问题求解
01 概述 Greedy Randomized Adaptive Search,贪婪随机自适应搜索(GRAS),是组合优化问题中的多起点元启发式算法,在算法的每次迭代中,主要由两个阶段组成:构造(co ...
- 微信公众平台开发详细步骤与java代码
1.微信公众平台设置 首先在https://mp.weixin.qq.com/注册一个公众平台账号(服务号.订阅号.企业号的区别) 微信公众平台地址:https://mp.weixin.qq.com ...
- 白话--长短期记忆(LSTM)的几个步骤,附代码!
1. 什么是LSTM 在你阅读这篇文章时候,你都是基于自己已经拥有的对先前所见词的理解来推断当前词的真实含义.我们不会将所有的东西都全部丢弃,然后用空白的大脑进行思考.我们的思想拥有持久性.LSTM就 ...
- 在linux环境下为eclipse配置jdk以及Tomcat服务(附图解详细步骤)
环境:jdk8,Tomcat7,eclipse 需要先在linux上安装好对应的软件及java环境,如果还没有安装的,可以先去看我之前写的两篇博客:ubuntu/linux中安装Tomcat(附图解详 ...
- ubuntu/linux中安装Tomcat(附图解详细步骤)
我的linux系统使用的是ubuntu14 1.首先需要先到Tomcat官网上下载对应linux系统的压缩包,可以直接在Ubuntu系统中进行下载,下载后的默认路径为主文件夹路径下的下载文件目录下 注 ...
随机推荐
- 使用Kubesec检查YAML文件安全
目录 一.系统环境 二.前言 三.Kubesec简介 四.使用Kubesec检查YAML文件安全 五.总结 一.系统环境 本文主要基于Kubernetes1.22.2和Linux操作系统Ubuntu ...
- python重拾基础第三天
本节内容 函数基本语法及特性 参数与局部变量 返回值 嵌套函数 递归 匿名函数 函数式编程介绍 高阶函数 内置函数 1. 函数基本语法及特性 背景提要 现在老板让你写一个监控程序,监控服务器的系统状况 ...
- Android系统启动:.rc文件
Android系统启动:.rc文件 reference : https://www.jianshu.com/p/a4c17f0110d0 以init.rc为例. .rc文件 init.rc文件由系统第 ...
- k8s学习总结之各组件功能及作用的详细介绍
K8S集群架构: 一个K8S集群是由两大部分组成: Master节点和Node节点 一.Master节点主要包括API Server.Scheduler.Controller manager.etcd ...
- python3 安装pyodbc失败 pip3 install pyodbc
python3 安装pyodbc失败 报错1: 关键报错信息: fatal error: sql.h: No such file or directory [root@centfos python3 ...
- yb课堂 下单页面组件开发 《四十三》
Pay.vue <template> <!--视频信息--> <div> <div class="info"> <p clas ...
- Vscode连接虚拟机报错
Vscode 连接虚拟机报错问题解决 问题解释 Permission denied, please try again.出现这个问题通常表示身份验证失败. 可能的原因有 SSH用户密码错误 SSH端口 ...
- 洛谷P1365
WJMZBMR打osu! / Easy 题目背景 原 维护队列 参见 P1903 题目描述 某一天WJMZBMR在打osu~~~但是他太弱逼了,有些地方完全靠运气:( 我们来简化一下这个游戏的规则 有 ...
- 【VMware vCenter】VMware vCenter Server(VCSA) 5.5 版本证书过期问题处理过程。
之前帮客户处理了一个因证书过期导致 vCenter Server 无法登录的问题,在此记录一下,因为时间过去有点久了,可能会有些地方描述的不是很清楚,所以就当作参考就行.客户环境是一个非常老的 vCe ...
- 解决方案 | pywintypes.com_error: (-2147221005, '无效的类字符串', None, None) --Python连接CAD报错真正解决思路!
1 背景 import pythoncom import win32com.client import math wincad = win32com.client.Dispatch("Aut ...