
CitusDB Multi-node Install and Test
Multi-node setup on CentOS
参考官网:https://docs.citusdata.com/en/v6.2/installation/production_rhel.html
Test Environments
CentOS Linux release 7.2.1511 (Core)
Three nodes(citus1,citus2,citus3)
Steps to be executed on all nodes
1. Add repository
curl https://install.citusdata.com/community/rpm.sh | sudo bash
2. Install PostgreSQL + Citus and initialize a database
sudo yum install -y citus62_96

sudo service postgresql-9.6 initdb || sudo /usr/pgsql-9.6/bin/postgresql96-setup initdb

echo "shared_preload_libraries = 'citus'" | sudo tee -a /var/lib/pgsql/9.6/data/postgresql.conf
3. Configure connection and authentication
sudo vi /var/lib/pgsql/9.6/data/postgresql.conf

sudo vi /var/lib/pgsql/9.6/data/pg_hba.conf
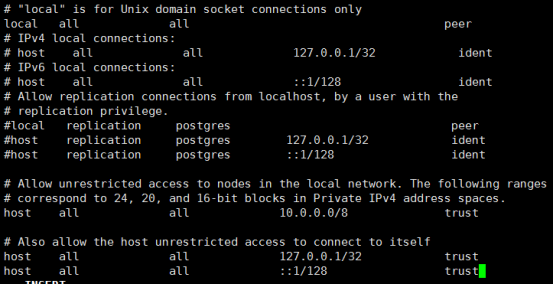
Note:Your DNS settings may differ. Also these settings are too permissive for some environments.The configuration is shown below:
https://www.postgresql.org/docs/9.6/static/auth-pg-hba-conf.html
4. Start database servers, create Citus extension
sudo service postgresql-9.6 restart

sudo chkconfig postgresql-9.6 on
You must add the Citus extension to every database you would like to use in a cluster. The following example adds the extension to the default database which is named postgres.
sudo -i -u postgres psql -c "CREATE EXTENSION citus;"
Steps to be executed only on the coordinator node
1. Add worker node
sudo -i -u postgres psql -c "SELECT * from master_add_node('citus2', 5432);"

sudo -i -u postgres psql -c "SELECT * from master_add_node('citus3', 5432);"
2. Verify
sudo -i -u postgres psql -c "SELECT * FROM master_get_active_worker_nodes();"
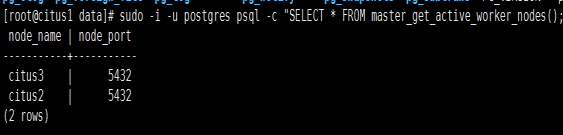
Succeeded!
Notes:Remove worker node command(If you add a node wrong)
sudo -i -u postgres psql -c "SELECT * from master_remove_node('work', 5432);"
See the details below:
https://docs.citusdata.com/en/v6.2/reference/user_defined_functions.html
Test
Download sample data
curl https://examples.citusdata.com/tutorial/companies.csv > /var/lib/pgsql/companies.csv
curl https://examples.citusdata.com/tutorial/campaigns.csv > /var/lib/pgsql/campaigns.csv
curl https://examples.citusdata.com/tutorial/ads.csv > /var/lib/pgsql/ads.csv
Creating tables
To start, you can first connect to the Citus co-ordinator(citus1) using psql.
# sudo -i -u postgres psql
CREATE TABLE companies ( id bigint NOT NULL, name text NOT NULL, image_url text, created_at timestamp without time zone NOT NULL, updated_at timestamp without time zone NOT NULL );

CREATE TABLE campaigns ( id bigint NOT NULL, company_id bigint NOT NULL, name text NOT NULL, cost_model text NOT NULL, state text NOT NULL, monthly_budget bigint, blacklisted_site_urls text[], created_at timestamp without time zone NOT NULL, updated_at timestamp without time zone NOT NULL );

CREATE TABLE ads ( id bigint NOT NULL, company_id bigint NOT NULL, campaign_id bigint NOT NULL, name text NOT NULL, image_url text, target_url text, impressions_count bigint DEFAULT 0, clicks_count bigint DEFAULT 0, created_at timestamp without time zone NOT NULL, updated_at timestamp without time zone NOT NULL );
Next, you can create primary key indexes on each of the tables just like you would do in PostgreSQL
ALTER TABLE companies ADD PRIMARY KEY (id);

ALTER TABLE campaigns ADD PRIMARY KEY (id, company_id);

ALTER TABLE ads ADD PRIMARY KEY (id, company_id);
Distributing tables and loading data
SELECT create_distributed_table('companies', 'id');

SELECT create_distributed_table('campaigns', 'company_id');

SELECT create_distributed_table('ads', 'company_id');
Load the data
postgres=# \copy companies from '/var/lib/pgsql/companies.csv' with csv;

COPY 100

postgres=# \copy campaigns from '/var/lib/pgsql/campaigns.csv' with csv;

COPY 978

postgres=# \copy ads from '/var/lib/pgsql/ads.csv' with csv;

COPY 7364
Running queries
postgres=# INSERT INTO companies VALUES (5000, 'New Company', 'https://randomurl/image.png', now(), now());

INSERT 0 1

postgres=# UPDATE campaigns

postgres-# SET monthly_budget = monthly_budget*2

postgres-# WHERE company_id = 5;

UPDATE 12

postgres=# BEGIN;

BEGIN

postgres=# DELETE from campaigns where id = 46 AND company_id = 5;

DELETE 1

postgres=# DELETE from ads where campaign_id = 46 AND company_id = 5;

DELETE 7

postgres=# COMMIT;

COMMIT

postgres=# SELECT name, cost_model, state, monthly_budget

postgres-# FROM campaigns

postgres-# WHERE company_id = 5

postgres-# ORDER BY monthly_budget DESC

postgres-# LIMIT 10;

name | cost_model | state | monthly_budget

-------------------------+---------------------+----------+----------------

Wondra | cost_per_impression | running | 16732

Quicksilver | cost_per_click | paused | 12664

Cyborg | cost_per_impression | running | 8198

Agent Hancock | cost_per_impression | running | 6996

Mr Cyclops I | cost_per_click | paused | 6122

Sasquatch Eyes | cost_per_impression | archived | 5828

Ultra Namor | cost_per_impression | paused | 5554

Carnage | cost_per_impression | paused | 4300

Cyborg Two-Face Machine | cost_per_click | archived | 4086

Binary | cost_per_impression | paused | 3620

(10 rows)
CitusDB Multi-node Install and Test的更多相关文章
- phantomjs-prebuilt@2.1.14 install: `node install.js`
在用vue-cli构建项目时,npm install 安装包的时候报错了. 错误信息: npm ERR! Failed at the phantomjs-prebuilt@2.1.14 install ...
- vue安装之后的报错处理---chromedriver@2.35.0 install: `node install.js`
报错:chromedriver@2.35.0 install: `node install.js` 这个错误的解决方法就是在你创建的项目目录,比如你创建的项目叫myVue,然后你就要在myVue这个目 ...
- npm ERR! errno 1 npm ERR! chromedriver@2.35.0 install: `node install.js`
在使用webpack+vue-cli进行vue项目构建时可能会出现一下错误,webpack@3.10.0及以上版本和vue-cli@2.9.2及以上版本会自动安装依赖(我在自己电脑上测试是这样的)不用 ...
- How to set an Apache Kafka multi node – multi broker cluster【z】
Set a multi node Apache ZooKeeper cluster On every node of the cluster add the following lines to th ...
- npm install报错:chromedriver@2.27.2 install: node install.js
报错: 刚开始以为是 node 或 npm 版本问题,前前后后折腾了好久,终于解决了 解决: 如果执行过npm install,先删除 node_modules 文件夹,不然运行的时候可能会报错 执行 ...
- 报错---“node install.js”
如图 解决方案: 目录中执行 npm install chromedriver --chromedriver_cdnurl=http://cdn.npm.taobao.org/dist/chromed ...
- phantomjs-prebuilt@2.1.16 install: `node install.js`
今天运行vue项目安装项目依赖(npm install)的时候,报这个错误: 解决办法: npm -g install phantomjs-prebuilt@2.1.16 --ignore-scrip ...
- npm 安装vue 报错Failed at the chromedriver@2.46.0 install script 'node install.js'
原因一般是下载源被封了,我们连接淘宝的下载源下载: npm install chromedriver --chromedriver_cdnurl=http://cdn.npm.taobao.org/d ...
- npm 安装vue 报错Failed at the chromedriver@2.34.0 install script 'node install.js'
提示版本不够,后来百度到,在你的vue项目包下执行: npm install chromedriver --chromedriver_cdnurl=http://cdn.npm.taobao.org/ ...
- vue 环境报错 chromedriver@2.44.1 install: `node install.js`
解决办法: 1. yarn add chromedriver -g 2.yarn add chromedriver --chromedriver_cdnurl=http://cdn.npm.taoba ...
随机推荐
- 什么是YAML?
YAML是"YAML不是一种标记语言"的外语缩写 [1] (见前方参考资料原文内容):但为了强调这种语言以数据做为中心,而不是以置标语言为重点,而用返璞词重新命名.它是一种直观的能 ...
- C#获取字符串宽度像素
通过Graphics对象的MeasureString方法可以获取字符串的大小,如下: Graphics graphics = CreateGraphics(); SizeF sizeF = graph ...
- Solr Principal - 工作原理/机制
From http://lucene.apache.org/solr/guide/7_1/overview-of-documents-fields-and-schema-design.html The ...
- C#调用记事本并填写内容
using System.Runtime.InteropServices; using System.Diagnostics; [DllImport("User32.DLL") ...
- 基于Delphi实现客户端服务端通信Demo
在开始之前我们需要了解下这个Demo功能是啥 我们可以看到这是两个小project,左边的project有服务端和客户端1,右边的project只有一个客户端2 效果就是当两个客户端各自分别输入正确的 ...
- ngnix 安装
1安装PCRE库 ftp://ftp.csx.cam.ac.uk/pub/software/programming/pcre/ 下载最新的 PCRE 源码包,使用下面命令下载编译和安装 PCRE 包: ...
- Spring之Bean的装配
一.Bean的装配Bean的装配,即Bean对象的创建.容器根据代码要求创建Bean对象后再传递给代码的过程,称为Bean的装配.1.默认装配方式代码通过getBean()方式从容器获取指定的Bean ...
- Spark学习之路(四)—— RDD常用算子详解
一.Transformation spark常用的Transformation算子如下表: Transformation算子 Meaning(含义) map(func) 对原RDD中每个元素运用 fu ...
- String.format()
System.out.println(String.format("sftp DownloadDir is: %s and new is %s", "哈哈",& ...
- linuxprobe培训第1节课笔记2019年7月5日
报了老刘的RHCE培训,这是老刘上课笔记简略版. 老刘在课上介绍了开源共享精神和大胡子(Richard M. Stallman—GNU创始人).linux发展史(Linus Benedict Torv ...