
Python安装pyinstaller方法,以及将项目生成可执行程序的步骤
pyinstaller安装方法
前提:确保计算机安装了Python语言环境,并且正确配置了环境变量。
方法一:联网在线自动安装
选择一 Windows OS下进入cmd(命令行窗口) 输入:pip install pyinstaller
选择二 在Pycharm IDE 终端下 输入:pip install pyinstaller
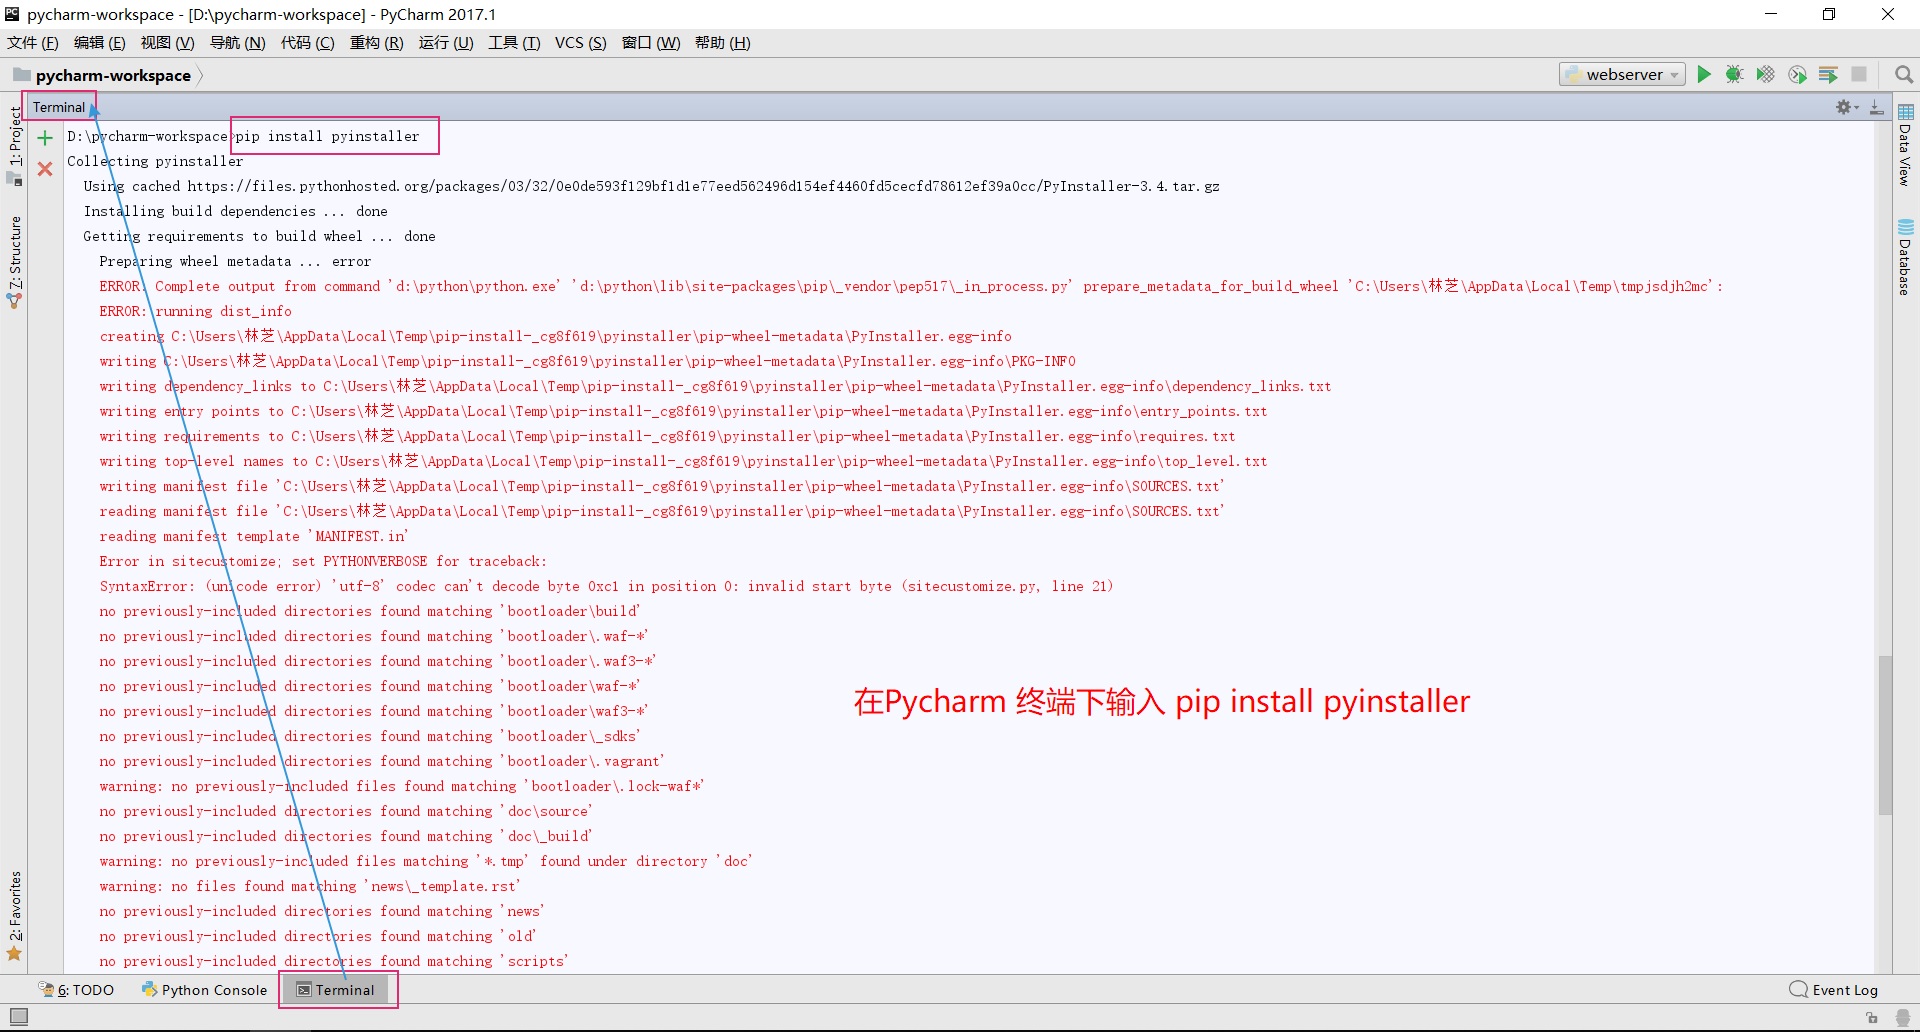
我在Pycharm 终端下安装pyinstaller时,遇到这样的安装错误:
D:\pycharm-workspace>pip install pyinstaller
Collecting pyinstaller
Using cached https://files.pythonhosted.org/packages/03/32/0e0de593f129bf1d1e77eed562496d154ef4460fd5cecfd78612ef39a0cc/PyInstaller-3.4.tar.gz
Installing build dependencies ... done
Getting requirements to build wheel ... done
Preparing wheel metadata ... error
ERROR: Complete output from command 'd:\python\python.exe' 'd:\python\lib\site-packages\pip\_vendor\pep517\_in_process.py' prepare_metadata_for_build_wheel 'C:\Users\林芝\AppData\Local\Temp\tmpjsdjh2mc':
ERROR: running dist_info
creating C:\Users\林芝\AppData\Local\Temp\pip-install-_cg8f619\pyinstaller\pip-wheel-metadata\PyInstaller.egg-info
writing C:\Users\林芝\AppData\Local\Temp\pip-install-_cg8f619\pyinstaller\pip-wheel-metadata\PyInstaller.egg-info\PKG-INFO
writing dependency_links to C:\Users\林芝\AppData\Local\Temp\pip-install-_cg8f619\pyinstaller\pip-wheel-metadata\PyInstaller.egg-info\dependency_links.txt
writing entry points to C:\Users\林芝\AppData\Local\Temp\pip-install-_cg8f619\pyinstaller\pip-wheel-metadata\PyInstaller.egg-info\entry_points.txt
writing requirements to C:\Users\林芝\AppData\Local\Temp\pip-install-_cg8f619\pyinstaller\pip-wheel-metadata\PyInstaller.egg-info\requires.txt
writing top-level names to C:\Users\林芝\AppData\Local\Temp\pip-install-_cg8f619\pyinstaller\pip-wheel-metadata\PyInstaller.egg-info\top_level.txt
writing manifest file 'C:\Users\林芝\AppData\Local\Temp\pip-install-_cg8f619\pyinstaller\pip-wheel-metadata\PyInstaller.egg-info\SOURCES.txt'
reading manifest file 'C:\Users\林芝\AppData\Local\Temp\pip-install-_cg8f619\pyinstaller\pip-wheel-metadata\PyInstaller.egg-info\SOURCES.txt'
reading manifest template 'MANIFEST.in'
Error in sitecustomize; set PYTHONVERBOSE for traceback:
SyntaxError: (unicode error) 'utf-8' codec can't decode byte 0xc1 in position 0: invalid start byte (sitecustomize.py, line 21)
no previously-included directories found matching 'bootloader\build'
no previously-included directories found matching 'bootloader\.waf-*'
no previously-included directories found matching 'bootloader\.waf3-*'
no previously-included directories found matching 'bootloader\waf-*'
no previously-included directories found matching 'bootloader\waf3-*'
no previously-included directories found matching 'bootloader\_sdks'
no previously-included directories found matching 'bootloader\.vagrant'
warning: no previously-included files found matching 'bootloader\.lock-waf*'
no previously-included directories found matching 'doc\source'
no previously-included directories found matching 'doc\_build'
warning: no previously-included files matching '*.tmp' found under directory 'doc'
warning: no files found matching 'news\_template.rst'
no previously-included directories found matching 'news'
no previously-included directories found matching 'old'
no previously-included directories found matching 'scripts'
no previously-included directories found matching 'tests\scripts'
no previously-included directories found matching '.github'
warning: no previously-included files found matching '.*'
warning: no previously-included files found matching '*.yml'
warning: no previously-included files found matching '*~'
warning: no previously-included files found matching '.directory'
writing manifest file 'C:\Users\林芝\AppData\Local\Temp\pip-install-_cg8f619\pyinstaller\pip-wheel-metadata\PyInstaller.egg-info\SOURCES.txt'
creating 'C:\Users\林芝\AppData\Local\Temp\pip-install-_cg8f619\pyinstaller\pip-wheel-metadata\PyInstaller.dist-info'
error: invalid command 'bdist_wheel'
----------------------------------------
ERROR: Command "'d:\python\python.exe' 'd:\python\lib\site-packages\pip\_vendor\pep517\_in_process.py' prepare_metadata_for_build_wheel 'C:\Users\林芝\AppData\Local\Temp\tmpjsdjh2mc'" failed with error code 1 in C:\Users\林芝\
AppData\Local\Temp\pip-install-_cg8f619\pyinstaller
######################## 终端提示我 命令执行失败,错误代码1 我也不知道这种方法安装失败的原因, 欢迎大家交流讨论#######################
方法二:自主下载pyinstaller包,进行手动安装
pyinstaller 的下载地址:http://www.pyinstaller.org/downloads.html
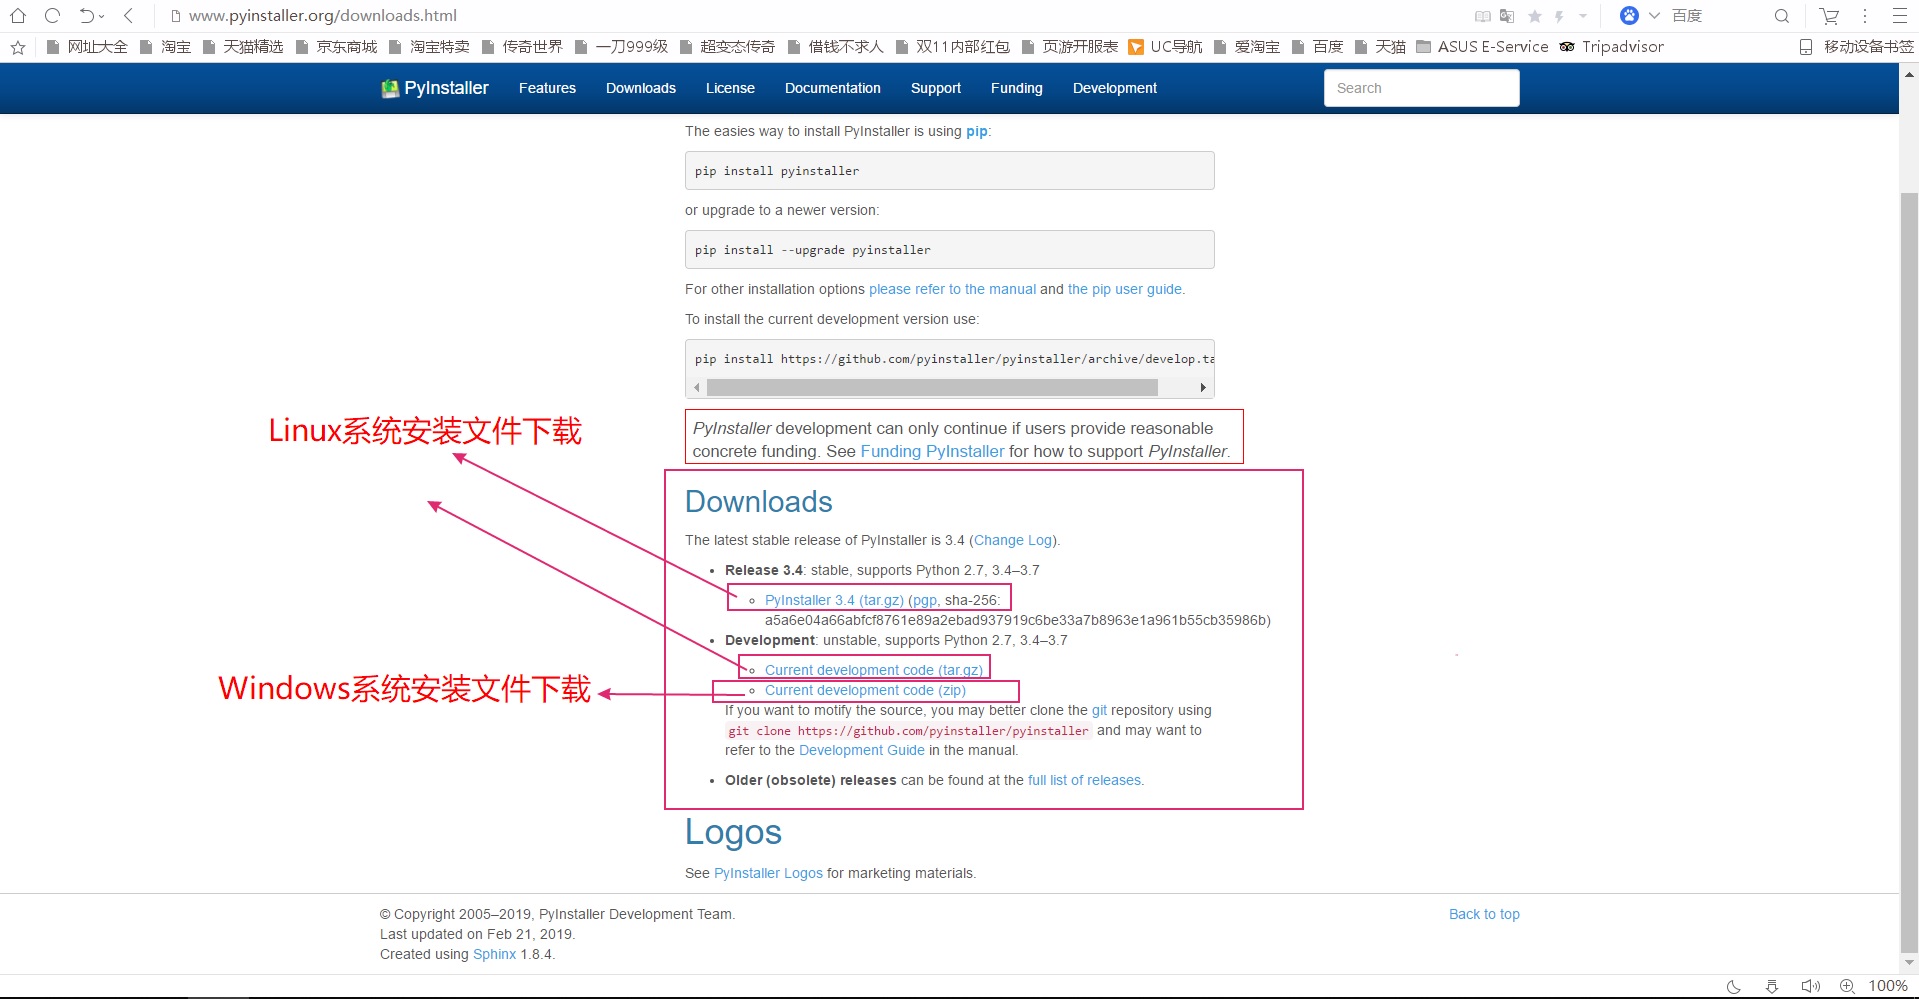
下载文件后,解压文件。
我的解压路径是: D:\python\pyinstaller-pyinstaller-d740524
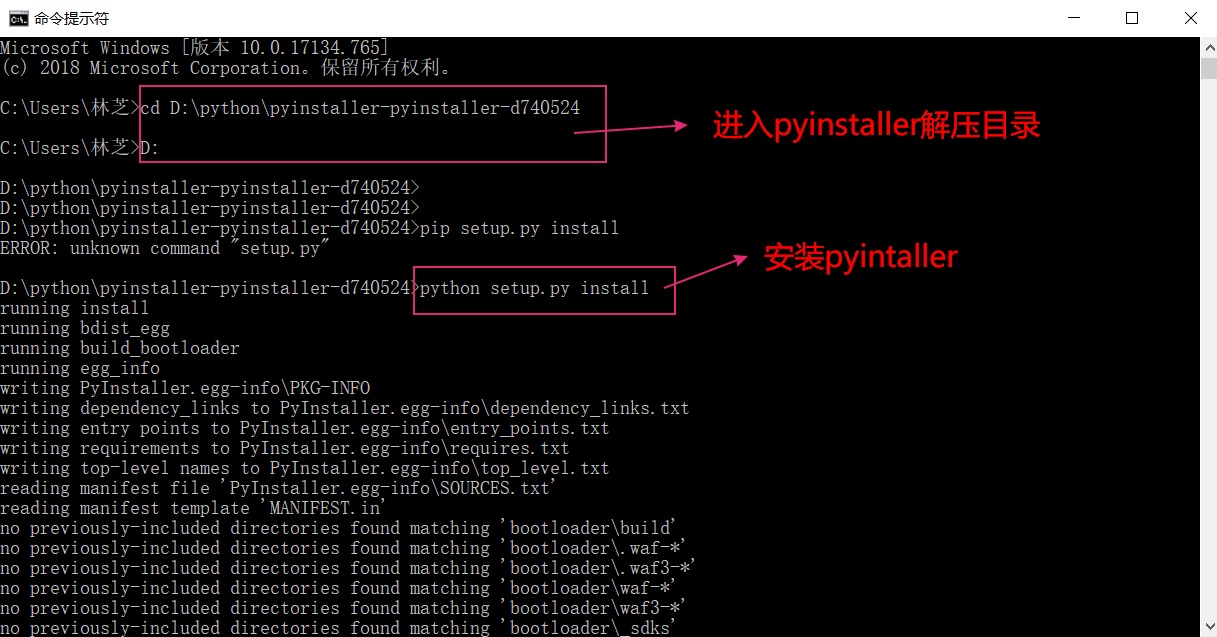
windows OS cmd(命令行窗口)进入 解压文件所在的目录。
cd D:\python\pyinstaller-pyinstaller-d740524
D:\
输入: python setup.py install
等待一段时间,pyinstaller就会安装成功
安装成功后,查看一下pyinstaller的版本信息
pyinstaller --version
出现结果如下,证明安装成功!

Python项目生成可执行程序的步骤
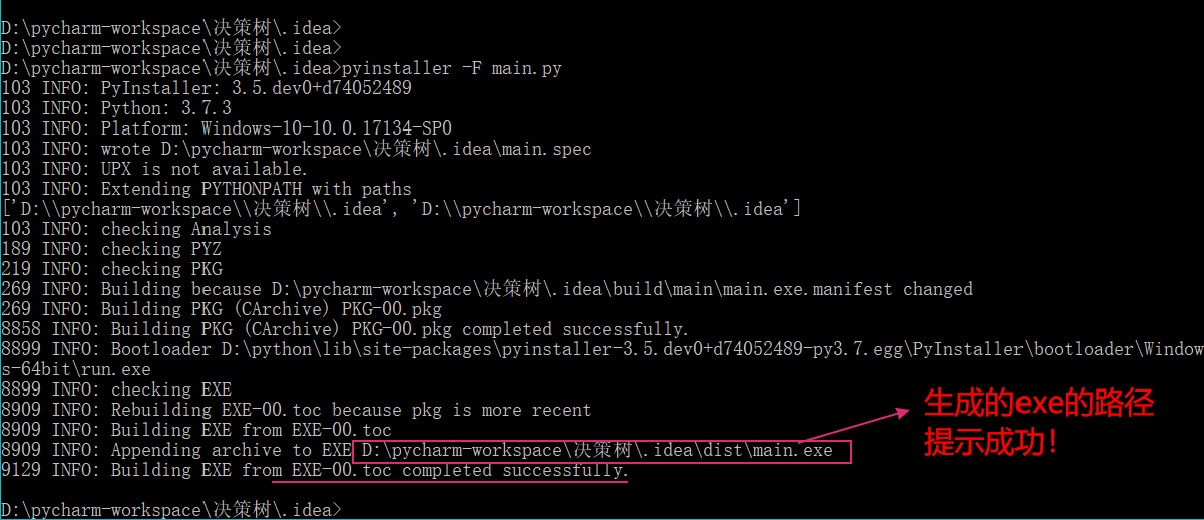
选择一:Windows OS下进入cmd(命令行窗口) 输入:pyinstaller -F xx.py xxx.py ......
选择二:在Pycharm IDE 终端下 输入:pyinstaller -F xx.py xxx.py ......
xx.py 和 xxx.py 是要打包的文件名
-F参数的含义是,将多个.py脚本文件打包成为一个可执行程序。
Python安装pyinstaller方法,以及将项目生成可执行程序的步骤的更多相关文章
- python安装模块方法汇总
方法一: 原文地址: http://blog.csdn.net/cighao/article/details/47860041 在 windows 系统下,只需要输入命令 pip install re ...
- python安装pip方法
1.先下载pip安装脚本: https://bootstrap.pypa.io/get-pip.py 2.执行python get-pip.py 3.安装完成.
- python 安装pyinstaller
pip install https://github.com/pyinstaller/pyinstaller/archive/develop.tar.gz
- c#项目调用Python模块的方法
将Python模块用pyinstaller打包成exe程序 下载安装UPX((http://upx.sourceforge.net/)) ,并把路径加到环境变量中. UPX是开源的加壳和压缩exe的程 ...
- PyInstaller安装使用方法
PyInstaller可以把Python应用程序及其所有依赖项捆绑到一个包中.用户可以在不安装Python解释器或任何模块的情况下运行打包的应用程序.PyInstaller支持Python 2.7和P ...
- 在Win8上安装pyinstaller打包python成为可执行文件
首先我使用的电脑系统是: Windows-8-6.2.9200 Python的版本是: 2.7.8 默认已安装python2.7且设置好了环境变量. 仅为个人记录,非教程. 首先先安装pip: 首先先 ...
- IDEA内的SpringBoot插件安装与SpringBoot项目生成地址
最新安装idea,在新建项目时没有spring initializr选项,也没有spring assistant选项.因此需要安装相应插件 在菜单栏 file>>settings>& ...
- 源码安装python +NGINX 的坎坷路 +uwsgi安装 部署django 的CRM项目
一.Nginx安装(基于ubuntu17.10 版本) 首先我们是基于源码安装,主要有如下步骤 1.安装依赖包 1.安装gcc g++的依赖库 sudo apt-get install build-e ...
- 在Eclipse中安装python插件的方法
一个博士给了我一堆代码,原本以为是C++或者java写的,结果是python,我压根没学过呀,不过本着语言都是相通的原则,我硬着头皮开始学习Python,当然先学习安装IDE(以前学习一门新语言,我会 ...
随机推荐
- 【福利】离散&C++&硬件一笔记合集
离散 C++ 硬件
- Redis高可用集群方案
Redis为我们提供了哨兵,它就像一个为我们的Redis服务站岗的人,当主服务器发生异常时,他会通过投票的方式,将从服务节点升为主服务节点.当我们处理好主节点故障并重启时,原来挂掉的主节点,作为新的主 ...
- 第三方登录之GitHub篇
第一步,准备工作.获取Client ID和Client Secret 1.自行登陆GitHub官网,点击Setting,如下图: 2.继续,点击Developer settings,如下图: 3.继续 ...
- Java的数组的作业11月06日
动手动脑 实验一:了解for循环得到棋盘结构 (1) 程序: import java.io.*; public class QiPan { //定义一个二维数组来充当棋盘 private String ...
- 【bzoj2342】[Shoi2011]双倍回文
这题属于博主还未填坑系列,先嘴巴AC,到时候有时间再搞字符串时,再来好好填坑. 废话不多说上题: 题解: 显然是和马拉车有关的吧,我们可以先对整个串跑一个马拉车,然后枚举‘#’好字符,并以他为中心,在 ...
- UVA - 11400 Lighting System Design
题文: You are given the task to design a lighting system for a huge conference hall. After doing a lot ...
- SQL SERVER数据库基本语法汇总,仅代表个人整理,仅供参考
以下SQL基本语法皆由本人整理,以下做一个汇总,关于游标,可作为了解,不要求掌握,其他查询.修改.删除操作等基本语法必须会使用.select * from [dbo].[TBICJE]select m ...
- 合并果子(STL优先队列)
STL优先队列:priority_queue 定义:priority_queue<int>q; 从小到大:priority_queue<int,vector<int>,g ...
- 算法学习之剑指offer(七)
题目1 题目描述 在数组中的两个数字,如果前面一个数字大于后面的数字,则这两个数字组成一个逆序对.输入一个数组,求出这个数组中的逆序对的总数P.并将P对1000000007取模的结果输出. 即输出P% ...
- Mybatis入门简版(补充)
一.Mybatis 中$与#的区别 #相当于对数据 加上 双引号,$相当于直接显示数据 1. #将传入的数据都当成一个字符串,会对自动传入的数据加一个双引号.如:order by #user_id#, ...