Spring Security 动态url权限控制(三)
一、前言
本篇文章将讲述Spring Security 动态分配url权限,未登录权限控制,登录过后根据登录用户角色授予访问url权限
基本环境
- spring-boot 2.1.8
- mybatis-plus 2.2.0
- mysql 数据库
- maven项目
Spring Security入门学习可参考之前文章:
- SpringBoot集成Spring Security入门体验(一)
https://blog.csdn.net/qq_38225558/article/details/101754743 - Spring Security 自定义登录认证(二)
https://blog.csdn.net/qq_38225558/article/details/102542072
二、数据库建表
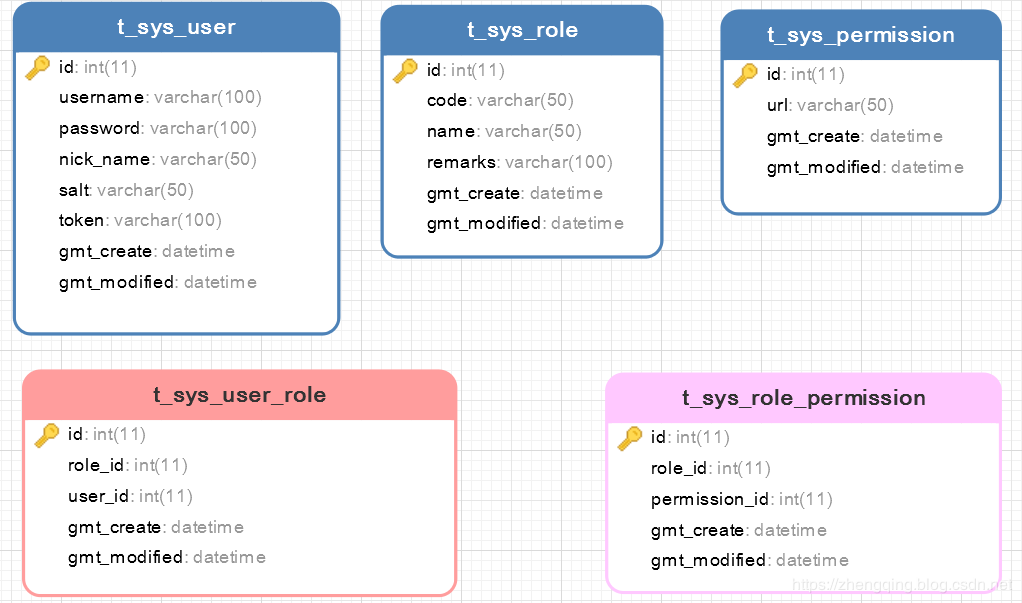
表关系简介:
- 用户表
t_sys_user关联 角色表t_sys_role两者建立中间关系表t_sys_user_role - 角色表
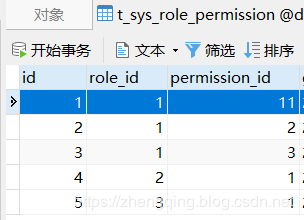
t_sys_role关联 权限表t_sys_permission两者建立中间关系表t_sys_role_permission - 最终体现效果为当前登录用户所具备的角色关联能访问的所有url,只要给角色分配相应的url权限即可
温馨小提示:这里逻辑根据个人业务来定义,小编这里讲解案例只给用户对应的角色分配访问权限,像其它的 直接给用户分配权限等等可以自己实现
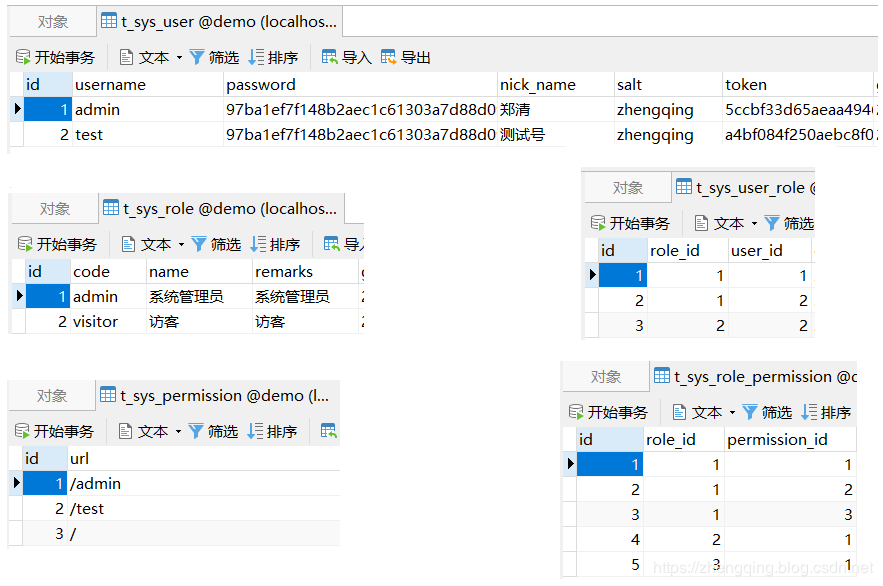
表模拟数据如下:
三、Spring Security 动态权限控制
1、未登录访问权限控制
自定义AdminAuthenticationEntryPoint类实现AuthenticationEntryPoint类
这里是认证权限入口 -> 即在未登录的情况下访问所有接口都会拦截到此(除了放行忽略接口)
温馨小提示:
ResponseUtils和ApiResult是小编这里模拟前后端分离情况下返回json格式数据所使用工具类,具体实现可参考文末给出的demo源码
@Component

public class AdminAuthenticationEntryPoint implements AuthenticationEntryPoint {

    @Override

    public void commence(HttpServletRequest request, HttpServletResponse response, AuthenticationException e) {

        ResponseUtils.out(response, ApiResult.fail("未登录!!!"));

    }

}
2、自定义过滤器MyAuthenticationFilter继承OncePerRequestFilter实现访问鉴权
每次访问接口都会经过此,我们可以在这里记录请求参数、响应内容,或者处理前后端分离情况下,以token换用户权限信息,token是否过期,请求头类型是否正确,防止非法请求等等
logRequestBody()方法:记录请求消息体logResponseBody()方法:记录响应消息体
【注:请求的HttpServletRequest流只能读一次,下一次就不能读取了,因此这里要使用自定义的MultiReadHttpServletRequest工具解决流只能读一次的问题,响应同理,具体可参考文末demo源码实现】
@Slf4j

@Component

public class MyAuthenticationFilter extends OncePerRequestFilter {

    private final UserDetailsServiceImpl userDetailsService;

    protected MyAuthenticationFilter(UserDetailsServiceImpl userDetailsService) {

        this.userDetailsService = userDetailsService;

    }

    @Override

    protected void doFilterInternal(HttpServletRequest request, HttpServletResponse response, FilterChain filterChain) throws ServletException, IOException {

        System.out.println("请求头类型: " + request.getContentType());

        if ((request.getContentType() == null && request.getContentLength() > 0) || (request.getContentType() != null && !request.getContentType().contains(Constants.REQUEST_HEADERS_CONTENT_TYPE))) {

            filterChain.doFilter(request, response);

            return;

        }

        MultiReadHttpServletRequest wrappedRequest = new MultiReadHttpServletRequest(request);

        MultiReadHttpServletResponse wrappedResponse = new MultiReadHttpServletResponse(response);

        StopWatch stopWatch = new StopWatch();

        try {

            stopWatch.start();

            // 记录请求的消息体

            logRequestBody(wrappedRequest);

//            String token = "123";

            // 前后端分离情况下,前端登录后将token储存在cookie中,每次访问接口时通过token去拿用户权限

            String token = wrappedRequest.getHeader(Constants.REQUEST_HEADER);

            log.debug("后台检查令牌:{}", token);

            if (StringUtils.isNotBlank(token)) {

                // 检查token

                SecurityUser securityUser = userDetailsService.getUserByToken(token);

                if (securityUser == null || securityUser.getCurrentUserInfo() == null) {

                    throw new AccessDeniedException("TOKEN已过期,请重新登录!");

                }

                UsernamePasswordAuthenticationToken authentication = new UsernamePasswordAuthenticationToken(securityUser, null, securityUser.getAuthorities());

                // 全局注入角色权限信息和登录用户基本信息

                SecurityContextHolder.getContext().setAuthentication(authentication);

            }

            filterChain.doFilter(wrappedRequest, wrappedResponse);

        } finally {

            stopWatch.stop();

            long usedTimes = stopWatch.getTotalTimeMillis();

            // 记录响应的消息体

            logResponseBody(wrappedRequest, wrappedResponse, usedTimes);

        }

    }

    private String logRequestBody(MultiReadHttpServletRequest request) {

        MultiReadHttpServletRequest wrapper = request;

        if (wrapper != null) {

            try {

                String bodyJson = wrapper.getBodyJsonStrByJson(request);

                String url = wrapper.getRequestURI().replace("//", "/");

                System.out.println("-------------------------------- 请求url: " + url + " --------------------------------");

                Constants.URL_MAPPING_MAP.put(url, url);

                log.info("`{}` 接收到的参数: {}",url , bodyJson);

                return bodyJson;

            } catch (Exception e) {

                e.printStackTrace();

            }

        }

        return null;

    }

    private void logResponseBody(MultiReadHttpServletRequest request, MultiReadHttpServletResponse response, long useTime) {

        MultiReadHttpServletResponse wrapper = response;

        if (wrapper != null) {

            byte[] buf = wrapper.getBody();

            if (buf.length > 0) {

                String payload;

                try {

                    payload = new String(buf, 0, buf.length, wrapper.getCharacterEncoding());

                } catch (UnsupportedEncodingException ex) {

                    payload = "[unknown]";

                }

                log.info("`{}`  耗时:{}ms  返回的参数: {}", Constants.URL_MAPPING_MAP.get(request.getRequestURI()), useTime, payload);

            }

        }

    }

}
3、自定义UserDetailsServiceImpl实现UserDetailsService 和 自定义SecurityUser实现UserDetails 认证用户详情
这个在上一篇文章中也提及过,但上次未做角色权限处理,这次我们来一起加上吧
@Service("userDetailsService")

public class UserDetailsServiceImpl implements UserDetailsService {

    @Autowired

    private UserMapper userMapper;

    @Autowired

    private RoleMapper roleMapper;

    @Autowired

    private UserRoleMapper userRoleMapper;

    /***

     * 根据账号获取用户信息

     * @param username:

     * @return: org.springframework.security.core.userdetails.UserDetails

     */

    @Override

    public UserDetails loadUserByUsername(String username) throws UsernameNotFoundException {

        // 从数据库中取出用户信息

        List<User> userList = userMapper.selectList(new EntityWrapper<User>().eq("username", username));

        User user;

        // 判断用户是否存在

        if (!CollectionUtils.isEmpty(userList)) {

            user = userList.get(0);

        } else {

            throw new UsernameNotFoundException("用户名不存在!");

        }

        // 返回UserDetails实现类

        return new SecurityUser(user, getUserRoles(user.getId()));

    }

    /***

     * 根据token获取用户权限与基本信息

     *

     * @param token:

     * @return: com.zhengqing.config.security.dto.SecurityUser

     */

    public SecurityUser getUserByToken(String token) {

        User user = null;

        List<User> loginList = userMapper.selectList(new EntityWrapper<User>().eq("token", token));

        if (!CollectionUtils.isEmpty(loginList)) {

            user = loginList.get(0);

        }

        return user != null ? new SecurityUser(user, getUserRoles(user.getId())) : null;

    }

    /**

     * 根据用户id获取角色权限信息

     *

     * @param userId

     * @return

     */

    private List<Role> getUserRoles(Integer userId) {

        List<UserRole> userRoles = userRoleMapper.selectList(new EntityWrapper<UserRole>().eq("user_id", userId));

        List<Role> roleList = new LinkedList<>();

        for (UserRole userRole : userRoles) {

            Role role = roleMapper.selectById(userRole.getRoleId());

            roleList.add(role);

        }

        return roleList;

    }

}
这里再说下自定义SecurityUser 是因为Spring Security自带的 UserDetails (存储当前用户基本信息) 有时候可能不满足我们的需求,因此我们可以自己定义一个来扩展我们的需求
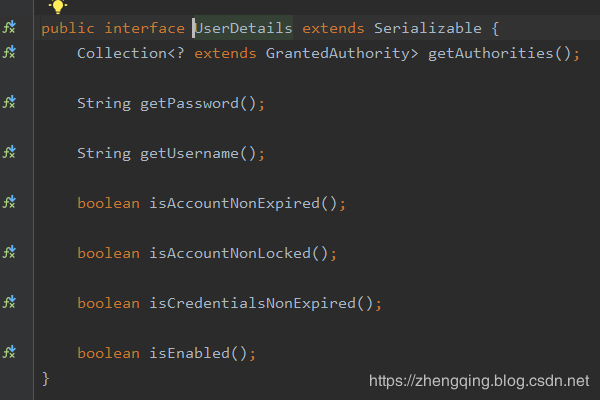
getAuthorities()方法:即授予当前用户角色权限信息
@Data

@Slf4j

public class SecurityUser implements UserDetails {

    /**

     * 当前登录用户

     */

    private transient User currentUserInfo;

    /**

     * 角色

     */

    private transient List<Role> roleList;

    public SecurityUser() { }

    public SecurityUser(User user) {

        if (user != null) {

            this.currentUserInfo = user;

        }

    }

    public SecurityUser(User user, List<Role> roleList) {

        if (user != null) {

            this.currentUserInfo = user;

            this.roleList = roleList;

        }

    }

    /**

     * 获取当前用户所具有的角色

     *

     * @return

     */

    @Override

    public Collection<? extends GrantedAuthority> getAuthorities() {

        Collection<GrantedAuthority> authorities = new ArrayList<>();

        if (!CollectionUtils.isEmpty(this.roleList)) {

            for (Role role : this.roleList) {

                SimpleGrantedAuthority authority = new SimpleGrantedAuthority(role.getCode());

                authorities.add(authority);

            }

        }

        return authorities;

    }

    @Override

    public String getPassword() {

        return currentUserInfo.getPassword();

    }

    @Override

    public String getUsername() {

        return currentUserInfo.getUsername();

    }

    @Override

    public boolean isAccountNonExpired() {

        return true;

    }

    @Override

    public boolean isAccountNonLocked() {

        return true;

    }

    @Override

    public boolean isCredentialsNonExpired() {

        return true;

    }

    @Override

    public boolean isEnabled() {

        return true;

    }

}
4、自定义UrlFilterInvocationSecurityMetadataSource实现FilterInvocationSecurityMetadataSource重写getAttributes()方法 获取访问该url所需要的角色权限信息
执行完之后到 下一步 UrlAccessDecisionManager 中认证权限
@Component
public class UrlFilterInvocationSecurityMetadataSource implements FilterInvocationSecurityMetadataSource {
@Autowired
PermissionMapper permissionMapper;
@Autowired
RolePermissionMapper rolePermissionMapper;
@Autowired
RoleMapper roleMapper;
/***
* 返回该url所需要的用户权限信息
*
* @param object: 储存请求url信息
* @return: null:标识不需要任何权限都可以访问
*/
@Override
public Collection<ConfigAttribute> getAttributes(Object object) throws IllegalArgumentException {
// 获取当前请求url
String requestUrl = ((FilterInvocation) object).getRequestUrl();
// TODO 忽略url请放在此处进行过滤放行
if ("/login".equals(requestUrl) || requestUrl.contains("logout")) {
return null;
}
// 数据库中所有url
List<Permission> permissionList = permissionMapper.selectList(null);
for (Permission permission : permissionList) {
// 获取该url所对应的权限
if (requestUrl.equals(permission.getUrl())) {
List<RoleMenu> permissions = rolePermissionMapper.selectList(new EntityWrapper<RoleMenu>().eq("permission_id", permission.getId()));
List<String> roles = new LinkedList<>();
if (!CollectionUtils.isEmpty(permissions)){
Integer roleId = permissions.get(0).getRoleId();
Role role = roleMapper.selectById(roleId);
roles.add(role.getCode());
}
// 保存该url对应角色权限信息
return SecurityConfig.createList(roles.toArray(new String[roles.size()]));
}
}
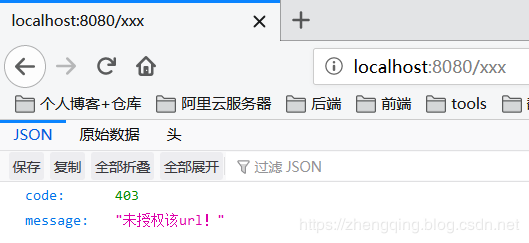
// 如果数据中没有找到相应url资源则为非法访问,要求用户登录再进行操作
return SecurityConfig.createList(Constants.ROLE_LOGIN);
}
@Override
public Collection<ConfigAttribute> getAllConfigAttributes() {
return null;
}
@Override
public boolean supports(Class<?> aClass) {
return FilterInvocation.class.isAssignableFrom(aClass);
}
}
5、自定义UrlAccessDecisionManager实现AccessDecisionManager重写decide()方法 对访问url进行权限认证处理
此处小编的处理逻辑是只要包含其中一个角色即可访问
@Component
public class UrlAccessDecisionManager implements AccessDecisionManager {
/**
* @param authentication: 当前登录用户的角色信息
* @param object: 请求url信息
* @param collection: `UrlFilterInvocationSecurityMetadataSource`中的getAttributes方法传来的,表示当前请求需要的角色(可能有多个)
* @return: void
*/
@Override
public void decide(Authentication authentication, Object object, Collection<ConfigAttribute> collection) throws AccessDeniedException, AuthenticationException {
// 遍历角色
for (ConfigAttribute ca : collection) {
// ① 当前url请求需要的权限
String needRole = ca.getAttribute();
if (Constants.ROLE_LOGIN.equals(needRole)) {
if (authentication instanceof AnonymousAuthenticationToken) {
throw new BadCredentialsException("未登录!");
} else {
throw new AccessDeniedException("未授权该url!");
}
}
// ② 当前用户所具有的角色
Collection<? extends GrantedAuthority> authorities = authentication.getAuthorities();
for (GrantedAuthority authority : authorities) {
// 只要包含其中一个角色即可访问
if (authority.getAuthority().equals(needRole)) {
return;
}
}
}
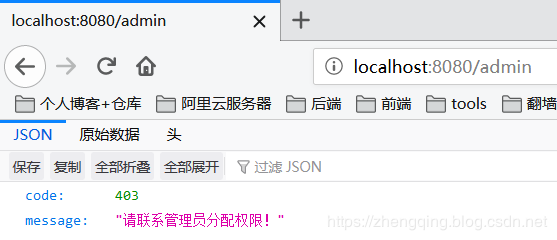
throw new AccessDeniedException("请联系管理员分配权限!");
}
@Override
public boolean supports(ConfigAttribute configAttribute) {
return true;
}
@Override
public boolean supports(Class<?> aClass) {
return true;
}
}
6、自定义无权限处理器 UrlAccessDeniedHandler实现AccessDeniedHandler重写handle()方法
在这里自定义403无权限响应内容,登录过后的权限处理
【 注:要和未登录时的权限处理区分开哦~ 】
@Component

public class UrlAccessDeniedHandler implements AccessDeniedHandler {

    @Override

    public void handle(HttpServletRequest request, HttpServletResponse response, AccessDeniedException e) throws IOException, ServletException {

        ResponseUtils.out(response, ApiResult.fail(403, e.getMessage()));

    }

}
7、最后在Security 核心配置类中配置以上处理
@Configuration

@EnableWebSecurity

@EnableGlobalMethodSecurity(prePostEnabled = true)

public class SecurityConfig extends WebSecurityConfigurerAdapter {

    /**

     * 访问鉴权 - 认证token、签名...

     */

    private final MyAuthenticationFilter myAuthenticationFilter;

    /**

     * 访问权限认证异常处理

     */

    private final AdminAuthenticationEntryPoint adminAuthenticationEntryPoint;

    /**

     * 用户密码校验过滤器

     */

    private final AdminAuthenticationProcessingFilter adminAuthenticationProcessingFilter;

    // 上面是登录认证相关  下面为url权限相关 - ========================================================================================

    /**

     * 获取访问url所需要的角色信息

     */

    private final UrlFilterInvocationSecurityMetadataSource urlFilterInvocationSecurityMetadataSource;

    /**

     * 认证权限处理 - 将上面所获得角色权限与当前登录用户的角色做对比,如果包含其中一个角色即可正常访问

     */

    private final UrlAccessDecisionManager urlAccessDecisionManager;

    /**

     * 自定义访问无权限接口时403响应内容

     */

    private final UrlAccessDeniedHandler urlAccessDeniedHandler;

    public SecurityConfig(MyAuthenticationFilter myAuthenticationFilter, AdminAuthenticationEntryPoint adminAuthenticationEntryPoint, AdminAuthenticationProcessingFilter adminAuthenticationProcessingFilter, UrlFilterInvocationSecurityMetadataSource urlFilterInvocationSecurityMetadataSource, UrlAccessDeniedHandler urlAccessDeniedHandler, UrlAccessDecisionManager urlAccessDecisionManager) {

        this.myAuthenticationFilter = myAuthenticationFilter;

        this.adminAuthenticationEntryPoint = adminAuthenticationEntryPoint;

        this.adminAuthenticationProcessingFilter = adminAuthenticationProcessingFilter;

        this.urlFilterInvocationSecurityMetadataSource = urlFilterInvocationSecurityMetadataSource;

        this.urlAccessDeniedHandler = urlAccessDeniedHandler;

        this.urlAccessDecisionManager = urlAccessDecisionManager;

    }

    /**

     * 权限配置

     * @param http

     * @throws Exception

     */

    @Override

    protected void configure(HttpSecurity http) throws Exception {

        ExpressionUrlAuthorizationConfigurer<HttpSecurity>.ExpressionInterceptUrlRegistry registry = http.antMatcher("/**").authorizeRequests();

        // 禁用CSRF 开启跨域

        http.csrf().disable().cors();

        // 未登录认证异常

        http.exceptionHandling().authenticationEntryPoint(adminAuthenticationEntryPoint);

        // 登录过后访问无权限的接口时自定义403响应内容

        http.exceptionHandling().accessDeniedHandler(urlAccessDeniedHandler);

        // url权限认证处理

        registry.withObjectPostProcessor(new ObjectPostProcessor<FilterSecurityInterceptor>() {

            @Override

            public <O extends FilterSecurityInterceptor> O postProcess(O o) {

                o.setSecurityMetadataSource(urlFilterInvocationSecurityMetadataSource);

                o.setAccessDecisionManager(urlAccessDecisionManager);

                return o;

            }

        });

        // 不创建会话 - 即通过前端传token到后台过滤器中验证是否存在访问权限

//        http.sessionManagement().sessionCreationPolicy(SessionCreationPolicy.STATELESS);

        // 标识访问 `/home` 这个接口,需要具备`ADMIN`角色

//        registry.antMatchers("/home").hasRole("ADMIN");

        // 标识只能在 服务器本地ip[127.0.0.1或localhost] 访问 `/home` 这个接口,其他ip地址无法访问

        registry.antMatchers("/home").hasIpAddress("127.0.0.1");

        // 允许匿名的url - 可理解为放行接口 - 多个接口使用,分割

        registry.antMatchers("/login", "/index").permitAll();

//        registry.antMatchers("/**").access("hasAuthority('admin')");

        // OPTIONS(选项):查找适用于一个特定网址资源的通讯选择。 在不需执行具体的涉及数据传输的动作情况下, 允许客户端来确定与资源相关的选项以及 / 或者要求, 或是一个服务器的性能

        registry.antMatchers(HttpMethod.OPTIONS, "/**").denyAll();

        // 自动登录 - cookie储存方式

        registry.and().rememberMe();

        // 其余所有请求都需要认证

        registry.anyRequest().authenticated();

        // 防止iframe 造成跨域

        registry.and().headers().frameOptions().disable();

        // 自定义过滤器在登录时认证用户名、密码

        http.addFilterAt(adminAuthenticationProcessingFilter, UsernamePasswordAuthenticationFilter.class)

            .addFilterBefore(myAuthenticationFilter, BasicAuthenticationFilter.class);

    }

    /**

     * 忽略拦截url或静态资源文件夹 - web.ignoring(): 会直接过滤该url - 将不会经过Spring Security过滤器链

     *                             http.permitAll(): 不会绕开springsecurity验证,相当于是允许该路径通过

     * @param web

     * @throws Exception

     */

    @Override

    public void configure(WebSecurity web) throws Exception {

        web.ignoring().antMatchers(HttpMethod.GET,

                "/favicon.ico",

                "/*.html",

                "/**/*.css",

                "/**/*.js");

    }

}
四、编写测试代码
控制层:
@Slf4j
@RestController
public class IndexController {
@GetMapping("/")
public ModelAndView showHome() {
return new ModelAndView("home.html");
}
@GetMapping("/index")
public String index() {
return "Hello World ~";
}
@GetMapping("/login")
public ModelAndView login() {
return new ModelAndView("login.html");
}
@GetMapping("/home")
public String home() {
String name = SecurityContextHolder.getContext().getAuthentication().getName();
log.info("登陆人:" + name);
return "Hello~ " + name;
}
@GetMapping(value ="/admin")
// 访问路径`/admin` 具有`ADMIN`角色权限 【这种是写死方式】
// @PreAuthorize("hasPermission('/admin','ADMIN')")
public String admin() {
return "Hello~ 管理员";
}
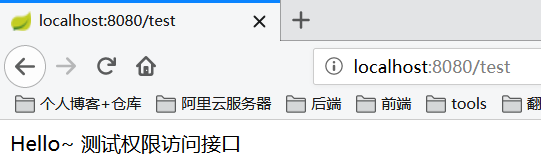
@GetMapping("/test")
public String test() {
return "Hello~ 测试权限访问接口";
}
}
页面和其它相关代码这里就不贴出来了,具体可参考文末demo源码
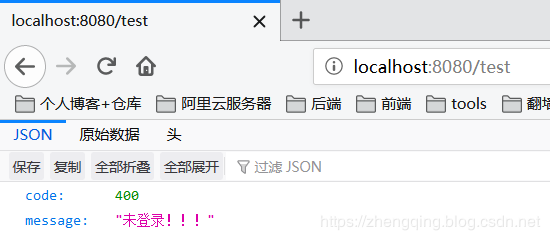
五、运行访问测试效果
1、未登录时
2、登录过后如果有权限则正常访问
3、登录过后,没有权限
这里我们可以修改数据库角色权限关联表t_sys_role_permission来进行测试哦 ~
Security 动态url权限也就是依赖这张表来判断的,只要修改这张表分配角色对应url权限资源,用户访问url时就会动态的去判断,无需做其他处理,如果是将权限信息放在了缓存中,修改表数据时及时更新缓存即可!
4、登录过后,访问数据库中没有配置的url 并且 在Security中没有忽略拦截的url时
六、总结
- 自定义未登录权限处理器
AdminAuthenticationEntryPoint- 自定义未登录时访问无权限url响应内容 - 自定义访问鉴权过滤器
MyAuthenticationFilter- 记录请求响应日志、是否合法访问,验证token过期等 - 自定义
UrlFilterInvocationSecurityMetadataSource- 获取访问该url所需要的角色权限 - 自定义
UrlAccessDecisionManager- 对访问url进行权限认证处理 - 自定义
UrlAccessDeniedHandler- 登录过后访问无权限url失败处理器 - 自定义403无权限响应内容 - 在
Security核心配置类中配置以上处理器和过滤器
Security动态权限相关代码:
本文案例demo源码
https://gitee.com/zhengqingya/java-workspace
Spring Security 动态url权限控制(三)的更多相关文章
- 第十九章 动态URL权限控制——《跟我学Shiro》
目录贴:跟我学Shiro目录贴 用过Spring Security的朋友应该比较熟悉对URL进行全局的权限控制,即访问URL时进行权限匹配:如果没有权限直接跳到相应的错误页面.Shiro也支持类似的机 ...
- 别再让你的微服务裸奔了,基于 Spring Session & Spring Security 微服务权限控制
微服务架构 网关:路由用户请求到指定服务,转发前端 Cookie 中包含的 Session 信息: 用户服务:用户登录认证(Authentication),用户授权(Authority),用户管理(R ...
- Spring security用户URL权限之FilterSecurityInterceptor
总: 用户通过浏览器发送URL地址,由FilterSecurityInterceptor判断是否具有相应的访问权限. 对于用户请求的方法权限,例如注解@PreAuthorize("hasRo ...
- Shiro学习(19)动态URL权限限制
用过spring Security的朋友应该比较熟悉对URL进行全局的权限控制,即访问URL时进行权限匹配:如果没有权限直接跳到相应的错误页面.Shiro也支持类似的机制,不过需要稍微改造下来满足实际 ...
- Spring Security实现RBAC权限管理
Spring Security实现RBAC权限管理 一.简介 在企业应用中,认证和授权是非常重要的一部分内容,业界最出名的两个框架就是大名鼎鼎的 Shiro和Spring Security.由于Spr ...
- 登陆模块,这个是很重要的模块,有shiro和spring security专门的权限认证框架
登陆模块,这个是很重要的模块,有shiro和spring security专门的权限认证框架
- Spring Security +Oauth2 +Spring boot 动态定义权限
Oauth2介绍:Oauth2是为用户资源的授权定义了一个安全.开放及简单的标准,第三方无需知道用户的账号及密码,就可获取到用户的授权信息,并且这是安全的. 简单的来说,当用户登陆网站的时候,需要账号 ...
- Spring Security 基于URL的权限判断
1. FilterSecurityInterceptor 源码阅读 org.springframework.security.web.access.intercept.FilterSecurityI ...
- spring security 动态 修改当前登录用户的 权限
1.前言 spring security 可以获取当前登录的用户信息,同时提供了接口 来修改权限列表信息 , 使用这个方法 ,可以动态的修改当前登录用户权限. 那么问题来了... 如果我是管理员 ,如 ...
随机推荐
- 时间复杂度big-O、Big-Omega和big-Theta
我们有三种曲线: A curve that we know is "above" the running time function when n is large. ( Bi ...
- 分享个人学习js的笔记
1.回到顶部效果. 2.滚动条向上滚动式,滑动滚轮.解决bug的方法. 3.有关Document. 4.getElementByClassName();获取元素类名的封装.单个类名的元素.任然不完美. ...
- 026 模块3-random库的使用
目录 一.random库基本介绍 1.1 random库概述 二.基本随机数函数 2.1 随机数种子 三.扩展随机数函数 3.1 随机数函数的使用 一.random库基本介绍 random库是使用随机 ...
- 小白专场-树的同构-c语言实现.md
目录 一.题意理解 二.求解思路 2.1 二叉树表示 2.2 程序框架搭建 2.3 如何建二叉树 2.4 如何判别两二叉树同构 更新.更全的<数据结构与算法>的更新网站,更有python. ...
- SqlServer DbHelper
/// <summary> /// 数据库通用操作类 /// </summary> public abstract class DbHelper { #region " ...
- ACM团队周赛题解(3)
940和822两套div.2 老规矩 #define MAXN 1000000+5#define MOD 1000000007#define PI (acos(-1.0))#define EPS 1e ...
- response中文乱码问题
1.要确定I代码的编码格式为UTF-8 2.乱码原因:浏览器和服务器的编码格式不同: 服务器的默认编码为:ISO-8859-1,如果浏览器的编码不是ISO-8859-1,就会出现乱码: public ...
- 数据结构慕课PTA 05-树9 Huffman Codes
题目内容 In 1953, David A. Huffman published his paper "A Method for the Construction of Minimum-Re ...
- 给idea设置默认使用的maven配置
一,前言 大家都知道,java开发中最经常使用的开发工具是Maven,最近看新同事在使用idea,我也下载了一个,准备尝试一下. 而maven是非诚方便进行工程管理的,至少管理jar包,是非常方便的, ...
- 站内搜索(ELK)之数据表字典类型字段的索引思路
数据表字典类型的字段,如人员表中的“性别”.流程表中的“处理状态”,此类字段中的值高度重复,不建议放到可检索的索引字段中,原因如下: 若数据表字典类型字段的值索引到单独的索引字段中,因字典数据字符数一 ...