Android--调用系统照相机拍照与摄像
前言
在很多场景中,都需要用到摄像头去拍摄照片或视频,在照片或视频的基础之上进行处理。但是Android系统源码是开源的,很多设备厂商均可使用,并且定制比较混乱。一般而言,在需要用到摄像头拍照或摄像的时候,均会直接调用系统现有的相机应用,去进行拍照或摄像,我们只取它拍摄的结果进行处理,这样避免了不同设备的摄像头的一些细节问题。本篇博客将介绍在Android应用中,如何调用系统现有的相机应用去拍摄照片与短片,并对其进行处理,最后均会以一个简单的Demo来演示效果。
本篇博客的主要内容如下:
系统现有相机应用的调用
对于如何调用系统现有应用,之前就有讲解,这里简单再说一下。在开发的应用中调用系统现有应用,需要使用Intent指定开启的应用的Action和Category,然后通过startActivity(Intent)或者startActivityForResult(Intent,int)开启指定的Activity,如果使用startActivityForResult()方法开启并需要返回值,再重写onActivityResult(int,int,Intent)即可。
先来看看系统现有相机应用的AndroidManifest.xml清单文件定义的Activity:
         <activity

             android:name="com.android.camera.Camera"

             android:clearTaskOnLaunch="true"

             android:configChanges="orientation|keyboardHidden"

             android:screenOrientation="landscape"

             android:taskAffinity="android.task.camera"

             android:theme="@android:style/Theme.Black.NoTitleBar.Fullscreen" >

             <intent-filter>

                 <action android:name="android.intent.action.MAIN" />

                 <categroy android:name="android.intent.category.DEFAULT" />

                 <categroy android:name="android.intent.category.LAUNCHER" />

             </intent-filter>

             <intent-filter>

                 <action android:name="android.media.action.IMAGE_CAPTURE" />

                 <categroy android:name="android.intent.category.DEFAULT" />

             </intent-filter>

             <intent-filter>

                 <action android:name="android.media.action.STILL_IMAGE_CAMERA" />

                 <categroy android:name="android.intent.category.DEFAULT" />

             </intent-filter>

         </activity>

         <activity

             android:name="com.android.camera.VideoCamera"

             android:clearTaskOnLaunch="true"

             android:configChanges="origientation|keyboardHidden"

             android:label="@string/video_camera_label"

             android:screenOrientation="landscape"

             android:taskAffinity="android.task.camcorder"

             android:theme="@android:style/theme.Black.NoTitleBar.Fullscreen" >

             <intent-filter>

                 <action android:name="android.media.action.VIDEO_CAMERA" />

                 <categroy android:name="android.intent.category.DEFAULT" />

             </intent-filter>

             <intent-filter>

                 <action android:name="android.media.action.VIDEO_CAPTURE" />

                 <categroy android:name="android.intent.category.DEFAULT" />

             </intent-filter>

         </activity>
它定义了两个Activity,com.android.camera.Camera表示照相机,com.android.camera.VideoCamera表示摄像机。从字面意思可以看出,为了捕获系统相机返回的数据,一般需要使用一下两个Action即可开启照相机与摄像机:
- android.media.action.IMAGE_CAPTURE:Intent的Action类型,从现有的相机应用中请求一张图片。
- android.media.action.VIDEO_CAPTURE:Intent的Action类型,从现有的相机应用中请求一段视频。
上面两个参数,均在MediaStore类中以静态常量的形式定义好了,分别是:MediaStore.ACTION_IMAGE_CAPTURE(相机)和MediaStore.ACTION_VIDEO_CAPTURE(摄像机)。
系统现有相机拍摄照片
上面介绍到,开启系统现有相机应用拍摄照片,需要用的MediaStore.ACTION_IMAGE_CAPTURE作为Intent的action开启Activity即可。但是在使用系统现有相机用用的时候,默认会把图片保存到系统图库的目录下,如果需要指定图片文件的保存路径,需要额外在Intent中设置。
设置系统现有相机应用的拍摄照片的保存路径,需要用Intent.putExtra()方法通过MediaStore.EXTRA_OUTPUT去设置Intent的额外数据,这里传递的是一个Uri参数,可以是一个文件路径的Uri。
             Intent intent=new Intent();

             // 指定开启系统相机的Action

             intent.setAction(MediaStore.ACTION_IMAGE_CAPTURE);

             intent.addCategory(Intent.CATEGORY_DEFAULT);

             // 根据文件地址创建文件

             File file=new File(FILE_PATH);

             // 把文件地址转换成Uri格式

             Uri uri=Uri.fromFile(file);

             // 设置系统相机拍摄照片完成后图片文件的存放地址

             intent.putExtra(MediaStore.EXTRA_OUTPUT, uri);
获取系统现有相机拍摄的图片
在新开启的Activity中,如果需要获取它的返回值,则需要使用startActivityForResult(Intent,int)方法开启Activity,并重写onActivityResult(int,int,Intent)获取系统相机的返回数据,那么我们只需要在onActivityResult()中获取到返回值即可。
系统相机拍摄的照片,如果不指定路径,会保存在系统默认文件夹下,可以使用Intent.getExtra()方法得到,得到的是一个Uri地址,表示了一个内容提供者的地址。如果通过MediaStore.EXTRA_OUTPUT指定了保存路径,那么通过Intent.getExtra()得到的将是一个空地址,但是既然是我们指定的地址,那么也不愁找不到它了。
系统现有相机拍摄图片Demo
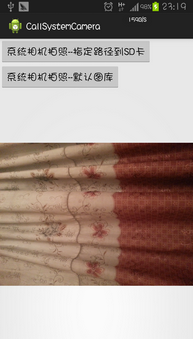
上面讲解了如何在开发的应用中使用系统相机拍摄照片并获得它所涉及到的内容,下面通过一个简单的Demo演示一下。在Demo中,有两个Button分别以指定路径的方式和不指定路径的方式启动系统相机,并获取返回值显示到ImageView中,Demo中注释比较详细,这里不再累述了。
布局代码:activity_syscamera.xml
 <?xml version="1.0" encoding="utf-8"?>

 <LinearLayout xmlns:android="http://schemas.android.com/apk/res/android"

     android:layout_width="match_parent"

     android:layout_height="match_parent"

     android:orientation="vertical" >

     <Button

         android:id="@+id/btn_StartCamera"

         android:layout_width="wrap_content"

         android:layout_height="wrap_content"

         android:text="系统相机拍照--指定路径到SD卡" />

     <Button

         android:id="@+id/btn_StartCameraInGallery"

         android:layout_width="wrap_content"

         android:layout_height="wrap_content"

         android:text="系统相机拍照--默认图库" />

     <ImageView

         android:id="@+id/iv_CameraImg"

         android:layout_width="match_parent"

         android:layout_height="match_parent" />

 </LinearLayout>
实现代码:SysCameraActivity.java
 package cn.bgxt.callsystemcamera;

 import java.io.File;

 import android.app.Activity;

 import android.content.Intent;

 import android.graphics.Bitmap;

 import android.graphics.BitmapFactory;

 import android.net.Uri;

 import android.os.Bundle;

 import android.provider.MediaStore;

 import android.util.Log;

 import android.view.View;

 import android.widget.Button;

 import android.widget.ImageView;

 public class SysCameraActivity extends Activity {

     private Button btn_StartCamera, btn_StartCameraInGallery;

     private ImageView iv_CameraImg;

     private static final String TAG = "main";

     private static final String FILE_PATH = "/sdcard/syscamera.jpg";

     @Override

     protected void onCreate(Bundle savedInstanceState) {

         super.onCreate(savedInstanceState);

         setContentView(R.layout.activity_syscamera);

         btn_StartCamera = (Button) findViewById(R.id.btn_StartCamera);

         btn_StartCameraInGallery = (Button) findViewById(R.id.btn_StartCameraInGallery);

         iv_CameraImg = (ImageView) findViewById(R.id.iv_CameraImg);

         btn_StartCamera.setOnClickListener(click);

         btn_StartCameraInGallery.setOnClickListener(click);

     }

     private View.OnClickListener click = new View.OnClickListener() {

         @Override

         public void onClick(View v) {

             Intent intent = null;

             switch (v.getId()) {

             // 指定相机拍摄照片保存地址

             case R.id.btn_StartCamera:

                 intent = new Intent();

                 // 指定开启系统相机的Action

                 intent.setAction(MediaStore.ACTION_IMAGE_CAPTURE);

                 intent.addCategory(Intent.CATEGORY_DEFAULT);

                 // 根据文件地址创建文件

                 File file = new File(FILE_PATH);

                 if (file.exists()) {

                     file.delete();

                 }

                 // 把文件地址转换成Uri格式

                 Uri uri = Uri.fromFile(file);

                 // 设置系统相机拍摄照片完成后图片文件的存放地址

                 intent.putExtra(MediaStore.EXTRA_OUTPUT, uri);

                 startActivityForResult(intent, 0);

                 break;

             // 不指定相机拍摄照片保存地址

             case R.id.btn_StartCameraInGallery:

                 intent = new Intent();

                 // 指定开启系统相机的Action

                 intent.setAction(MediaStore.ACTION_IMAGE_CAPTURE);

                 intent.addCategory(Intent.CATEGORY_DEFAULT);

                 startActivityForResult(intent, 1);

                 break;

             default:

                 break;

             }

         }

     };

     @Override

     protected void onActivityResult(int requestCode, int resultCode, Intent data) {

         Log.i(TAG, "系统相机拍照完成,resultCode="+resultCode);

         if (requestCode == 0) {

             File file = new File(FILE_PATH);

             Uri uri = Uri.fromFile(file);

             iv_CameraImg.setImageURI(uri);

         } else if (requestCode == 1) {

             Log.i(TAG, "默认content地址:"+data.getData());

             iv_CameraImg.setImageURI(data.getData());

         }

     }

 }
效果展示:
这里只是简单的演示了如何调用系统现有的相机应用获取拍摄的图片,没有做图片资源的回收,所以可能会有内存溢出的错误,重新启动应用即可。
系统现有相机拍摄视频
从系统现有的相机应用中获取拍摄的视频,与获取拍摄的图片过程大致相同,但是它除了可以通过putExtra()设置MediaStore.EXTRA_OUTPUT输出路径外,还可以设置其它值,这里简单介绍一下:
- MediaStore.EXTRA_OUTPUT:设置媒体文件的保存路径。
- MediaStore.EXTRA_VIDEO_QUALITY:设置视频录制的质量,0为低质量,1为高质量。
- MediaStore.EXTRA_DURATION_LIMIT:设置视频最大允许录制的时长,单位为毫秒。
- MediaStore.EXTRA_SIZE_LIMIT:指定视频最大允许的尺寸,单位为byte。
系统现有相机拍摄视频Demo
既然和拍摄照片的流程一样,这里就不再累述了,直接上Demo。在Demo中通过一个Button启动一个系统现有相机拍摄视频,最后保存在SD卡上。
实现代码:
 package cn.bgxt.callsystemcamera;

 import java.io.File;

 import android.app.Activity;

 import android.content.Intent;

 import android.net.Uri;

 import android.os.Bundle;

 import android.provider.MediaStore;

 import android.util.Log;

 import android.view.View;

 import android.widget.Button;

 public class SysVideoCameraActivity extends Activity {

     private Button btn_StartVideoCamera;

     private static final String FILE_PATH = "/sdcard/sysvideocamera.3gp";

     private static final String TAG="main";

     @Override

     protected void onCreate(Bundle savedInstanceState) {

         super.onCreate(savedInstanceState);

         setContentView(R.layout.activity_sysvideocamera);

         btn_StartVideoCamera = (Button) findViewById(R.id.btn_StartVideoCamera);

         btn_StartVideoCamera.setOnClickListener(click);

     }

     private View.OnClickListener click = new View.OnClickListener() {

         @Override

         public void onClick(View v) {

             Intent intent = new Intent();

             intent.setAction("android.media.action.VIDEO_CAPTURE");

             intent.addCategory("android.intent.category.DEFAULT");

             File file = new File(FILE_PATH);

             if(file.exists()){

                 file.delete();

             }

             Uri uri = Uri.fromFile(file);

             intent.putExtra(MediaStore.EXTRA_OUTPUT, uri);

             startActivityForResult(intent, 0);

         }

     };

     @Override

     protected void onActivityResult(int requestCode, int resultCode, Intent data) {

         Log.i(TAG, "拍摄完成,resultCode="+requestCode);

     }

 }
效果展示:
总结
到此就把如何使用系统现有相机应用拍摄照片与视频都讲解清楚了,在非相机相关的项目中,如果需要拍照的话,一般都是调用系统现有的相机应用,而不会直接调用Camera硬件去获取图像。

Android--调用系统照相机拍照与摄像的更多相关文章
- Android 调用系统照相机拍照和录像
本文实现android系统照相机的调用来拍照 项目的布局相当简单,只有一个Button: <RelativeLayout xmlns:android="http://schemas.a ...
- android 调用系统照相机拍照后保存到系统相册,在系统图库中能看到
需求: 调用系统照相机进行拍照,并且保存到系统相册,调用系统相册的时候能看到 系统相册的路径:String cameraPath= Environment.getExternalStorageD ...
- Android 调用系统相机拍照保存以及调用系统相册的方法
系统已经有的东西,如果我们没有新的需求的话,直接调用是最直接的.下面讲讲调用系统相机拍照并保存图片和如何调用系统相册的方法. 首先看看调用系统相机的核心方法: Intent camera = new ...
- Android调用系统照相机
ndroid调用系统相机实现拍照功能 在实现拍照的功能时遇到了很多问题,搜索了很多资料,尝试了很多办法,终于解决了,下面简要的描述下在开发过程中遇到的问题. 虽然之前看过android开发的书,但是没 ...
- [android] 调用系统照相机和摄像机
查看系统照相机源码,找到清单文件查看 查看意图过滤器,action是android.media.action.IMAGE_CAPTURE category是android.intent.categor ...
- Android调用系统相机拍照保存照片很小解决方案
保存图片小的一般操作步骤: 1. 调用系统相机 Intent intent = new Intent(MediaStore.ACTION_IMAGE_CAPTURE); startActivityFo ...
- android 调用系统相机拍照 获取原图
好吧,为了这个问题又折腾了一整天.之前在网上找来的方法,如果在onActivityResult中直接用data.getData()的方式来生成bitmap,其实获取的是拍照生成的缩略图!看看尺寸就 ...
- Android 调用系统相机拍照,生命周期重走OnCreate,导致无数据的解决办法
extends:http://blog.csdn.net/b275518834/article/details/42347903 BUG具体体现为 : (1) 摄像头拍照后图片数据不一定能返回 ; o ...
- Android 调用系统相机拍照并获取原图
第一步:调用相机 Intent getImageByCamera = new Intent( android.provider.MediaStore.ACTION_IMAGE_CAPTURE); St ...
随机推荐
- 怎样在ASP.NET(C#) 使用Json序列化反序列化问题?
using System; using System.Collections.Generic; using System.Web; using System.Web.Script.Serializat ...
- C# 串口操作系列(4) -- 协议篇,文本协议数据解析
C# 串口操作系列(4) -- 协议篇,文本协议数据解析 标签: c#uiobjectstringbyte 2010-06-09 01:50 19739人阅读 评论(26) 收藏 举报 分类: 通讯 ...
- BZOJ.5397.circular(随机化 贪心)
BZOJ 感觉自己完全没做过环上选线段的问题(除了一个2-SAT),所以来具体写一写qwq. 基本完全抄自remoon的题解qwq... (下标从\(0\sim m-1\)) 拆环为链,对于原线段\( ...
- Python数据模型及Pythonic编程
Python作为一种多范式语言,它的很多语言特性都能从其他语言上找到参照,但是Python依然形成了一套自己的“Python 风格”(Pythonic).这种Pythonic风格完全体现在 Pytho ...
- layedit第三次改造
原文链接:http://www.bianbingdang.com/article_detail/105.html 作为技术人员,在网上写代码,常常涉及代码块的编写.一个好的代码块,让页面美化很多. 由 ...
- 删除PeopleSoft Process Scheduler服务器定义
DELETE FROM PS_SERVERDEFN WHERE SERVERNAME= 'PSNT2' ; DELETE FROM PSSERVERSTAT where SERVERNAME = 'P ...
- SharePoint Column Format
https://docs.microsoft.com/en-us/sharepoint/dev/declarative-customization/column-formatting . { &quo ...
- Vue中scoped css和css module比较
scoped css 官方文档 scoped css可以直接在能跑起来的vue项目中使用. 使用方法: <style scoped> h1 { color: #f00; } </st ...
- 面试题:int和Integer的区别
java底层源码: -128 127之间
- 关于gulp-sftp上传到服务器
首先下载npm模块 npm install --save-dev gulp gulp-sftp webpack del gulp-sftp 上传服务器主要依赖 gulp.webpack必备 del 是 ...


