
04 Django REST Framework 认证、权限和限制
目前,我们的API对谁可以编辑或删除代码段没有任何限制。我们希望有更高级的行为,以确保:
- 代码片段始终与创建者相关联。
- 只有通过身份验证的用户可以创建片段。
- 只有代码片段的创建者可以更新或删除它。
- 未经身份验证的请求应具有完全只读访问权限。
01-认证
REST framework 提供了一些开箱即用的身份验证方案,并且还允许你实现自定义方案。
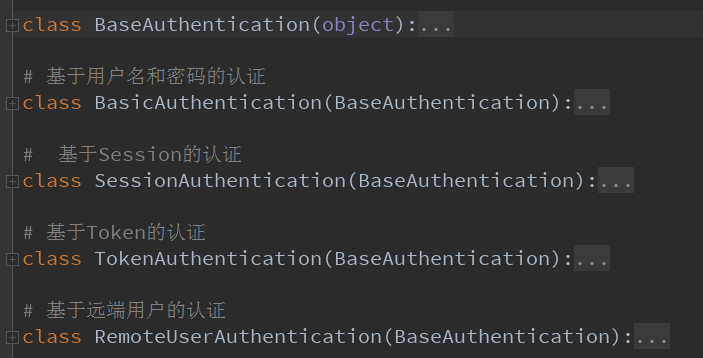
1.1-自定义Token认证
定义一个用户表和一个保存用户Token的表:
class UserInfo(models.Model):

    username = models.CharField(max_length=16)

    password = models.CharField(max_length=32)

    type = models.SmallIntegerField(

        choices=((1, '普通用户'), (2, 'VIP用户')),

        default=1

    )

class Token(models.Model):

    user = models.OneToOneField(to='UserInfo')

    token_code = models.CharField(max_length=128)
1.2-定义一个登录视图
def get_random_token(username):

    """

    根据用户名和时间戳生成随机token

    :param username:

    :return:

    """

    import hashlib, time

    timestamp = str(time.time())

    m = hashlib.md5(bytes(username, encoding="utf8"))

    m.update(bytes(timestamp, encoding="utf8"))

    return m.hexdigest()

class LoginView(APIView):

    """

    校验用户名密码是否正确从而生成token的视图

    """

    def post(self, request):

        res = {"code": 0}

        print(request.data)

        username = request.data.get("username")

        password = request.data.get("password")

        user = models.UserInfo.objects.filter(username=username, password=password).first()

        if user:

            # 如果用户名密码正确

            token = get_random_token(username)

            models.Token.objects.update_or_create(defaults={"token_code": token}, user=user)

            res["token"] = token

        else:

            res["code"] = 1

            res["error"] = "用户名或密码错误"

        return Response(res)
1.3-定义一个认证类
我们自己写的认证类都要继承内置认证类 "BaseAuthentication"
class BaseAuthentication(object):

    """

    All authentication classes should extend BaseAuthentication.

    """

    def authenticate(self, request):

        """

        Authenticate the request and return a two-tuple of (user, token).

        """

        #内置的认证类,authenticate方法,如果不自己写,默认则抛出异常

        raise NotImplementedError(".authenticate() must be overridden.")

    def authenticate_header(self, request):

        """

        Return a string to be used as the value of the `WWW-Authenticate`

        header in a `401 Unauthenticated` response, or `None` if the

        authentication scheme should return `403 Permission Denied` responses.

        """

        #authenticate_header方法,作用是当认证失败的时候,返回的响应头

        pass
BaseAuthentication源码
from rest_framework.authentication import BaseAuthentication

from rest_framework.exceptions import AuthenticationFailed

class MyAuth(BaseAuthentication):

    def authenticate(self, request):

        if request.method in ["POST", "PUT", "DELETE"]:

            request_token = request.data.get("token", None)

            if not request_token:

                raise AuthenticationFailed('缺少token')

            token_obj = models.Token.objects.filter(token_code=request_token).first()

            if not token_obj:

                raise AuthenticationFailed('无效的token')

            return token_obj.user.username, None

        else:

            return None, None

    def authenticate_header(self, request):

        pass
1.4-视图级别认证
class CommentViewSet(ModelViewSet):

    queryset = models.Comment.objects.all()

    serializer_class = app01_serializers.CommentSerializer

    authentication_classes = [MyAuth, ]
1.5-全局级别认证
# 在settings.py中配置

REST_FRAMEWORK = {

    "DEFAULT_AUTHENTICATION_CLASSES": ["app01.utils.MyAuth", ]

}
1.6 在settings里面设置的全局认证,所有业务都需要经过认证,如果想让某个不需要认证,只需要在其中添加下面的代码:
authentication_classes = [] #里面为空,代表不需要认证
02-权限
只有VIP用户才能看的内容。premission.py
2.1-内置权限验证类
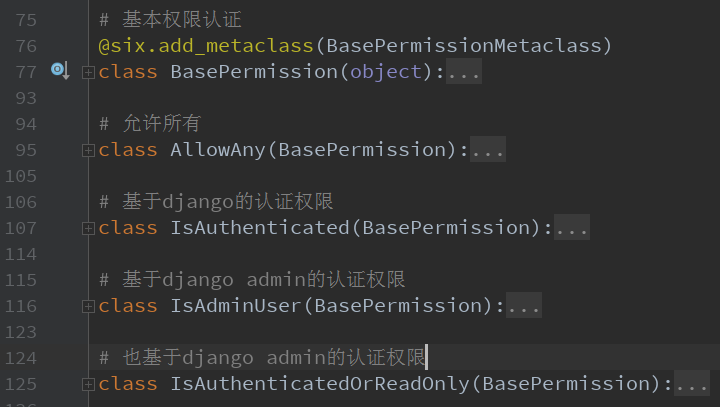
django rest framework 提供了内置的权限验证类,其本质都是定义has_permission()方法对权限进行验证:
2.2-自定义一个权限类
# 自定义权限

class MyPermission(BasePermission):

    message = 'VIP用户才能访问'

    def has_permission(self, request, view):

        """

        自定义权限只有VIP用户才能访问

        """

        # 因为在进行权限判断之前已经做了认证判断,所以这里可以直接拿到request.user

        if request.user and request.user.type == 2:  # 如果是VIP用户

            return True

        else:

            return False
2.3-视图级别配置
class CommentViewSet(ModelViewSet):

    queryset = models.Comment.objects.all()

    serializer_class = app01_serializers.CommentSerializer

    authentication_classes = [MyAuth, ]

    permission_classes = [MyPermission, ]
2.4-全局级别配置
# 在settings.py中设置rest framework相关配置项

REST_FRAMEWORK = {

    "DEFAULT_AUTHENTICATION_CLASSES": ["app01.utils.MyAuth", ],

    "DEFAULT_PERMISSION_CLASSES": ["app01.utils.MyPermission", ]

}
在全局配置权限后,因部分视图不想使用全局的权限限制,所以 需要在部分视图里配置:
permission_classes = [OrdinaryPremission,] #不用全局的权限配置的话,这里就要写自己的局部权限
03-限制
DRF内置了基本的限制类,首先我们自己动手写一个限制类,熟悉下限制组件的执行过程。
3.1-自定义限制类
VISIT_RECORD = {}

# 自定义限制

class MyThrottle(object):

    def __init__(self):

        self.history = None

    def allow_request(self, request, view):

        """

        自定义频率限制60秒内只能访问三次

        """

        # 获取用户IP

        ip = request.META.get("REMOTE_ADDR")

        timestamp = time.time()

        if ip not in VISIT_RECORD:

            VISIT_RECORD[ip] = [timestamp, ]

            return True

        history = VISIT_RECORD[ip]

        self.history = history

        history.insert(0, timestamp)

        while history and history[-1] < timestamp - 60:

            history.pop()

        if len(history) > 3:

            return False

        else:

            return True

    def wait(self):

        """

        限制时间还剩多少

        """

        timestamp = time.time()

        return 60 - (timestamp - self.history[-1])
3.2-视图级别配置
class CommentViewSet(ModelViewSet):

    queryset = models.Comment.objects.all()

    serializer_class = app01_serializers.CommentSerializer

    throttle_classes = [MyThrottle, ]
3.3-全局级别配置
# 在settings.py中设置rest framework相关配置项

REST_FRAMEWORK = {

    "DEFAULT_AUTHENTICATION_CLASSES": ["app01.utils.MyAuth", ],

    "DEFAULT_PERMISSION_CLASSES": ["app01.utils.MyPermission", ]

    "DEFAULT_THROTTLE_CLASSES": ["app01.utils.MyThrottle", ]

}
04-使用内置限制类
我们可以通过继承SimpleRateThrottle类,来实现节流,会更加的简单,因为SimpleRateThrottle里面都帮我们写好了。
class SimpleRateThrottle(BaseThrottle):

    """

    A simple cache implementation, that only requires `.get_cache_key()`

    to be overridden.

    The rate (requests / seconds) is set by a `rate` attribute on the View

    class.  The attribute is a string of the form 'number_of_requests/period'.

    Period should be one of: ('s', 'sec', 'm', 'min', 'h', 'hour', 'd', 'day')

    Previous request information used for throttling is stored in the cache.

    """

    cache = default_cache

    timer = time.time

    cache_format = 'throttle_%(scope)s_%(ident)s'

    scope = None   #这个值自定义,写什么都可以

    THROTTLE_RATES = api_settings.DEFAULT_THROTTLE_RATES

    def __init__(self):

        if not getattr(self, 'rate', None):

            self.rate = self.get_rate()

        self.num_requests, self.duration = self.parse_rate(self.rate)

    def get_cache_key(self, request, view):

        """

        Should return a unique cache-key which can be used for throttling.

        Must be overridden.

        May return `None` if the request should not be throttled.

        """

        raise NotImplementedError('.get_cache_key() must be overridden')

    def get_rate(self):

        """

        Determine the string representation of the allowed request rate.

        """

        if not getattr(self, 'scope', None):

            msg = ("You must set either `.scope` or `.rate` for '%s' throttle" %

                   self.__class__.__name__)

            raise ImproperlyConfigured(msg)

        try:

            return self.THROTTLE_RATES[self.scope]

        except KeyError:

            msg = "No default throttle rate set for '%s' scope" % self.scope

            raise ImproperlyConfigured(msg)

    def parse_rate(self, rate):

        """

        Given the request rate string, return a two tuple of:

        <allowed number of requests>, <period of time in seconds>

        """

        if rate is None:

            return (None, None)

        num, period = rate.split('/')

        num_requests = int(num)

        duration = {'s': 1, 'm': 60, 'h': 3600, 'd': 86400}[period[0]]

        return (num_requests, duration)

    def allow_request(self, request, view):

        """

        Implement the check to see if the request should be throttled.

        On success calls `throttle_success`.

        On failure calls `throttle_failure`.

        """

        if self.rate is None:

            return True

        self.key = self.get_cache_key(request, view)

        if self.key is None:

            return True

        self.history = self.cache.get(self.key, [])

        self.now = self.timer()

        # Drop any requests from the history which have now passed the

        # throttle duration

        while self.history and self.history[-1] <= self.now - self.duration:

            self.history.pop()

        if len(self.history) >= self.num_requests:

            return self.throttle_failure()

        return self.throttle_success()

    def throttle_success(self):

        """

        Inserts the current request's timestamp along with the key

        into the cache.

        """

        self.history.insert(0, self.now)

        self.cache.set(self.key, self.history, self.duration)

        return True

    def throttle_failure(self):

        """

        Called when a request to the API has failed due to throttling.

        """

        return False

    def wait(self):

        """

        Returns the recommended next request time in seconds.

        """

        if self.history:

            remaining_duration = self.duration - (self.now - self.history[-1])

        else:

            remaining_duration = self.duration

        available_requests = self.num_requests - len(self.history) + 1

        if available_requests <= 0:

            return None

        return remaining_duration / float(available_requests)
SimpleRateThrottle 源码
from rest_framework.throttling import SimpleRateThrottle

class VisitThrottle(SimpleRateThrottle):

    '''匿名用户60s只能访问三次(根据ip)'''

    scope = 'NBA'   #这里面的值,自己随便定义,settings里面根据这个值配置Rate

    def get_cache_key(self, request, view):

        #通过ip限制节流

        return self.get_ident(request)

class UserThrottle(SimpleRateThrottle):

    '''登录用户60s可以访问10次'''

    scope = 'NBAUser'    #这里面的值,自己随便定义,settings里面根据这个值配置Rate

    def get_cache_key(self, request, view):

        return request.user.username
4.1-全局配置
# 在settings.py中设置rest framework相关配置项

REST_FRAMEWORK = {

    "DEFAULT_AUTHENTICATION_CLASSES": ["app01.utils.MyAuth", ],

    # "DEFAULT_PERMISSION_CLASSES": ["app01.utils.MyPermission", ]

    "DEFAULT_THROTTLE_CLASSES": ["app01.utils.VisitThrottle", ],

    # 设置访问频率

    "DEFAULT_THROTTLE_RATES": {

        'NBA':'3/m',         #没登录用户3/m,NBA就是scope定义的值

        'NBAUser':'10/m',    #登录用户10/m,NBAUser就是scope定义的值

    }

}
4.2-局部配置
class AuthView(APIView):

    .

    .

    .

    # 默认的节流是登录用户(10/m),AuthView不需要登录,这里用匿名用户的节流(3/m)

    throttle_classes = [VisitThrottle,]

   .

    .
4.3-BaseThrottle
1. 自己要写allow_request和wait方法

2. get_ident就是获取ip
源码如下:
class BaseThrottle(object):

    """

    Rate throttling of requests.

    """

    def allow_request(self, request, view):

        """

        Return `True` if the request should be allowed, `False` otherwise.

        """

        raise NotImplementedError('.allow_request() must be overridden')

    def get_ident(self, request):

        """

        Identify the machine making the request by parsing HTTP_X_FORWARDED_FOR

        if present and number of proxies is > 0. If not use all of

        HTTP_X_FORWARDED_FOR if it is available, if not use REMOTE_ADDR.

        """

        xff = request.META.get('HTTP_X_FORWARDED_FOR')

        remote_addr = request.META.get('REMOTE_ADDR')

        num_proxies = api_settings.NUM_PROXIES

        if num_proxies is not None:

            if num_proxies == 0 or xff is None:

                return remote_addr

            addrs = xff.split(',')

            client_addr = addrs[-min(num_proxies, len(addrs))]

            return client_addr.strip()

        return ''.join(xff.split()) if xff else remote_addr

    def wait(self):

        """

        Optionally, return a recommended number of seconds to wait before

        the next request.

        """

        return None
04 Django REST Framework 认证、权限和限制的更多相关文章
- Django REST framework认证权限和限制和频率
认证.权限和限制 身份验证是将传入请求与一组标识凭据(例如请求来自的用户或其签名的令牌)相关联的机制.然后 权限 和 限制 组件决定是否拒绝这个请求. 简单来说就是: 认证确定了你是谁 权限确定你能不 ...
- Django REST Framework 认证 - 权限 - 限制
一. 认证 (你是谁?) REST framework 提供了一些开箱即用的身份验证方案,并且还允许你实现自定义方案. 自定义Token认证 第一步 : 建表>>>> 定义一个 ...
- Django REST framework认证权限和限制 源码分析
1.首先 我们进入这个initial()里面看下他内部是怎么实现的. 2.我们进入里面看到他实现了3个方法,一个认证,权限频率 3.我们首先看下认证组件发生了什么 权限: 啥都没返回,self.per ...
- Django Rest Framework(认证、权限、限制访问频率)
阅读原文Django Rest Framework(认证.权限.限制访问频率) django_rest_framework doc django_redis cache doc
- Django Rest framework 之 权限
django rest framework 之 认证(一) django rest framework 之 权限(二) django rest framework 之 节流(三) django res ...
- django 之(三) --- 认证|权限
用户模块 登陆注册1:Django2.0 [ 1:N ] user/url.py from django.urls import path from user.views0 import UserT ...
- rest framework 认证 权限 频率
认证组件 发生位置 APIview 类种的 dispatch 方法执行到 initial 方法 进行 认证组件认证 源码位置 rest_framework.authentication 源码内部需要 ...
- Django Rest Framework之权限
基本代码结构 url.py: from django.conf.urls import url, include from app import views urlpatterns = [ url(r ...
- Django REST framework - 认证
目录 认证 DRF 5种验证方式 如何确定身份验证? 设置身份验证方案 案例: 基于自定义Token认证 第一步: 定义一个用户表和一个保存用户Token的表 第二步: 定义一个登陆视图 第三步定义一 ...
随机推荐
- Python2 编码问题分析
本文浅显易懂,绿色纯天然,手工制作,请放心阅读. 编码问题是一个很大很杂的话题,要向彻底的讲明白可以写一本书了.导致乱码的原因很多,系统平台.编程语言.多国语言.软件程序支持.用户选择等都可能导致无法 ...
- MySQLSource-Flume
1. 自定义Source说明 实时监控MySQL,从MySQL中获取数据传输到HDFS或者其他存储框架,所以此时需要我们自己实现MySQLSource. 2. 自定义MySQLSource步骤 根据官 ...
- C#工具:防sql注入帮助类
SQL注入是比较常见的网络攻击方式之一,它不是利用操作系统的BUG来实现攻击,而是针对程序员编程时的疏忽,通过SQL语句,实现无帐号登录,甚至篡改数据库. using System; using Sy ...
- C# 消息队列-MSMQ
MQ是一种消息中间件技术,所以它能够支持多种类型的语言开发,同时也是跨平台的通信机制,也就是说MQ支持将信息转化为XML或者JSon等类型的数据存储到消息队列中,然后可以使用不同的语言来处理消息队列中 ...
- 为什么选择 Intellij IDEA 作为日常开发工具
作为一个从事 Java 开发的程序员,每天离不开编辑器的帮助.还记得刚开始学习 Java 编程的时候,使用 Eclipse 作为日常开发工具.后来工作以后,需要使用 Intellij IDEA,刚开始 ...
- 20, CSS 定义选择器
1. ID 与类 2. 层叠 3. 分组 4. 继承 5. 上下文选择器 6. 子类选择器 7. 其他选择器 8. 结构与注释 20.1 ID 与类 选择器是用于控制页面设计的样式.即 ID 选择器何 ...
- jQuery.parseJSON()函数详解
jQuery.parseJSON()函数用于将格式完好的JSON字符串转为与之对应的JavaScript对象. 所谓”格式完好”,就是要求指定的字符串必须符合严格的JSON格式,例如:属性名称必须加双 ...
- Rxjs常用operators
本文使用的是angular6内置的rxjs,版本号为6.3.3 concat 通过顺序地发出多个 Observables 的值将它们连接起来,一个接一个的. 参数: 名称 类型 属性 描述 other ...
- XUnit 依赖注入
XUnit 依赖注入 Intro 现在的开发中越来越看重依赖注入的思想,微软的 Asp.Net Core 框架更是天然集成了依赖注入,那么在单元测试中如何使用依赖注入呢? 本文主要介绍如何通过 XUn ...
- 测者的测试技术笔记:揭开java method的一个秘密--巨型函数
相信,很多人都不知道Java的Method的上限为64K.本文将超过这个上限的函数叫做巨型函数. 巨型函数的问题 1.如果代码超过了这个限制,Java编译器就报"Code too large ...