
安装tensorflow,那叫一个坑啊
最近,项目团队需要研究并应用AI的技术,在具体的产品实施环节中使用。之前的几个项目,是委托武汉大学给做的,基于keras框架,实现了一些图像识别的项目。
这不,上方希望自己能够掌握一些常用且成熟的AI算法,并能够运用于项目技术关键环节,要我将tensorflow作为入口,手头的项目,架构已经不存在问题的,可以交出去,让团队成员代为管理,关键问题,我可以给出指导意见。不多说闲话了,进入正题。
今天,这篇作为tensorflow的处女篇博文,就以环境搭建为主吧。介绍我在部署tensorflow遇到的问题,以及如何处置的。
起初,我是想用源码安装的,因为google的技术资源,担心有依赖找不到,毕竟我大天朝,对google的屏蔽还是比较不错的嘛。
1. 走起,源码安装tensorflow。
因为google的源码,编译是基于bazel的,一个类似make的工具,也可以类比ant,maven等等,大家知道这个bazel是用于编译打包之类的一个工具即可。
1.1 安装bazel。
在github上下载了一个0.4.5.tar.gz的源码安装包,执行.compile.sh的时候,报了错,什么要指定源码路径,必须要指定protoc指令之类,建议用dist的版本,但是我这破网,压根下不动,算了,本来这个编译工具就第一次用,诸多不熟悉,转战其他方案,选择bazel-0.4.2-installer-linux-x86_64.sh,这个安装比较简单。
[root@bogon tool]# ./bazel-0.4.-installer-linux-x86_64.sh

Bazel installer

---------------

Bazel is bundled with software licensed under the GPLv2 with Classpath exception.

You can find the sources next to the installer on our release page:

   https://github.com/bazelbuild/bazel/releases

# Release 0.4. (--)

Baseline: 6331a94

Cherry picks:

   + 7b835d9: Do not patch WORKSPACE in the release process

Incompatible changes:

  - Callback functions in Skylark no longer support the cfg

    parameter. This is a cleanup and only affects the signatures of

    callbacks, since the parameter hasn't been set since September

    .

Important changes:

  - Alias proto_library's produce a descriptor set that contains all

    srcs of its dependencies.

  - proto_library supports strict proto deps.

  - Top level @androidsdk support library targets have been replaced

    by @androidsdk//<group id>:<artifact id>-<version> for Android

    SDK Support and Google Play Services libraries.

## Build informations

   - [Build log](http://ci.bazel.io/job/Bazel/JAVA_VERSION=1.8,PLATFORM_NAME=linux-x86_64/1080/)

   - [Commit](https://github.com/bazelbuild/bazel/commit/ba94a7b)

Uncompressing.......

Bazel is now installed!

Make sure you have "/usr/local/bin" in your path. You can also activate bash

completion by adding the following line to your :

  source /usr/local/lib/bazel/bin/bazel-complete.bash

See http://bazel.build/docs/getting-started.html to start a new project!
看看,安装的如何,检查一下bazel的命令。
[root@bogon tool]# bazel --help

Warning: ignoring http_proxy in environment.

                                                           [bazel release 0.4.]

Usage: bazel <command> <options> ...

Available commands:

  analyze-profile     Analyzes build profile data.

  build               Builds the specified targets.

  canonicalize-flags  Canonicalizes a list of bazel options.

  clean               Removes output files and optionally stops the server.

  coverage            Generates code coverage report for specified test targets.

  dump                Dumps the internal state of the bazel server process.

  fetch               Fetches external repositories that are prerequisites to the targets.

  help                Prints help for commands, or the index.

  info                Displays runtime info about the bazel server.

  mobile-install      Installs targets to mobile devices.

  query               Executes a dependency graph query.

  run                 Runs the specified target.

  shutdown            Stops the bazel server.

  test                Builds and runs the specified test targets.

  version             Prints version information for bazel.

Getting more help:

  bazel help <command>

                   Prints help and options for <command>.

  bazel help startup_options

                   Options for the JVM hosting bazel.

  bazel help target-syntax

                   Explains the syntax for specifying targets.

  bazel help info-keys

                   Displays a list of keys used by the info command.
也不错,说明安装一切正常了。
1.2 安装protobuf
点击此处即可下载
wget https://pypi.python.org/packages/0f/53/e43b226f83a5a542c16695e9624b7bd2bde4ad016776c7c3233901bcf5b4/protobuf-3.2.0-cp27-cp27mu-manylinux1_x86_64.whl#md5=a1a807fee3a7df784e171837853cc29d  #下载指令

pip install protobuf-3.2.-cp27-cp27mu-manylinux1_x86_64.whl  #安装指令

[root@bogon tool]# pip install protobuf-3.2.-cp27-cp27mu-manylinux1_x86_64.whl

Processing ./protobuf-3.2.-cp27-cp27mu-manylinux1_x86_64.whl

Requirement already satisfied: setuptools in /usr/lib/python2./site-packages (from protobuf==3.2.)

Requirement already satisfied: six>=1.9 in /usr/lib/python2./site-packages (from protobuf==3.2.)

Requirement already satisfied: appdirs>=1.4. in /usr/lib/python2./site-packages (from setuptools->protobuf==3.2.)

Requirement already satisfied: packaging>=16.8 in /usr/lib/python2./site-packages (from setuptools->protobuf==3.2.)

Requirement already satisfied: pyparsing in /usr/lib/python2./site-packages (from packaging>=16.8->setuptools->protobuf==3.2.)

Installing collected packages: protobuf

Successfully installed protobuf-3.2.
本出安装的版本是最新的版本,3.2.0,本地的python是2.7的,所以,选择的是cp27。
1.3 安装setuptools
这个安装包,是python的一套便于下载,安装,更新和卸载软件包的套件。本地的安装版本是34.3.2,可以在此处下载
wget https://pypi.python.org/packages/de/b2/b63accae9aa1a4cf02e03c7522102f686a1bd9b8b1b847716198152d2c63/setuptools-34.3.2-py2.py3-none-any.whl#md5=0d9c6a1da32797da04bde303e4d623d9  #下载指令

pip install setuptools-34.3.-py2.py3-none-any.whl  #安装指令

[root@bogon tool]# pip install setuptools-34.3.-py2.py3-none-any.whl

Processing ./setuptools-34.3.-py2.py3-none-any.whl

Requirement already satisfied: six>=1.6. in /usr/lib/python2./site-packages (from setuptools==34.3.)

Collecting appdirs>=1.4. (from setuptools==34.3.)

  Downloading appdirs-1.4.-py2.py3-none-any.whl

Collecting packaging>=16.8 (from setuptools==34.3.)

  Downloading packaging-16.8-py2.py3-none-any.whl

Requirement already satisfied: pyparsing in /usr/lib/python2./site-packages (from packaging>=16.8->setuptools==34.3.)

Installing collected packages: appdirs, packaging, setuptools

  Found existing installation: setuptools 0.9.

    Uninstalling setuptools-0.9.:

      Successfully uninstalled setuptools-0.9.

Successfully installed appdirs-1.4. packaging-16.8 setuptools-34.3.
1.4 安装six
six套件,是用于python2和python3的兼容性服务的软件包。本处使用的版本是1.10,点击此处下载。
wget https://pypi.python.org/packages/c8/0a/b6723e1bc4c516cb687841499455a8505b44607ab535be01091c0f24f079/six-1.10.0-py2.py3-none-any.whl#md5=3ab558cf5d4f7a72611d59a81a315dc8  #下载指令

pip install six-1.10.-py2.py3-none-any.whl  #安装指令
除了six套件之外,比如python-devel,swig等都可以参照上述类似方法进行安装,就不再重述。
1.5 tensorflow源码安装
[root@bogon source_code]# git clone https://github.com/tensorflow/tensorflow.git
在Github上clonetensorflow的源码,然后切换到指定分支r1.0上。
[root@bogon tensorflow]# git branch r1.
接下来,就进行对tensorflow的配置工作。当然了,我的机器上是有GPU支持的,所以要安装cuda以及cudnn来进行运算速度提速。
[root@bogon source_code]# nvidia-smi

Tue Mar  ::

+-----------------------------------------------------------------------------+

| NVIDIA-SMI 367.57                 Driver Version: 367.57                    |

|-------------------------------+----------------------+----------------------+

| GPU  Name        Persistence-M| Bus-Id        Disp.A | Volatile Uncorr. ECC |

| Fan  Temp  Perf  Pwr:Usage/Cap|         Memory-Usage | GPU-Util  Compute M. |

|===============================+======================+======================|

|     GeForce GTX     Off  | ::00.0     Off |                  N/A |

|  %   35C    P0    39W / 180W |      0MiB /  8113MiB |      %      Default |

+-------------------------------+----------------------+----------------------+

+-----------------------------------------------------------------------------+

| Processes:                                                       GPU Memory |

|  GPU       PID  Type  Process name                               Usage      |

|=============================================================================|

|  No running processes found                                                 |

+-----------------------------------------------------------------------------+
安装cuda,其实很简单,去nvidia的官网,下载所需的版本,我这里,下载安装的是8.0的cuda,5.1的cudnn。
安装完cuda后,cudnn的安装,其实比较简单,将下载的压缩包解压,并将include下面的文件copy到cuda安装路径下的include下,将lib64下面的so文件copy到cuda安装路径下的lib64下面,另外,so文件要建软连接,因为版本号可能是3位数字,但是后面tensorflow需要用到的地方可能是两位数字,比如这里,真是版本号是5.1.10,就要建立软连接,将5.1指向5.1.10.
最后,需要配置机器的环境变量。
#下面三行指定了cuda以及cudnn的环境
export PATH=/usr/local/cuda-8.0/bin:/usr/local/bin:$PATH

export LD_LIBRARY_PATH=/usr/local/cuda-8.0/lib64:$LD_LIBRARY_PATH

export CUDA_ROOT=/usr/local/cuda-8.0


#下面的三行指定环境变量是JAVA8

export JAVA_HOME=/usr/java/jdk1..0_121

export PATH=$JAVA_HOME/bin:$PATH

export CLASSPATH=.:$JAVA_HOME/lib/dt.jar:$JAVA_HOME/lib/tools.jar
切记一点,tensorflow源码安装,有一点,官方要求的是JDK必须是java8.
下面,进入真正源码配置准备安装。
[root@bogon tensorflow]# ./configure /usr/bin/python

Please specify the location of python. [Default is /usr/bin/python]:

Please specify optimization flags to use during compilation when bazel option "--config=opt" is specified [Default is -march=native]:

Do you wish to use jemalloc as the malloc implementation? [Y/n] y

jemalloc enabled

Do you wish to build TensorFlow with Google Cloud Platform support? [y/N] n

No Google Cloud Platform support will be enabled for TensorFlow

Do you wish to build TensorFlow with Hadoop File System support? [y/N] n

No Hadoop File System support will be enabled for TensorFlow

Do you wish to build TensorFlow with the XLA just-in-time compiler (experimental)? [y/N] n

No XLA JIT support will be enabled for TensorFlow

Found possible Python library paths:

  /usr/lib/python2./site-packages

  /usr/lib64/python2./site-packages

Please input the desired Python library path to use.  Default is [/usr/lib/python2./site-packages]

Using python library path: /usr/lib/python2./site-packages

Do you wish to build TensorFlow with OpenCL support? [y/N] n

No OpenCL support will be enabled for TensorFlow

Do you wish to build TensorFlow with CUDA support? [y/N] y

CUDA support will be enabled for TensorFlow

Please specify which gcc should be used by nvcc as the host compiler. [Default is /usr/bin/gcc]:

Please specify the CUDA SDK version you want to use, e.g. 7.0. [Leave empty to use system default]: 8.0

Please specify the location where CUDA 8.0 toolkit is installed. Refer to README.md for more details. [Default is /usr/local/cuda]: /usr/local/cuda-8.0

Please specify the Cudnn version you want to use. [Leave empty to use system default]: 5.1

Please specify the location where cuDNN 5.1 library is installed. Refer to README.md for more details. [Default is /usr/local/cuda-8.0]: /usr/local/cudnn/lib64

Invalid path to cuDNN  toolkit. Neither of the following two files can be found:

/usr/local/cudnn/lib64/lib64/libcudnn.so.5.1

/usr/local/cudnn/lib64/libcudnn.so.5.1

.5.1

Please specify the Cudnn version you want to use. [Leave empty to use system default]: 5.1.

Please specify the location where cuDNN 5.1. library is installed. Refer to README.md for more details. [Default is /usr/local/cuda-8.0]: /usr/local/cudnn/lib64

Please specify a list of comma-separated Cuda compute capabilities you want to build with.

You can find the compute capability of your device at: https://developer.nvidia.com/cuda-gpus.

Please note that each additional compute capability significantly increases your build time and binary size.

[Default is: "3.5,5.2"]:

Warning: ignoring http_proxy in environment.

........

INFO: Starting clean (this may take a while). Consider using --expunge_async if the clean takes more than several minutes.

Warning: ignoring http_proxy in environment.

........

ERROR: com.google.devtools.build.lib.packages.BuildFileContainsErrorsException: error loading package '': Encountered error while reading extension file 'closure/defs.bzl': no such package '@io_bazel_rules_closure//closure': Error downloading [http://bazel-mirror.storage.googleapis.com/github.com/bazelbuild/rules_closure/archive/5ca1dab6df9ad02050f7ba4e816407f88690cf7d.tar.gz, https://github.com/bazelbuild/rules_closure/archive/5ca1dab6df9ad02050f7ba4e816407f88690cf7d.tar.gz] to /root/.cache/bazel/_bazel_root/3a66f6079c893d4123754fa0783e0a83/external/io_bazel_rules_closure/5ca1dab6df9ad02050f7ba4e816407f88690cf7d.tar.gz: All mirrors are down: [Proxy address 10.90.1.101:8080 is not a valid URL].
上面的configure过程中,提示用户,需要指定相关的配置参数信息,需要哪些信息,上面可以看得到,有很详细的描述信息。
只是,源码安装,我折腾了很久,大半天过去了,都提示各种错误,主要原因是我们单位的网络原因,很多资源都无法下载,就好比上述错误日志信息中最后面一行提到的各种软件包下载不了。
到此,我决定放弃源码安装,走另外一条路线,套件安装。 虽然源码安装没有成功,但是,到这一步,基本的流程算是清楚了。基于源码安装逻辑,需要补充一点知识,就是去学习下bazel的使用。
2. tensorflow的套件安装。
2.1 下载tensorflow套件。
当然,还是基于上述各种准备工作之后,进行的tensorflow的whl套件安装。下载地址,这个是比较重要的信息。
上面的地址,不是一个HTML的页面,而是一个XML文件,从中找到自己需要的版本。我下载的就是0.11的cp27版本,如下图:
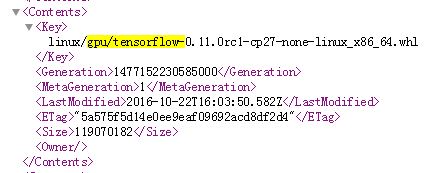
在浏览器地址栏中输入: https://storage.googleapis.com/tensorflow/linux/gpu/tensorflow-0.11.0rc1-cp27-none-linux_x86_64.whl 即可下载。
2.2 安装套件
[root@bogon tensorflow]# pip install tensorflow-0.11.0rc1-cp27-none-linux_x86_64.whl

Processing ./tensorflow-0.11.0rc1-cp27-none-linux_x86_64.whl

Requirement already satisfied: six>=1.10. in /usr/lib/python2./site-packages (from tensorflow==0.11.0rc1)

Requirement already satisfied: wheel in /usr/lib/python2./site-packages (from tensorflow==0.11.0rc1)

Collecting mock>=2.0. (from tensorflow==0.11.0rc1)

  Downloading mock-2.0.-py2.py3-none-any.whl (56kB)

    % |████████████████████████████████| 61kB 17kB/s

Requirement already satisfied: numpy>=1.11. in /usr/lib64/python2./site-packages (from tensorflow==0.11.0rc1)

Collecting protobuf==3.0. (from tensorflow==0.11.0rc1)

  Downloading protobuf-3.0.-cp27-cp27mu-manylinux1_x86_64.whl (.2MB)

    % |██████▎                         | .0MB 594bytes/s eta ::^C

Operation cancelled by user

[root@bogon tensorflow]#
由于之前,我按照的protobuf版本是3.2.0的,而这里需要的是3.0.0的,所以就进行了再次下载,这个源速度太慢。 去python的资源库进行下载吧,这个python的资源库,有点类似maven的仓库,基本所有的资源都有。点击地址,进入选择所需版本。
安装所需的3.0.0的protobuf后,再次进行tensorflow的安装:
[root@bogon tensorflow]# pip install tensorflow-0.11.0rc1-cp27-none-linux_x86_64.whl

Processing ./tensorflow-0.11.0rc1-cp27-none-linux_x86_64.whl

Requirement already satisfied: six>=1.10. in /usr/lib/python2./site-packages (from tensorflow==0.11.0rc1)

Requirement already satisfied: wheel in /usr/lib/python2./site-packages (from tensorflow==0.11.0rc1)

Collecting mock>=2.0. (from tensorflow==0.11.0rc1)

  Using cached mock-2.0.-py2.py3-none-any.whl

Requirement already satisfied: numpy>=1.11. in /usr/lib64/python2./site-packages (from tensorflow==0.11.0rc1)

Requirement already satisfied: protobuf==3.0. in /usr/lib64/python2./site-packages (from tensorflow==0.11.0rc1)

Collecting funcsigs>=; python_version < "3.3" (from mock>=2.0.->tensorflow==0.11.0rc1)

  Downloading funcsigs-1.0.-py2.py3-none-any.whl

Collecting pbr>=0.11 (from mock>=2.0.->tensorflow==0.11.0rc1)

  Downloading pbr-2.0.-py2.py3-none-any.whl (98kB)

    % |████████████████████████████████| 102kB 36kB/s

Requirement already satisfied: setuptools in /usr/lib/python2./site-packages (from protobuf==3.0.->tensorflow==0.11.0rc1)

Requirement already satisfied: appdirs>=1.4. in /usr/lib/python2./site-packages (from setuptools->protobuf==3.0.->tensorflow==0.11.0rc1)

Requirement already satisfied: packaging>=16.8 in /usr/lib/python2./site-packages (from setuptools->protobuf==3.0.->tensorflow==0.11.0rc1)

Requirement already satisfied: pyparsing in /usr/lib/python2./site-packages (from packaging>=16.8->setuptools->protobuf==3.0.->tensorflow==0.11.0rc1)

Installing collected packages: funcsigs, pbr, mock, tensorflow

Successfully installed funcsigs-1.0. mock-2.0. pbr-2.0. tensorflow-0.11.0rc1
哈哈,这次是不是安装成功了,的确,这次安装成功,显示了需要的插件的版本等信息。
2.3 测试是否安装成功
下面,测试下吧,看看tensorflow是否安装好了呢,起码tensorflow的资源,在python编程中可以使用吧。
[root@bogon tensorflow]# python

Python 2.7. (default, Nov   , ::)

[GCC 4.8.  (Red Hat 4.8.-)] on linux2

Type "help", "copyright", "credits" or "license" for more information.

>>> import tensorflow as tf

I tensorflow/stream_executor/dso_loader.cc:] successfully opened CUDA library libcublas.so locally

I tensorflow/stream_executor/dso_loader.cc:105] Couldn't open CUDA library libcudnn.so. LD_LIBRARY_PATH: /usr/local/cuda-8.0/lib64:/usr/local/cuda-8.0/lib64:

I tensorflow/stream_executor/cuda/cuda_dnn.cc:3448] Unable to load cuDNN DSO

I tensorflow/stream_executor/dso_loader.cc:] successfully opened CUDA library libcufft.so locally

I tensorflow/stream_executor/dso_loader.cc:] successfully opened CUDA library libcuda.so. locally

I tensorflow/stream_executor/dso_loader.cc:] successfully opened CUDA library libcurand.so locally

Traceback (most recent call last):

  File "<stdin>", line 1, in <module>

  File "/usr/lib/python2.7/site-packages/tensorflow/__init__.py", line 23, in <module>

    from tensorflow.python import *

  File "/usr/lib/python2.7/site-packages/tensorflow/python/__init__.py", line 53, in <module>

    from tensorflow.core.framework.graph_pb2 import *

  File "/usr/lib/python2.7/site-packages/tensorflow/core/framework/graph_pb2.py", line 6, in <module>

    from google.protobuf import descriptor as _descriptor

  File "/usr/lib64/python2.7/site-packages/google/protobuf/__init__.py", line 37, in <module>

    __import__('pkg_resources').declare_namespace(__name__)

  File "/usr/lib/python2.7/site-packages/pkg_resources/__init__.py", line 72, in <module>

    import packaging.requirements

  File "/usr/lib/python2.7/site-packages/packaging/requirements.py", line 59, in <module>

    MARKER_EXPR = originalTextFor(MARKER_EXPR())("marker")

TypeError: __call__() takes exactly 2 arguments (1 given)
上面的错误,显示的是两个方面的信息,一个是CUDA中libcudnn.so文件找不到,查找了一下,是因为cudnn的lib64中的so文件复制到cuda/lib64的时候,发生了typo,修改后,就可以了。 但是后面这个错误,貌似就不是那么好处理,感觉是版本冲突的问题,因为最后提示参数的个数不对,这种问题,通常是程序的API变了,往往就是发生在版本兼容的问题上。
处于这个分析,我通过pip指令,将tensorflow进行了upgrade的操作,如下:
[root@bogon tool]# pip install --upgrade tensorflow

Collecting tensorflow

  Downloading tensorflow-1.0.-cp27-cp27mu-manylinux1_x86_64.whl (.1MB)

    % |████████████████████████████████| .1MB 20kB/s

Collecting protobuf>=3.1. (from tensorflow)

  Downloading protobuf-3.2.-cp27-cp27mu-manylinux1_x86_64.whl (.6MB)

    % |████████████████████████████████| .6MB 53kB/s

Collecting wheel (from tensorflow)

  Downloading wheel-0.29.-py2.py3-none-any.whl (66kB)

    % |████████████████████████████████| 71kB 75kB/s

Requirement already up-to-date: mock>=2.0. in /usr/lib/python2./site-packages (from tensorflow)

Collecting numpy>=1.11. (from tensorflow)

  Downloading numpy-1.12.-cp27-cp27mu-manylinux1_x86_64.whl (.5MB)

    % |████████████████████████████████| .5MB 32kB/s

Requirement already up-to-date: six>=1.10. in /usr/lib/python2./site-packages (from tensorflow)

Requirement already up-to-date: setuptools in /usr/lib/python2./site-packages (from protobuf>=3.1.->tensorflow)

Requirement already up-to-date: funcsigs>=; python_version < "3.3" in /usr/lib/python2./site-packages (from mock>=2.0.->tensorflow)

Requirement already up-to-date: pbr>=0.11 in /usr/lib/python2./site-packages (from mock>=2.0.->tensorflow)

Requirement already up-to-date: appdirs>=1.4. in /usr/lib/python2./site-packages (from setuptools->protobuf>=3.1.->tensorflow)

Requirement already up-to-date: packaging>=16.8 in /usr/lib/python2./site-packages (from setuptools->protobuf>=3.1.->tensorflow)

Collecting pyparsing (from packaging>=16.8->setuptools->protobuf>=3.1.->tensorflow)

  Downloading pyparsing-2.2.-py2.py3-none-any.whl (56kB)

    % |████████████████████████████████| 61kB 77kB/s

Installing collected packages: protobuf, wheel, numpy, tensorflow, pyparsing

  Found existing installation: protobuf 3.0.

    Uninstalling protobuf-3.0.:

      Successfully uninstalled protobuf-3.0.

  Found existing installation: wheel 0.24.

    Uninstalling wheel-0.24.:

      Successfully uninstalled wheel-0.24.

  Found existing installation: numpy 1.11.

    Uninstalling numpy-1.11.:

      Successfully uninstalled numpy-1.11.

  Found existing installation: tensorflow 0.11.0rc1

    Uninstalling tensorflow-0.11.0rc1:

      Successfully uninstalled tensorflow-0.11.0rc1

  Found existing installation: pyparsing 1.5.

    DEPRECATION: Uninstalling a distutils installed project (pyparsing) has been deprecated and will be removed in a future version. This is due to the fact that uninstalling a distutils project will only partially uninstall the project.

    Uninstalling pyparsing-1.5.:

      Successfully uninstalled pyparsing-1.5.

Successfully installed numpy-1.12. protobuf-3.2. pyparsing-2.2. tensorflow-1.0. wheel-0.29.

[root@bogon tool]#
哟呵,看来分析是对的,没错,这么升级之后,tensorflow现在是最新版本1.0.1的版本了。其他相关的依赖包也被更新到了所需版本。
再来测试下,看看tensorflow是否能运行hello world吧。
[root@bogon tool]# python

Python 2.7. (default, Nov   , ::)

[GCC 4.8.  (Red Hat 4.8.-)] on linux2

Type "help", "copyright", "credits" or "license" for more information.

>>> import tensorflow as tf

>>>

>>> hello = tf.constant('Hello, tensorflow!')

>>> sess = tf.Session()

W tensorflow/core/platform/cpu_feature_guard.cc:] The TensorFlow library wasn't compiled to use SSE3 instructions, but these are available on your machine and could speed up CPU computations.

W tensorflow/core/platform/cpu_feature_guard.cc:] The TensorFlow library wasn't compiled to use SSE4.1 instructions, but these are available on your machine and could speed up CPU computations.

W tensorflow/core/platform/cpu_feature_guard.cc:] The TensorFlow library wasn't compiled to use SSE4.2 instructions, but these are available on your machine and could speed up CPU computations.

W tensorflow/core/platform/cpu_feature_guard.cc:] The TensorFlow library wasn't compiled to use AVX instructions, but these are available on your machine and could speed up CPU computations.

W tensorflow/core/platform/cpu_feature_guard.cc:] The TensorFlow library wasn't compiled to use AVX2 instructions, but these are available on your machine and could speed up CPU computations.

W tensorflow/core/platform/cpu_feature_guard.cc:] The TensorFlow library wasn't compiled to use FMA instructions, but these are available on your machine and could speed up CPU computations.

>>> print sess.run(hello)

Hello, tensorflow!

>>> a = tf.constant()

>>> b = tf.constant()

>>> print sess.run(a+b)

>>>
从上面的输出信息看,tensorflow在被import的过程中,没有报错了,说明tensorflow的资源安装已经没有问题了。后续的操作,输出都是对的,也没有问题了,到此,说明,tensorflow安装成功。
总结,tensorflow的安装:
1. 源码安装,需要面对的问题比较多,但是可以接触到更多的实现上的技术细节,掌握的技术也会多很多。但是,条件不允许的情况下,要学会平衡选择。
2. python的资源,通过yum或pip,非常容易获取,基于套件的安装,要善于分析日志输出信息,善于利用python的资源。
上述两个方面,其实,对其他任何技术问题,都可以触类旁通的。
安装tensorflow,那叫一个坑啊的更多相关文章
- 教你避过安装TensorFlow的两个坑
TensorFlow作为著名机器学习相关的框架,很多小伙伴们都可能要安装它.WIN+R,输入cmd运行后,通常可能就会pip install tensorflow直接安装了,但是由于这个库比较大,接近 ...
- 在WIN SERVER 2016上安装DOCKER(带过坑)
目录 1 概要 1 1.1 主要优势 1 2 在Windows Server上部署Docker 2 概要 博客使用Word发博,发布后,排版会出现很多问题,敬请谅解 ...
- Ubuntu下安装Tensorflow
本文目录 引言 基于Anaconda的tensorflow安装 1 下载linux版本的Anaconda安装包 2 安装Anaconda 利用anaconda安装tensorflow 1 建立一个 c ...
- Windows环境下Anaconda安装TensorFlow的避坑指南
最近群里聊天时经常会提到DL的东西,也有群友在学习mxnet,但听说坑比较多.为了赶上潮流顺便避坑,我果断选择了TensorFlow,然而谁知一上来就掉坑里了…… 我根据网上的安装教程,默认安装了最新 ...
- Ubuntu16.04编译安装tensorflow,2018最新血泪踩坑之后的全面总结!绝对成功!【转】
本文转载自:https://blog.csdn.net/pzh11001/article/details/79683133 大家好,我是 (深度学习硬件DIY总群)(719577294)群主: ...
- 依赖Anaconda环境安装TensorFlow库,避免采坑
TensorFlow™ 简介: TensorFlow是一个采用数据流图(data flow graphs),用于数值计算的开源软件库.节点(Nodes)在图中表示数学操作,图中的线(edges)则表示 ...
- 安装TensorFlow踩的坑
1.TensorFlow的版本要和对应的cuda,cudnn版本都对应上,装了cuda 9.0和cudnn 7.5,TensorFlow默认装了最新版1.13.1,一直出现 DLL error: 找不 ...
- 趟坑:使用pip安装TensorFlow
这几天在安装TensorFlow,看了很多教程,方法也试了几种. 最后还是用pip安装成功的,过程如下. 1.安装ubuntu后在 系统设置-软件与更新-附加驱动 里,更新N卡驱动. (N卡官网下载 ...
- 说说Windows7 64bits下安装TensorFlow GPU版本会遇到的一些坑
不多说,直接上干货! 再写博文,回顾在Windows7上安装TensorFlow-GPU的一路坑 Windows7上安装TensorFlow的GPU版本后记 欢迎大家,加入我的微信公众号:大数据躺过的 ...
随机推荐
- Web安全测试解决方案
Web安全测试解决方案 介绍常见的Web安全风险,Web安全测试方法.测试基本理论和测试过程中的工具引入
- python 实现 KNN 分类器——手写识别
1 算法概述 1.1 优劣 优点:进度高,对异常值不敏感,无数据输入假定 缺点:计算复杂度高,空间复杂度高 应用:主要用于文本分类,相似推荐 适用数据范围:数值型和标称型 1.2 算法伪代码 (1)计 ...
- vim 删除
shift + $ :光标往后 shift + ^ :光标往前 shift + D 删除当前光标直到末尾
- 服务器上安装caffe的过程记录
1. 前言 因为新的实验室东西都是新的,所以在服务器上要自己重新配置CAFFE 这里假设所有依赖包学长们都安装好了,我是没有sudo权限的 服务器的配置: CUDA 8.0 Ubuntu 16.04 ...
- NOI-1.1-10-字符表示超级玛丽
10:超级玛丽游戏 总时间限制: 1000ms 内存限制: 65536kB 描述 超级玛丽是一个非常经典的游戏.请你用字符画的形式输出超级玛丽中的一个场景. 输入 无. 输出 如样例所示. 样 ...
- HTML5 canvas 内部元素事件响应
HTML5 canvas 内部元素事件响应 isPointInPath 只能拿当前上下文的路径 重画每个部分 都isPointInPath判断
- pat--7-11 出栈序列的合法性(25 分)
7-11 出栈序列的合法性(25 分) 给定一个最大容量为 M 的堆栈,将 N 个数字按 1, 2, 3, ..., N 的顺序入栈,允许按任何顺序出栈,则哪些数字序列是不可能得到的?例如给定 M=5 ...
- CodeForces 4A
A A - Water~melon Time Limit:1000MS Memory Limit:65536KB 64bit IO Format:%I64d & %I64u Submit St ...
- acm 2032
////////////////////////////////////////////////////////////////////////////////#include<iostream ...
- 命令提示符操作及Java的特点
day1_3 命令提示符的操作 GUI 图形化方式(可视化) CLI 命令行方式 (编程方式) dir 列出当前目录下文件及文件夹 md 创建文件夹 rd 删除文件夹(只能删除空文件夹) cd 进入指 ...